MSI GF63 Thin SSD Upgrade Guide: Maximize Performance
Enhance your MSI GF63 Thin laptop's speed and storage with our comprehensive SSD upgrade guide. Boost gaming and productivity!
By Lily Updated on June 17, 2025
Why Upgrade SSD in MSI GF63 Thin?
Upgrading the SSD in your MSI GF63 Thin is one of the most impactful changes you can make to improve overall system performance. Here are the immediate benefits you can get from a solid-state drive upgrade:
✅Experience a Noticeable Performance Boost: Replacing the old SSD with a high-speed NVMe SSD can dramatically reduce loading times for Windows, games, and applications.
✅Solve the Storage Shortage Problem: If your MSI GF63 Thin laptop comes with only 128GB or 256GB SSDs, it can quickly fill up with system files, updates, and games. You need a higher-capacity SSD for more games and large files.
✅Extend the Laptop’s Lifespan: As your usage evolves, so do your performance demands. Upgrading to a better SSD helps keep your laptop relevant and responsive, delaying the need for a full replacement.
Which SSD Works with MSI GF63 Thin?
Before starting your MSI GF63 Thin SSD upgrade, it’s crucial to know which SSDs are compatible with your laptop. The MSI GF63 Thin is compatible with both NVMe PCIe and SATA SSDs. It typically has one M.2 slot for NVMe SSDs and one 2.5" SATA slot for SATA SSDs.
Note: If you are not sure about your laptop’s SSD compatibility, look up your exact model (e.g., GF63 Thin 11UC) on MSI’s website.
Step-By-Step Guide: MSI GF63 Thin Upgrade SSD
MSI GF63 Thin storage upgrade can be run in two ways: replacing the primary M.2 NVMe SSD or adding a secondary 2.5" SATA SSD. I’ll show you two cases in detail.
Case 1: Replace Old M.2 SSD
To replace the primary M.2 NVMe SSD without reinstalling everything, follow the instructions below:
Step 1. Clone old M.2 SSD to new M.2 SSD
To transfer everything from the old M.2 SSD to the new M.2 SSD, you need a specialized disk cloning software – AOMEI Backupper Professional.

-
Flexible cloning options: It supports Disk Clone, System Clone and Partition Clone. You can choose one clone type according to your specific needs.
-
Support MBR/GPT disks: With it, you can clone MBR to MBR, GPT to GPT, or MBR to GPT/GPT to MBR without conversion.
-
Clone disks of different sizes: AOMEI's intelligent-sector cloning enables you to clone larger HDD to smaller SSD. You can also optimize disk space usage by editing partitions when cloning to a larger drive.
Download AOMEI Backupper and follow the steps below to clone your old M.2 SSD:
1. Connect the new M.2 SSD to your laptop via a USB-to-NVMe adapter.
2. Install and launch AOMEI Backupper. Go to Clone > Disk Clone.

3. Select your current internal SSD as the source disk and choose the newly connected M.2 SSD as the target disk.

4. Check SSD Alignment to optimize performance. Finally, click Start Clone and wait for the process to complete.

Step 2. Swap two M.2 SSDs
Once cloning is done, it’s time to physically install the new SSD:
1. Power off your laptop completely and unplug the power adapter.
2. Remove the back panel using a precision screwdriver.
3. Locate the M.2 SSD slot. Unscrew and remove the old SSD gently at a 30-degree angle.
4. Insert the new SSD into the same slot and tighten it with the same screw.
5. Reattach the back panel and boot the laptop. Your MSI GF63 Thin should now boot from the new SSD with all data and settings preserved.
Case 2: Add 2.5″ SATA SSD
Adding a secondary 2.5" SATA SSD on MSI GF63 Thin laptop is a great way to expand your storage without reinstalling Windows or migrating data. Follow the guidance below:
Step 1. Install the SATA SSD
1. Power off and unplug your laptop before opening the case.
2. Open the back panel using a precision screwdriver.
3. Insert the SATA SSD into the bay and connect it to the SATA cable.
4. Secure the drive if mounting brackets or screws are available.
5. Close the panel and reboot your laptop.
Step 2. Initialize the new SSD in Windows
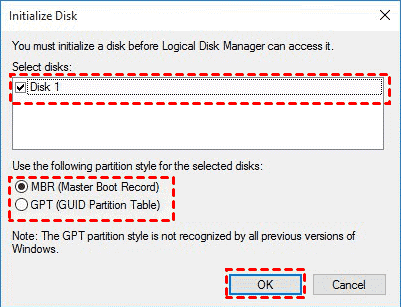
After booting up, Windows might not recognize the new SSD right away. Here’s how to get it ready:
1. Press Windows + X and select Disk Management.
2. A pop-up will ask you to initialize the disk—choose GPT (GUID Partition Table).
3. Right-click the unallocated space and select New Simple Volume.
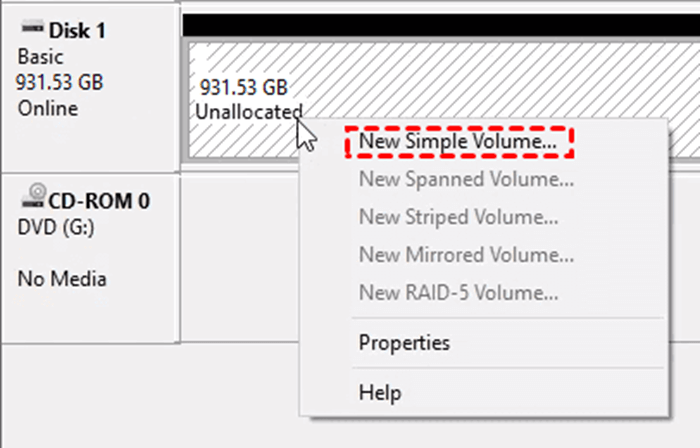
4. Follow the wizard to format the SSD and assign it a drive letter. Your 2.5" SATA SSD is now ready to use!
FAQs about MSI GF63 Thin SSD Upgrade
1. Can I install both M.2 and 2.5-inch SSDs at the same time?
2. Do I need to reinstall Windows after upgrading the SSD?
3. What SSD capacity is best for MSI GF63 Thin?
That depends on your needs:
- 500GB is great for everyday users and students.
- 1TB–2TB is ideal for gamers, creators, and professionals with large files.
Summary
Upgrading the SSD in your MSI GF63 Thin is one of the most effective ways to boost performance, expand storage, and extend your laptop’s lifespan. This guide covers everything you need to know about MSI GF63 Thin SSD Upgrade. By cloning your current drive using AOMEI Backupper, you don’t need to reinstall everything from scratch. Give it a try right now!

