


5 Ways to Perform VMware Image Backup and Restore for Free
VMware image backup and restore is necessary to prevent virtual machine data loss. This article offers detailed information on how to backup and restore VMware VM at image-level.
By Crystal / Updated on March 8, 2023
What is VMware image backup and restore
VMware image backup and restore is to create and restore an entire operating system of virtual machine including files, applications and the OS configurations. The backup is saved as a standalone file that is called an image.
In VMware environment, you can back up VM to different onsite or offsite devices. For example, you can backup VM to an external USB drive, network attached hard drives, NAS, SAN, or Firewire devices. And the created backup images can be saved in case of the following recovery needs:
- Restore VMware VMs to previous state in the event of errors or data loss/corruption.
- Restore the backup image to create an identical VM to achieve VM clone/migration.

VMware image-based backup vs file-based backup
VMware image-based backup and file-based backup are 2 common concepts in the field of virtual machine backup. What is the difference between them, and which one is better? Here is a brief statement:
File-based backup enables you to select certain files and folders inside the VM that you want to back up. It allows for more granular recovery options such as Exchange, SQL database, System State (Registry, Active Directory, etc). It is ideal for preventing data loss due to file corruption, application bugs, or human errors like accidental file deletion.
Image-based backup in VMware is an image of your entire system, which is ideal for disaster scenarios where an entire system restore is required. For instance, when your hard drive dies, your Windows will not boot or is corrupt, your machine is stolen, an upgrade goes horribly wrong, or other major disaster that requires a complete rollback of the entire machine and do a system image recovery.
✎In a nutshell, there is no superiority or inferiority between the two, the choice depends more on your recovery needs, and if you want to recover an entire virtual machine quickly, image backup and restore is the way to go, because if you don’t have a full image backup, it would task a long time to restore or configure a VMware VM.
To take it a step further, if you want to protect VMs with valuable data or running critical business, image backup and restore can reduce the downtime.
How to backup and restore VMware image (5 ways)
The first thing to clarify is that there is no real way to image backup in VMware's built-in options. For long term data protection and batch operations, users usually need to use an agent-less professional backup tool for VMware backup and restore.
But if you prefer native tools and features, there are some options can help you achieve the similar purpose. For example, you can copy VMDK files entirely or export/import the VM as a backup. Alternatively, you can also clone or migrate a VM to create an identical one in different location.
Here I will introduce 5 methods and workarounds in total:
*Note: These built-in features usually require you to manually operate on each VM, so they are better suited to situations where you have fewer virtual machines.
Way 1. Perform VMware image backup and restore via free Backup tool
As mentioned above, professional and agent-less backup solutions usually provides better support for VMware image backup and restore. Here I will introduce a free VMware backup software - AOMEI Cyber Backup as an example.
It supports VMware ESXi & Hyper-V, and enables you to create backup images of multiple VMs at once. Besides the basic data protection, you can also develop a flexible backup strategy, monitors the status and sends email notifications if there's an error to save the labour and reduce administration costs.
Enjoy more benefits from this free VMware image backup software:
Perpetual Free: no time limit for AOMEI Cyber Backup Free Edition.
Support Free ESXi: support both paid and free versions of VMware ESXi.
Easy-to-use: backup and restore multiple virtual machines via central console without complicated configuration and reinstallation.
Auto image backup: Schedule image backups flexibly, and create cleanup policy to auto delete old backups.
Centralized Backup: Perform multiple VMs backup simultaneously from a central console.
Fast VM restore: Recover an entire VM quickly and easily, without any complicated reinstallation and configuration.
Restore from history version: For VMs that have been backed up multiple times, you can select any of the history versions to restore.
Hit the button below to download AOMEI Cyber Backup Free Edition:
*You can choose to install this VM backup software on either Windows or Linux system.
How to image backup VMware virtual machine for free:
1. Navigate to AOMEI Cyber Backup, then add your VMware device and click Backup Task >> Create New Task to schedule VM image backup and restore in VMware.
2. In the opened wizard, do as followings to backup VM at image level.
✦ Enter a Task Name and select VMware ESXi Backup as an example.
✦ On Device Name section, select virtual machines you want to backup at image-level.
✦ On Target section, specify a location to store VMs.
For example, you can easily backup VM to network or local directory. According to 3-2-1 backup rule, you should save VM backups to two different storage devices or locations.
✦ On Schedule section, choose full/incremental/differential backup to keep tracking virtual machine data and select the time and frequency (daily/weekly/monthly), which protects business security all the time.
✦ Click Start Backup. It allows you to select start backup now or later.
How to restore VM from the VMware backup image:
When a backup is complete, you can restore VM from image backups by clicking the Restore button.
✦ Select a VM backup and click Restore to original location. It allows you to restore the entire VMware virtual machine to the original place easily and quickly.
✍ While the Free Edition covers most of the VM backup needs, you can also upgrade to Premium Edition to enjoy:
✦ Batch VM Backup: Batch backup large numbers of VMs managed by vCenter Server or standalone ESXi hosts.
✦ Backup Cleanup: Configure retention policy to auto delete the old backup files and save storage space.
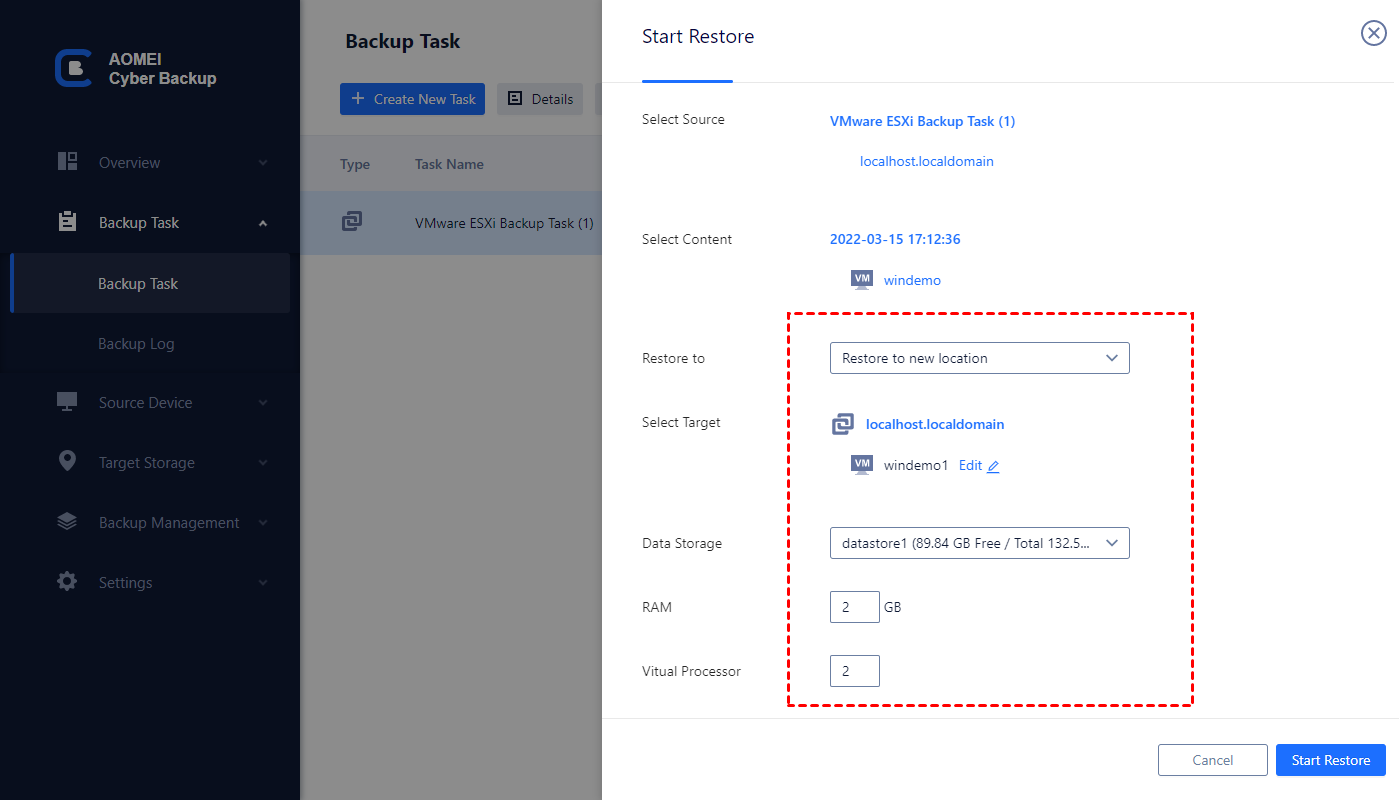
✦ Restore to new location: Easily make a clone of a virtual machine in the same or another datastore/host, without reinstalling or configuring a new VM.
AOMEI Cyber Backup automates VMware image backup and offers instant disaster recovery for all sizes of business. It’s ideal to protect VM data with an economical cost, no matter how many virtual machines you have.
Way 2. Copy VMDK files manually as a full backup
In VMware environment, copy is the most common way to achieve the similar purpose of VM image backup and restore.
1. Navigate to vSphere Web Client, click Storage >> Datastore browser.
2. Create a new directory first at the target location, then go to select the .vmx file and .vmdk file of a VMware virtual machine. Click Copy.
3. Access to the target directory you created, and copy the files into the new directory. Confirm Copy.
Register VM from the copied file:
1. Then backup to Create/Register VM on the main screen. You can restore a VMware VM at the image-level.
2. Select Register an existing virtual machine, click Next.
3. Navigate to the existing directory you create, select the .vmx file and click Next.
4. Complete the configuration and click Finish.
*Note: Run the command to register a virtual machine from a command line in an ESXi host:
# vim-cmd solo/registervm /vmfs/volumes/datastore_name/VM_directory/VM_name.vmx
Way 3. Export and import VMware virtual machine
VMware offers different VM backup solutions. Among them, exporting VM from ESXi is commonly used to perform VMware image backup and restore.
1. Log in ESXi 6.7 by entering Username and IP address. Shut down the virtual machine, then start exporting a VM .ovf template.
2. Right-click the VM and select Export.
Tips: When exporting a virtual machine, it will merge the snapshots automatically.
3. In the opened window, select the .ovf, .vmdk and .mf. Click OK.
4. Select a local directory to store the ovf. files.
Restore VMware by importing virtual machine in ESXi:
1. Click Create/Register VM.
2. On the Select creation type page, choose Deploy a virtual machine from an OVF or OVA template. Click Next.
3. Enter a new name for the virtual machine, and select the exported .ovf and .vmdk files. Click Next.
Way 4. Clone a VMware VM to create identical VM (requires vCenter)
VM Cloning is to create an identical virtual machine. In VMware ESXi, it requires vCenter Server and is rather convenient to perform VM image backup and restore.
1. Access to vCenter Client, then right-click a VM and select Clone >> Clone to Virtual Machine.
2. Select a target datastore and host.
3. Select virtual disk format as Same format as source, and VM Storage Policy as Keep existing VM storage policies. Then specify a datastore location to store the VM files.
4. Customize the operating system, the VM’s hardware, or select whether to power on the VM after creation.
5. Review the settings and click Finish.
✦ Tips:
If you are familiar with command line, you can also use command line to clone ESXi VM.
1. Enable SSH in your ESXi host and create a directory to hold your new clone
#mkdir /vmfs/volumes/datastore1/Host2
2. Clone your Host1 VM to Host2
#vmkfstools -i /vmfs/volumes/datastore1/Host1/Host1.vmdk /vmfs/volumes/datastore1/Host2/Host2.vmdk -d thin
3. Register the virtual machine in VMware ESXi
# vim-cmd solo/registervm /vmfs/volumes/datastore1/Host2/Host2.vmdk
Way 5. Migrate virtual machine in VMware (requires vCenter)
Moving a VM in VMware benefits in data migration, data protection and disaster recovery, which reduce the burden of storage and utilize the virtual disk space. If you have vCenter and want to move VM to another datastore or host, this is the way to go.
How to migrate VM in VMware:
1. Right-click and select Migrate.
2. For example, I select Change storage only, and click Next. It only migrates virtual disks, configuration files, or a combination of these, to a new datastore on the same host.
3. Select Same format as source and Keep existing VM storage policies from the VM Storage Policy drop-down menu.
4. Check the information and close the wizard by clicking Finish.
Summary
As we know, backup solution is critical to business success. Compared with file-based backup, VMware image backup and restore is a better option for disaster recovery and ensure business continuity in the virtual machine infrastructure.
However, there is no real image backup and restore option in VMware. Users usually use some workarounds (the built-in features) to achieve the same purpose. For a long term data protection solution, it is better to use a professional VMware backup solution.

