


(Full Guide) Free Virtual Machine Backup for VMware & Hyper-V
Virtual machine backup is a big concept that includes different backup options in different hypervisors which may confuse you. In this article, I will help you pick the right VMware or Hyper-V VM backup solution, and offers a step-by-step guide to backup virtual machine.
By Crystal / Updated on October 23, 2023
Virtual Machine Backup Overview & Necessity
A virtual machine (VM) is a virtual environment based on computer architectures and provide functionality of a physical computer. It allow users to run an operating system in a single application window, providing a secure sandbox to test programs or access virus-infected data.
Virtual machines are run on hypervisor, and a hypervisor allows one host computer to support multiple guest VMs by virtually sharing its resources. There are mainly 2 types of hypervisors:
Type 1 hypervisor: also known as bare-metal hypervisor, runs directly on the computing hardware. VMware ESXi and Microsoft Hyper-V are the most commonly used type 1 hypervisor.
Type 2 hypervisor: also known as hosted hypervisor, runs on top of the operating system of the host machine. VMware Workstation is the most commonly used type 2 hypervisor.
Whichever host you are running VMs on, there may be data loss caused by virtual server or physical device failures, abnormal shutdown, or other mis-operations. Therefore, it is essential to create virtual machine backup regularly.
By creating VM backups, you can effectively ensure that important data can be restored in time if it is lost. Implementing a good VM backup strategy can enable faster disaster recovery, and keep business continuity.

Virtual Machine Backup vs Snapshot, Are They the Same?
A common myth about VM backup is how it differs from the VM snapshot and whether they can replace each other? To answer this, let's take a closer look at the 2 concepts:
VM snapshots: Snapshots (or checkpoints for Hyper-V) record the state of a VM at a point in time, including all data, memory, devices on the network, network interfaces, and power state. It can roll back the VM to that point in time when problem occurs. However, it relies on pre-existing physical or virtual machine files to restore data.
VM Backups: Backups are complete copies of virtual machines, but independent of the VM. They can be securely stored in the cloud, in a separate location, or offsite. They allow you to recreate VMs without relying on source VMs.
VM snapshot vs VM backup: Simply put, a snapshot can be seen as a means of backup in a broad sense, but it is not a complete replacement for a backup. To better distinguish them, here I list 3 main differences:
| VM snapshot | VM backup | |
| Data security | Snapshots depend on the parent disk, and record incremental changes from a point in time. If a VM's parent disk is deleted, you cannot restore it from snapshot | VM backups are independent and not affected by this |
| Backup Speed | Faster | Slower. The more data is backed up, the longer the backup takes |
| Space Taken | Depend on the snapshot number and the data volume has changed | VM backups can take up a lot of your storage space |
Overall, snapshots are very convenient for quick testing and troubleshooting, but cannot be use as a long-term way to protect data from disaster. So they are not recommended for production environments.
Meanwhile, virtual machine backups can be used as a long-term, fixed data protection measure. If there are risks that your VM disks may be deleted or the VM infrastructure may fail, VM backups may be safer.
The following content will focus on the classification and methods of VM backup. In practice, however, you can also combine backups and snapshots as you wish.
How to Choose Virtual Machine Backup Solution Properly
Virtual machine backup methods can be divided into many types from different perspectives, which also creates some difficulties for users to understand. But in terms of how it works, you basically only need to consider the following two main types regardless of the hypervisor: file-based backup and image-based backup.
✎Image-based backup (via agentless backup software): Back up the entire VM, including operating system and all data on disk. With it, you can achieve fast disaster recovery and get immediately usable VM.
✎File-based backup (via agent-based backup software): Back up a VM as physical machine by installing Agent on each guest machine. You can choose certain files to back up flexibly, but when restoring you need to create an empty new VM first and then install the agent on the guest machine to restore the data.
Usually image-based backups are more complete and independent. This is due to a lower tolerance for downtime and a higher need for rapid recovery in production environments. If you need to consider more granular backup categories and needs, file-based backups are better suited to your actual needs for a VM backup strategy.
Other common VM backup needs you may consider
👉 Different backup method
◇ Full backup: It refers to a complete backup of all data at a given point in time. With this type of backup, the lost data can be recovered using mainly one disk. Therefore it greatly speeds up the recovery time of the system or data.
Its disadvantages are the considerable amount of data to be backed up each time and the large amount of duplicate info in the backup data, which makes the backups take longer and take more storage space.
◇ Incremental backup: Backs up data that has changed since the last backup (full, differential or incremental). The advantage of it is that there's no duplicate backup data, so the amount of data backed up is not large and the time required for backup is short.
However, recovery from incremental backups requires the last full backup plus all incremental backup disks in order, which greatly increased the recovery time.
◇ Differential backup: Back up any data added or modified between the time of the last full backup and the time of the differential backup.
When restoring, only the first full backup and the last differential backup need to be restored, so it takes less time to restore than an incremental backup, while taking up less disk space than a full backup.
👉 Applications for different backup types
◇ Combine full and differential backup (recommended): Use a weekly backup plan as an example, you can make a full backup on Monday and a differential backup on Tuesday to Friday. If the data is corrupted on Friday, then you only need to restore the full backup on Monday and the differential backup on Thursday. This strategy takes more time to back up the data, but less time to restore it.
◇ Combine full and incremental backup: Take a weekly backup for example, make a full backup on Monday and an incremental backup on Tuesday to Friday. If the data is corrupted on Friday, you need to restore the full backup on Monday and all incremental backups from Tuesday to Thursday. This one takes less time to backup, but longer to restore.

👉 Backup to different storages
◇ Local backup: Store the VM backup files in the local path of the host.
◇ Remote backup: Store the VM backup files in the remote server, for example, a network share, or cloud.
👉 Different backup frequency
◇ Immediate backup: Backup virtual machine once by manual operation.
◇ Regular backup: Create a backup schedule to perform automatic virtual machine backup.
Next, I will present an image-based virtual machine software that meets all these needs for VMware and Hyper-V.
FREE VM Backup Solution for VMware ESXi and Hyper-V
When choosing a free VM backup solution for VMware ESXi and Hyper-V, consider factors like ease of use, the number of VMs you need to back up, and the level of features provided.
Method 1. Create a Complete Image-based Backup for VM Protection
AOMEI Cyber Backup is a strong choice for its user-friendly interface and support for both VMware and Hyper-V. It provides complete image backups capture the entire VM, ensuring full system recovery in case of critical failures.
There are indeed some native backup options that can do something close to image-based backup, but they are more or less deficient, for example, you need to power off VM beforehand, you can only back up only one VM at a time, you cannot automate backup, etc.
Therefore, many IT staffs turn to a dedicated and free VM backup software that supports offers you the following:
✦ Agentless Image Backup: create independent and image-based backup for VMware ESXi and Hyper-V VMs.
✦ Support Free ESXi: support both paid and free versions of VMware ESXi.
✦ Various Backup Methods: Besides full backup, you can perform incremental or differential VM backup to capture only changed data and save storage space.
✦ Automated Hot Backup: auto backup running VMs and notify via email.
✦ Restore from Any Point: Restore a whole VM to usable state from any history backup version.
AOMEI Cyber Backup supports VMware ESXi 6.0 and later versions, as well as Hyper-V in Windows 8/8.1/10/11, Windows Server/Microsoft Hyper-V Server 2012 R2 and later versions. You can click the following button to download the free edition.
💡 3 easy steps to create automatic backup tasks of multiple VMs
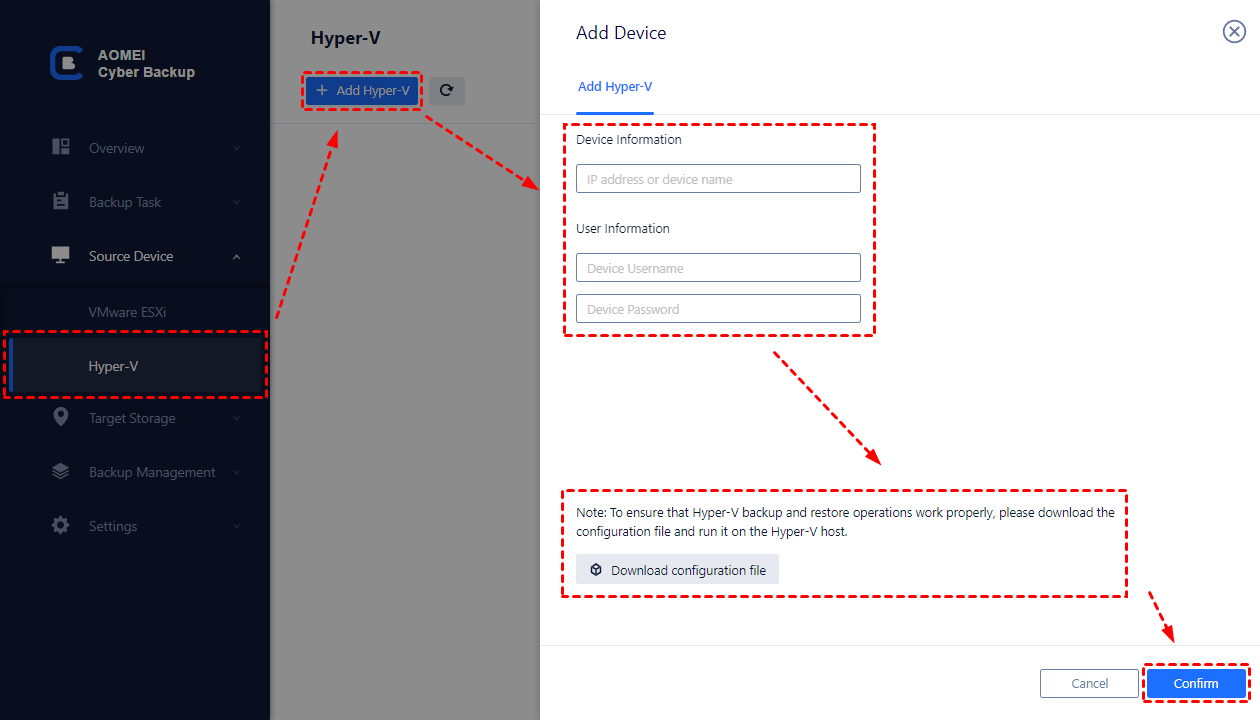
1. Bind Devices: Access to AOMEI Cyber Backup web client, navigate to Source Device > VMware/Hyper-V > + Add VMware Device/Hyper-V to add a host. And then click … > Bind Device.
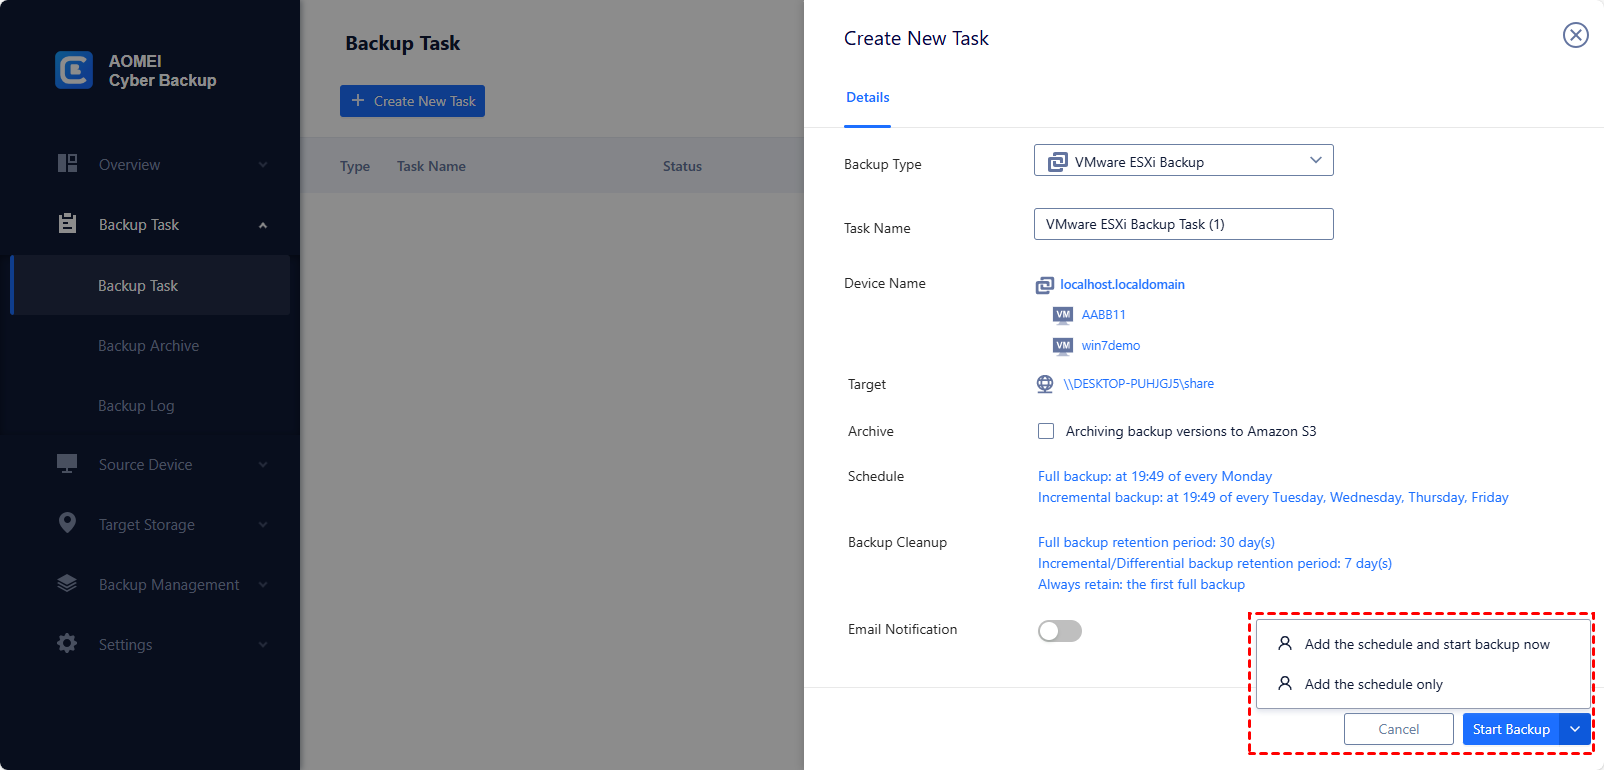
2. Create Backup Task: Navigate to Backup Task > + Create New Task, and then set up Task Name, Backup Type, Device, Target, and Schedule as needed.
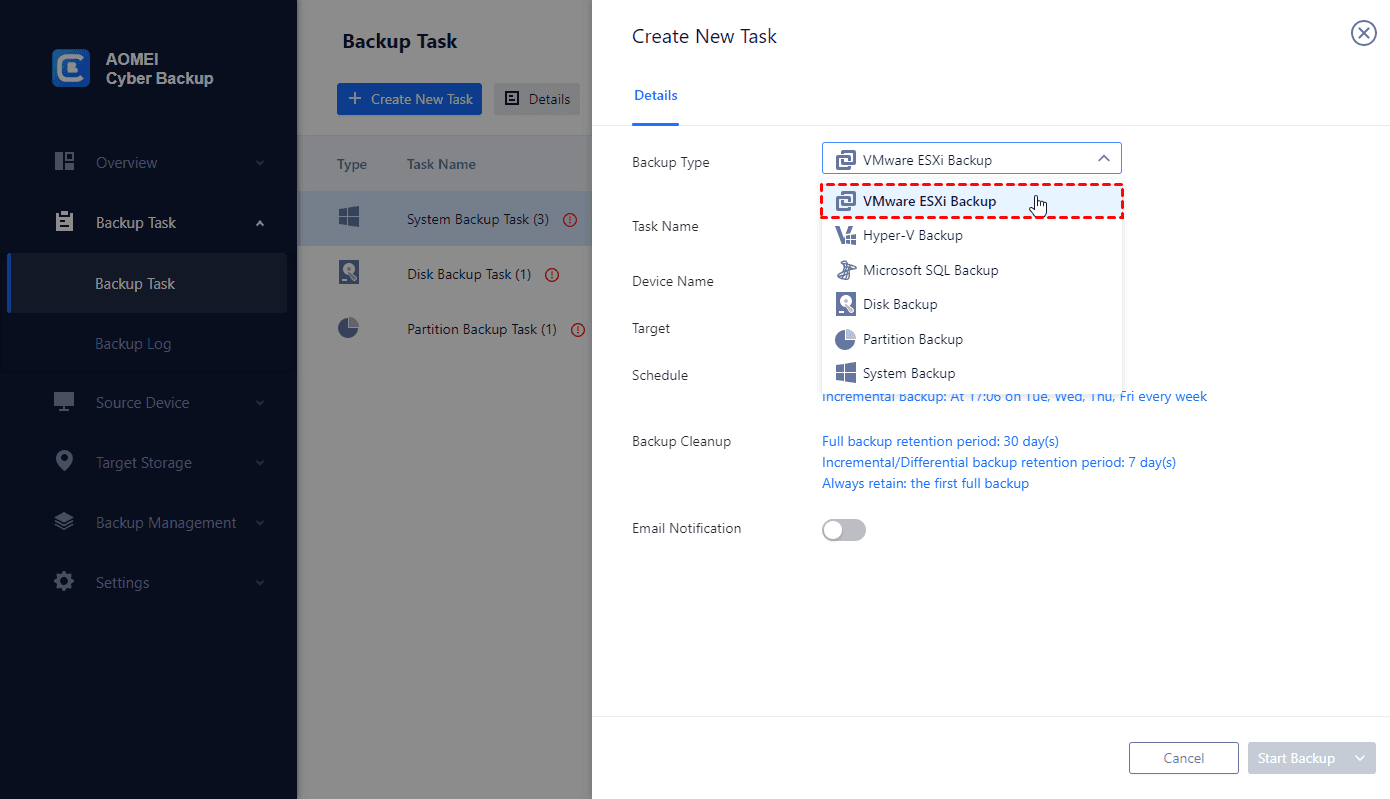
- Device: Select the virtual machines you want to backup.
- Target: You can select to back up to a local path, or to a network path. Used paths will be saved in Favorite Storage for handy selection.
- Schedule: You can choose to perform full, differential or incremental backup, and automate execution daily, weekly or monthly according to the frequency you specified.
3. Start Backup: Click Start Backup and you select Add the schedule and start backup now, or Add the schedule only.
Created backup tasks will be listed and monitored separately, for progress checking and schedule changing.
💡 While the Free Edition covers most of VM backup needs, you can also upgrade to enjoy:
※ Batch VM Backup: batch backup large numbers (up to unlimited) of VMs while running.
※ Backup cleanup: Configure a retention policy to auto delete old backup files and save storage space.
※ Restore to new location: Create a new VM in the same or another datastore/host directly from the backup, saves the trouble of re-configuring the new VM.
Method 2. Create File-based Backup for Virtual Machine
File backups are crucial for individual file and folder recovery especailly for granular data retrieval. AOMEI Backupper easily back up OS, settings, applications, and any data on your Windows PC and quickly sync files to another location. It not only offers File backup, but also the features of System Backup, Disk Backup and Partition Backup.
You just need to download and install this software on your computer. And then prepare an external hard drive to store your files.
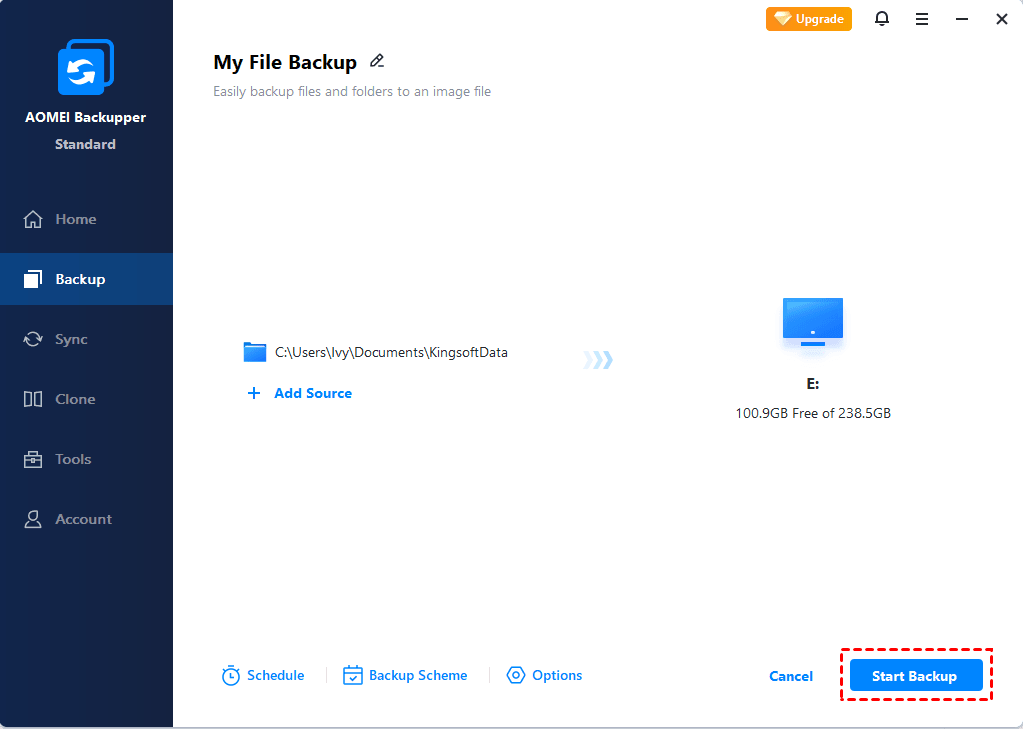
1. Launch AOMEI Backupper Standard, you will see its deep-blue interface. Then, click File Backup under the Backup tab.

2. Click Add File or Add Folder according to your needs. Choose the files or folders which you want to backup.
3. Select backup destination. You can backup files to external hard drive, NAS network location, or other locations as long as it can be detected by Windows.

4. Click Schedule Backup to automate the file backup task. You can schedule backup in daily/weekly/monthly/event triggers/USB plug in mode.

📢 There are two more options at the lower location, namely, Options, and Backup Scheme, which can help you customize the file backup task.
※ Options: You can comment, enable email notification, set compression level, create pre/post-command, etc.
※ Backup Scheme: 4 different backup schemes are supported and you can use them to delete old backups to free up disk space while keeping the latest backup versions. But they are available on AOMEI Backupper Professional at least.
5. Confirm everything is OK and click Start Backup to backup files.
Updated: How to Backup Virtual Machines with Built-in Options
As said above, there are some native backup options come with the hypervisor. They may be somehow different from backups in a strict sense, but they do provide a degree of data protection.
Next I will use VMware and Hyper-V as examples for a brief explanation. You can click on the anchor text to jump to corresponding part.
-> VMware ESXi VM backup (2 methods)
-> VMware Workstation VM backup (3 methods)
-> Hyper-V VM backup (2 methods)
Built-in options for VMware ESXi virtual machine backup
As one of the most popular type-1 hypervisor, VMware ESXi offers you some convenient options to save or deploy virtual machine. Here I will introduce 2 frequently used methods:
Method 1. Manually download VM files: ESXi Web Client allows you to download all the VM files, including VMDK virtual disk file and VMX configuration file from datastore. Then you can upload the files and register a new VM.
Method 2. Export VM to OVF template: OVF is a file format that supports exchange of virtual appliances across products and platforms. You can achieve faster downloads with the compressed OVF files.
👉Method 1. Manually download virtual machine disk files from VMware ESXi
1. Access ESXi Web Client, commit all snapshots and power off the virtual machine you want to back up.
2. Turn to Storage page, click Datastore browser on toolbar. Locate the folder of the virtual machine you want to back up, and click Download to download them separately to local.

4. Close Datastore browser window, and you can see the progress in Recent tasks.
👉Method 2. Export the virtual machine as OVF template
1. Access ESXi Web Client, commit all snapshots and power off the virtual machine you want to back up.
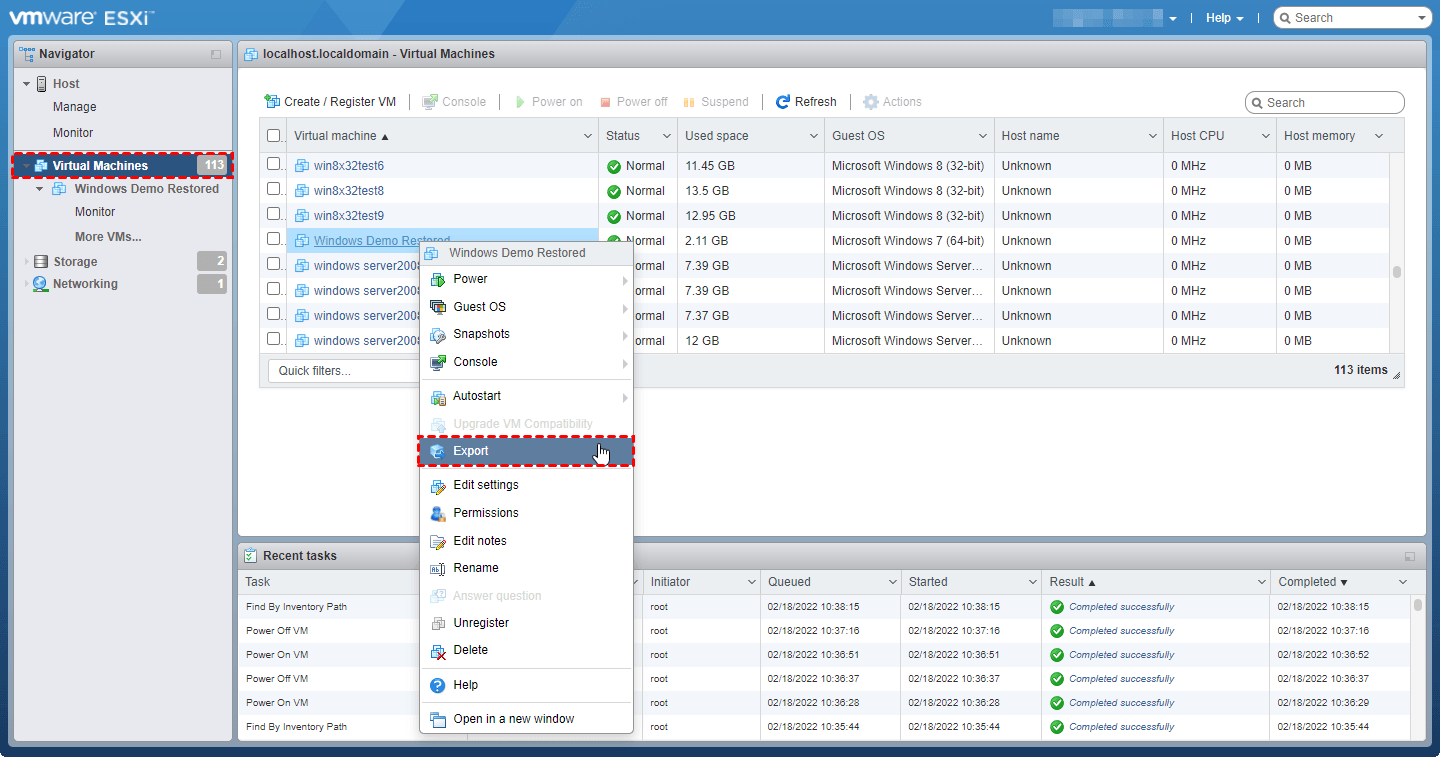
2. Go to Virtual Machines page, right-click the virtual machine you want to backup and select Export. Click OK to confirm it.
3. Select Save File option twice to download the .ovf file and .vmdk file. Then click OK to close the window.
When it’s done, you can click download button on toolbar to find where these files are stored.
Built-in options for VMware Workstation virtual machine backup
The backup options in VMware Workstation are similar to ESXi, and you can find an additional feature - VM cloning. Let's take a look at them:
Method 1. Manually Copy VM Disk Files: By manually copying the workstation VM files and storing them additionally, you can restore the VM by opening them directly on workstation.
Method 2. Export VM to OVF Template: Open Virtualization Format (OVF) is a file format that supports exchange of virtual appliances across products and platforms.
Method 3. Clone VMs: Clone is a way to create multiple same VMs. There are 2 kinds of VM clone - a full clone takes long time to create, while a linked clone depends on the parent VM.
In this section, I will demonstrate how to use these ways to backup VMware Workstation VMs.
👉Method 1: Manually copy virtual machine disk files
1. Launch VMware Workstation, move the cursor to the name of the VM you want to backup. There will be a box showing the folder path where the virtual disk files and configuration files of this system are stored.
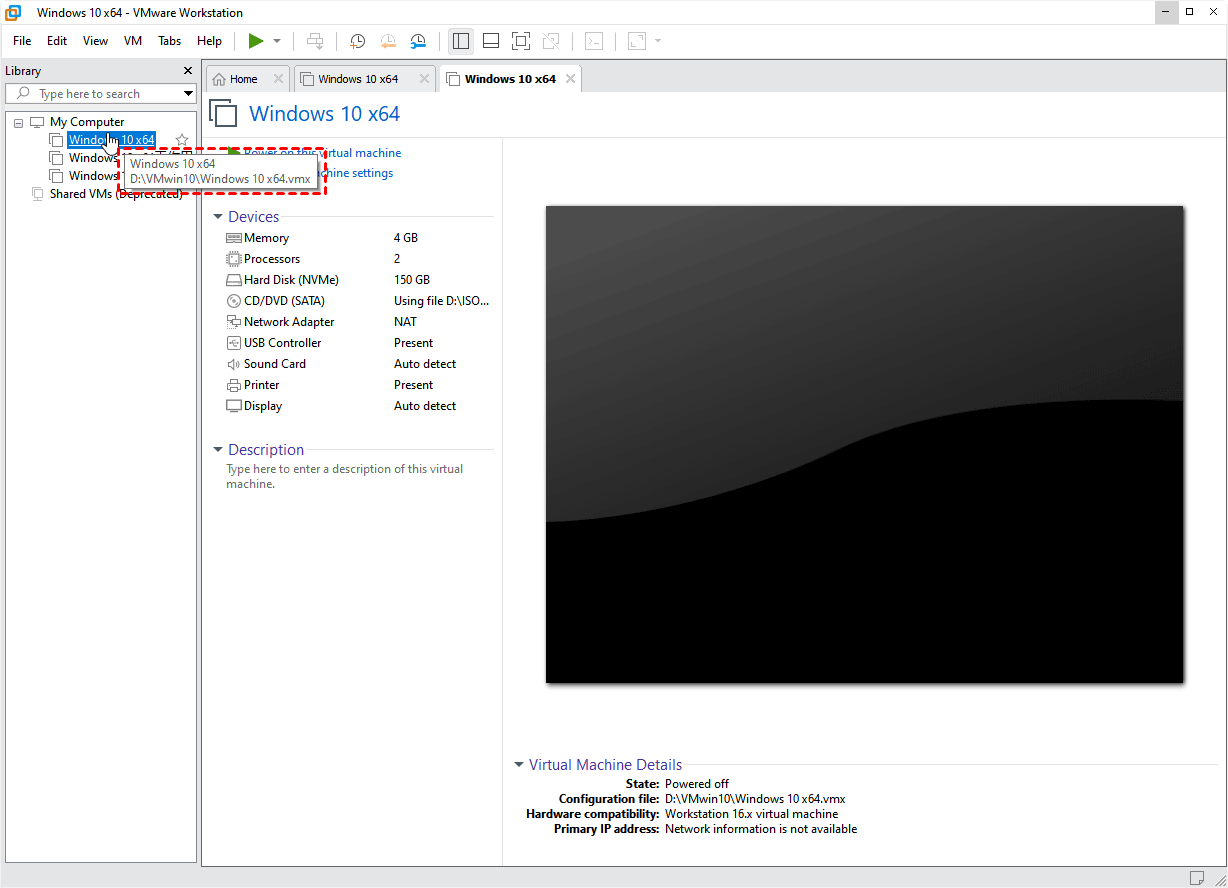
2. Come to the folder, and then copy all files or the whole folder to the destination location where you want to store the backup.
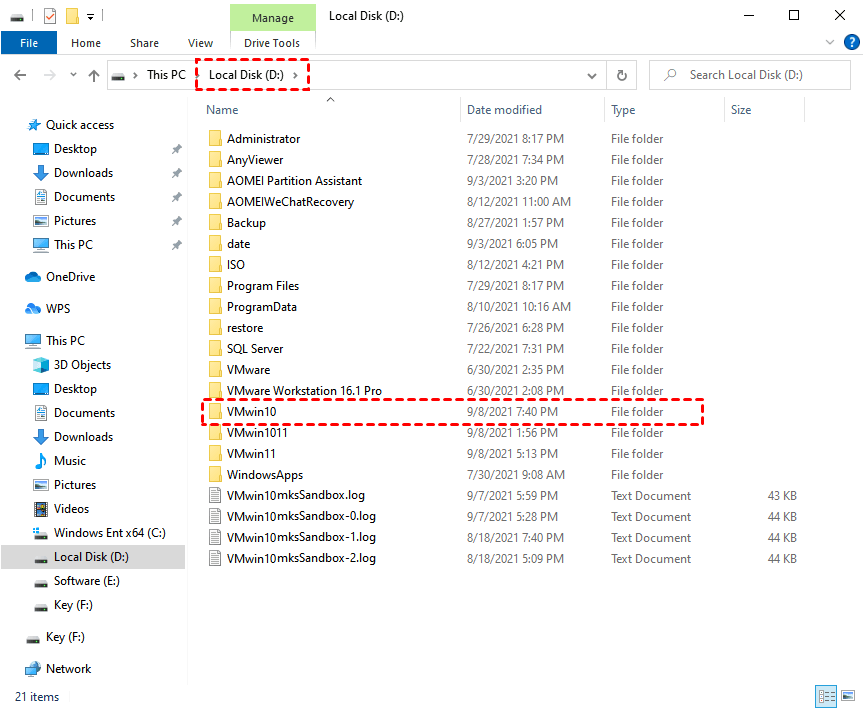
Note: In this way, you need to manually copy your VM data regularly, to keep the backup always new.
👉Method 2: Export virtual machine to OVF template
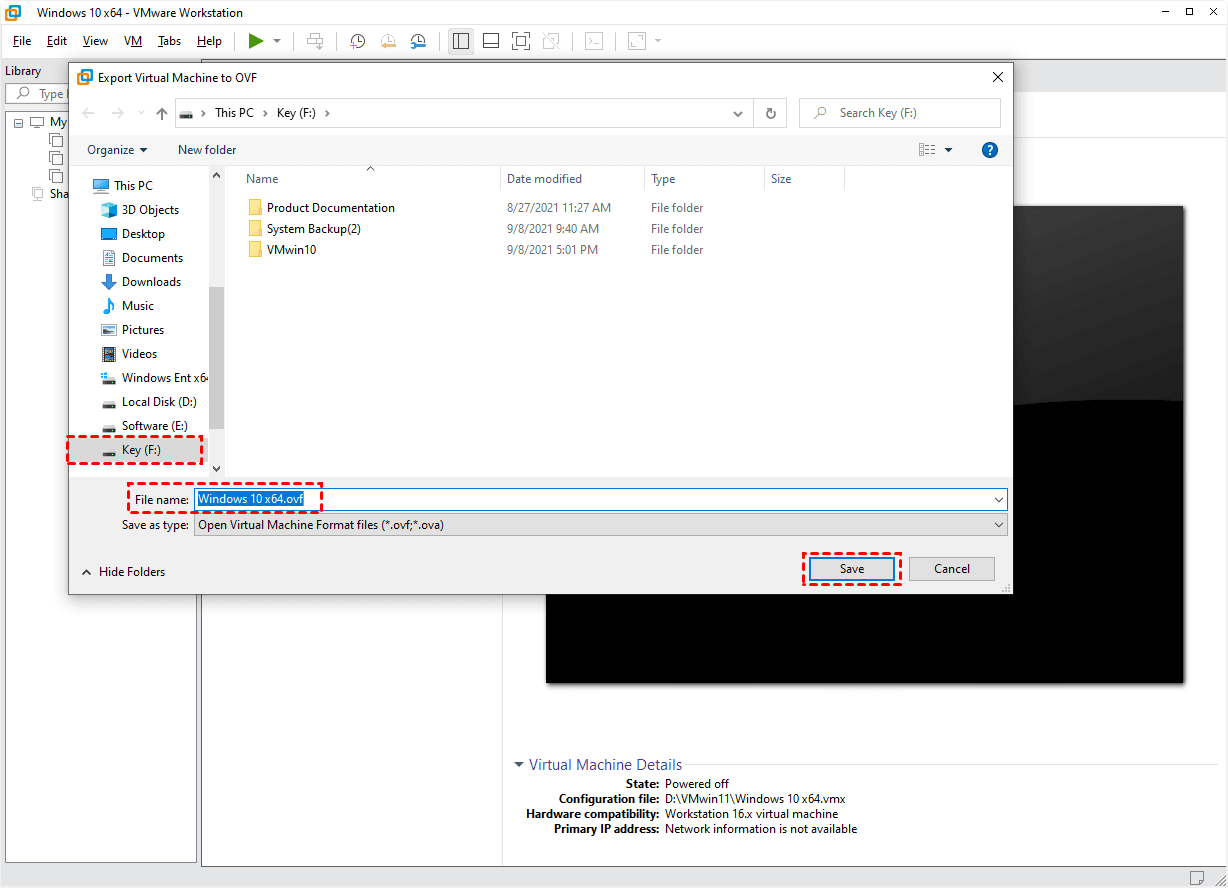
1. Launch VMware Workstation, select the target VM, and click File on the toolbar, select Export to OVF…

2. Select a path where you want to save the OVF template file in the pop-up window, and then click Save.
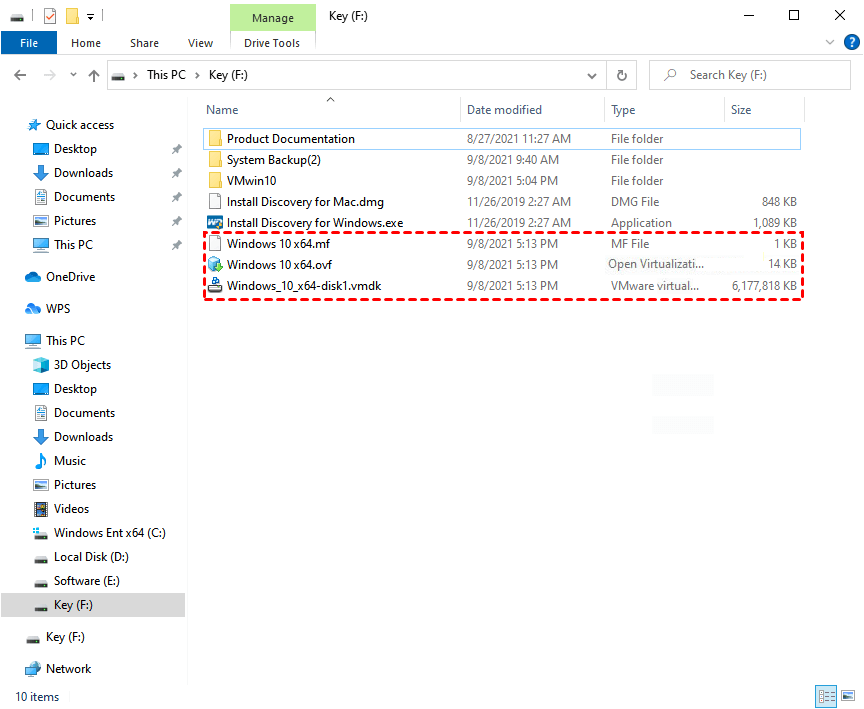
3. Wait for the Export process. The more software you installed in this system, the more time this process will cost.
When it’s accomplished, you will find 3 files in destination location. The manifest file ends with .mf, the OVF file which provides a complete specification of the virtual machine, and the virtual disk file ends with .vmdk.
Tip: You can also backup VMware Workstation VM by manually copy disk files or clone.
👉Method 3: Clone your virtual machine
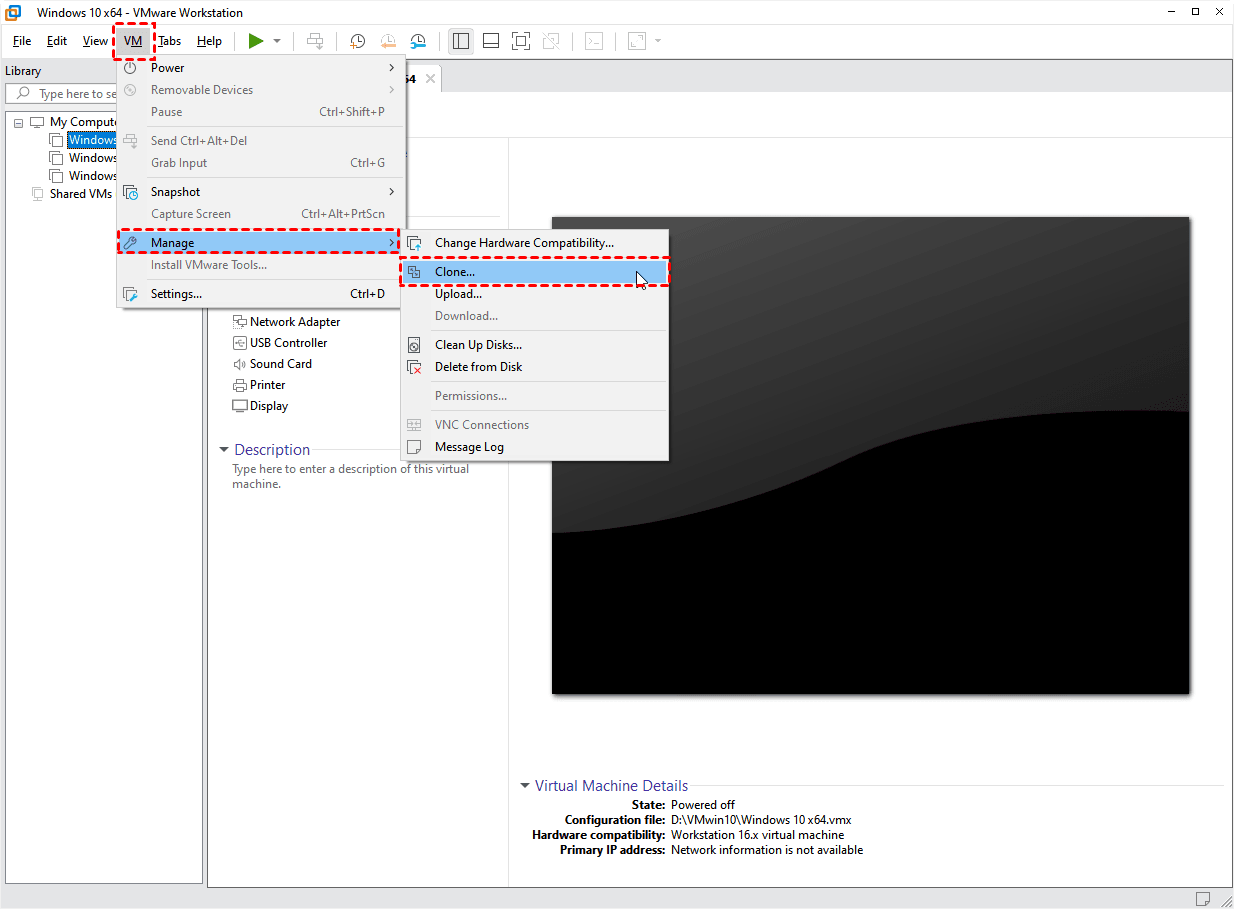
1. Launch VMware Workstation, select the VM you want to clone.
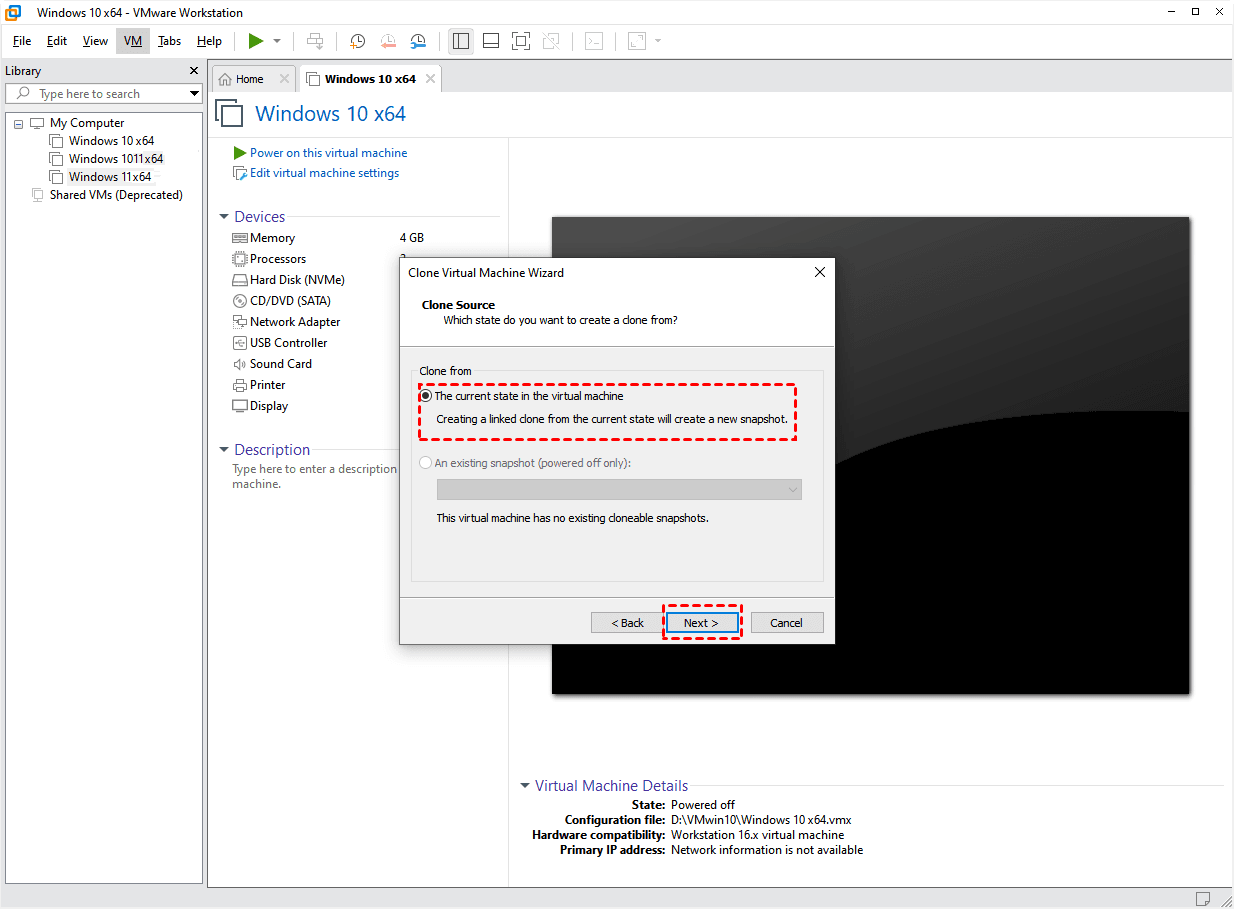
Then click VM button on toolbar, and select Manage > Clone… to open Clone Virtual Machine Wizard. Click Next in the pop-up window.
2. Designate Clone Source. You can choose to Clone from the current state in the virtual machine, or from an existing snapshot (powered off only). If you select the upper one, workstation will create a snapshot before cloning it; if you don’t have a usable snapshot, the second choice will be unselectable.
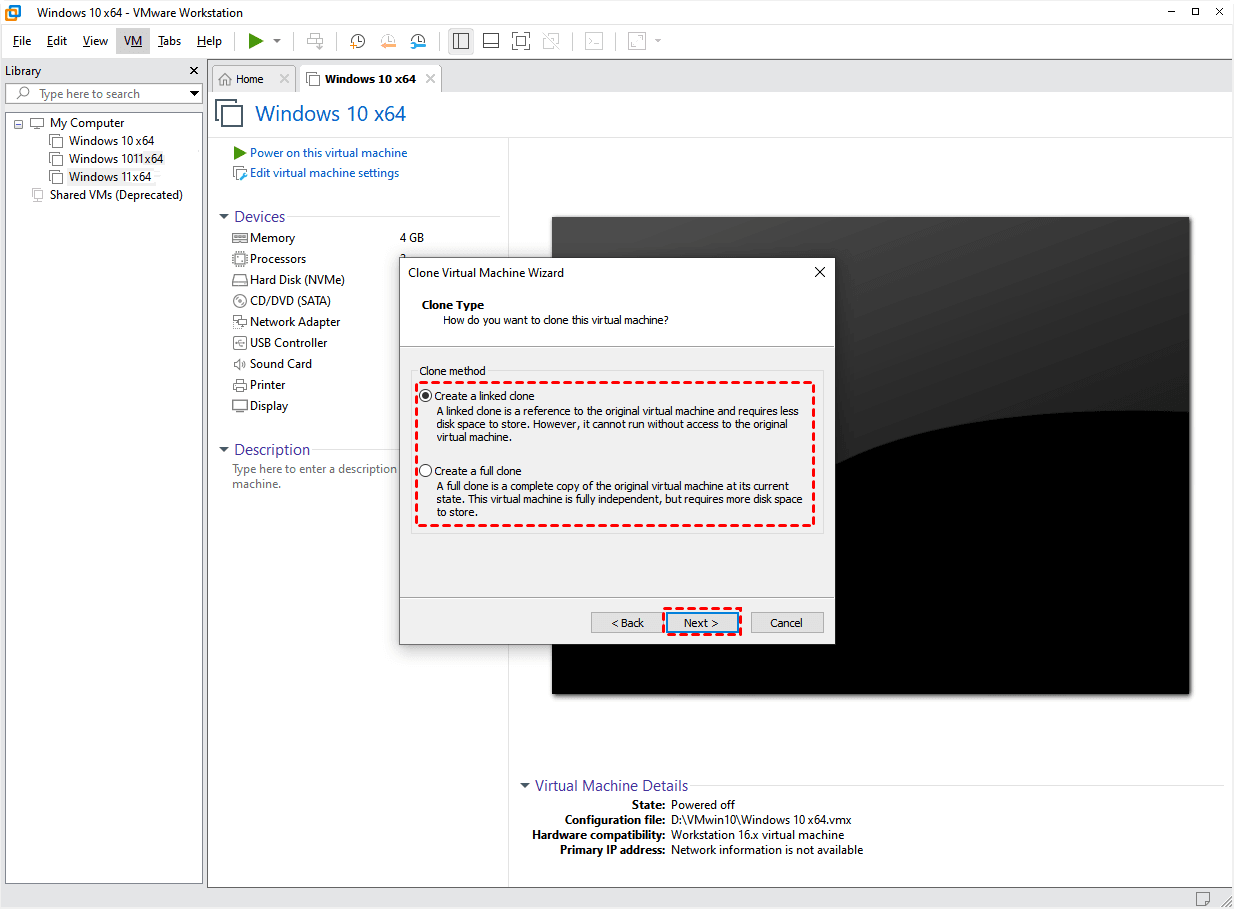
3. Click Next to continue, and designate Clone Type. You can create a linked clone, or create a full clone.
4. Provide the name and storage path of your clone. Then click Finish.
Built-in options for Hyper-V virtual machine backup
Although with different hypervisor, the way Hyper-V virtual machines are backed up is also similar to VMware:
Method 1. Export Hyper-V VMs: Export VMs to OVF or OVA templates in Hyper-V Manager.
Method 2. Windows Server Backup: Windows Server Backup (WSB) is a built-in feature allows you to schedule automatic backup tasks of multiple Hyper-V VMs.
👉Method 1: Export Hyper-V VM via Hyper-V Manager
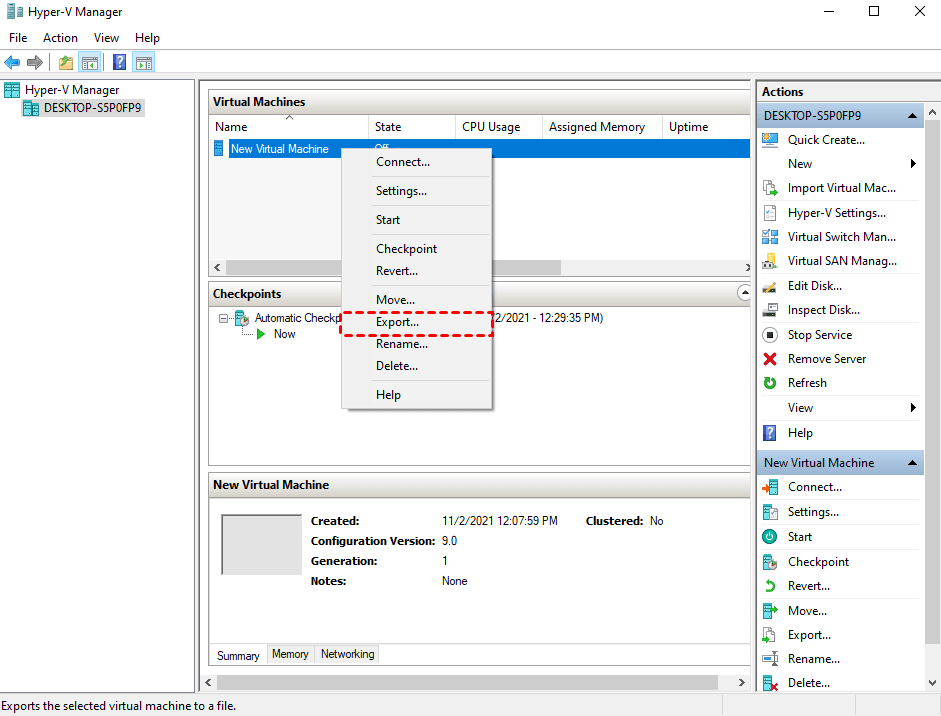
1. Launch Hyper-V Manager. Right-click the VM you want to backup, select Export…
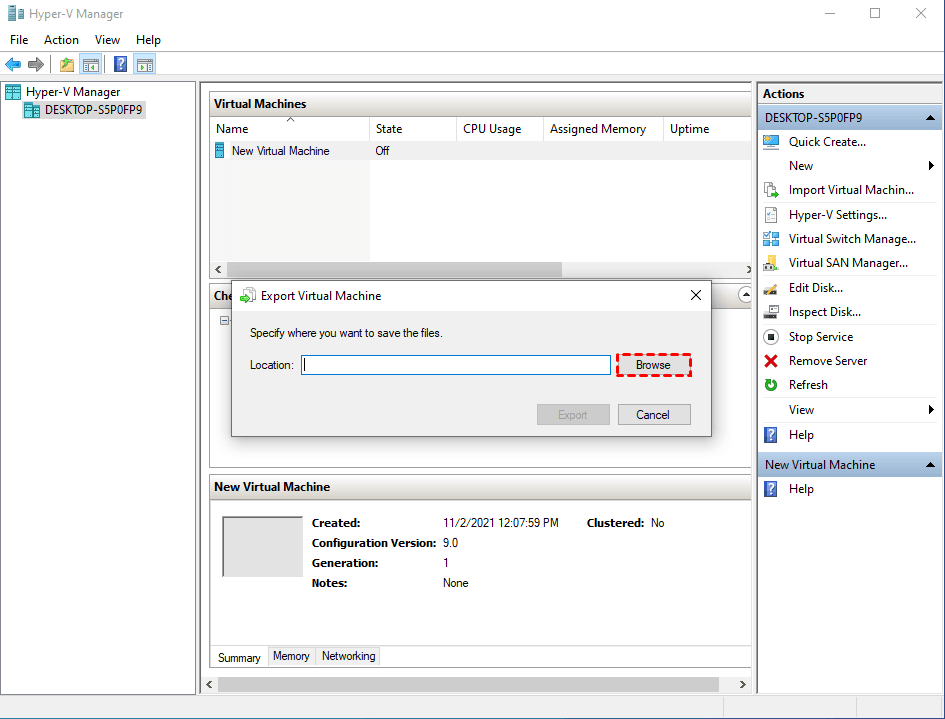
2. Click Browse to specify where you want to save the files in the pop-up window.
3. Wait for the Export progress to complete. The more software you installed in this system, the more time this process will cost. When it's done, you will find 3 folders in the destination location - the VHD files, VM configuration files, and the snapshots.
👉Method 2. Backup VMs using Windows Server Backup
You can also use the built-in backup utility Windows Server Backup for Hyper-V VMs. Try following steps:
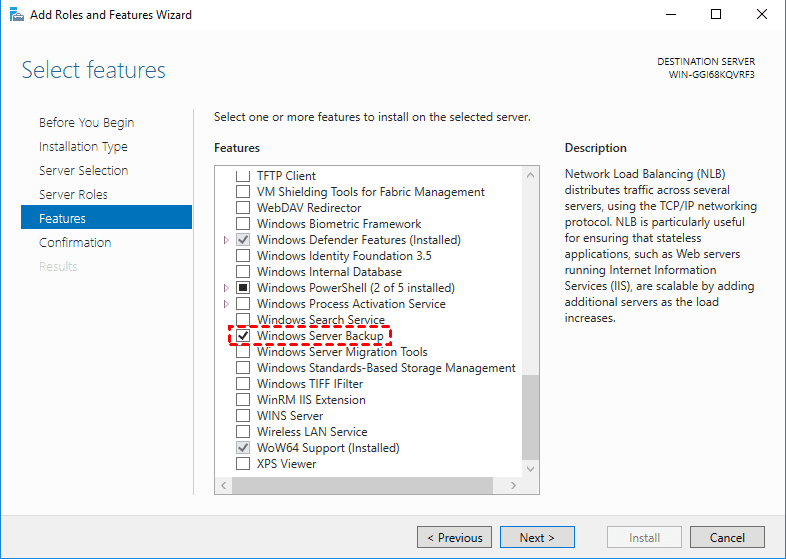
1. Launch Server Manager. Click Manage -> Add Roles -> Features -> Next -> Role-based or feature-based installation -> Next. Select the Server from the server pool and proceed to Features page, find and check Windows Server Backup in Features list to install.
2. Then you can click Tools and access Windows Server Backup. Choose Backup Schedule or Backup Once according to your needs. Here take Backup Once as an example.
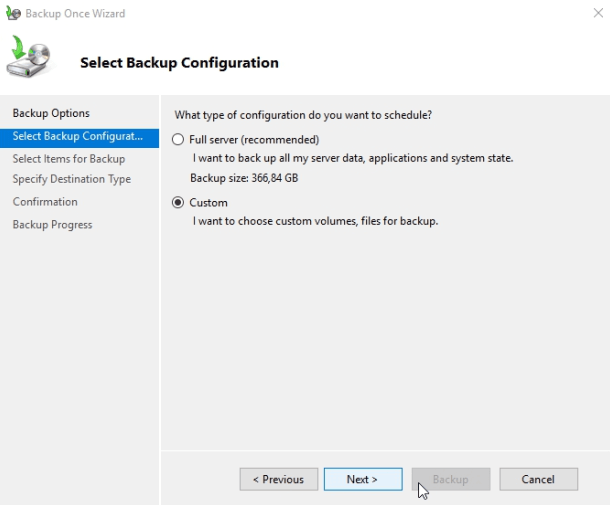
3. Follow the Backup Once Wizard to make your choice. In Select Backup Configuration page, you can select Custom to choose a specific folder or files. Then click Next.
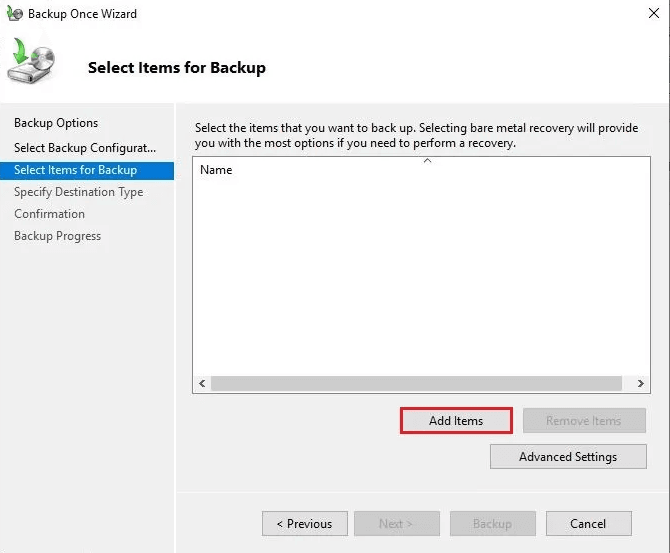
4. Click Add items to select the Hyper-V VM you want to back up, and specify a Destination Type and in the next step. You can choose backup Hyper-V to local drive or network share.
5. After selecting a Destination location, you can confirm the settings and click Backup to start.
Summary
Virtual machine backup is one of the most basic measures to ensure VM data security. In this article, I introduced what is virtual machine backup, how can you pick a VM backup solution properly, and how to create backups for VMware and Hyper-V VMs.
Besides, as another failsafe measure, please note that VMware snapshots cannot be used as backups, or you may result in data loss.

