


How to Migrate P2V in VMware (Download and Use Converter)
If you don't want to create and configure new VMs from scratch, you can perform VMware P2V migration via vCenter Converter, or effective backup & restore tools as an alternative.
By Crystal / Updated on June 4, 2026
What is P2V in VMware
P2V is abbreviated from “physical to virtual”, the process of converting or migrating workloads from a physical machine to a virtual machine (VM). P2V conversion involves capturing an image of a physical machine disk and converting it to a virtual disk format compatible with the VMware hypervisor, as well as configuring virtual machine settings to match the original physical environment.
💬What are the main advantages of P2V? VMs are running in a physical host server that can run multiple VMs and allocate resources to them, which takes up less hardware and physical space, resulting in greater flexibility. This way, the time and expense of maintaining physical servers and apps can be greatly reduced.
When virtualizing physical server workloads, rather than creating and configuring a new VM, it is clearly easier to take an image-level copy of the physical computer and transform it into a virtual machine. And just like Disk2vhd for Hyper-V P2V conversion, VMware also provides VMware vCenter Converter for P2V migration.
It was once removed from the download list, but now makes a comeback. Let’s see how to use it for P2V VMware.
What tool do you use for VMware P2V (download)
On February 2, 2022, VMware announced that vCenter Converter was removed from the Product Downloads list, because VMware Converter has not been updated in a long time and has some potential security concerns.
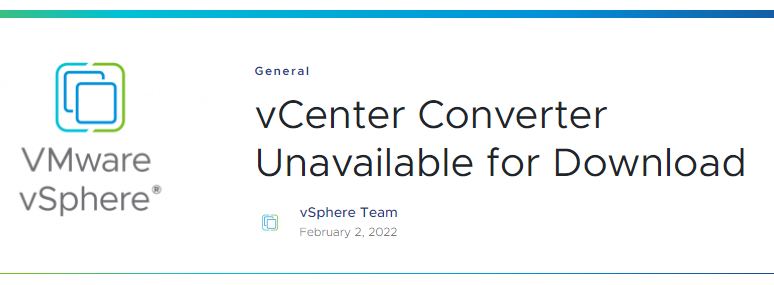
Good thing, it‘s finally back. According to the tagline, vCenter Converter supports many source physical machines, including Windows and Linux desktop and server editions. It's a great solution that provides a graphical interface and can be used with hosts that are licensed for free ESXi hypervisor.
To use it, you can launch the vCenter Converter official page and click [DOWNLOAD NOW] to proceed. Next, I will introduce how to perform P2V VMware via vCenter Converter as well as an alternative software.
How to perform P2V with VMware Converter
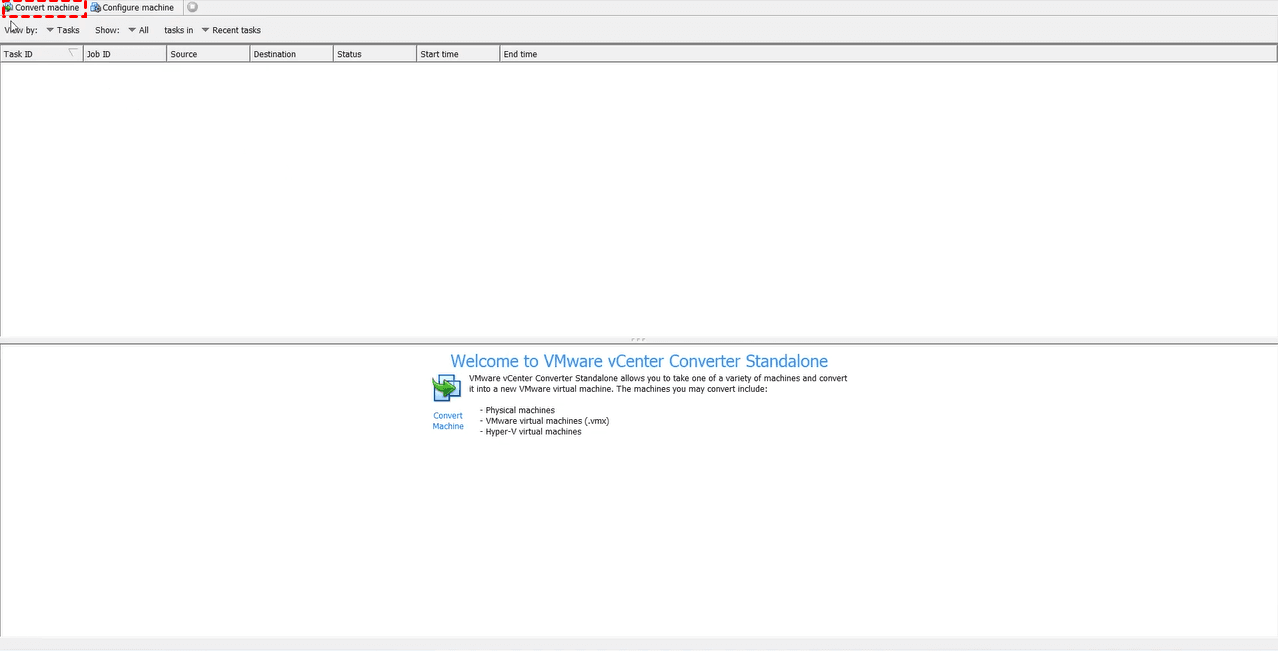
1. Launch VMware vCenter Converter Standalone, click Convert machine button to open the wizard.
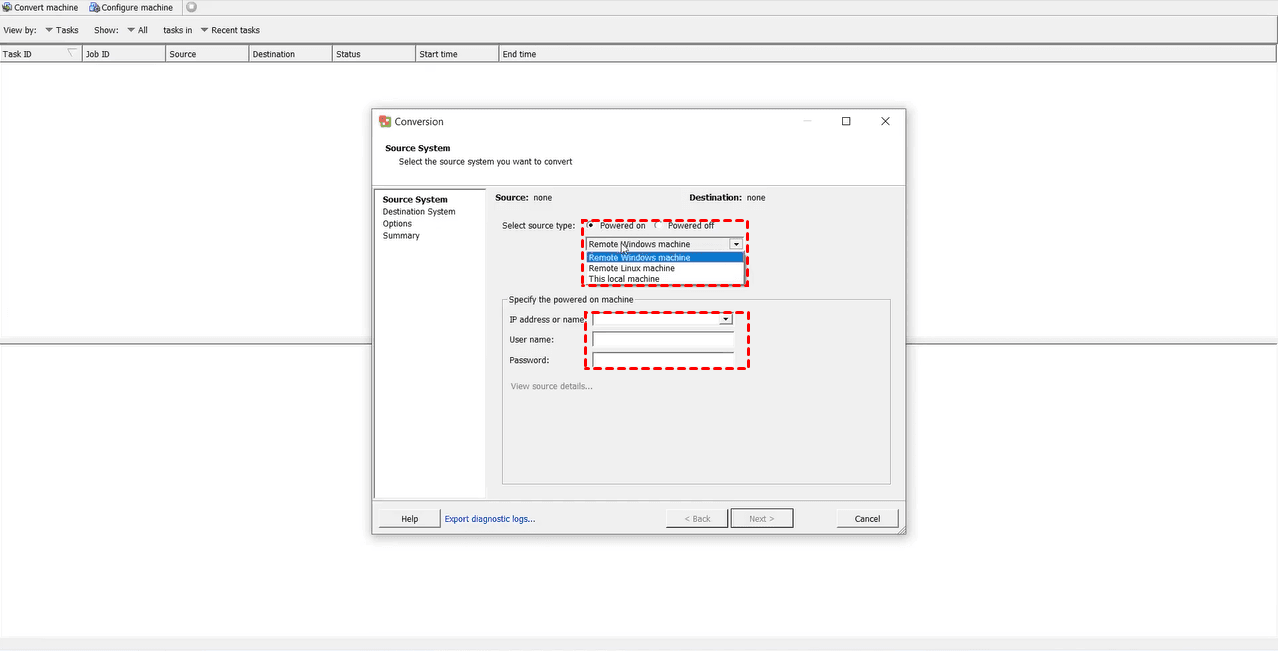
2. On Source System tab, select source type as Powered on option, and select Remote Windows machine from the below dropping menu.
Provide relevant connection credentials, and click Next.
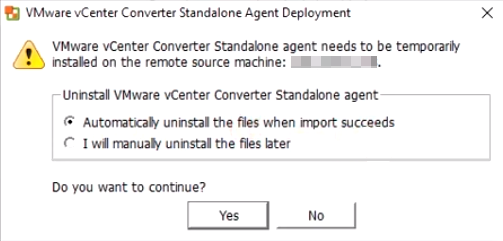
3. It will pop up a window to inform you that the Converter agent needs to be temporarily installed on the remote source machine.
Choose whether to automatically uninstall the agent when import succeeds or not. Click Yes to continue.
4. On Destination System page, select VMware Infrastructure virtual machine as the destination type, and provide VMware server connection credentials. Then click Next.

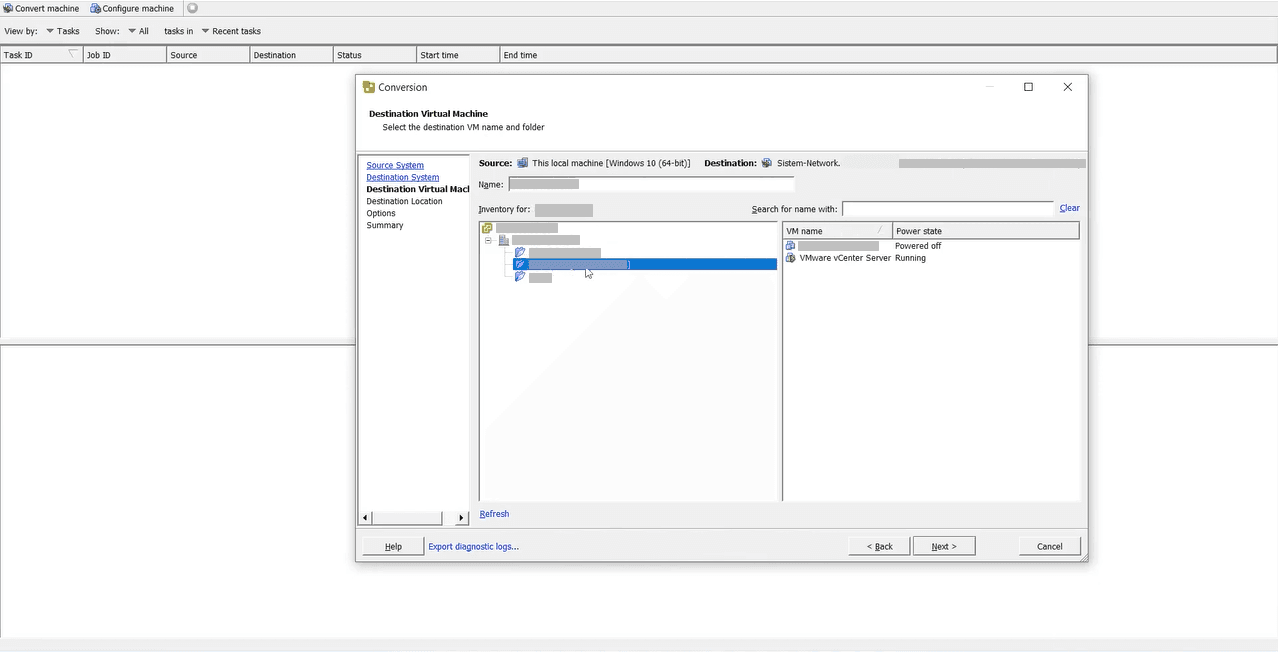
5. On Destination Virtual Machine page, provide an inventory Name for the new VM, and click Next.
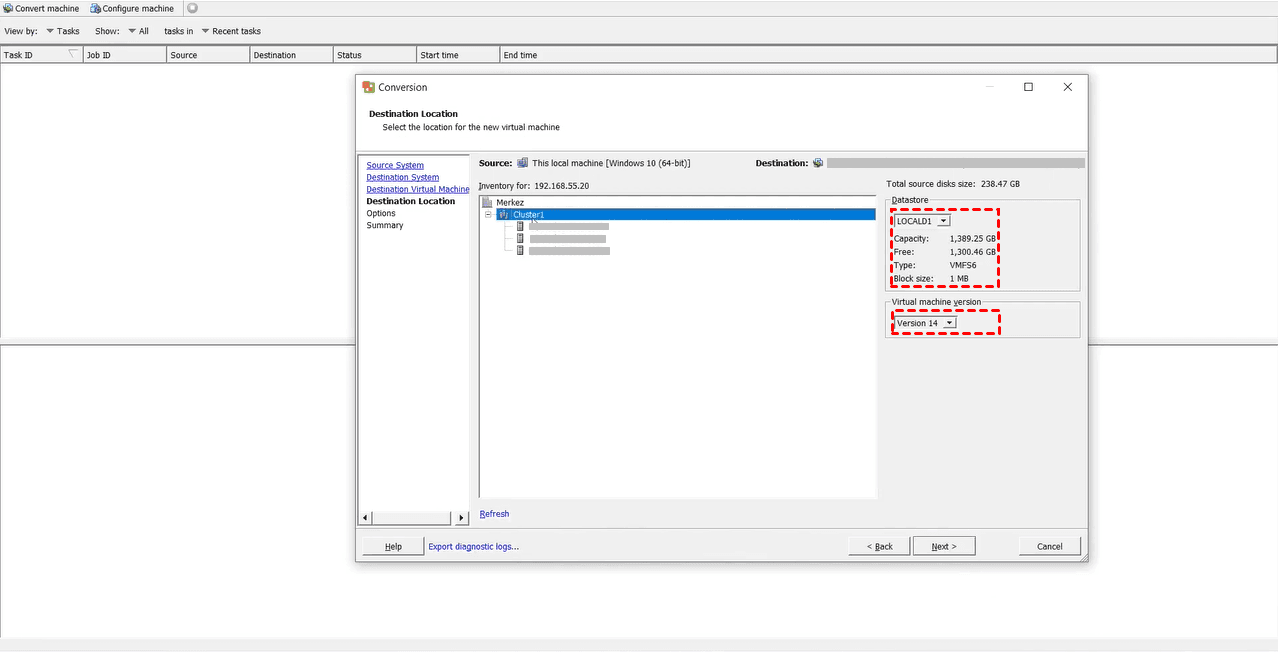
6. On Destination Location page, select the ESXi host, Datastore, and Virtual machine version. Click Next.
Tip: If you want to convert to VMware Workstation, Fusion, or Player:
On Destination System page, select VMware Workstation or other VMware virtual machine as the destination type, and select VMware product in the dropping menu.
Provide a Name and select a location for the virtual machine. You can select a local folder or a network share, with User name and Password to be used when connecting to the network share of the destination virtual machine. Then click Next.
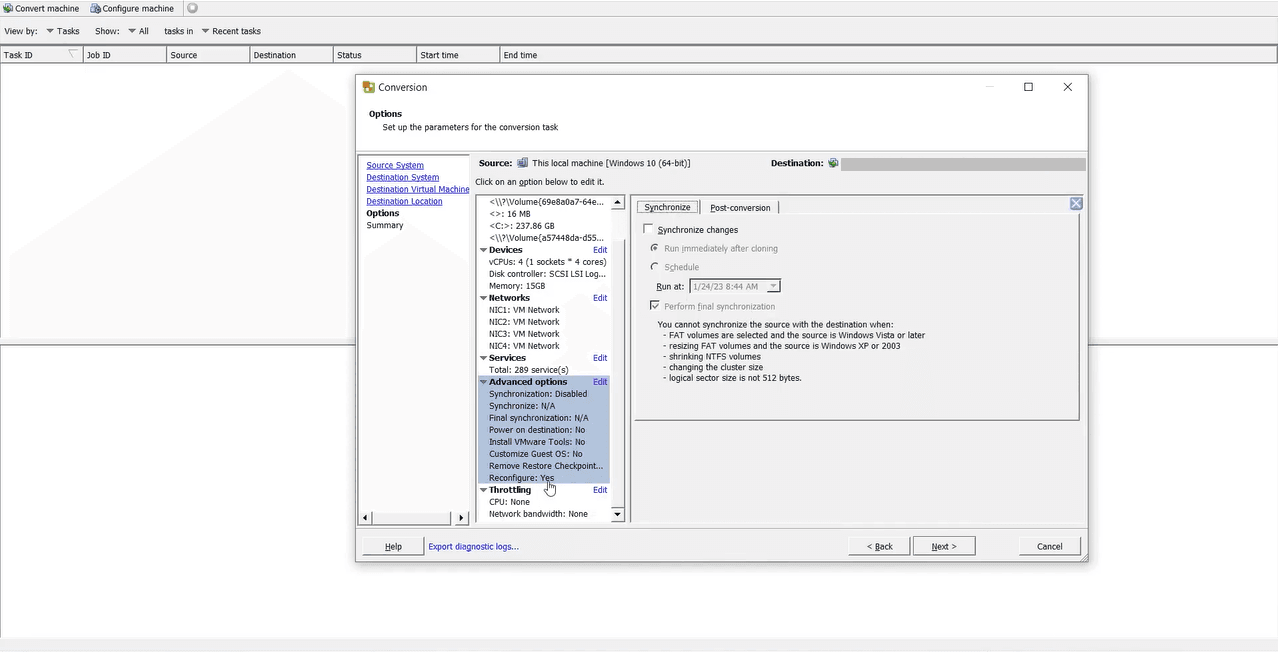
7. On Options page, browse Current settings and optionally Edit the parameters for the conversion task. Then click Next to continue.
8. On Summary page, review the settings and click Finish to start conversion. You can see the progress in Recent Tasks.
For more details, you could refer to VMware vCenter Converter Standalone document.
Effective alternatives to P2V migration VMware flexibly (2 Tools)
If for some reason you can't use VMware vCenter Converter, or if you have more granular needs for P2V migration - such as migrating specific data, or migrating a historical version of a physical machine image, you can also use another secure alternative products to perform P2V migration in VMware.
Method 1. Use AOMEI Cyber Backup to migrate physical PC/Server to Virtual
AOMEI Cyber Backup provides full protection for your physical PC/server and VMware virtual machines. It quickly backs up Windows files, system, disks and partitions and quickly restores a computer to a virtual environment.
✻ Flexible Scheduling: set daily/weekly/monthly backup to back up any changes regularly.
✻ Various Backups: schedule full or incremental backups of your system to guard against data loss.
✻ Quick Recovery: entire system or specific data to original or new computer quickly.
✻ Comprehensive Compatibility: compatible with various Windows operating systems such as Windows Server and Windows 11, 10, 8, 7.
You can download and install the system image backup software -AOMEI Cyber Backup from the button below:
✢ First, you need to install the AOMEI Cyber Backup Agent on your target device and connect to AOMEI Cyber Backup Management Server.
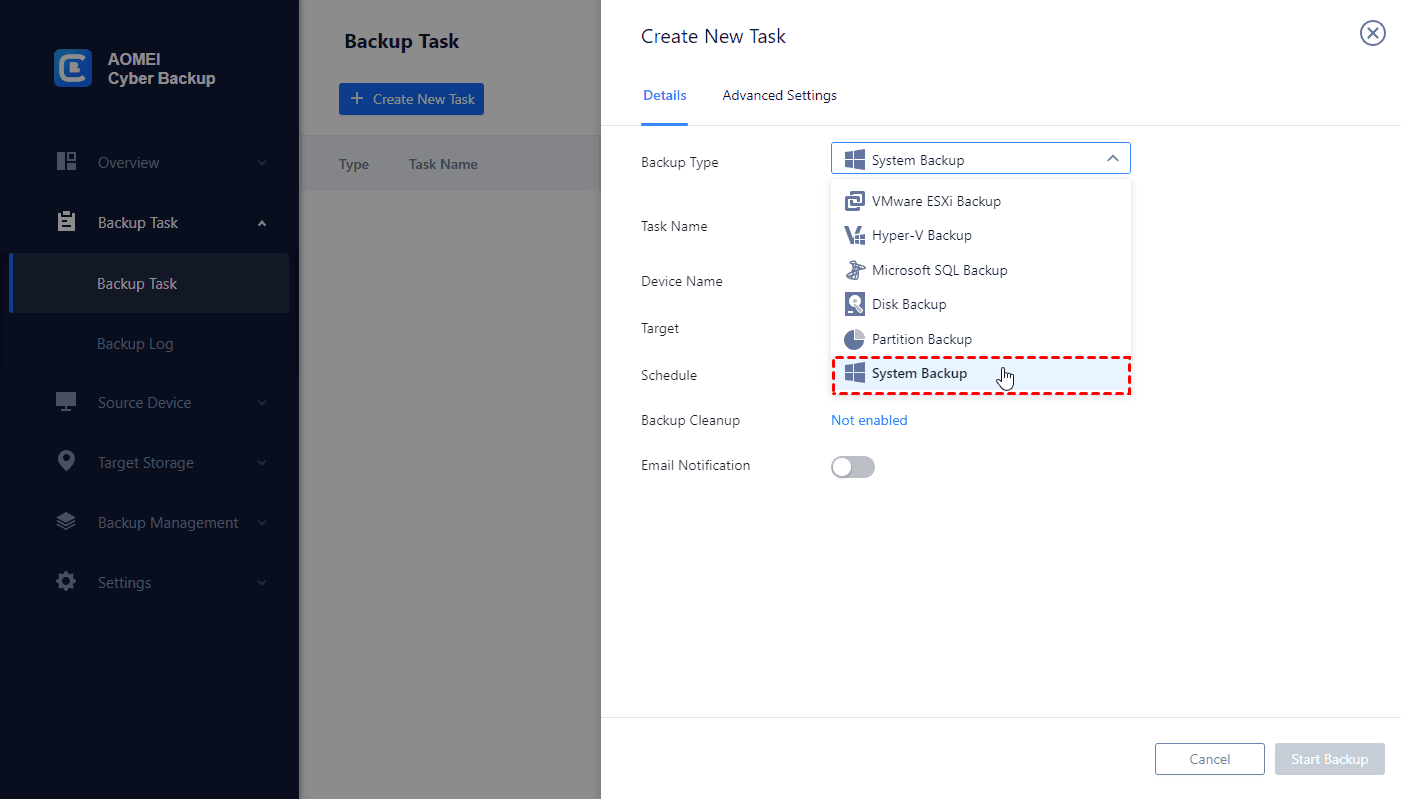
1. Navigate to "Backup" tab after opening this software, then choose "Create New Task" >> "System Backup".
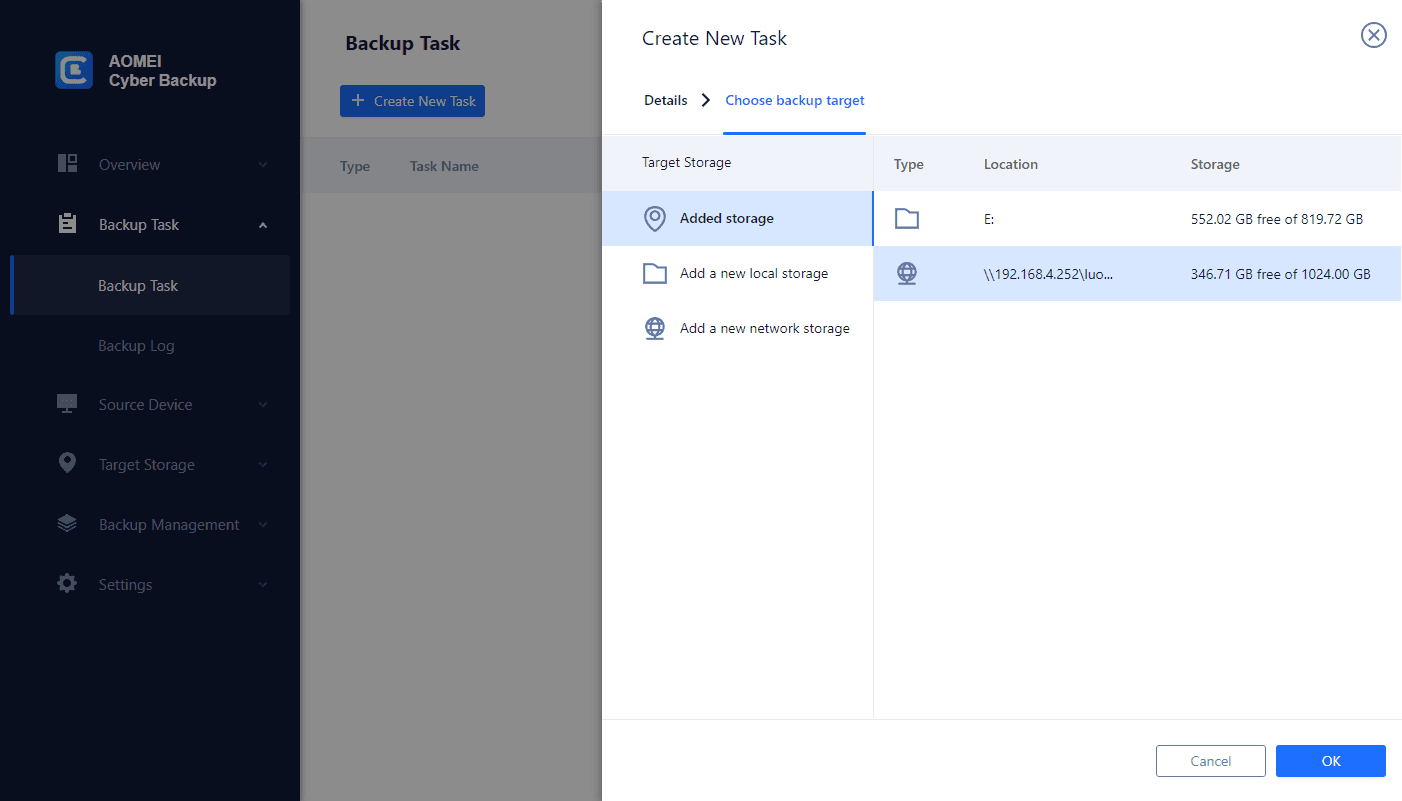
2. Select a system you want to back up. Then choose a destination to save the backup.
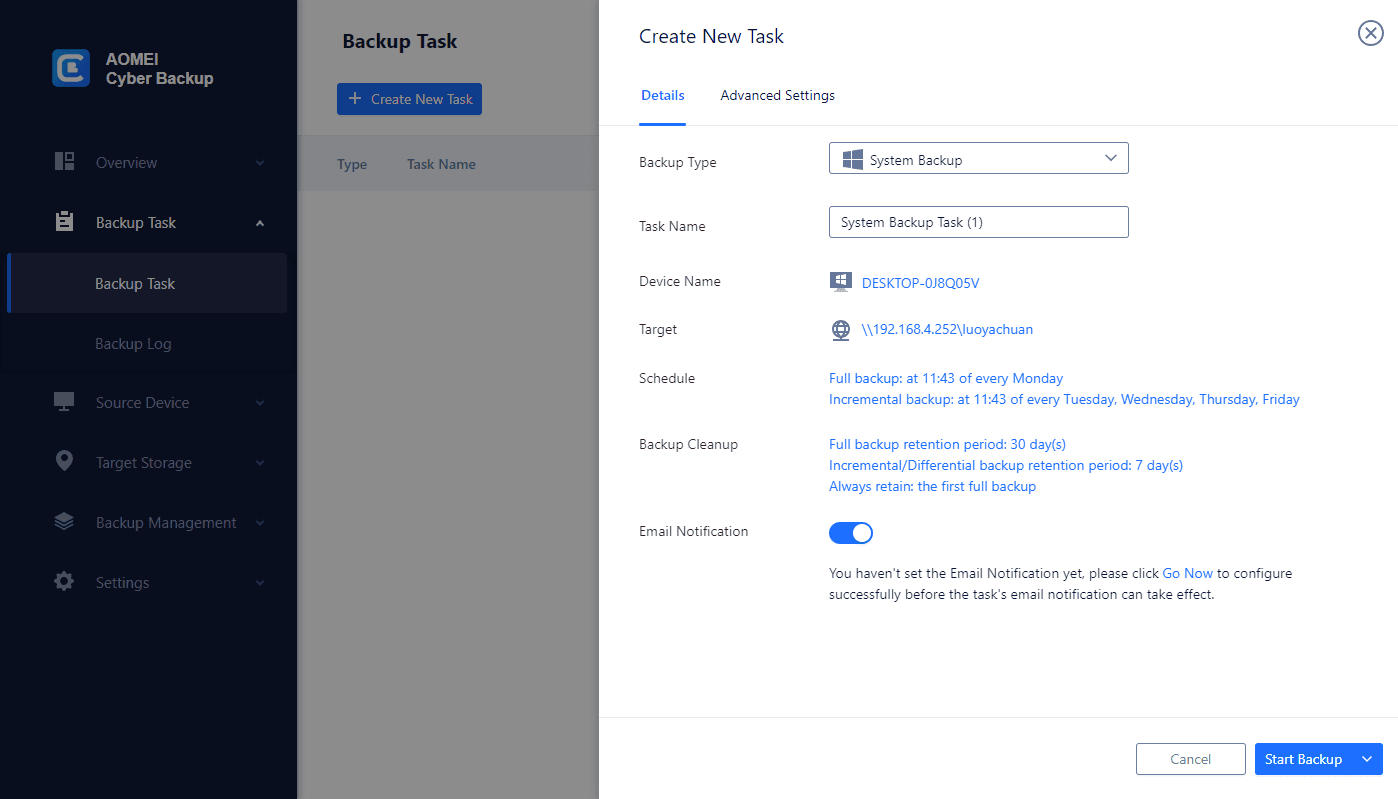
3. Schedule backup method as full / incremental / differential backup and run the backup tasks at daily / weekly / monthly.

4. Configure retention policy to auto delete the old backup files and save storage space.
5. Click Start Backup to protect your system.
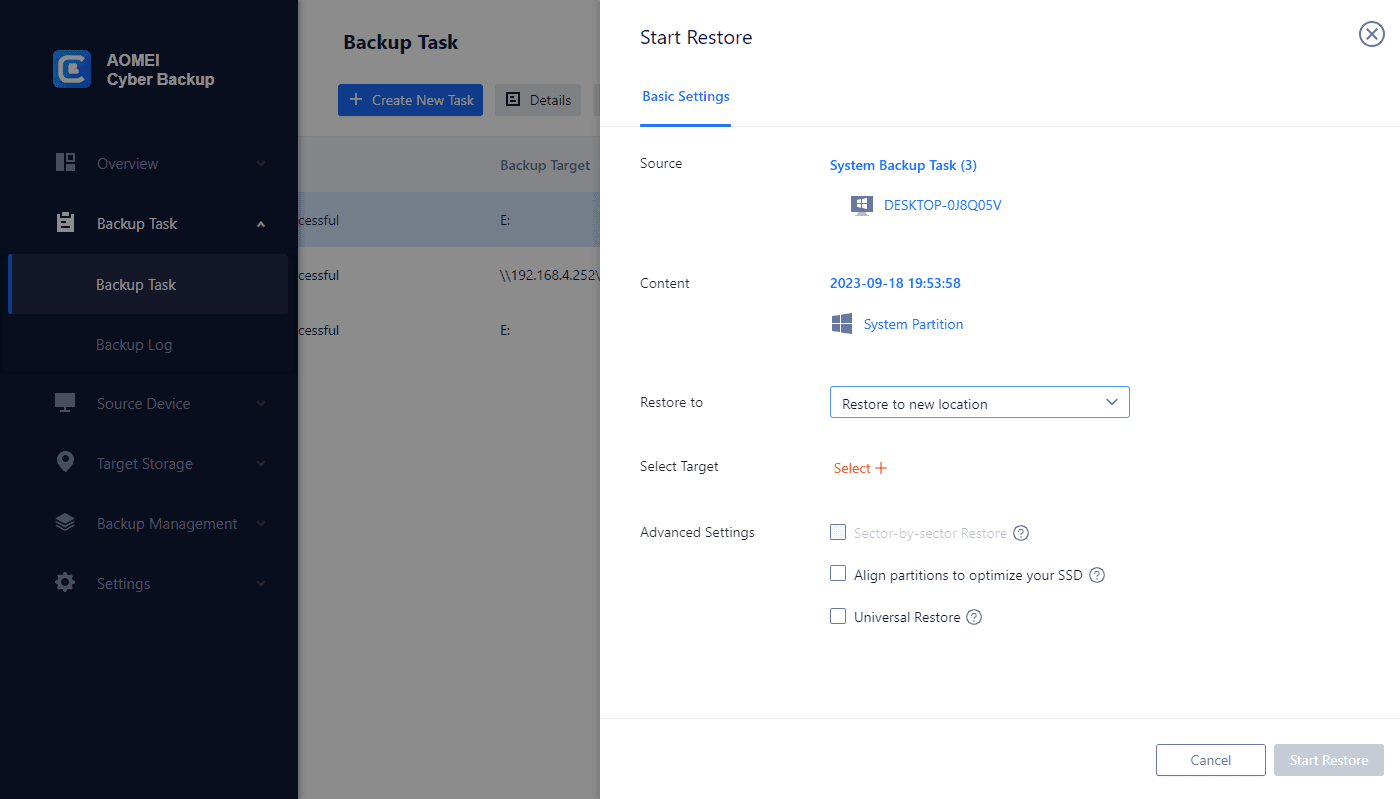
6. To restore the entire system easily and quickly: After completing the backup, you can click Restore to recover the system quickly when the unforeseen happens. It’s easy to migrate a physical computer to a VMware ESXi environment.
Method 2. Perform VMware P2V migration via AOMEI Centralized Backupper
Another effective alternative software for P2V is AOMEI Centralized Backupper. As the name suggests, it's a backup & restore software that can backup endpoints (physical or virtual machines) on the network centrally.
With it, you can back up and restore any physical machine or virtual machine on the network, and perform Windows Backup and SQL Server auto backup as you like.
It supports Windows machines installed with Windows 11, 10, 8, 7, Vista, XP & Windows Server 2022, 2019, 2016, 2012 (R2), 2008 (R2), etc.

In the next part, I will show you how to perform P2V migration to VMware via AOMEI Centralized Backupper. You can click the following button to free download the converter alternative and have a try:
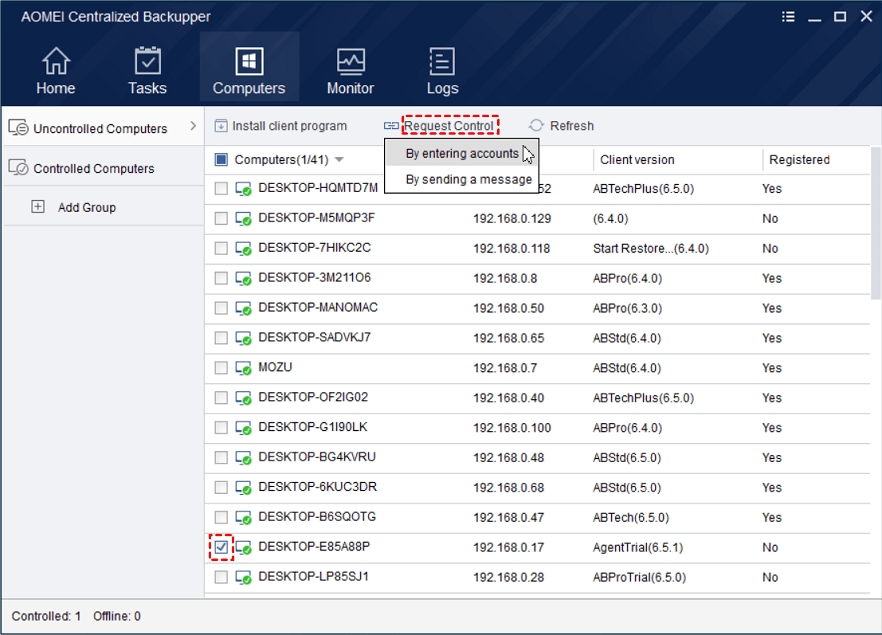
1. Launch AOMEI Centralized Backupper and go Computer > Uncontrolled Computers > Install client program. You’ll see two options:
- Manual Client Installation: Manually copy the setup file to client computers, run it as administrator and follow the wizard to install it one by one.
- Remote Client Installation: Choose the client computers that you’d like to backup, input username and password of each computer and click “Install All”.
By remote installation way, these machines will be added to your control automatically afterward; If you installed client programs manually, you still need to Request Control for them to obtain control permissions.
A request window will pop up on the client machines, once authorized, you can backup whenever you like.
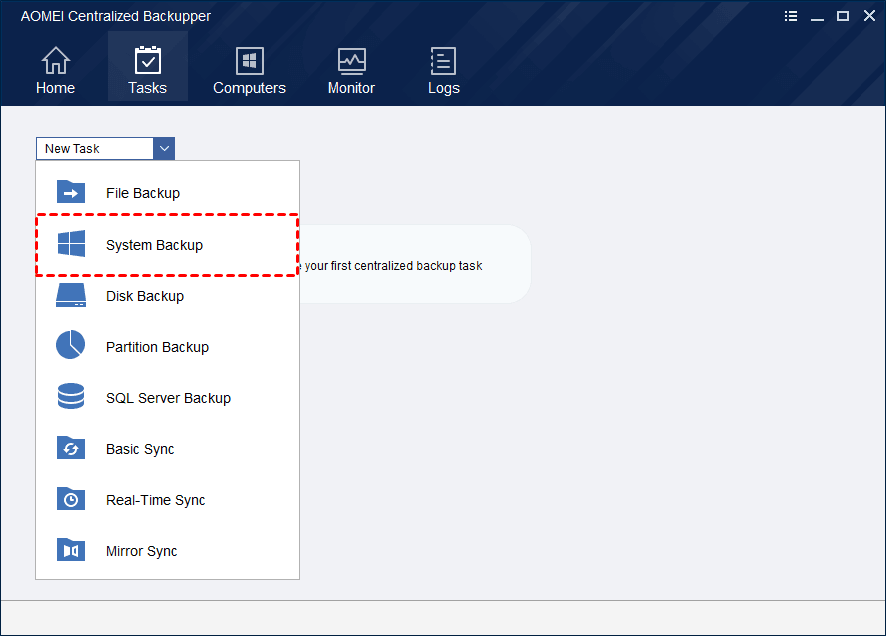
2. Navigate to Tasks > New Task > System Backup.
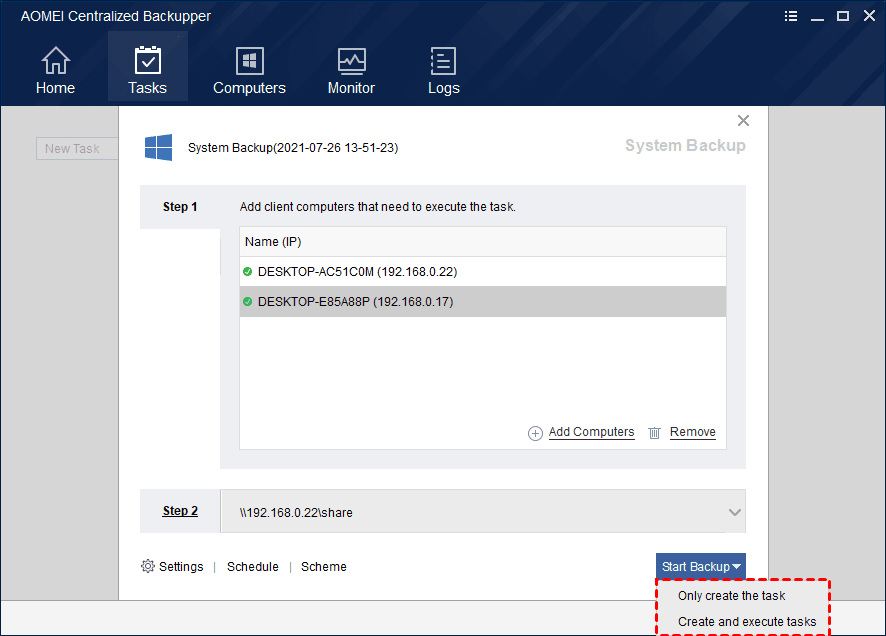
3. Click + Add Computers to specify the physical machine, click OK to confirm.

4. Click Step 2 to specify a Share or NAS device to store the system backup, and then click Start Backup.
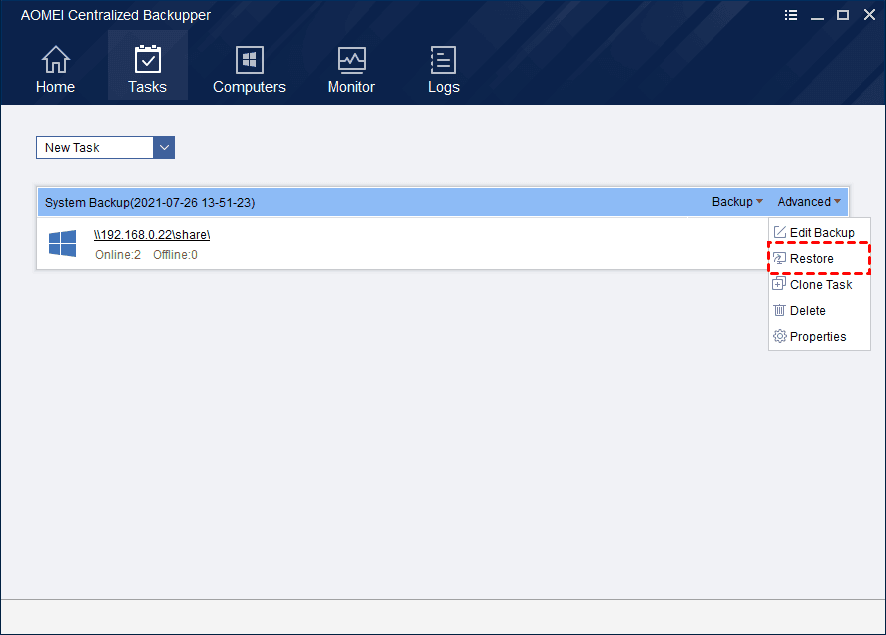
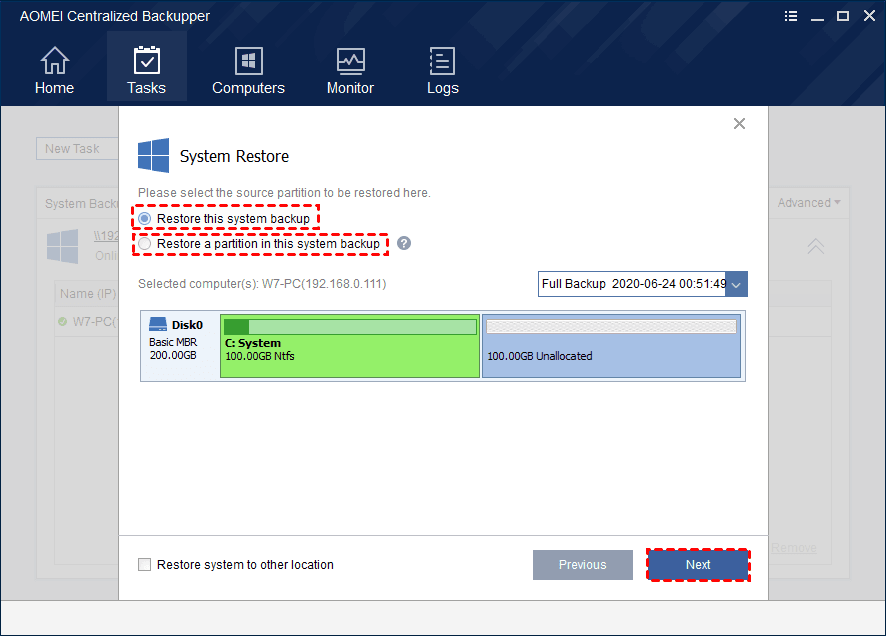
5. The created task will be listed separately in Tasks. Click Advanced > Restore on the right top of the task.
6. Specify the system backup as the restore source, and select Restore this system backup option, check Restore system to other location option below, and click Next.
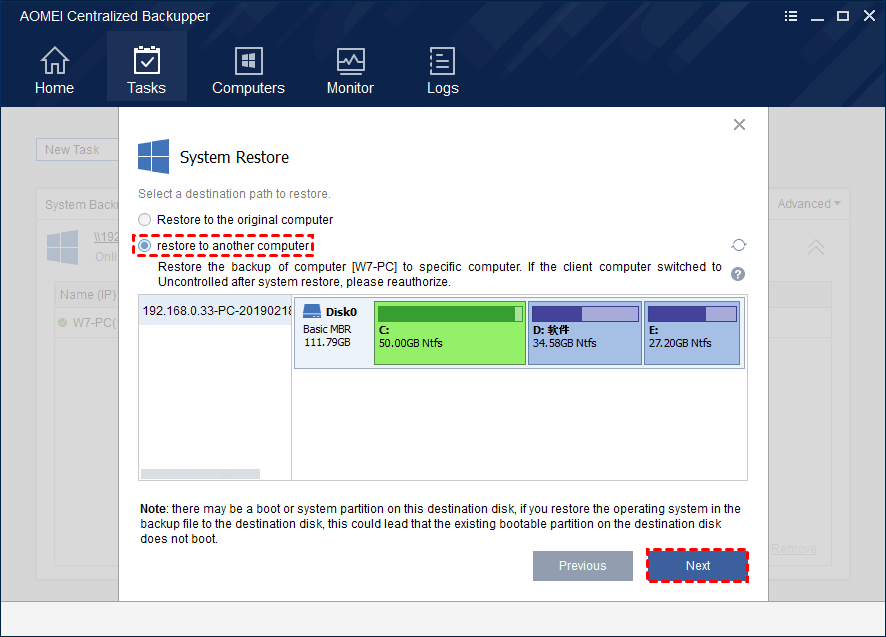
7. Select to restore to another computer option and specify the destination virtual machine and its system disk. Click Next to continue.
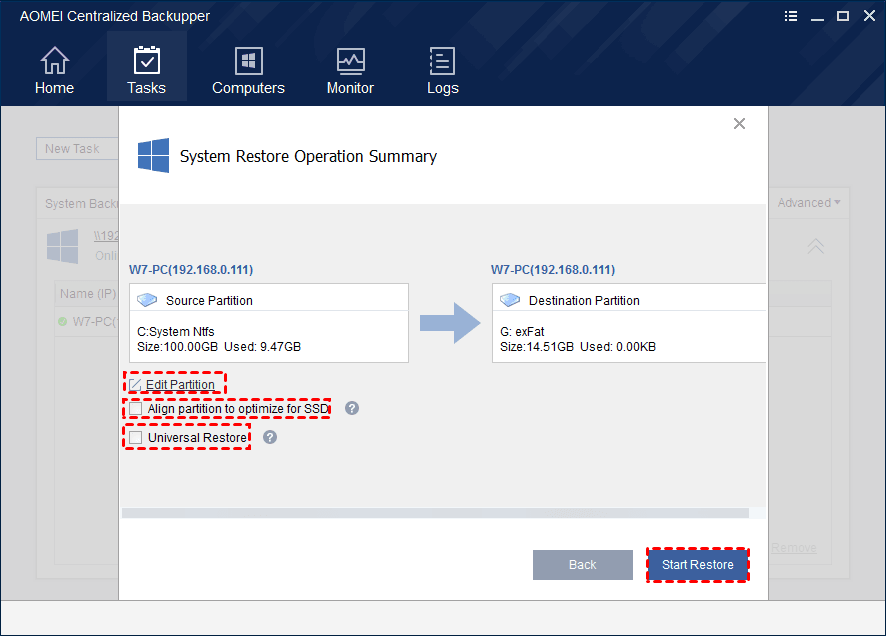
8. Review the Restore summary and click Start Restore to complete the P2V migration.
Summary
Migrating your workloads from physical machine to virtual machine (P2V) can save you many efforts indeed, and VMware provides a free tool, VMware vCenter Converter for VMware P2V.
You can refer to the above tutorial to perform P2V VMware, or use alternative tools to perform the migration. Besides P2V, it can also be used to clone VMDK to physical disk, or convert between VMware and Hyper-V.

