


Complete Guide | How to Backup Hyper-V Virtual Machines
Are you running Hyper-V virtual machines and wondering how to keep your critical data safe and secure? In this article, we'll show you how to backup Hyper-V VM and answer whether to backup Hyper-V host. So let's dive in how to safeguard your Hyper-V virtual machines!
By Crystal / Updated on July 22, 2024
Overview of Hyper-V Backup Solution
Microsoft Hyper-V is a type-1 hypervisor built into 64-bit Professional, Enterprise, and Education editions of Windows 8 and later versions, providing a cost-effective virtualization solution for businesses. One of the main benefits of using Hyper-V is the ability to easily create and manage multiple virtual machines (VMs) using Hyper-V Manager. However, due to the critical nature of these VMs, it's important to backup them regularly to prevent data loss and business interruption.
If you're wondering how to back up your Hyper-V VMs, this article has got you covered. We'll explore three common methods to backup Hyper-V virtual machines and answer some common questions, such as whether there is a built-in option to do so or if you should also backup the Hyper-V host.
By following the steps outlined in this article, you can rest assured that your Hyper-V VMs are backed up and secure, providing peace of mind and allowing you to focus on your core business activities.
![]()
Things you should know before backing up Hyper-V
Despite the similar definitions and roles, the physical machine backup and virtual machine backup still differ in approach and classification. So before you take action to backup Hyper-V, there are some things you need to consider first.
Should you backup a Hyper-V host?
Actually, it is generally agreed by IT staff that it is Not Necessary to back up your Hyper-V host. In most cases, what matters is to back up virtual machines on the host.
Backing up Hyper-V host refers to backing up the Hyper-V hypervisor settings, including storage, networking, roles, permissions, and the virtual switch configurations, etc. Currently, there is no direct way to do this.
Ideally, Hyper-V hosts should be kept simple so that VMs can be flexibly migrated to other hosts or hypervisors. This makes reconfiguring the Hyper-V host a simple and quick job and takes even shorter time than restoring from a backup.
Hyper-V host-level vs guest-level backup
Basically, there are 2 approaches to performing Hyper-V backup: host-level backup and guest-level backup.
● Host-level VM backup will back up the entire VMs, including its configuration, allowing you to restore an entire VM and make it instantly available. It is efficient and agentless. You can centrally create backup tasks for all virtual machines without the need to install agents.
● Guest-level VM backup will back up the VM as the physical machines by installing an agent on guest operating systems, namely agent-based backup. You can select what to backup inside the VM, such as a partition, disk, SharePoint file.
But when restoring, you need to create an empty VM and install a guest OS, and then reinstall the agent on the guest OS.

Should we perform Hyper-V backup in host or guest level? This depends on your needs. But in most cases, host-level backup is more recommended as it facilitates batch management and entire VM recovery.
If you have a wide variety of backup and recovery needs, you can also use a combination of the two.
Two built-in methods to backup Hyper-V virtual machines
In this section, I will introduce 2 built-in ways to perform host-level Hyper-V VM backup. You can jump to them by clicking on the anchor text.
◇ Export Hyper-V VMs: By exporting VMs to OVF or OVA templates you can restore to other Hyper-V hosts. However, you can only backup one VM at a time.
◇ Using Windows Server Backup: Windows Server Backup (WSB) is a built-in feature that provides backup and restore options for Windows server environments, allowing you to schedule automatic backup tasks of multiple VMs. But you cannot monitor the backup status this way.
Notes:
►Hyper-V checkpoints should not be used as backups because they rely on the parent disk completely, if the parent disk is corrupted or deleted, checkpoint files cannot be used to restore VM.
►Except for the above 2 ways, you can also gain a complete and independent VM copy by manually copying VM files and creating a new VM, then attaching VHD file to restore the data. However, it is not recommended because Hyper-V puts VM files in different locations.
Method 1: Export Hyper-V VM on Hyper-V Manager
You can use Hyper-V Manager to export VM as a Hyper-V backup solutions. Here's how to do it:
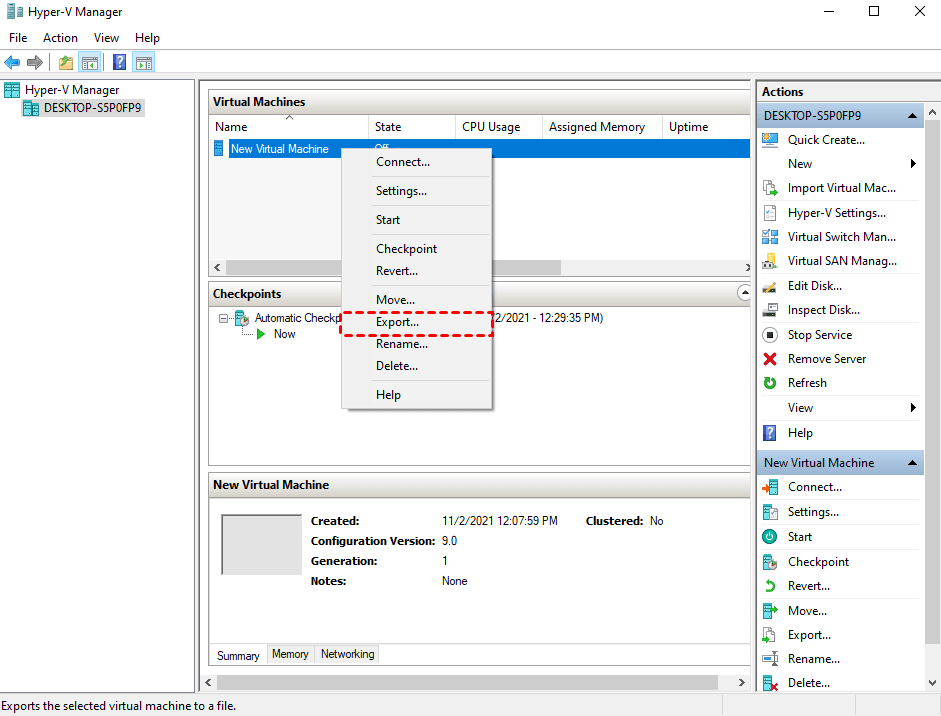
1. Launch Hyper-V Manager. Right-click the VM you want to backup, select Export…
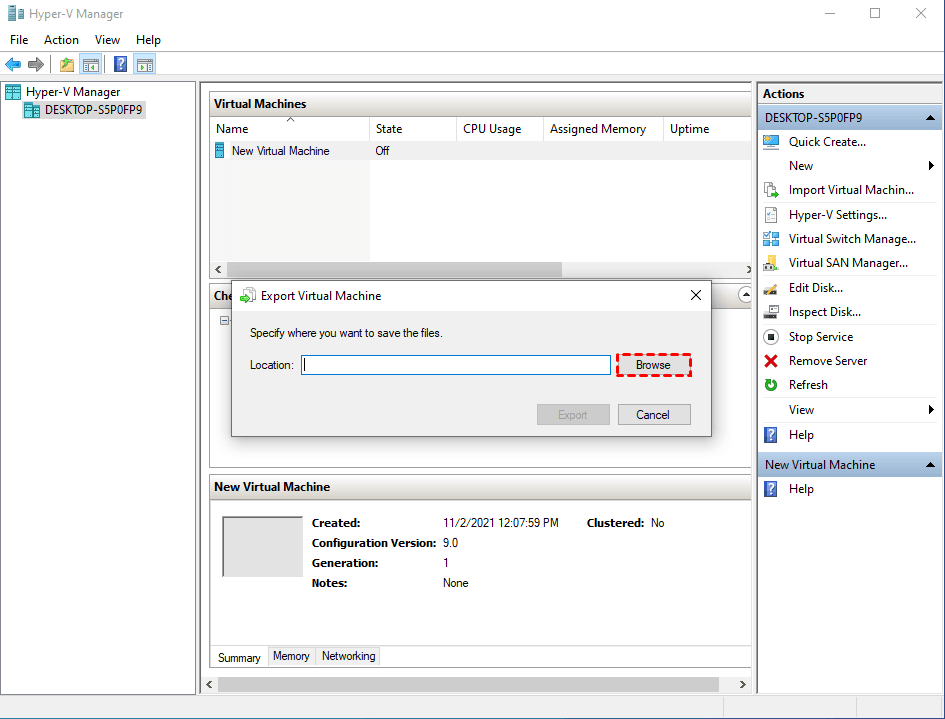
2. Click Browse to specify where you want to save the files in the pop-up window.
3. Wait for the Export progress. The more software you installed in this system, the more time this process will cost.
When it’s accomplished, you will find 3 folders in the destination location. The VHD files, the VM configuration files, and the snapshots.
Method 2. Backup Hyper-V VMs with Windows Server Backup
You can also use Windows Server Backup for Hyper-V VMs. Try the following steps:
1. Launch Server Manager. Click Manage and select Add Roles and Features. Click Next.

2. Select Role-based or feature-based installation as the Installation Type. Click Next.
3. Select the Server from the server pool and click Next.
4. Click Next on Server Roles page.
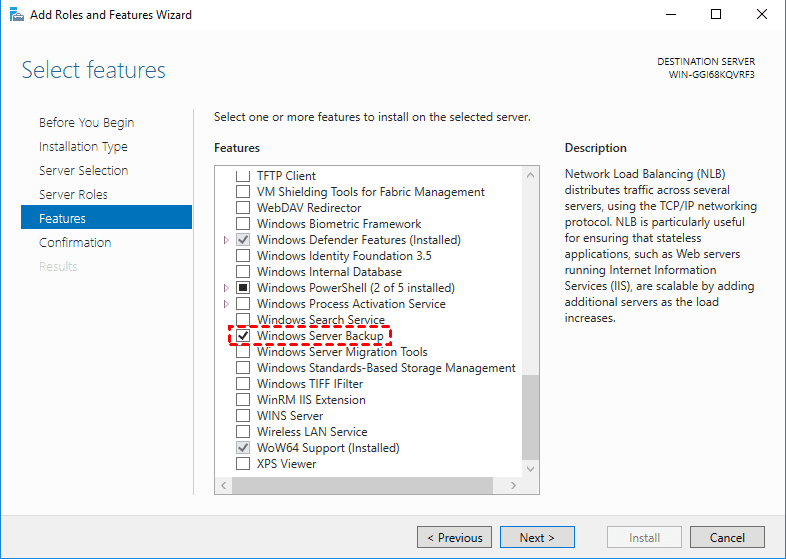
5. On the Features page, find and check Windows Server Backup in the Features list. Click Next to install.
6. When it’s done, close the window and back to Server Manager. Click Tools and select Windows Server Backup.
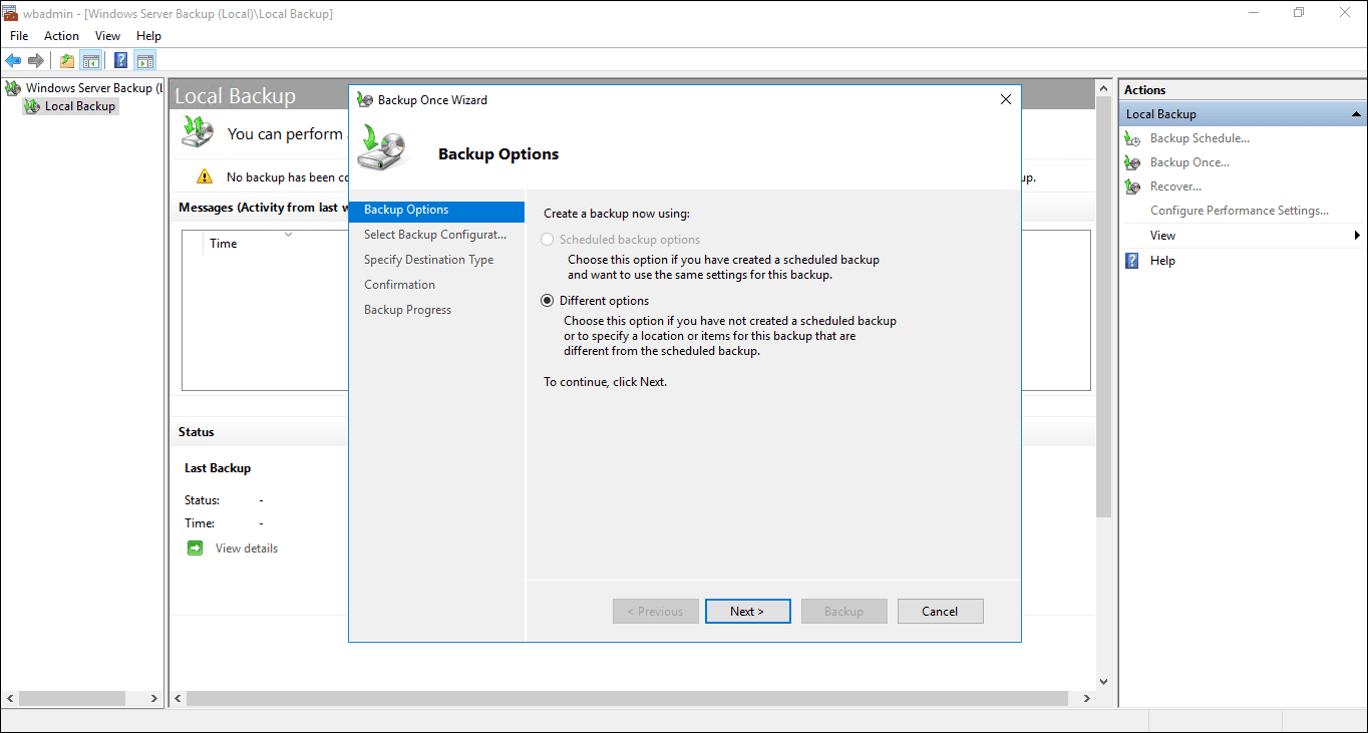
7. As you can see, you can choose Backup Schedule, Backup Once, and Recover in Actions menu. Here we click Backup Once.
8. In the pop-up Backup Once Wizard, select Different options and click Next.
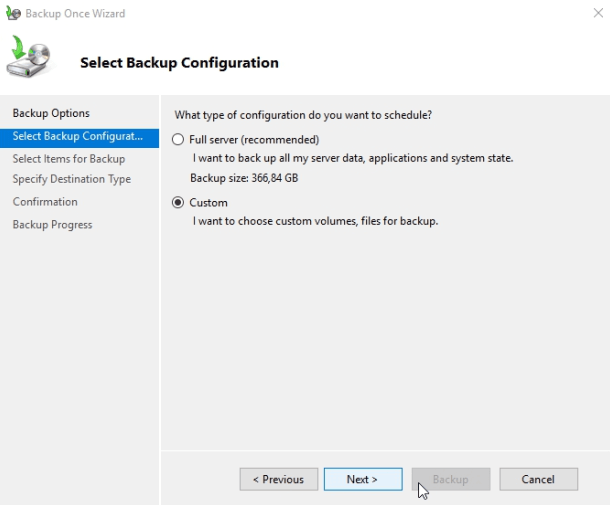
9. In the Select Backup Configuration page, you can select Custom to choose a specific folder or files. Then click Next.
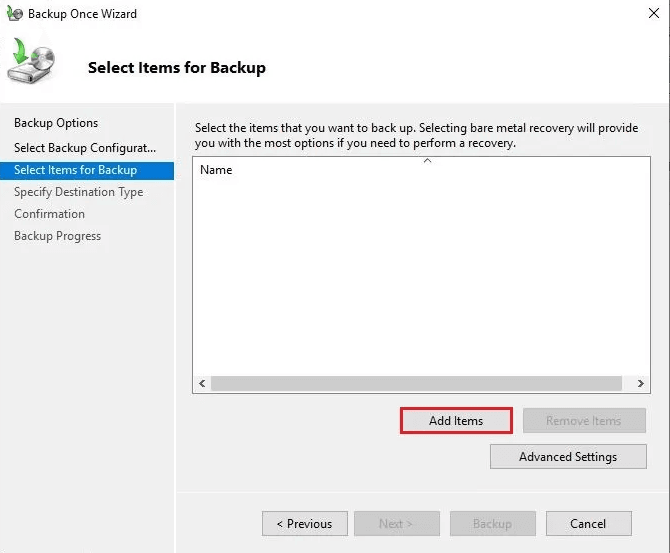
10. Click Add items to select the Hyper-V VM you want to back up.
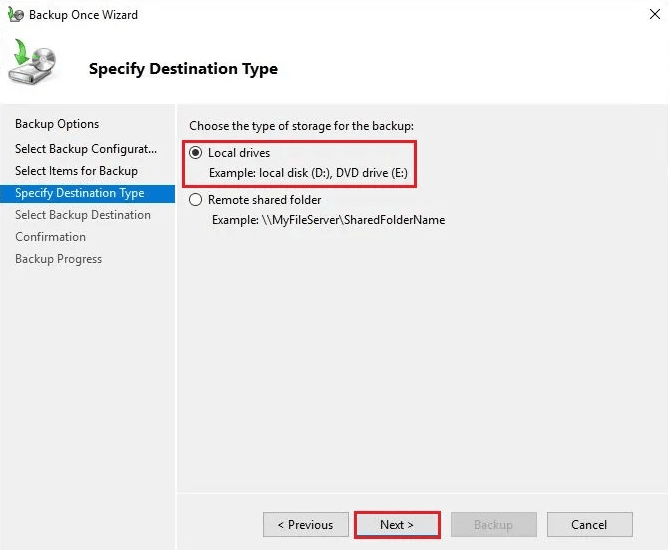
11. Specify a Destination Type and click Next. As you can see, you can choose backup to local drive or network share.
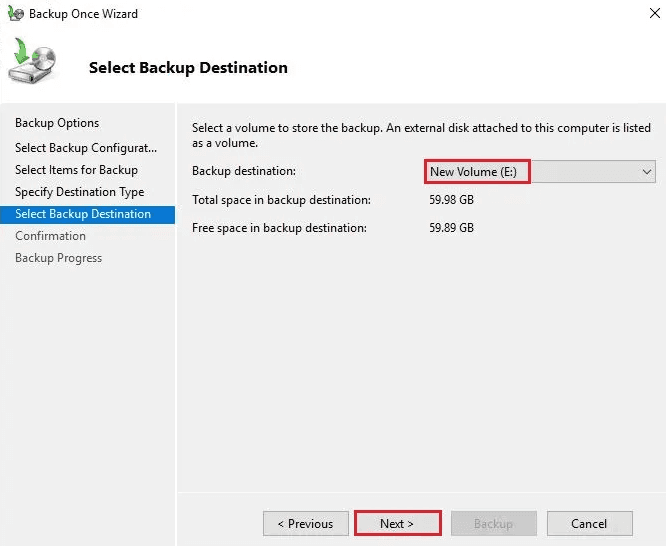
12. Select the Destination location and click Next.
13. Confirm the settings and click Backup to start. Thus you can restore Hyper-V VM from Windows Server Backup when necessary.
✎ WSB has an automatic disk usage management feature which can shrink the storage space allocated for snapshots to delete old backups and make space for new backups. But this feature often leads to failures of backups and other errors, because WSB will not shrink the storage space to less than 1/8 of target volume size.
Method 3. Backup Hyper-V VMs with System Center Data Protection Manager
You can also use System Center Data Protection Manager (DPM) to backup Hyper-V virtual machines. Here are the steps of how to use it.
Step 1. Download and install System Center DPM from the Microsoft website. Then run this tool.
Step 2. Click Protection > New to create a protection group.
Step 3. Click Next. Then choose Servers as the protection group. Then add your Hyper-V host or VMs.
Step 4. Configure your backup task in the following prompts.
Step 5. Then check the summary of the backup, and click Create Group.

Method 4. Best way to backup Hyper-V virtual machines (agentless and free)
Among the 3 ways introduced above, using the export feature you can only backup one VM at a time, while WSB can automatically backup multiple VMs, but again, its backup cleanup feature is very unstable.
Therefore, many Hyper-V users would choose to use a dedicated utility for better functionality. Here I will use AOMEI Cyber Backup, the agentless and free Hyper-V backup software that can schedule automatic backup tasks of multiple VMs and offer you the following benefits.
✤ Centralized VM Backup: create full and independent image-level backup for VMware ESXi and Hyper-V VMs from a central console.
✤ Multiple Storage Destinations: You can backup virtual machines to a local drive, external hard drive, NAS, or network share.
✤ Cloud Archive: Support archiving VM backup versions to an Amazon S3 storage.
✤ Automated Execution: create backup schedules to automate backups daily, weekly, and monthly.
✤ Role Assignment: allows one administrator to create sub-accounts with limited privileges.
✤ Email Notification: send email notification when the task is completed or abnormal.
✤ Backup Hyper-V while running: You don't need to turn off your Hyper-V VMs when running a backup task.
✤ Perpetual Free: you can use AOMEI Cyber Backup Free Edition with no time limit.
Below, I will illustrate how to backup Hyper-V virtual machines. You can click on the button to enjoy the perpetual free edition:
- ✍Notes:
- You can choose to install this VM backup software on either Windows or Linux system.
- If you want a guest-level Hyper-V VM backup, you can also install AOMEI Cyber Backup agent to your VMs and protect them like backup Windows physical machines.
✤3 quick steps to create automatic Hyper-V VMs backup tasks
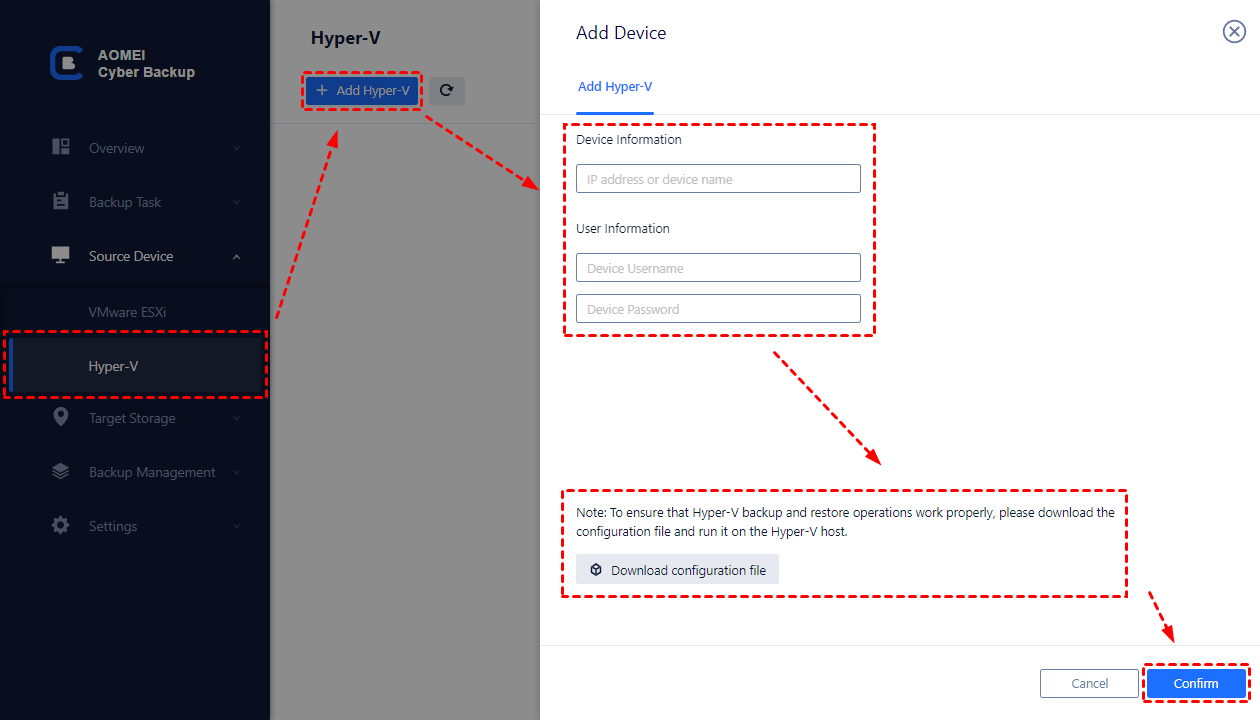
Step 1. Bind Devices
Navigate to Source Device > Hyper-V > + Add Hyper-V to add a host, and click … > Bind Device.
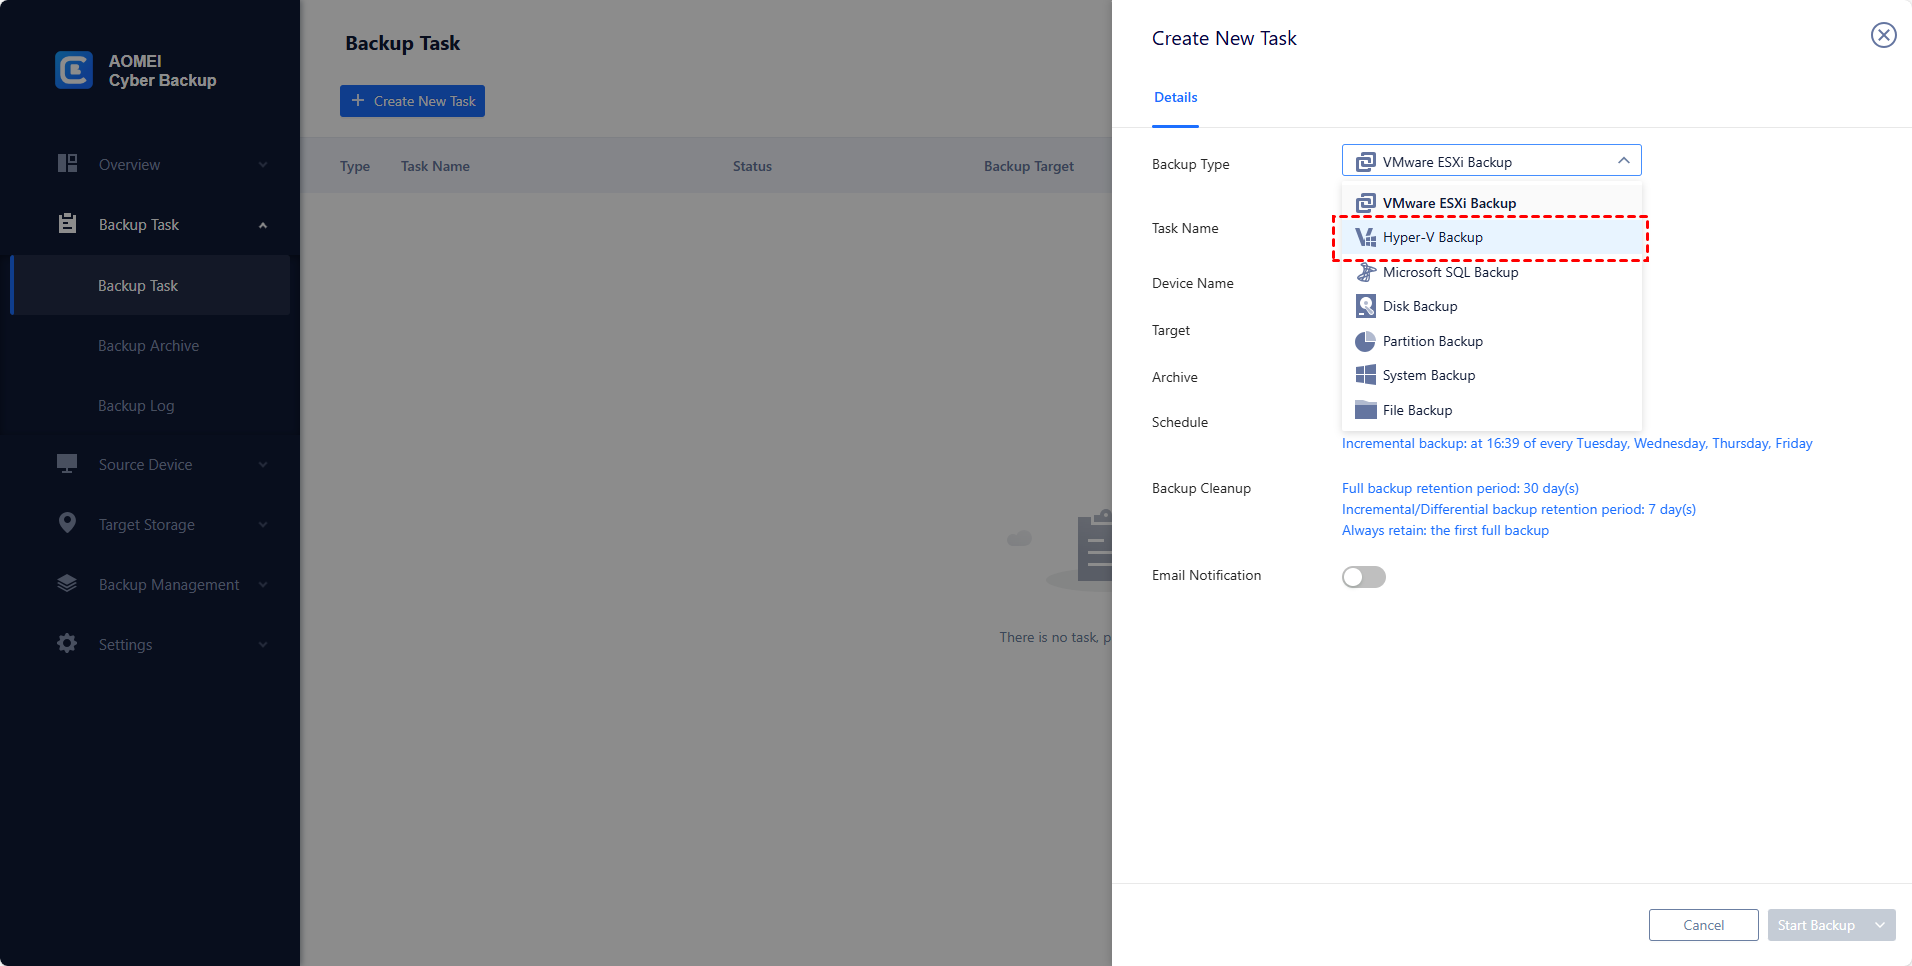
Step 2. Create Backup Task
Navigate to Backup Task > + Create New Task, and specify the Task Name, Backup Type, Device, Target, Schedule on a simple page.
- Device: Select the VMs on the host you want to back up.
- Target: You can select to back up to a local path, or to a network path.
- Archive: To add an Amazon S3 bucket, and archive backup versions to the S3 storage.
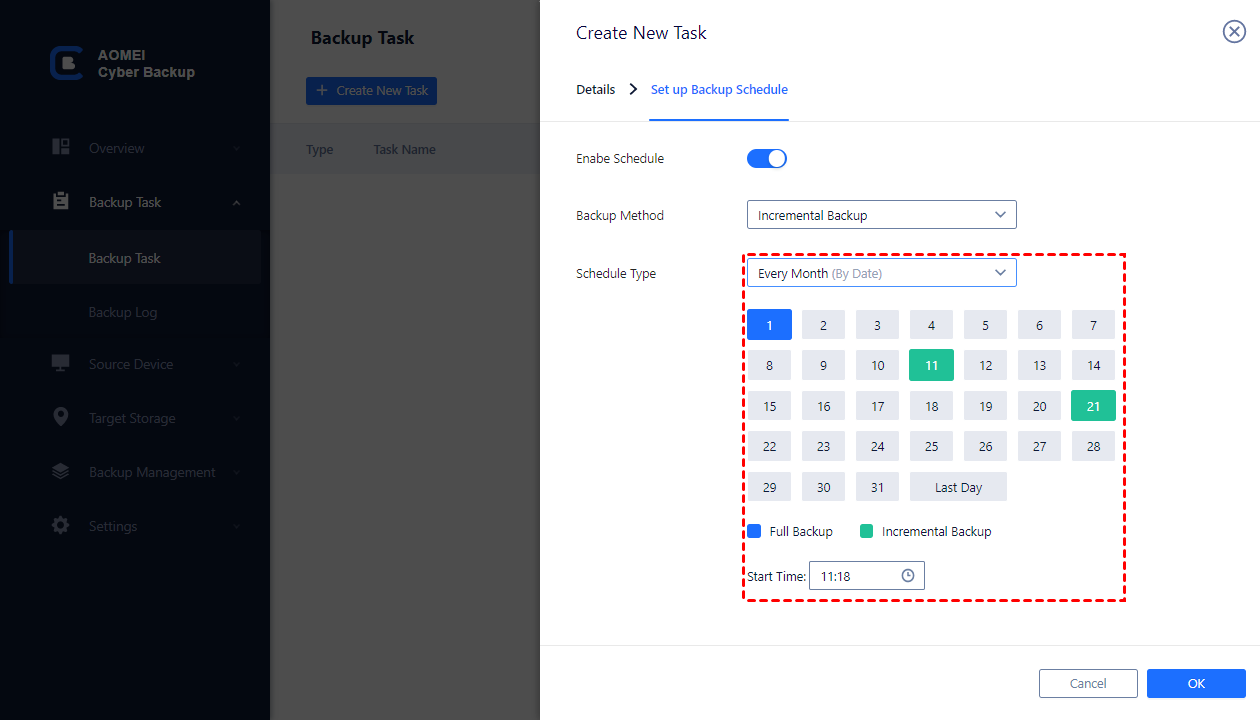
- Schedule: You can create a backup schedule to perform full, differential or incremental backup, and automate execution daily, weekly or monthly according to the frequency you specified.
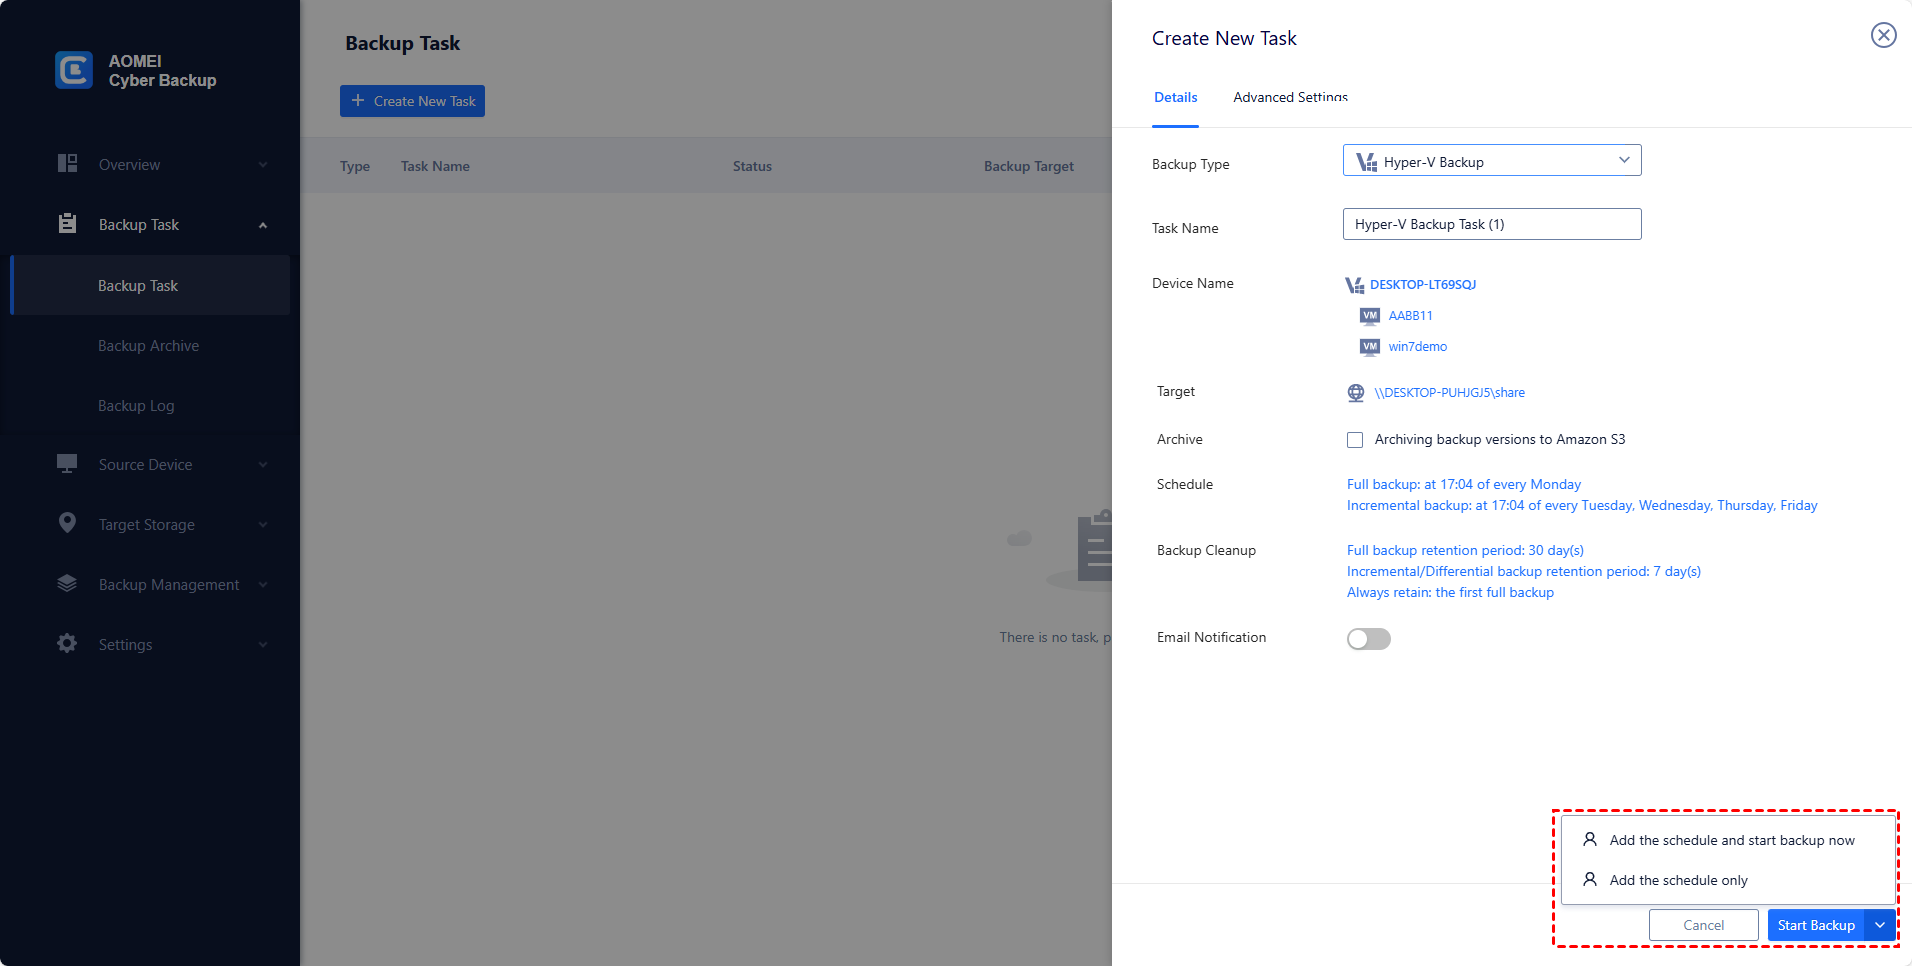
Step 3. Create and execute the backup
Click Start Backup you can select to Add the schedule only, or Add the schedule and start backup now.
✤ Restore Hyper-V from any backed up point
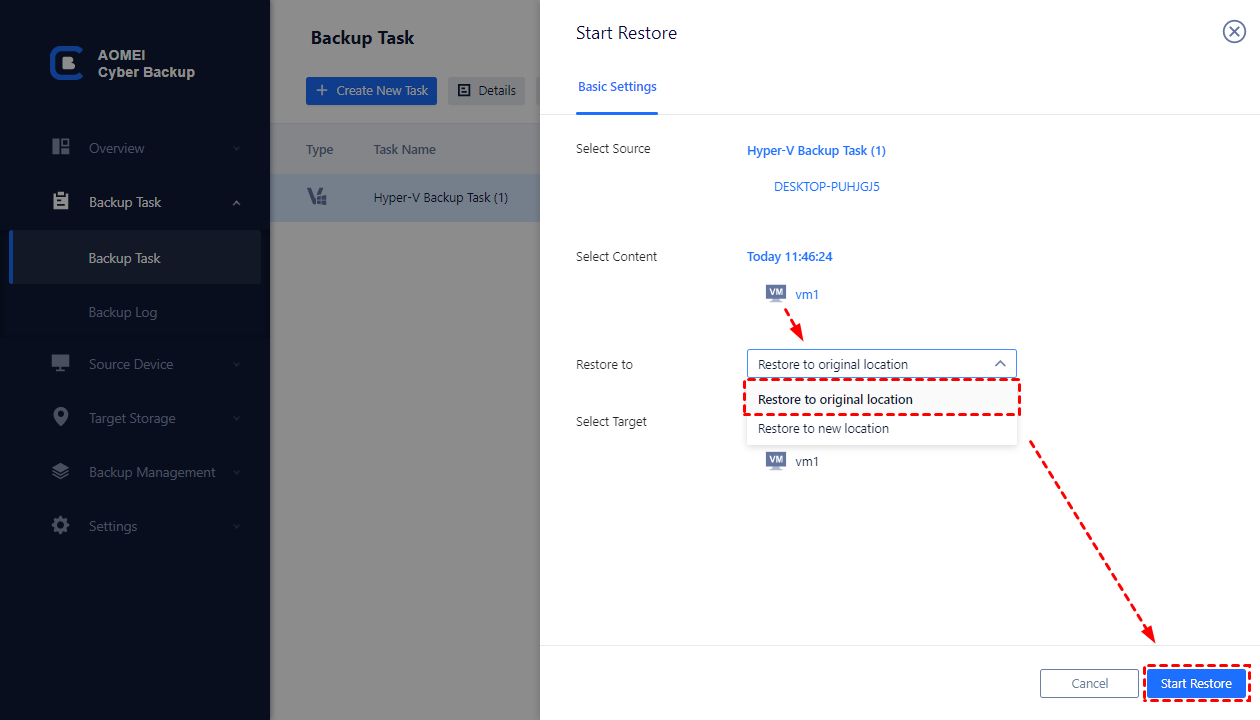
Simply navigate to Backup Management > History Versions and select the VM and restore point you want to restore to, click … > Restore and you can restore the entire VM to a usable state quickly and easily.
Then click Start Restore to perform the VM recovery.
✎ While the Free Edition has covered most of VM backup needs, you can also upgrade to enjoy:
Batch VM Backup: Batch back up unlimited numbers of VMs managed by hosts.
Backup cleanup: Specify a retention policy, and the old backups that exceed the limit will be auto deleted.
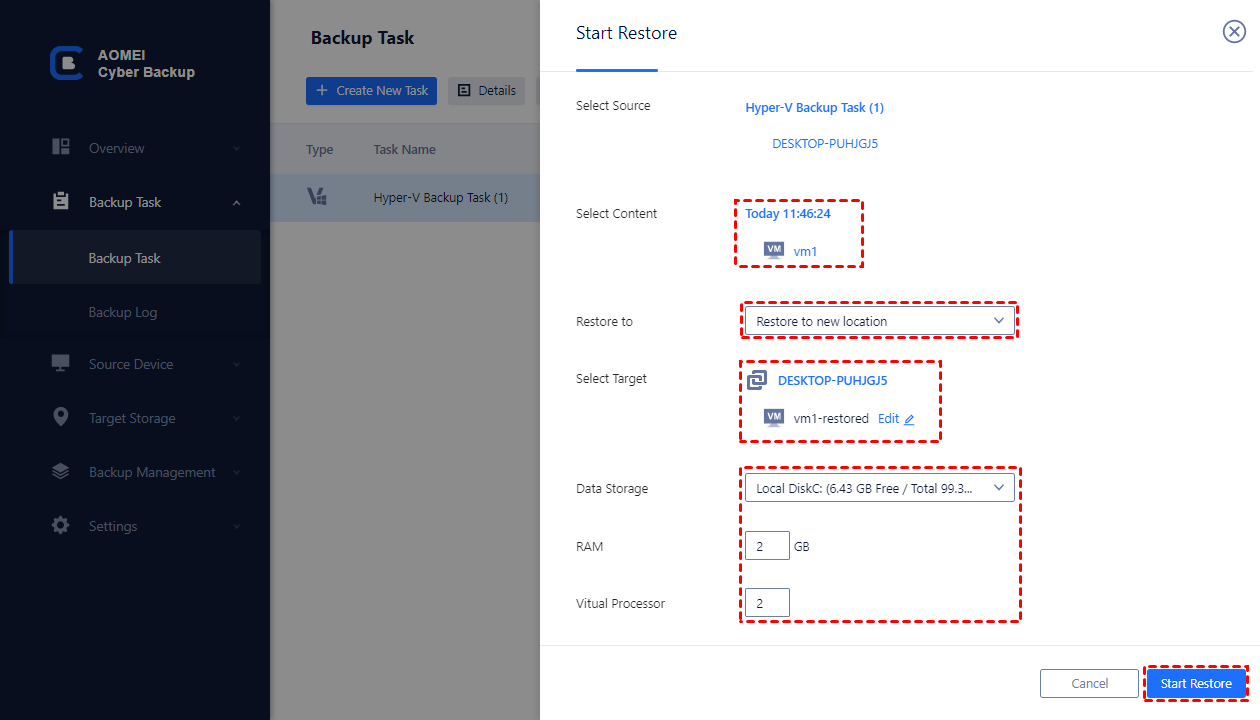
Restore to new location: Create a new VM from the backup to the original or another datastore, host, and reset the RAM and Vital Processor.
AOMEI Cyber Backup will record all operations made to the VMs, and separate error logs for easy reference and troubleshooting.
Summary
In this article, I'll introduce you to 4 methods of Hyper-V VM backup solutions, and provide you with step-by-step instructions on how to export your Hyper-V VMs and use Windows Server Backup or System Center DPM. Additionally, if you're looking for a professional Hyper-V backup tool, I highly recommend giving AOMEI Cyber Backup a try. With its advanced features and user-friendly interface, it's sure to meet all of your needs to backup Hyper-V VM.
Besides Hyper-V backup, you can also centrally manage and backup VMware ESXi VMs on AOMEI Cyber Backup.

