
Complete | How to Recover Deleted User Profile in Windows 10/11 [5 Ways + 1 Tip]
How to recover deleted user profile in Windows 10? There are 4 helpful methods that you can try. Also, it covers a simple solution to create regular backups for crucial data for free.
By Jonna / Updated on April 30, 2026
What Happens If Your User Profile Gets Deleted?
Each user who logs into a Windows computer has their own user profile. It can get corrupted or deleted due to disk errors, improper shutdown, registry errors, malfunction, malware or viruses, etc., causing the loss of your personal settings, documents, and application data.
Windows also removes this user profile from the logon screen, this brings up two scenarios:
#1. You are not able to log on to Windows again. In this case, you will need to enter Safe Mode to continue the operation.
#2. Alternatively, Windows may create a temporary profile, which allows you to use it only one session. Any changes you made won't be retained when you log off. So in the long run, you still need to find a way to recover the lost user profile data.
Let's discuss how to recover deleted user profile in Windows 10/11.
In order to permanently prevent data loss caused by accidental deletion and other accidents, it is recommended that you use professional backup software to automatically back up your computer. Click the jump link below! Get a free backup solution!
💡 Do Regular Backup in Case of Accidental Data Loss?
How to Recover Deleted User Profile in Windows 10
Case: I accidentally deleted my user profile
About 2 days ago, I removed files which I no longer use from my computer. I emptied the user profiles’ folder but find that my user profiles have disappeared. It is possible to be recovered?
If you accidentally delete your user profile, the best case is that it goes into the recycle bin and you can recover it with a simple click. However, if you delete the user profile permanently, or it gets corrupted due to some non-human errors, here are some effective solutions you can try:
| ✔ Method 1 | Recover deleted user folder without backup - quick way >>Details |
| ✔ Method 2 | Recover user profile via File History backup >>Details |
| ✔ Method 3 | Recover deleted user profile from Restore Point >>Details |
| ✔ Method 4 | Recover corrupted user profile via Registry >>Details |
| ✔ Better protection | Do regular backup to avoid accidental loss >>Details |
*The examples below are mainly based on Windows 10. If you are a Windows 7 user, please click here.
Way 1. How to Recover Deleted Users Folder without Backup
If you deleted the user profile by mistake, then most likely there won't be a prior backup (unless you have system restore points turned on, or have set up File History).
In this case, you need a data recovery tool to retrieve the deleted user profile even without previous backup, such as FastRecovery. With it, the whole data recovery process will be easy and effective.
- Recover 1000+ types of data: Word, PPT, Excel, Photos, Audios, Videos, Emails, Webpages, and Compressed files.
- Recoverable scope: Deletion, disk formatting, system crash, and more data loss scenarios.
- Advanced scanning: Quick Scan and Deep Scan detect all the deleted or lost files without omissions.
- Flexible layout: Organize and display data by Type or Path, allowing you to sort, search, filter, and preview files.
- Highly compatible: Support NTFS, FAT32, exFAT, and ReFS in Windows 11, 10, 8, 7, and Windows Server.
Retrieve your precious data with several simple clicks.
Here is a step-by-step guide to recover deleted user profile in Windows 10.
-
Don't download and install FastRecovery on the drive where you store deleted files, as this may cause data to be overwritten.
-
Any newly added data or disk formatting can overwrite data. Please avoid these operations after deletion.
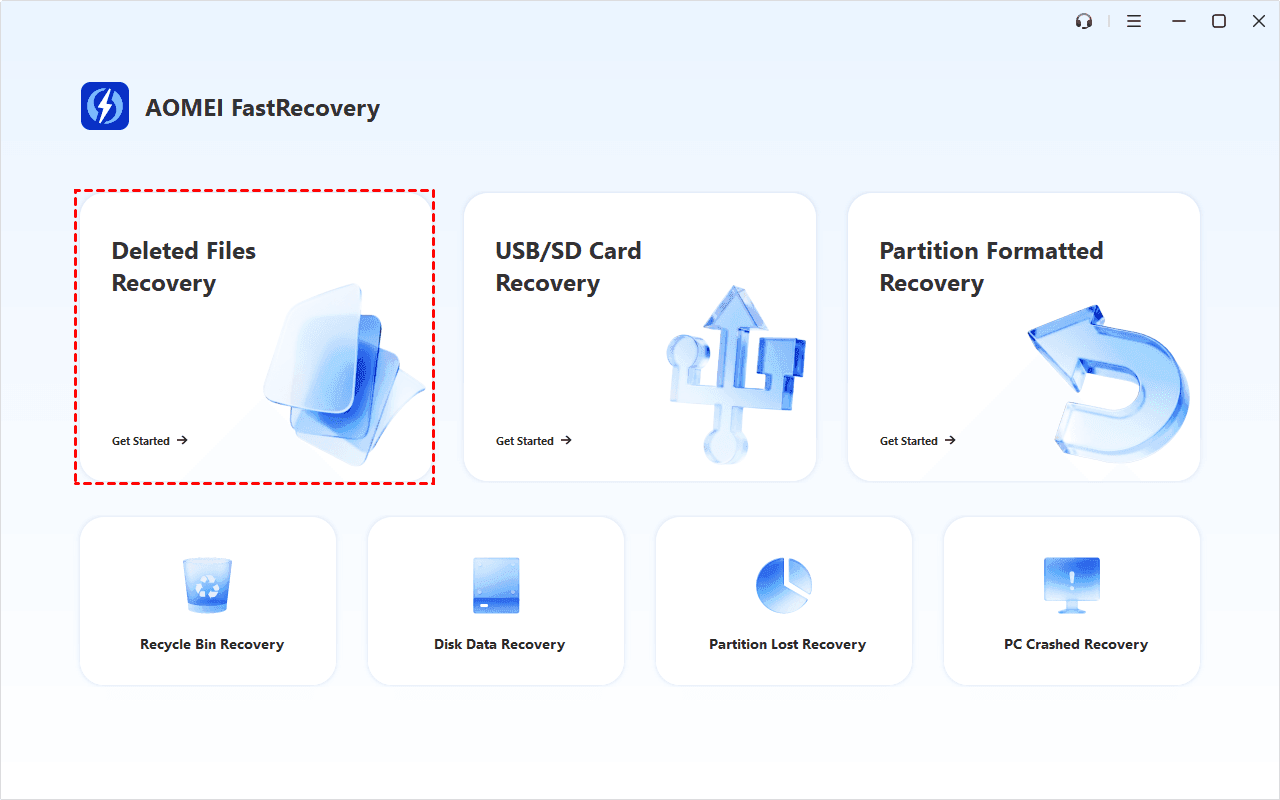
Step 1. Select a recovery option
After launching FastRecovery on your Windows, click Deleted Files Recovery. You can also choose a more suitable alternative, such as Disk Data Recovery, Recycle Bin Recovery, etc. All of them can help you retrieve data without causing any damage.
Step 2. Select the partition where the user profile was located
You'll see all available drives. Choose the partition where the accidentally deleted users folder was stored before (usually the C drive). Click Scan.

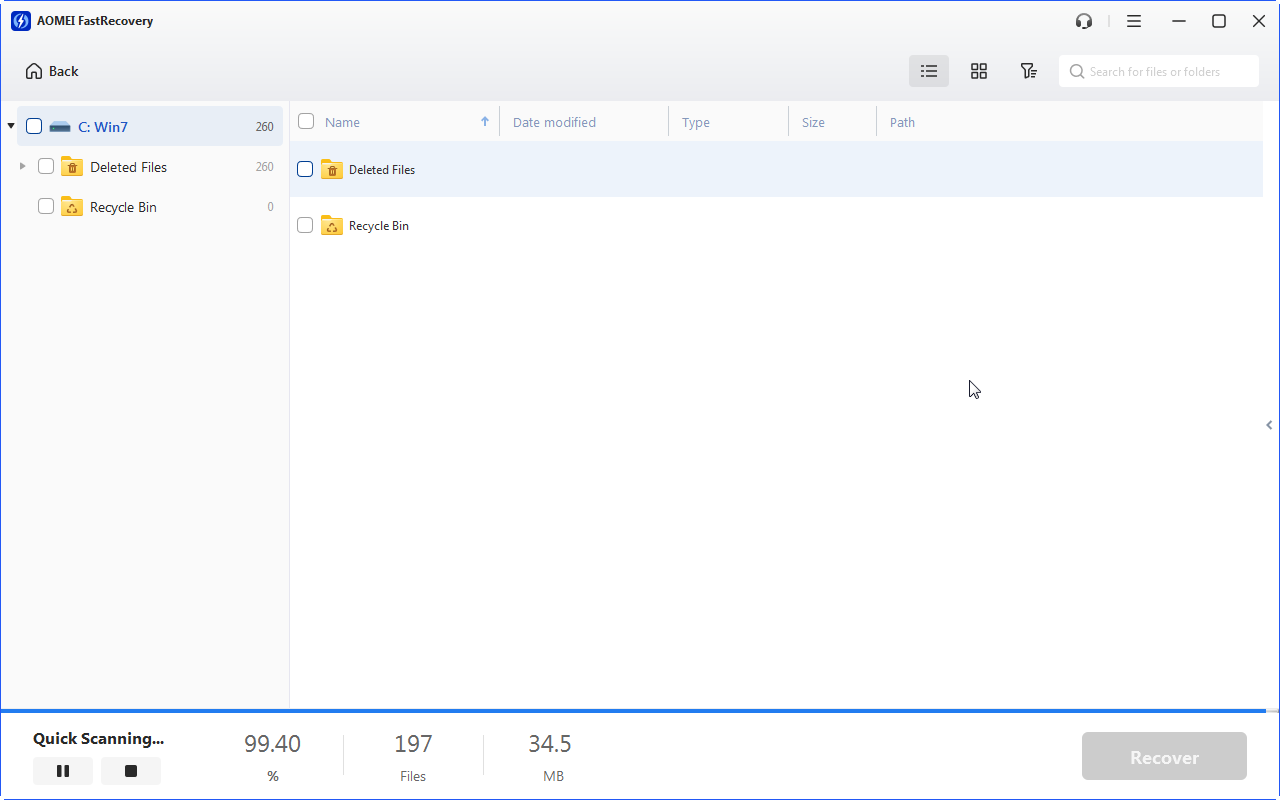
Step 3. Start scanning lost data
The scanning process will start with a quick scan automatically to find deleted or missing files. You can select files by Type (default) or Path, and combine them with options to sort, filter, search, and preview files.
- ⬆⬇Sort: Sort files by name, date modified, type, etc., on the right panel.
- 🔽 Filter: Specify the Type/Size (from Less than 512KB to 1GB above) to target your search.
- 🔎 Search: Type the file name or extension in the search box to locate deleted files precisely.
- 👁🗨 Preview: Double-click files to preview formats such as wav, ico, jpg, png, bmp, jpeg, tif, svg, gif, mp4, mp3, txt, xlsx, pdf, ini, docx, etc.
- The Type categories include all supported data types, including images, videos, documents, mails, web pages, compressed files, etc.
- If you can’t find the deleted or lost files, click Deep Scan to search the disk thoroughly. It will scan every sector of the disk to find files buried deeper in the file system.
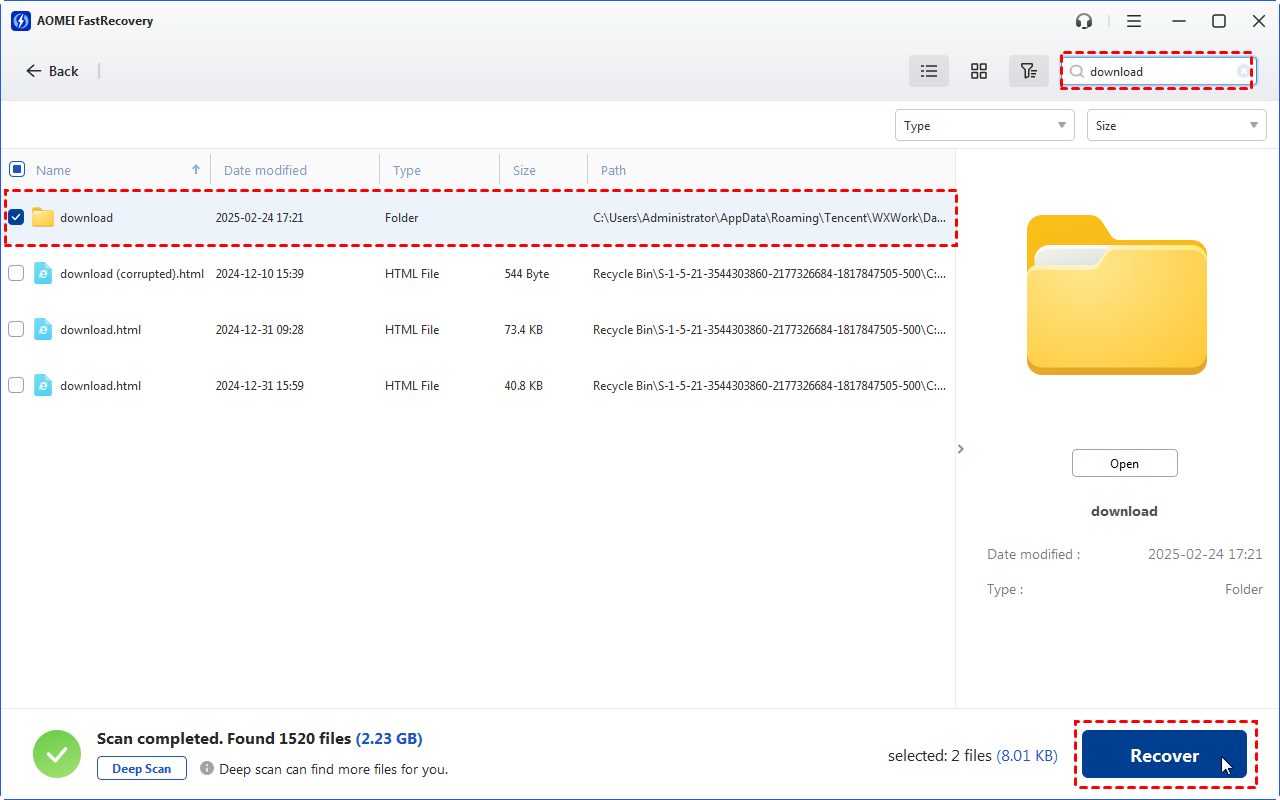
Step 4. Select the files you want to recover
Tick the deleted folder and click the Recover button to save the recovered user's profile.
-
Don't save the recovered files to the original location, as it may cause data overwriting.
-
The free edition only supports 500MB of data recovery. To recover a large number of deleted or missing files, consider upgrading FastRecovery to the advanced editions.
Way 2. How to Recover User Profile via File History Backup
If you have made a backup with File History, you can follow the guidance below to recover deleted files in Windows 10, 11.
Step 1. Type “file history” in the search box on taskbar.
Step 2. Select Restore your files with File History from the search results.
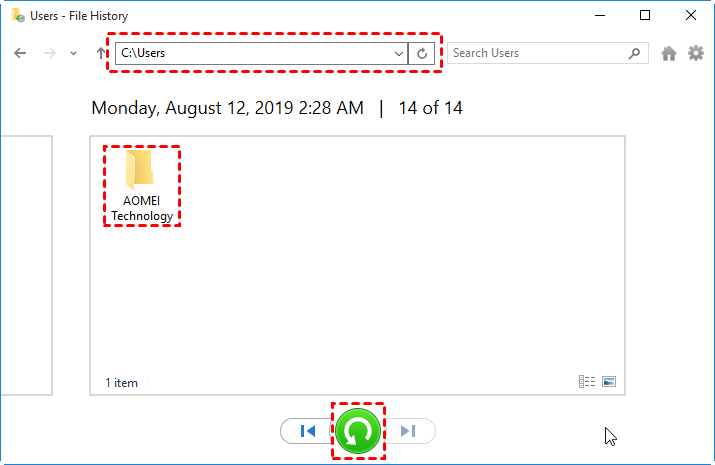
Step 3. In the pop-up window, choose the folder (C:\Users\folder) that user profile is usually located in.
Step 4. There may be different versions of this item. Find the version you’d like to restore.
Step 5. Click the Restore button to restore your desired version.
✍If Windows notices a naming conflict with the item you’re trying to restore, you should choose how to handle the conflict - Replace the File in the Destination Folder, Skip This File, or Compare Info for Both Files.
Step 6. Close the File History.
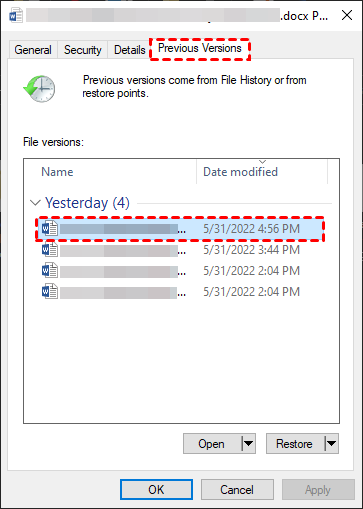
Alternatively, you can navigate to folder containing the data you want to recover. Right-click it and go to Properties -> Previous Versions. Select an earlier version from the list, and then “Restore” it.
Way 3. How to Recover Delete User Profile from Restore Point
System Restore Points are backup snapshots of your Windows system that can restore your system to a previous working state, thus fixing problems and helping you retrieve deleted or corrupted user profiles.
One of the benefits of this method is that it can be used even when you can't log on to Windows. But please note that all the apps, drives, and updates installed after the Restore Point will be removed. If you still want to try this way, please refer to the following steps.
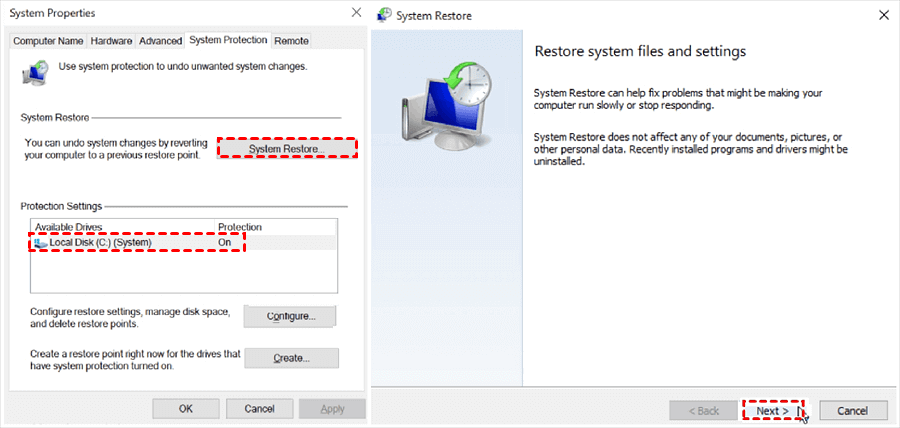
Step 1. If you can still log on to Windows, simply press Windows and enter Create a restore point. Then click the Open button.
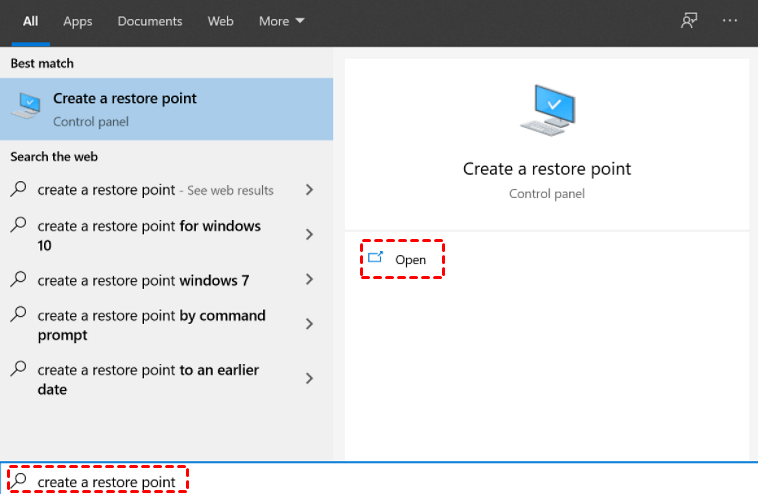
Click System Restore > Next.
*If you can't log on to Windows 10 after the user profile gets deleted, you can do this by holding down the "Shift" key at the login screen while clicking the Power button and selecting Restart.
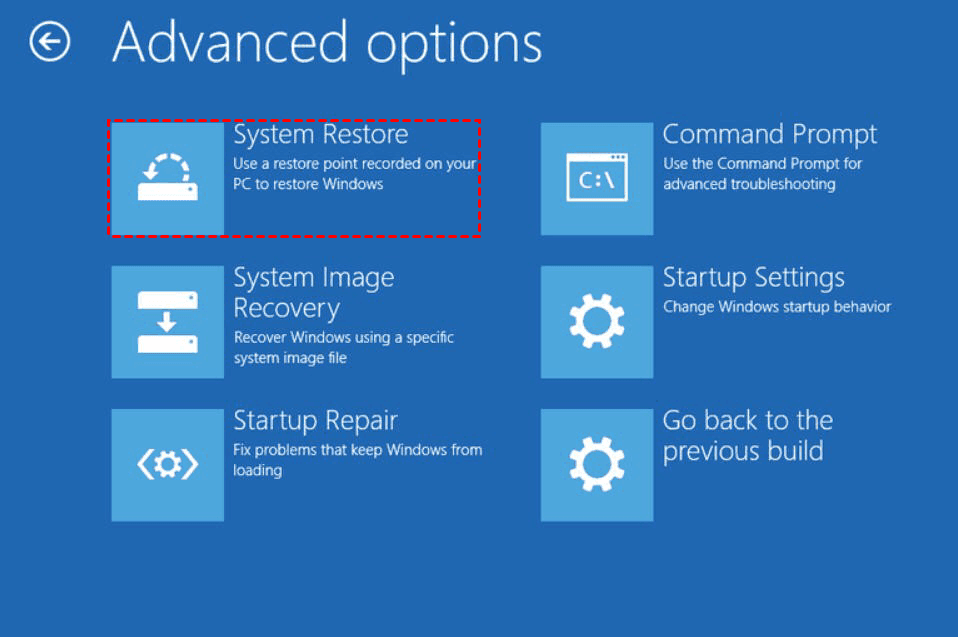
On the next screen, select Troubleshooting > Advanced options > System Restore.
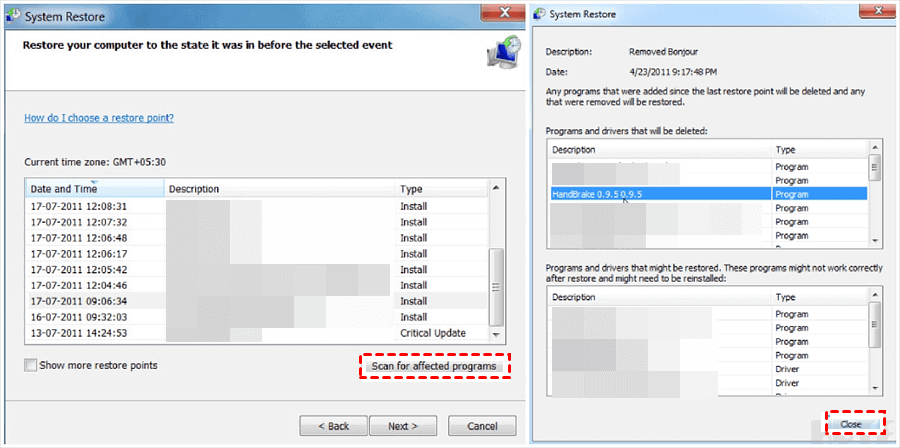
Step 2. Select a restore point from the list and Scan for affected programs to check items that will be removed. Then Close the window.
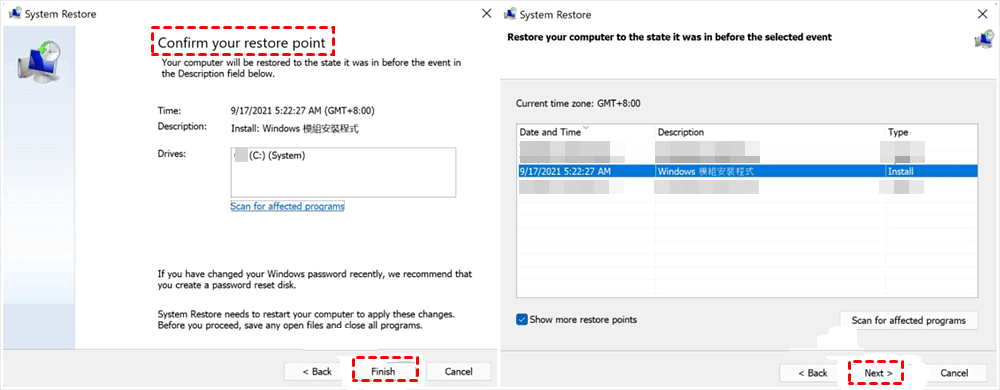
Step 3. Click Finish after confirming your desired restore point. Then click Next.
Step 4. Click Yes to start the restoration process. After restoring, Close the window. Please note that the System Restore cannot be interrupted during the restoration process.
Way 4. How to Recover Corrupted User Profile via Registry
The "ProfileList" registry key in Windows plays a crucial role in managing user profiles on a computer. It stores information about each user profile on the system, including their associated Security Identifiers (SIDs), profile paths, and other settings.
If your user profile gets corrupted, you can recover it in Registry. However, if the user profile is deleted, the SID associated with it will be removed without a backup in the Windows Registry, and you cannot recover the lost data from the deleted profile in this way.
If you are sure that the method is appropriate for your situation, please follow the instruction below step by step to recover your user profile.
Modifying the registry is risky and it is recommended that you make a backup before starting the operation. See also: Backing up the registry
Step 1. Find out your security identifier
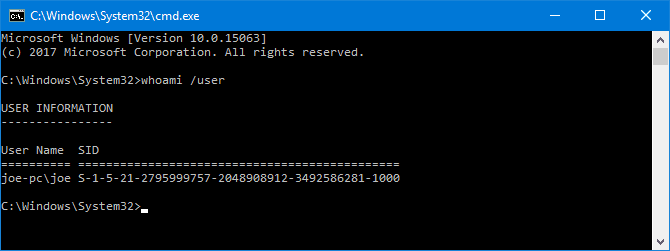
1. Open Command Prompt in administrator authority.
2. Type: “whoami /user” and hit Enter, then, you can see the SID of the current account.
Step 2. Edit the Registry
1. Type: “regedit” in the Search box and hit Enter to load Registry Editor.
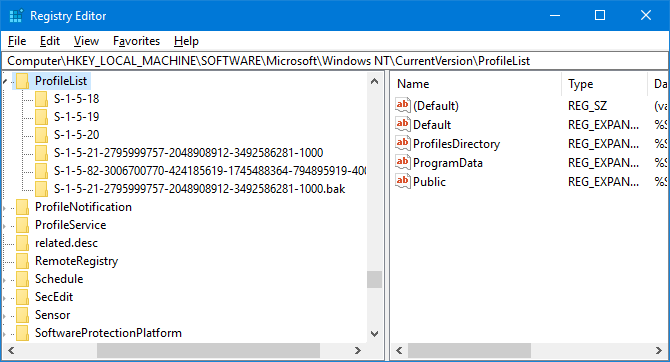
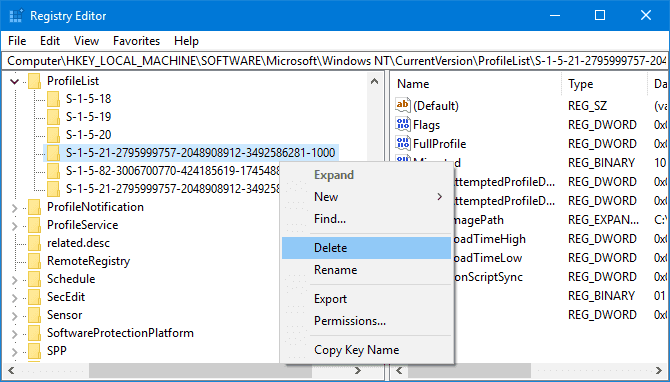
2. Click HKEY_LOCAL_MACHINE>SOFTWARE>Microsoft>Windows NT>CurrentVersion>ProfileList one by one on the left-hand pane. Then you will see a list of SIDs within the ProfileList folder.
Step 3. Recover deleted user profile in Windows 10
1. Check the list, if the SID is listed twice, you can delete the duplicate folder without the .BAK extension.
Right-click the folder from the left-hand pane and click Delete. Click Yes to confirm it.
2. When the SID is not listed twice, and the left one is a BAK folder, you need to rename it.
Right-click the folder with the .BAK extension, click Rename, and remove .BAK from the end of it. Press Enter to save the changes.
*If there are neither duplicate SIDs in the list nor a .BAK extension after the folder, then both of the above operations can be omitted.

3. Then you can adjust the folder path.
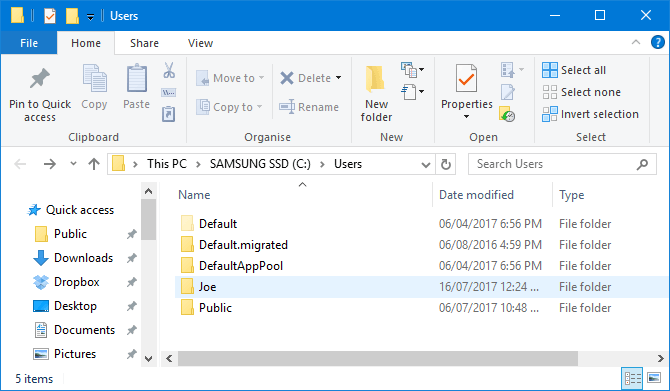
Click the folder on the left-hand pane that matches your SID. Double-click ProfileImagePath on the right pane, input the correct path for your user profile in Value Data.

Note: If you’re not sure what the correct path is, press Windows key + R to open Run, type C:\Users, and press Enter. You will see your user profiles like the following screenshot.
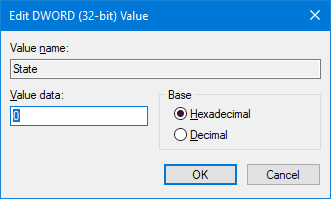
4. Double-click State on the right-hand registry pane, change the Value data to 0 and click OK.
Close the Registry Editor and restart your computer. Sign back into your user account and you should find that everything back to normal.
Do Regular Backup in Case of Accidental Data Loss
Obviously, if we made a backup in advance, we can restore the file directly anytime we need. However, File History has some disadvantages. For example, it can’t back up the entire system, and it does not support backup long path files. Moreover, sometimes you may find File History not backing up all files.
A professional third-party program like AOMEI Backupper Standard can be a better choice.

- File backup: free backup software for Windows 11/10 user files including profile and personal files.
- Automatic backup: backup files or system in daily, weekly, monthly, or event-trigger backup mode.
- Storage Support: backup files to external hard drive, cloud drives, or local disk, supporting all brands of storage device.
- Cloud Backup: allows back up to AOMEI Cloud (sign up for a 15-day trial with 1TB of free storage) if needed for personal data store.
You can refer to the following steps to do regular file backup.
Step 1. Download AOMEI Backupper Standard, install, and launch it.
Step 2. Click File Backup under the Backup tab. Optionally, you can choose System Backup to back up the entire system partition, thus the user profile and other system files, and settings will all be backed up.

Step 3. Click Select Source and then Add File or Add Folder according to your needs. Generally, the path of the user profile is C:\Users\[Username].

Step 4. Select a destination path. You can choose to back up to NAS, internal hard drive, external storage device, or cloud storage device.

Step 5. Click Start Backup to execute the task. When it's finished, you've got a backup file in hand.
You can choose to restore user profile or any other data from it by heading to Home > Restore.

FAQs on Recover Deleted User Profile on Windows 10
Conclusion
If you don't have any prior backups, the most effective way to recover deleted user profile in Windows 10/11 is to use data recovery software. But there's no 100% guarantee that your data can be retrieved.
From a data security perspective, it's always recommended to create backups regularly. AOMEI Backupper Standard is a good choice for system and files protection. With it, you don't need to worry about suchlike errors and accidental loss.
Also, if you are a Windows Server user, AOMEI Backupper Server can meet your needs.

