6 Easy Ways to Transfer Photos from iPhone to USB
How to transfer photos from iPhone to USB and flash drive? Here are 6 easy ways to upload pictures from iPhone to USB, it's effective for backing up iPhone data or freeing up iPhone space.
By Dylan / Updated on June 20, 2024
Why Need to Transfer Photos from iPhone to Flash Drive?
A lot of users need to transfer photos from iPhone to USB, whether you are a Windows or Mac user, you can get the best method here. So when might you consider "can you transfer photos directly from iPhone to flash drive?"
💡Transfer pictures that fill your iPhone
iPhone comes with amazing photography technology allowing users to take beautiful photos. However, as the photo quality is updated, photos take more storage space than before. You may get the "iPhone storage full" notification,so just migrate some photos to USB and free up some storage space on your iPhone.
💡Backup iPhone photos to USB
Transferring photos from iPhone to USB flash drive is a wise idea to avoid data loss. If you got some important pictures on your iPhone, you can create a backup on a USB drive or other storage device. Once you encounter a problem making everything on your iPhone lost, you can still have the extra copy of your photos. And USB comes with large storage and great portability, so you can take your photos wherever you go.

Next, we will introduce the 6 most commonly used methods of how to copy photos from iPhone to USB flash drive easily, which involves the best free iPhone data exporter.
| 💡 FoneTool | Easiest way to transfer photos from iPhone to USB quickly. >> Full Steps |
| 📘 Photos App | A Windows built-in app that helps you transfer the camera roll. >> Full Steps |
| 📙 Windows Explorer | Go to DICM folder and copy and paste your iPhone photos. >> Full Steps |
| ☁ iCloud | Sync photos from iPhone to USB via cloud server. >> Full Steps |
| ⌨ Mac Image Capture | Import all iPhone pictures to USB via Mac built-in tool. >> Full Steps |
| 📱Without comptuer | Share iPhone photos to the connected USB drive/flash drive with adapter. >> Full Steps |
Part 1. How to Transfer Photos from iPhone to USB on PC/Mac
We will show you how to upload photos to flash drive from iPhone using Mac and PC, if you don't have a computer nearby, don't panic. You can directly swipe to Part 2 to learn how to transfer photos from iPhone to USB stick without computer.
📍 View the video tutorial to learn the transfer tips
Method 1. Easiest Way to Transfer Pictures from iPhone to Flash Drive
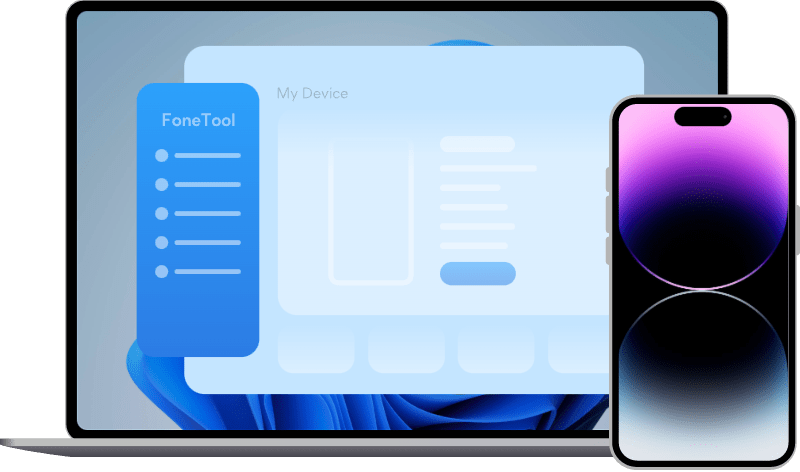
FoneTool is a professional and free iOS transfer software. You can easily transfer iPhone data like photos, music and contacts to another destination, including USB, flash drive, external hard drive, Windows PC, etc. The intuitive interface allows users without any computer knowledge to transfer iPhone photos to USB without network.
- Supports Various Pictures. Transfer photos stored in Camera Roll and any other albums.
- Transfer What You Need. Preview and transfer all photos or selected ones as per your needs.
- Without Compression. FoneTool transfers full-resolution photos to flash drive without losing quality.
- Wide Compatibility. Supports all iPhone models and the latest iOS, as well as USB/HDD/SSD/CD/PC/laptop.
Click the download button to install FoneTool and upload photos from iPhone to USB flash drive safely and quickly by following the guidelines below, FoneTool supports different USB brands.
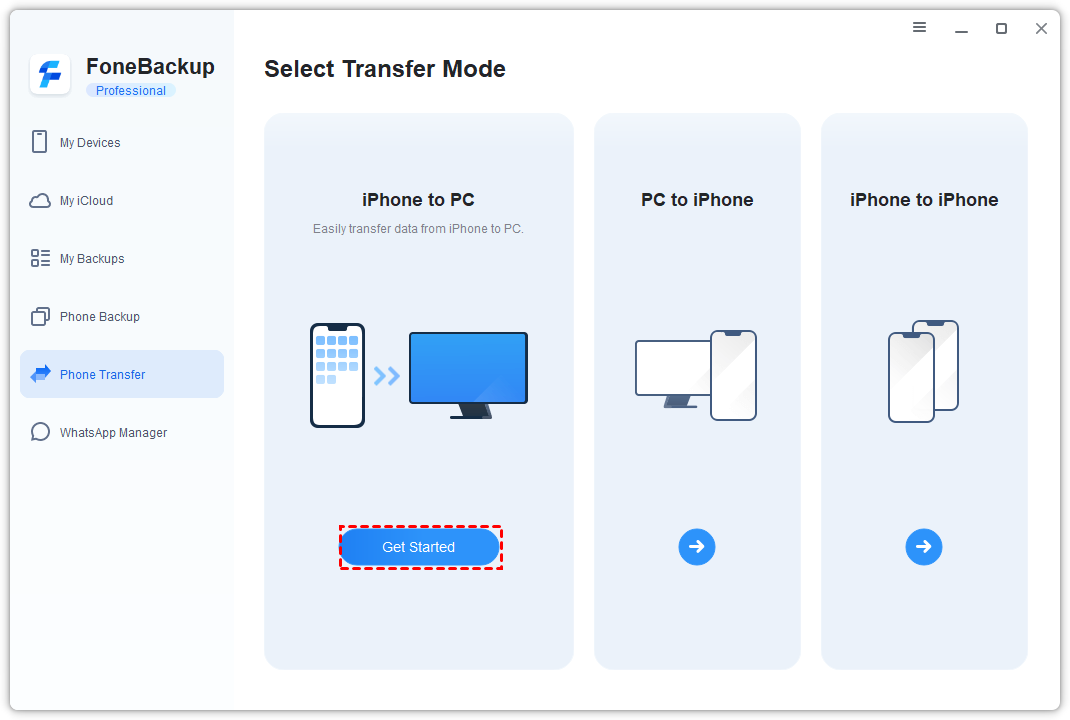
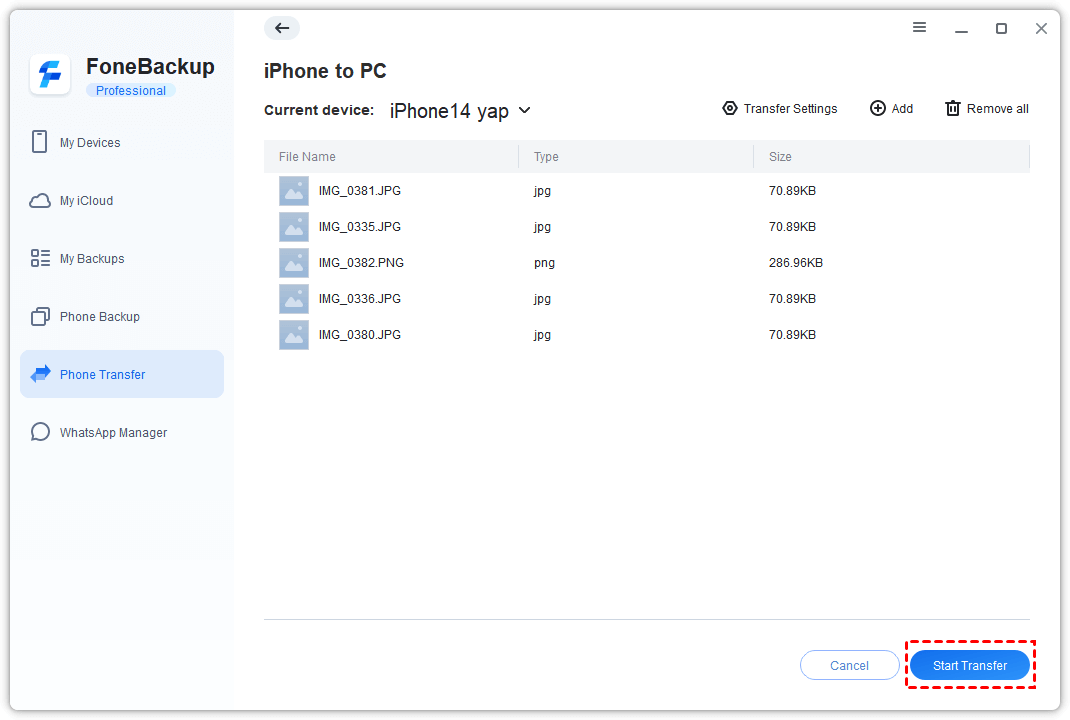
Step 1. Connect your iPhone and USB flash drive to your computer, click the Phone Transfer option > Go to iPhone to PC > Click Get Started.
Besides transferring iPhone data to flash drive, it can also import files to an iPhone, offering professional backup solutions to protect it from loss.
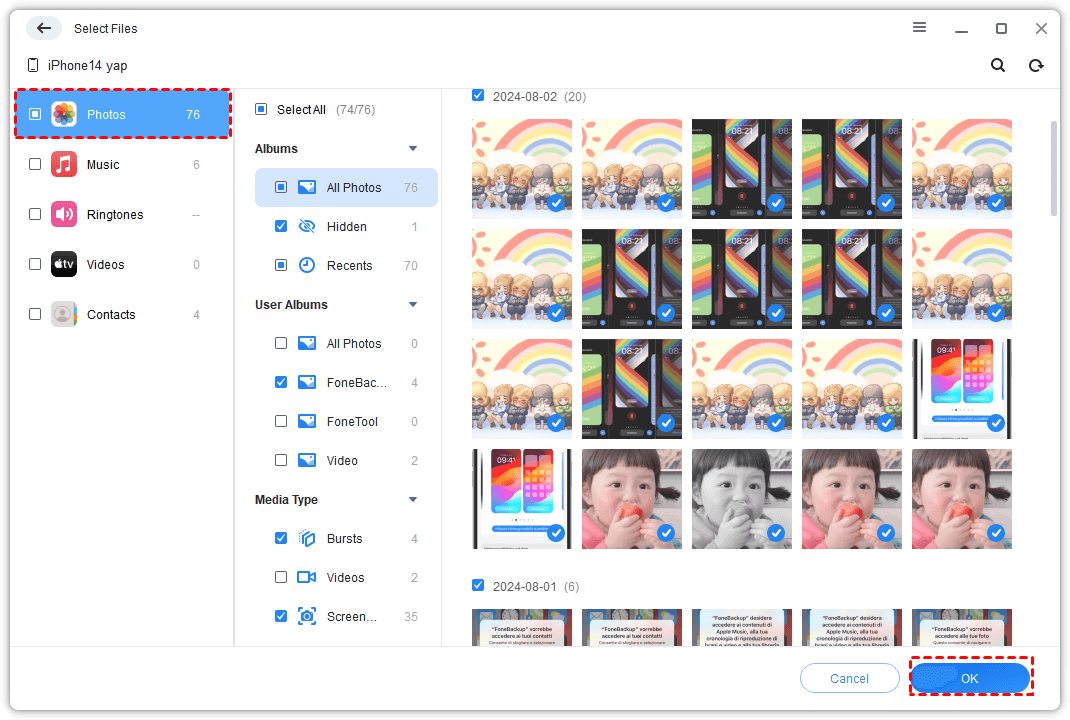
Step 2. Under the Photos tab, select the pictures you want to transfer and click OK.
Step 3. Choose your USB flash drive as the destination from the Transfer Settings option. Then click Start Transfer to begin the task.
Wait for the process to finished, then all these selected pictures are saved on your USB flash drive. It's complex to transfer photos from iPhone to USB without computer, so FoneTool is the best phone data transfer tool. If you're looking for other options, read on below.
Method 2. Upload Photos from iPhone to USB Flash Drive via Photos App
"Photos" is a Windows photos manager that helps you export Camera Roll photos from iPhone to Windows 11, 10, 8, 7 computers. Then you can save them to an external USB drive.
How to transfer pictures from iPhone to flash drive
Step 1. Connect your phone and unlock it. Then click Trust and type the password if you are asked to Trust this computer.
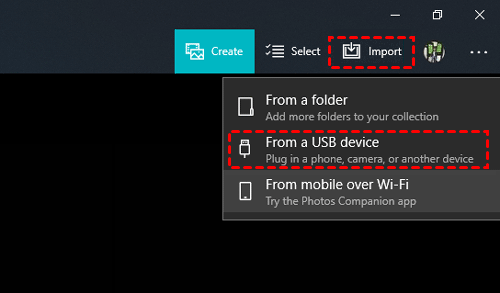
Step 2. Click Import and select From a USB device. After that, it will automatically detect your photos on the iPhone, you just need to wait for a few minutes.
-
If you encounter the problem that the iPhone not importing photos issue, you can click to go to solve it.
Step 3. Select the photos you don’t want to import because all the new photos will be checked by default. Then, click Import Selected. After the operation is 100% completed, you can see it in your Pictures folder.
-
That's right, this method can't save the image directly to the USB Drive path, and you may need to spend more time doing it step by step.
Step 4. Insert the flash drive into the USB port and create a new iPhone pictures folder. Copy and paste those pictures into this folder.
Method 3. Transfer Pictures from iPhone to Flash Drive via Windows Explorer
File Explorer is a built-in function of a Windows PC with which you can view and manage files on your devices and drives. You can use it to transfer pictures from iPhone to a thumb drive.
How to transfer iPhone photos to flash drive using Windows Explorer
Step 1. Connect your iPhone and unlock it. Connect USB flash drive to computer and create a new folder called iPhone Pictures in it. Then, click Trust to allow your computer to access your photos.
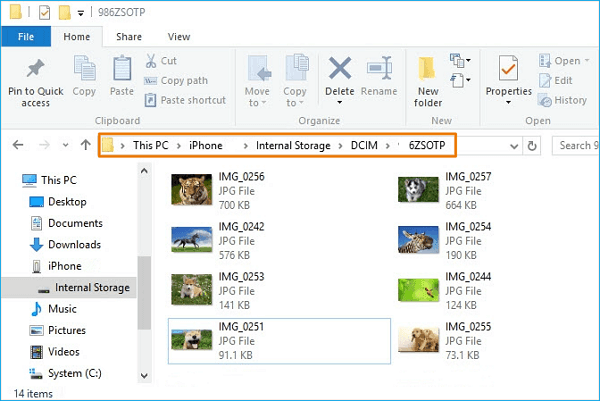
Step 2. Go to Computer or This PC, and you see a new device named xxx iPhone.
Step 3. Then, double-click the iPhone and open Internal Storage > DCIM folder, then preview your photos here and download photos from iPhone to flash drive via Copy and Paste.
-
Sometimes you can't find the DCIM folders on your computer because the connection has not been successfully built. If you have that problem, refer to this guide: Fix iPhone Internal Storage not Showing or Empty DCIM Folder.
Method 4. Transfer Photos from iPhone to Flash Drive via iCloud
Firstly, please make sure there is enough iCloud space. This method allows you to upload all your photos to iCloud and then download them to any networked computer. However, iCloud's free space must be larger than the space occupied by the photo. iCloud offers 5GB of free space, you may need to upgrade your iCloud storage before you can store more photos.
How to download pictures from iPhone to flash drive
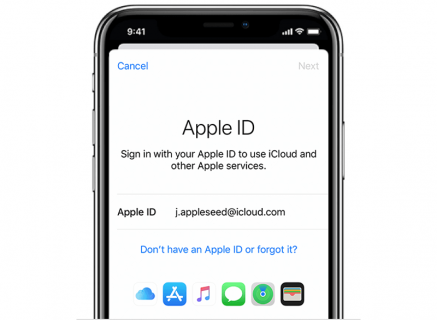
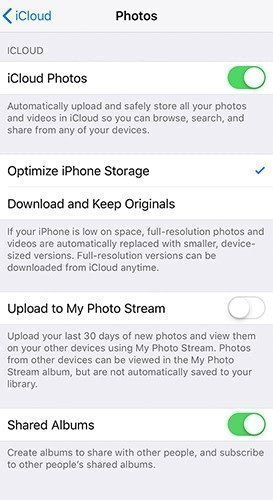
Step 1. Open the Settings of the iPhone. Enter the Apple ID. And go to iCloud > Photo.
If you haven’t logged in, tap Sign in to the iPhone, enter your Apple ID and password, and click Sign in.
Step 2. Click on the iCloud Photo switch. Then, as long as Wi-Fi is connected, the photos and videos on the phone will be uploaded to the iCloud account.
- If you have a lot of photos, you may need to upload them for hours and be patient.
- If you want to save iPhone storage, tap Optimize iPhone storage to keep smaller versions of your photos on your device.
Step 3. Download and open iCloud on your computer. In a web browser, go to https://www.icloud.com/.
Step 4. Log in to iCloud, and then go to the Photos app. Click the Photos tab in the upper left of the page.
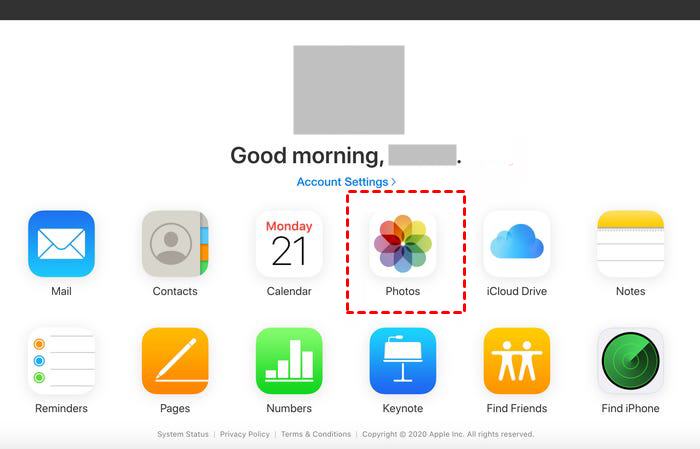
Step 5. Select the photo you want to download. Hold down Ctrl (Windows) or Command (Mac) and click on each photo you want to download.
Step 6. Click the Download button. And then Insert the USB disk, and create a new folder called iPhone pictures.
Step 7. Copy and paste the image file imported into the computer and move it to the USB. Alternatively, you can also complete how to transfer photos from iPhone to Sandisk with the above steps.
Method 5. Save iPhone Pictures to Flash Drive on Mac Image Capture
If you are using Macbook, you can use the built-in Image Capture software to save iPhone photos to a thumb drive.
How to transfer photos from iPhone to flash drive on Mac Image Capture
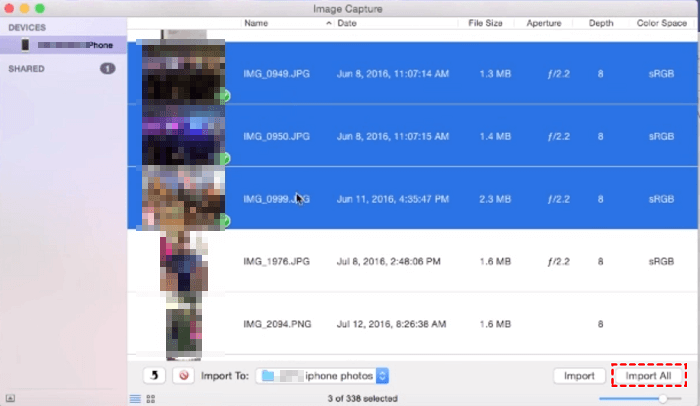
Step 1. Make sure your iPhone and flash drive are connected to your Mac. Run Image Capture on your Mac.
Step 2. On the left side of the interface, choose your iPhone under the Device section. Let Image Capture import your photos.
Step 3. At the bottom of the Image Capture, you can select a location to save your photos. Then click Import All to start the process.
Part 2. How to Transfer Photos from iPhone to USB Stick Without Computer
How to move photos from iPhone to flash drive without a computer? You just need a Lightning to USB adapter to connect your iPhone directly to the USB flash drive. This allows for seamless file transfer from your iPhone to the USB drive.
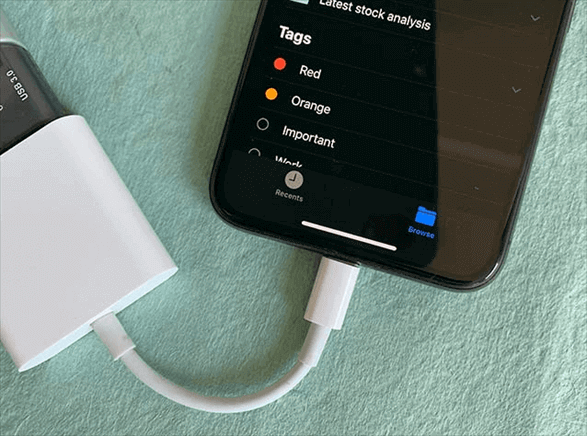
If you prefer to transfer data from your iPhone to a USB drive without the assistance of a computer, you can follow these steps using an external USB adapter for your iPhone:
Step 1. Please connect your USB drive and iPhone to the Lightning to USB adapter.
Step 2. Launch the Files app on your iPhone.
Step 3. Locate the files (such as photos, music, and videos) you wish to transfer. Tap and hold on to them to initiate the copy action.
Step 4. Return to the Files app and select your USB drive as the destination to paste the copied files.
Transferring files from an iPhone to a USB drive through the Files app is a straightforward process. Simply follow the step-by-step tutorial provided above, and you'll be able to transfer your data from your iPhone to a USB drive within minutes.
Conclusion
Here we discussed 6 methods of how to transfer photos from iPhone to USB flash drive. They can help you to transfer pictures from iPhone to Sandisk, Samsung flash drive based on your need.
We recommend you to use FoneTool, which not only performs well in iPhone transfer (fast, powerful, and secure), but also provides iPhone full backup/selective backup, photo duplication, iCloud data and cloud storage management, etc., which is a powerful helper for you to manage iOS data.