


Quick Start Guide | SQL Server Management Studio Backup
SQL Server Management Studio is the most commonly used tool to back up our SQL Server databases. This article shows you how to use SQL Management Studio to meet different backup needs.
By Crystal / Updated on October 28, 2024
SQL Server Management Studio Backup Guide
SQL Server Management Studio (SSMS) is an integrated environment for managing the SQL Server infrastructure. It provides tools for configuring, deploying, monitoring, and managing SQL Server instances, which you can use to upgrade data-tier components, generate SQL Server database scripts or execute queries.
With the graphical interface of SQL Server Management Studio, any general user and developer can perform most SQL Server database operations and management, without using complex SQL statements, including the daily database backups.
This article shows you how to use SQL Management Studio backup databases.
![]()
How to Create Backups using SQL Server Management Studio
Using SQL Server Management Studio to backup SQL Server databases is almost the first choice for most users. In addition to creating different types of backups, we may also need to back up databases to different locations, back up multiple or all databases, create automatic SQL backup and delete tasks, back up individual tables, etc.
📌Tip: There is also a professional backup software AOMEI Cyber Backup to backup and restore SQL Server databases.
In the following, I will describe the detailed steps to achieve them:
👉Creating Different Types of Backups for Single Database
👉Backup SQL Server Database to Different Locations
👉Using SQL Management Studio to Backup All Databases
👉Schedule Automatic Backup and Deletion Task with SSMS
👉Generate Scripts to Copy Tables to Another Database
Creating Different Types of Backups for Single Database
To meet different needs, SQL Management Studio supports many backup types. This section will show you the detailed steps of the following 5 common types of backups:
- Full backup: This is the most common backup type, and also the simplest and most basic one. A full backup contains all database objects such as tables, indexes, views and stored procedures, and transaction logs needed when restoring.
- Differential backup: A SQL Server differential backup only captures the data that has changed since the last full backup. The time to restore a differential backup is shorter than that of a full backup.
- Transaction Log Backup: A transaction log backup captures all transaction logs that record the changes to the database since the last transaction log backup. It is used to restore the database to a specific point in time.
- Copy-only backup: A MSSQL copy-only backup is completely independent of the SQL Server database backup sequence, and does not interfere with the subsequent differential backup and restore.
- Backup Encryption: SQL Server 2014 and later versions provide the option to encrypt backups when they are created. Before enable SQL Server Backup Encryption, you need to create and back up the database master key and certificate.
✦ Creating Full, Differential, or Transaction Log Backups
1. Launch SSMS and connect to your instance.
2. Expand Databases. Right-click the database name you want to back up, and select Tasks > Back Up…
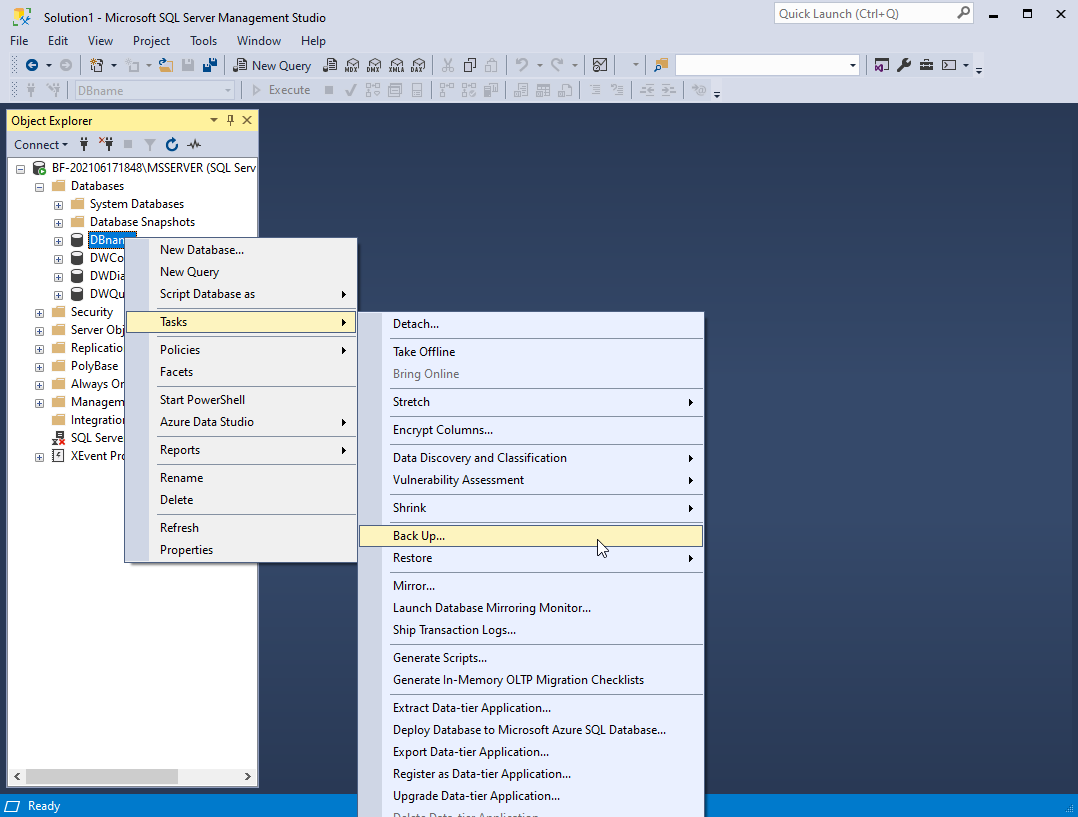
3. In the pop-up window, select Full, Differential, or Transaction Log in Backup type.
Note: If you want to create differential backup or transaction log backups, please create a full backup in advance, as the differential or incremental base.
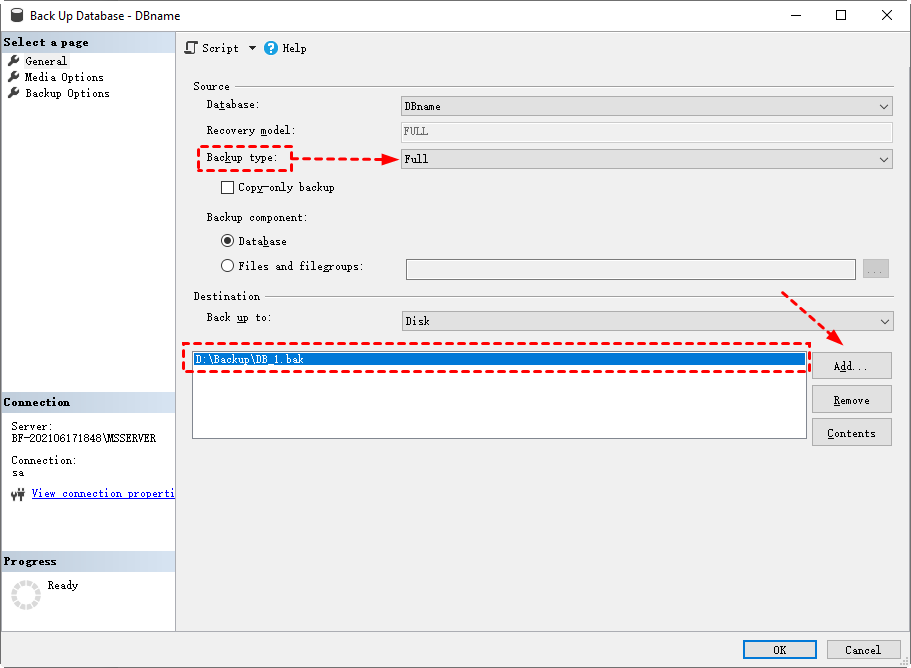
4. Click Add… to specify a Destination location. Name this backup file with the suffix .bak in File name.
5. Click OK to execute.
✦ Creating a Copy-only Backup with SSMS
1. Launch SSMS and connect to your instance.
2. Expand Databases. Right-click the database name you want to back up, and select Tasks > Back Up…
3. In the pop-up window, select Full or Transaction Log in Backup type.
4. Check the Copy-only Backup option below Backup type.
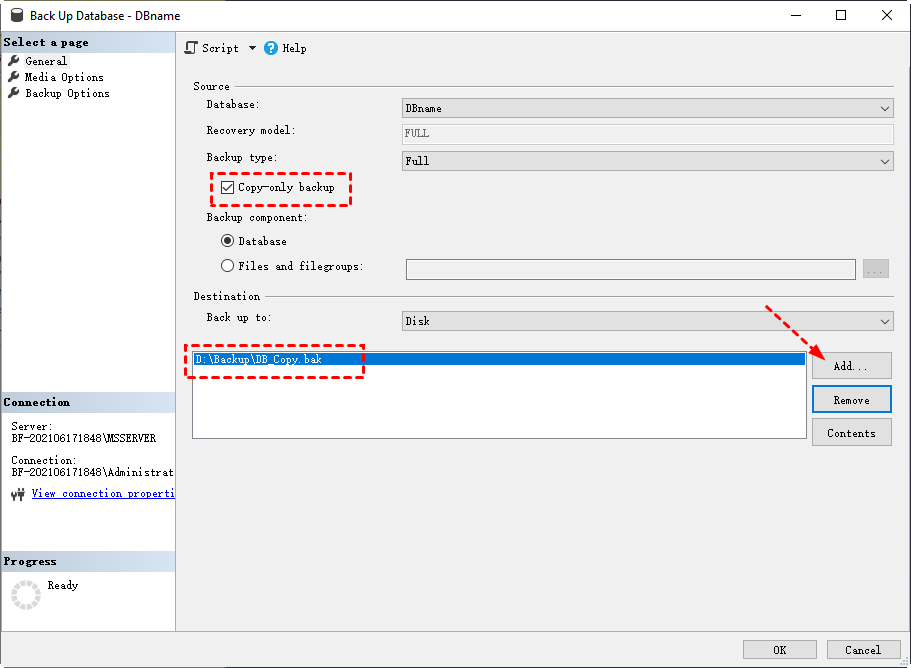
5.Click Add… to specify a Destination location. Name this backup file with the suffix .bak in File name.
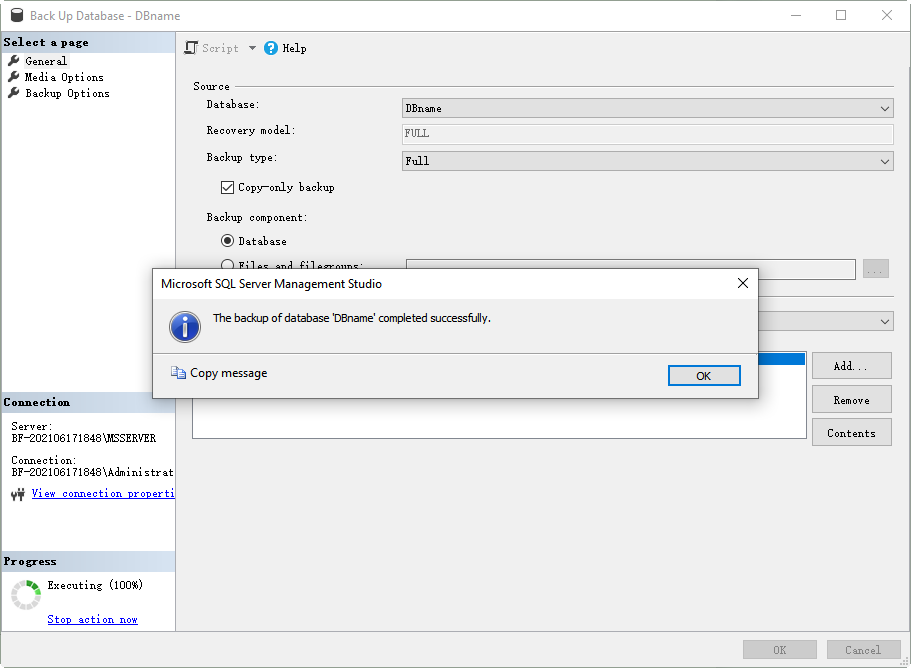
6.Click OK to execute.
Note:
Copy-only backup option is available only for full backups or transaction log backups. Copy-only full backups work on all recovery models, while copy-only transaction log backups only work on full recovery model and bulk-logged recovery model.
Also, copy-only backups are restored in the same way as other backups.
✦ Enable Backup Encryption on SSMS
Before you begin, please make sure you’ve created a DMK and a certificate, and made backups of them.
1. Launch SSMS and connect to your instance.
2. Expand Databases. Right-click the database name you want to back up, and select Tasks > Back Up…
3. In the pop-up window, General page, select Full, Differential, or Transaction Log in Backup type.
4. Click Add… to specify a Destination location. Name this backup file with the suffix .bak in File name.
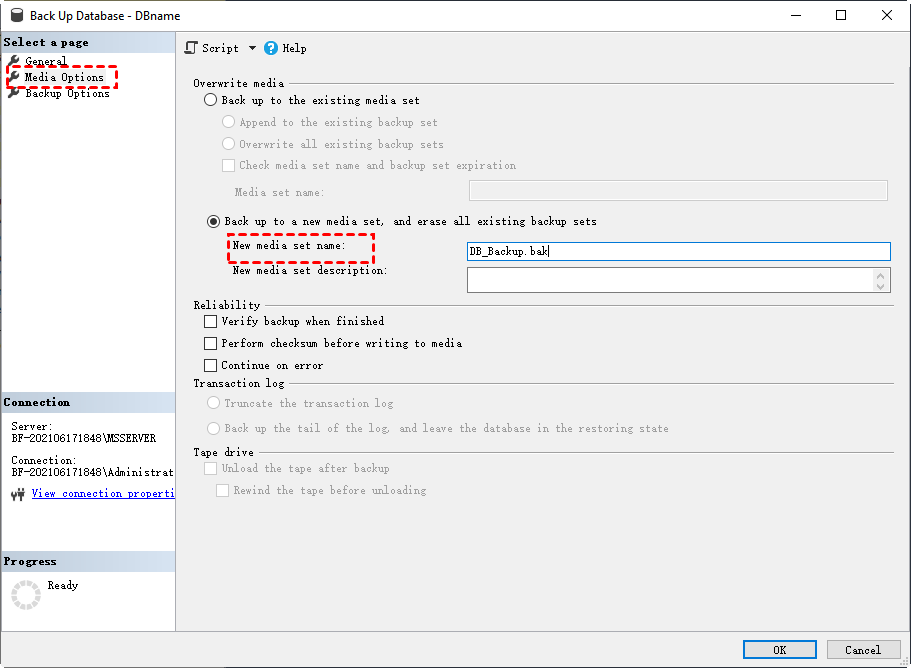
5. Turn to Media Options page, select Back up to a new media set, and erase all existing backup sets. Name the new media set.
6. Turn to Backup Options page, check Encrypt backup, and select the Algorithm and Certificate or Asymmetric key.
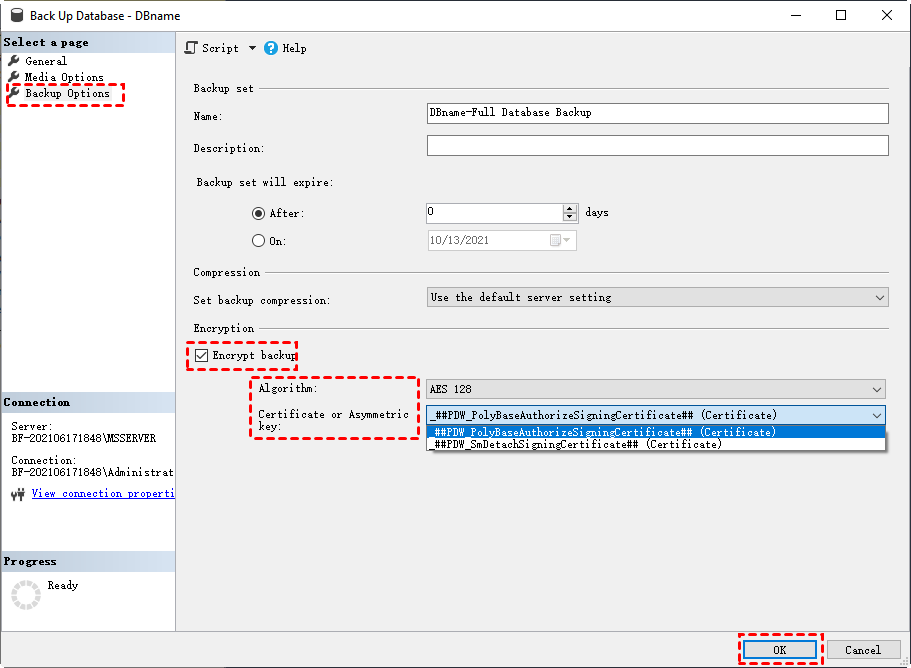
7. Click OK to execute.
Backup SQL Server Database to Different Locations
In practical use, sometimes you may need to back up your database to different locations, such as a network drive. Or to make it easier to choose and change backup location, you may also have specified a logical backup device in advance. In this section I will describe how to back up your database to these locations.
✦ Backup to a Logical Backup Device
Before you start, please note that if you want to you need to specify a logical backup device in SQL Server first.
1. Launch SSMS and connect to your instance.
2. Expand Databases. Right-click the database name you want to back up, and select Tasks > Back Up…
3. In the pop-up window, select Full, Differential, or Transaction Log in Backup type.
4. In Destination section, click Add… to specify the logical backup device you created.
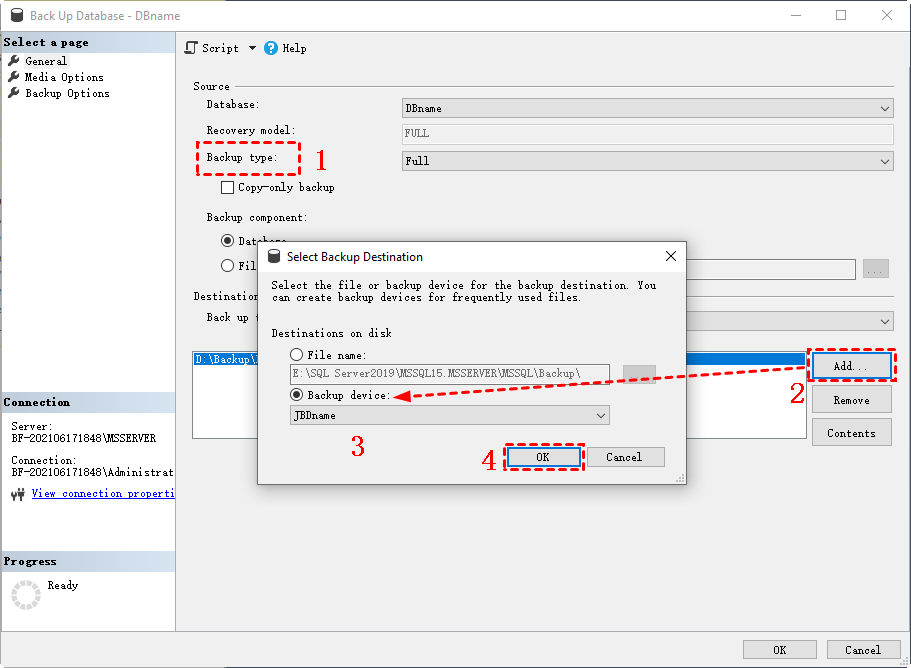
5. Click OK to execute.
✦ Using SQL Management Studio Backup to Network Drive
1. Launch SSMS and connect to your instance.
2. Expand Databases. Right-click the database name you want to back up, and select Tasks > Back Up…
3. In the pop-up window, select Full, Differential, or Transaction Log in Backup type.
4. In Destination section, click Add… and manually input the UNC path of the network drive, add the name of this backup file with the suffix .bak. For example: \\192.168.0.52\backups\Data_1.bak
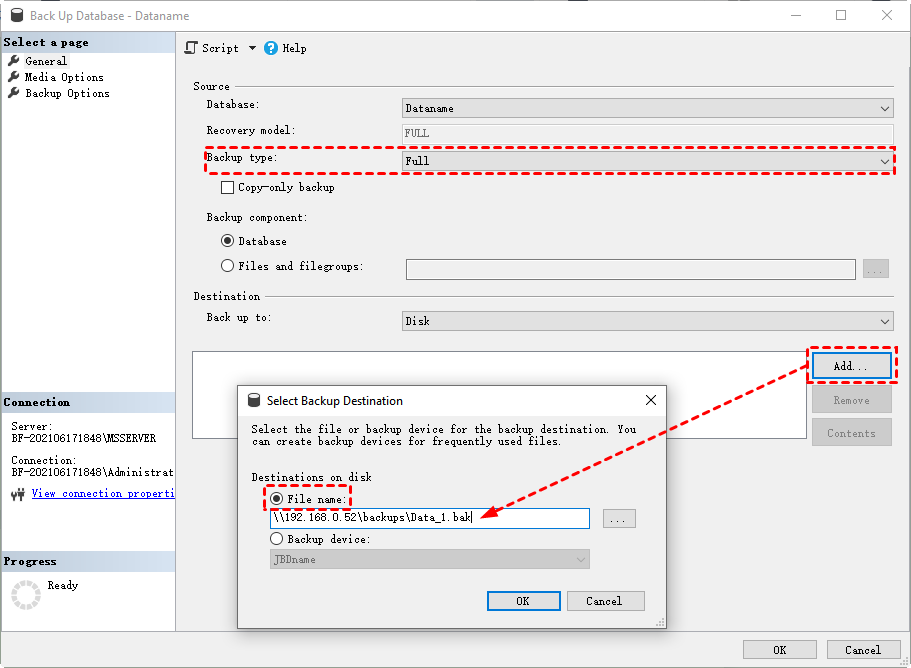
6. Click OK to execute.
Using SQL Management Studio to Backup All Databases
If you want to use SQL Management Studio to back up all or multiple databases, it is much easier and faster to create a Maintenance Plan than to manually do it one by one.
However, Maintenance Plan and SQL Server Agent is not available on Express version.
Here are the detailed steps:
1. Launch SSMS and connect to your instance.
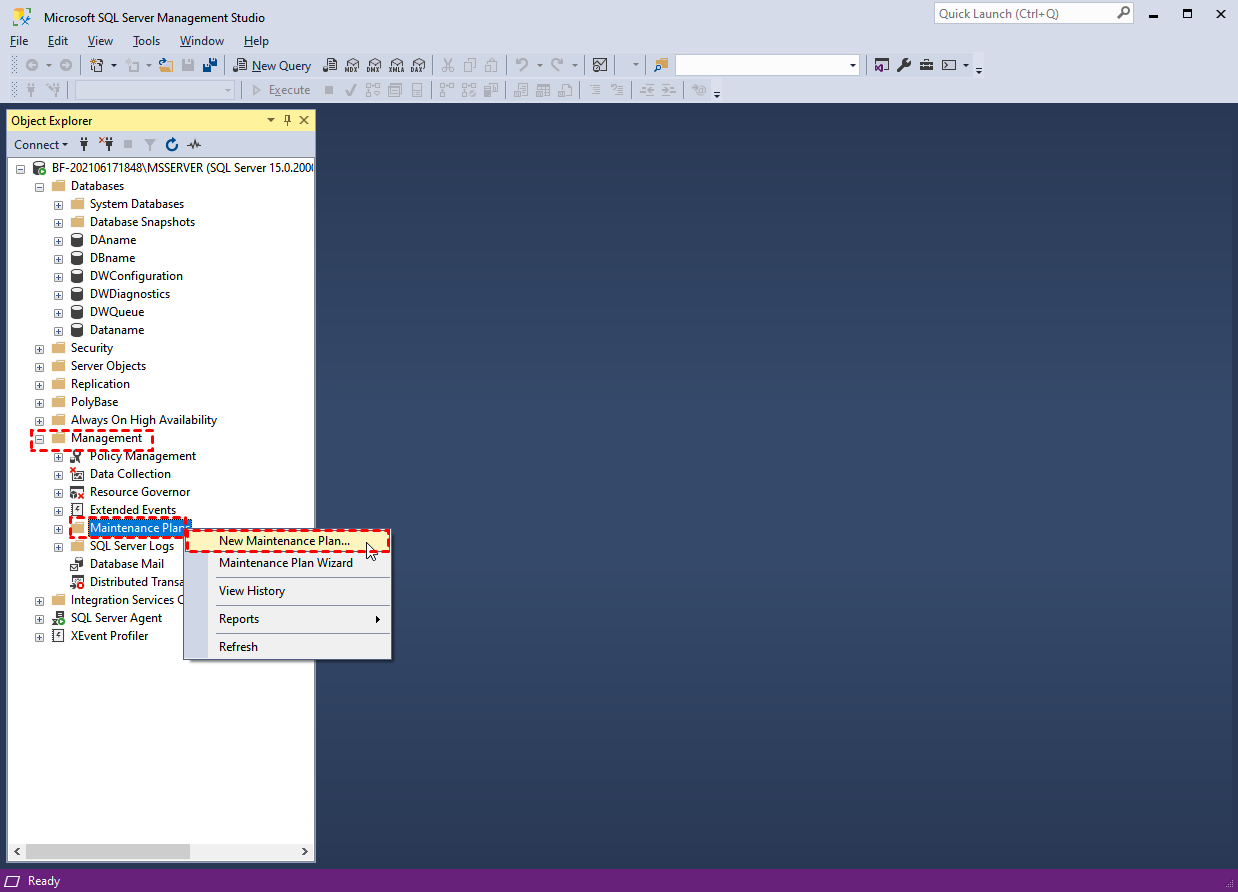
2. Expand Management. Right-click Maintenance Plans and select New Maintenance Plan…
3. Name this plan. Click Toolbox next to Object Explorer, and double-click Back Up Database Task.
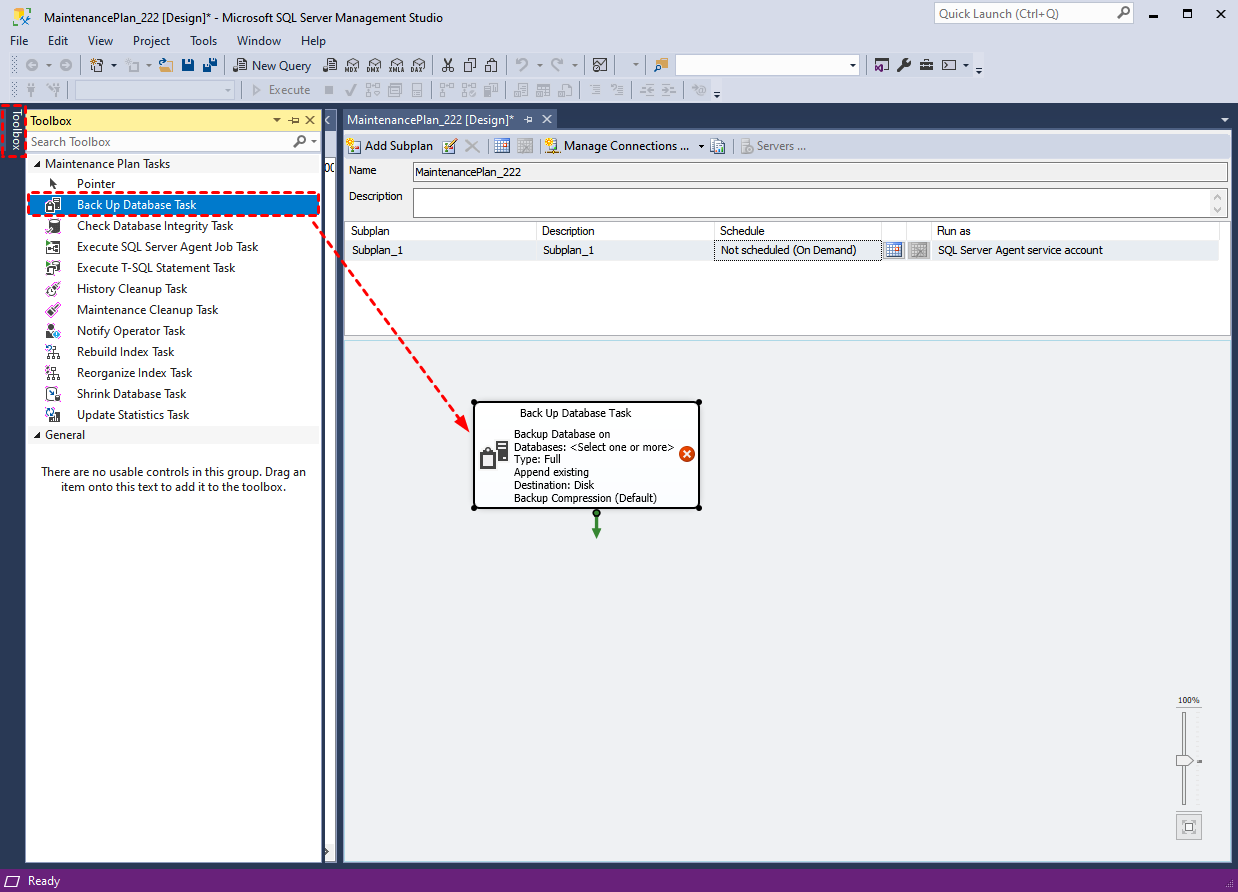
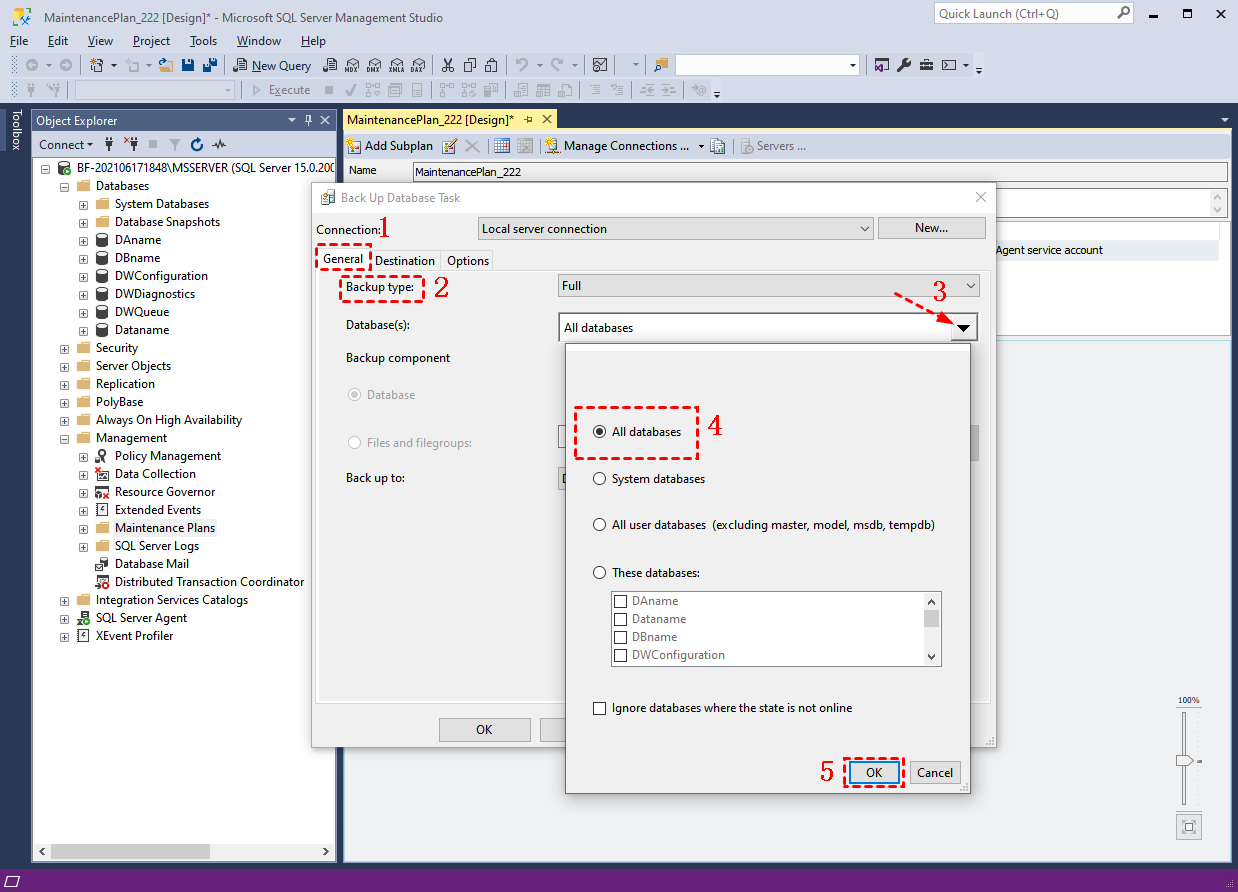
4. Double-click the newly created backup task in the right blank. First select Backup type in General page.
5. Expand Database(s) dropping menu and select All databases. Click OK to save.
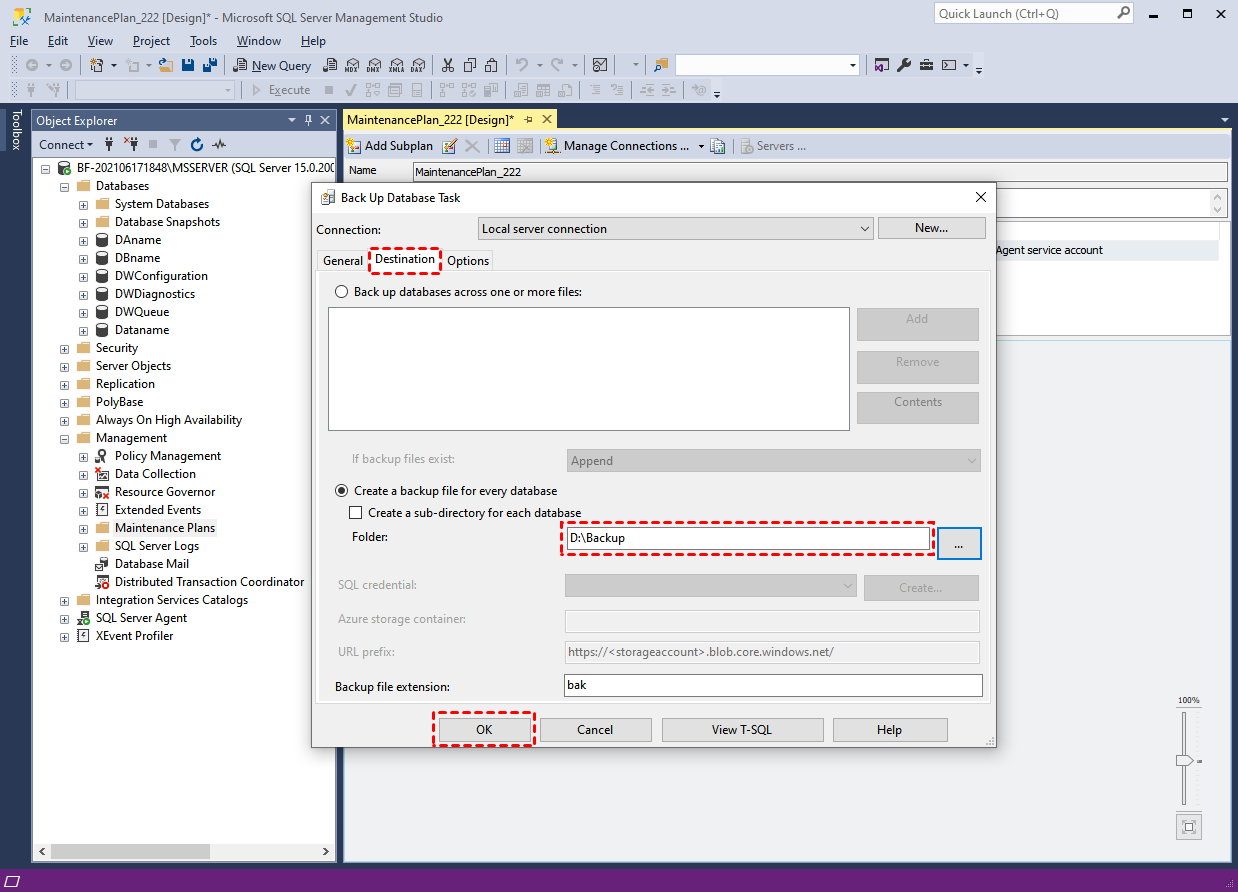
6. Turn to Destination page, fill in the path of the location where you want to store backups. Click OK to save.
Now you can close maintenance plan settings window or use shortcut win+S to save this plan.
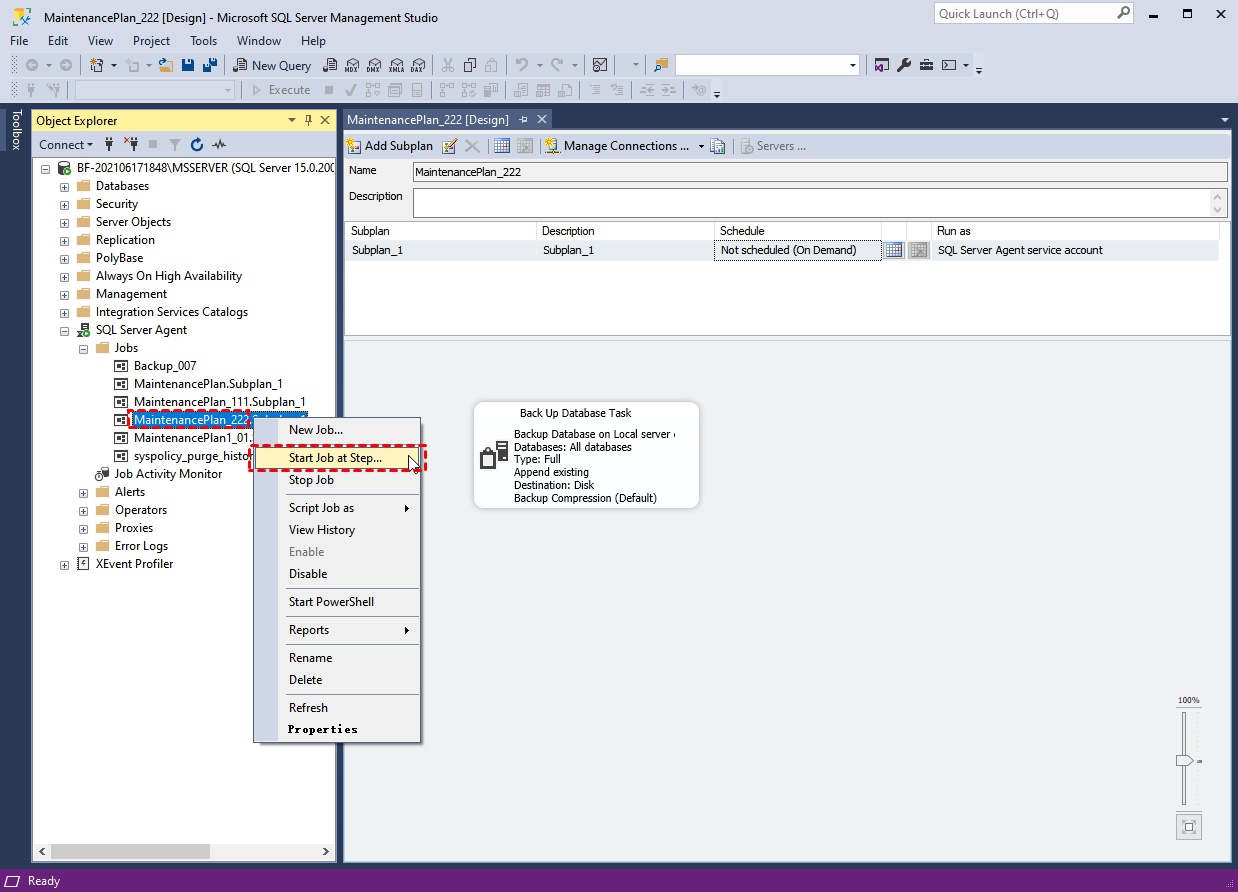
7. Right-click SQL Server Agent to Start it. Find the newly created plan in SQL Server Agent > Jobs. Right-click it and select Start Job at Step… to execute.
Schedule Automatic Backup and Deletion Task with SSMS
To avoid accidental data loss, timely backup is essential. However, manually using SQL Management Studio to back up database can be boring and time-consuming, so you can schedule automatic backup tasks to keep them up-to-date.
Besides, backups will accumulate over time and take up disk space. Therefore, I recommend you creating automatic Cleanup task to delete old backups, in combination with SQL Server auto backup task.
✦ Use SQL Management Studio to Schedule Automatic Backup Task
1. Launch SSMS and connect to your instance.
2. Expand Management, right-click Maintenance Plans and select New Maintenance Plan…
3. Name this plan. Click Toolbox next to Object Explorer, and double-click Back Up Database Task.
4. Double-click the newly created backup task in the right blank. First select Backup type in General page.
5. Expand Database(s) dropping menu and select single or multiple specific databases you want to back up. Click OK to save.
6. Turn to Destination page, fill in the path of the location where you want to store backups. Click OK to close the settings window.
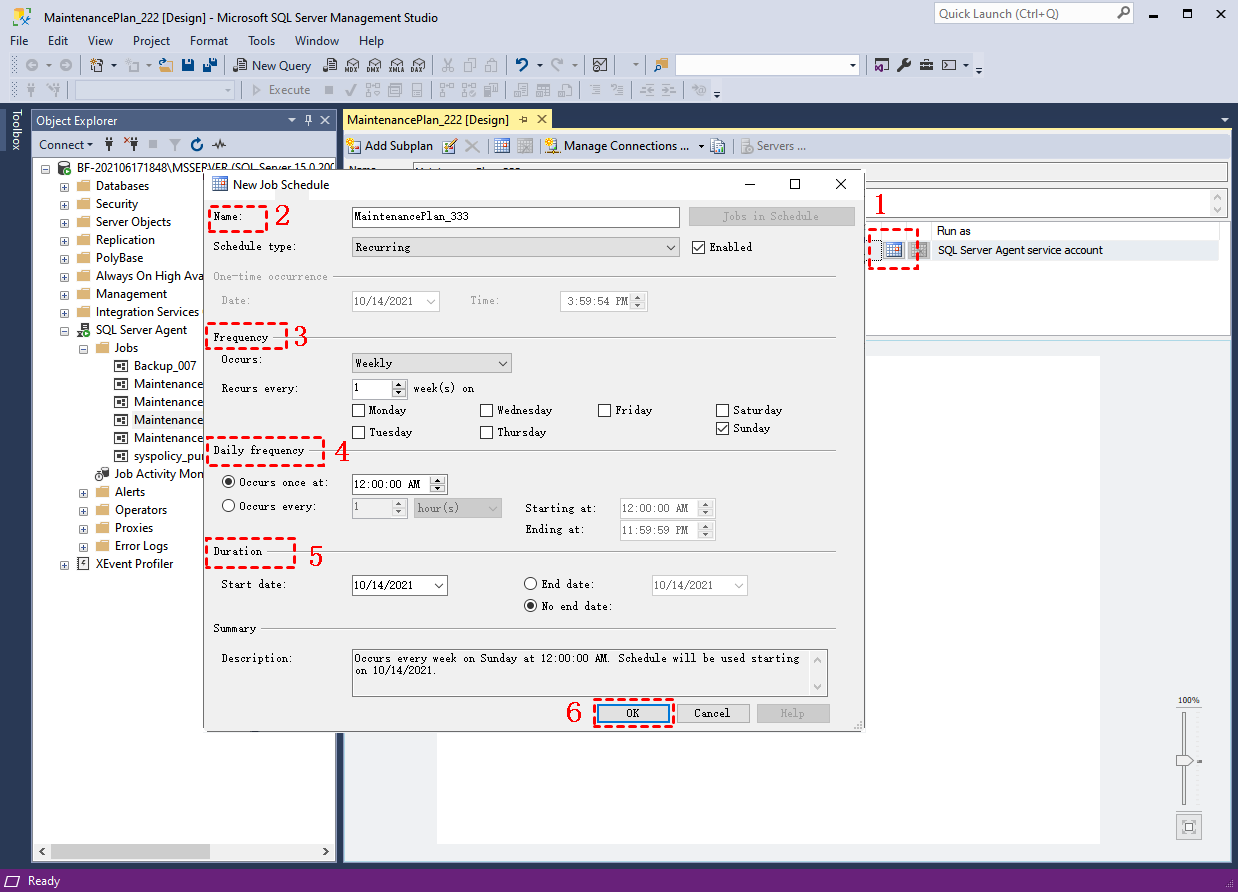
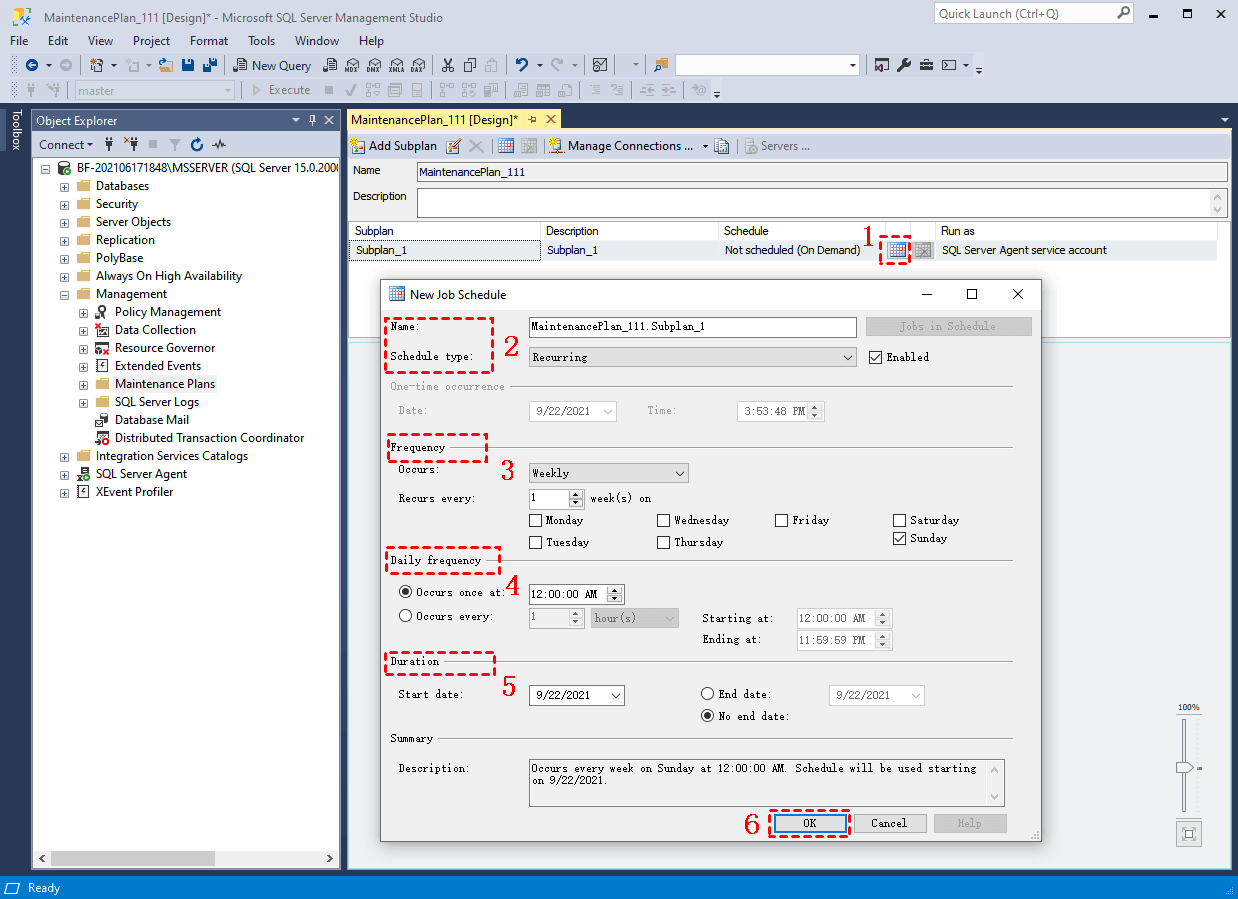
7. Click Subplan Schedule (calendar icon). In the pop-up window, arrange the Frequency, Daily Frequency, Duration, Start date and End date. Click OK to save.
Now you can close maintenance plan settings window or use shortcut win+S to save this plan.
8. Right-click SQL Server Agent to Start it. Find the newly created plan in SQL Server Agent > Jobs. Right-click it and select Start Job at Step… to execute.
✦ Use SQL Server Management Studio to Delete Backup Files Automatically
1. Launch SSMS and connect to your instance.
2. Expand Management, right-click Maintenance Plans and select New Maintenance Plan…
3. Name this plan. Click Toolbox next to Object Explorer, and double-click Maintenance Cleanup Task.

4. Double-click the newly created cleanup task in the right blank. Select Backup files as deleting files.
5. Select Search folder and delete files based on an extension, and click … to specify the Folder location where the backups are stored. Input bak in File extension.
If you want to delete the transaction log backups you can input trn in File extension.
6. In File age, specify after how many days the older files will be deleted. Click OK to save the settings.

7.Click Subplan Schedule (calendar icon). In the pop-up window, arrange the Frequency, Daily Frequency, Duration, Start date and End date. Click OK to save.
Now you can close maintenance plan settings window or use shortcut win+S to save this plan.
8. Right-click SQL Server Agent to Start it. Find the newly created plan in SQL Server Agent > Jobs. Right-click it and select Start Job at Step… to execute.

Generate Scripts to Copy Tables to Another Database
Tables are the basic SQL Server database objects used to store all the data in the database. If you only made minor changes to one single table, you may think a full backup is taking up space.
Actually, there’s no directly way to back up or restore table only in SQL Server. We can only achieve similar results in other ways. For example, copy the table to another database, or export the data in tables.
Note: For a table may depend on other tables via foreign key relationships, so please make sure your table is independent and complete before you start.
1. Launch SSMS and connect to your instance.
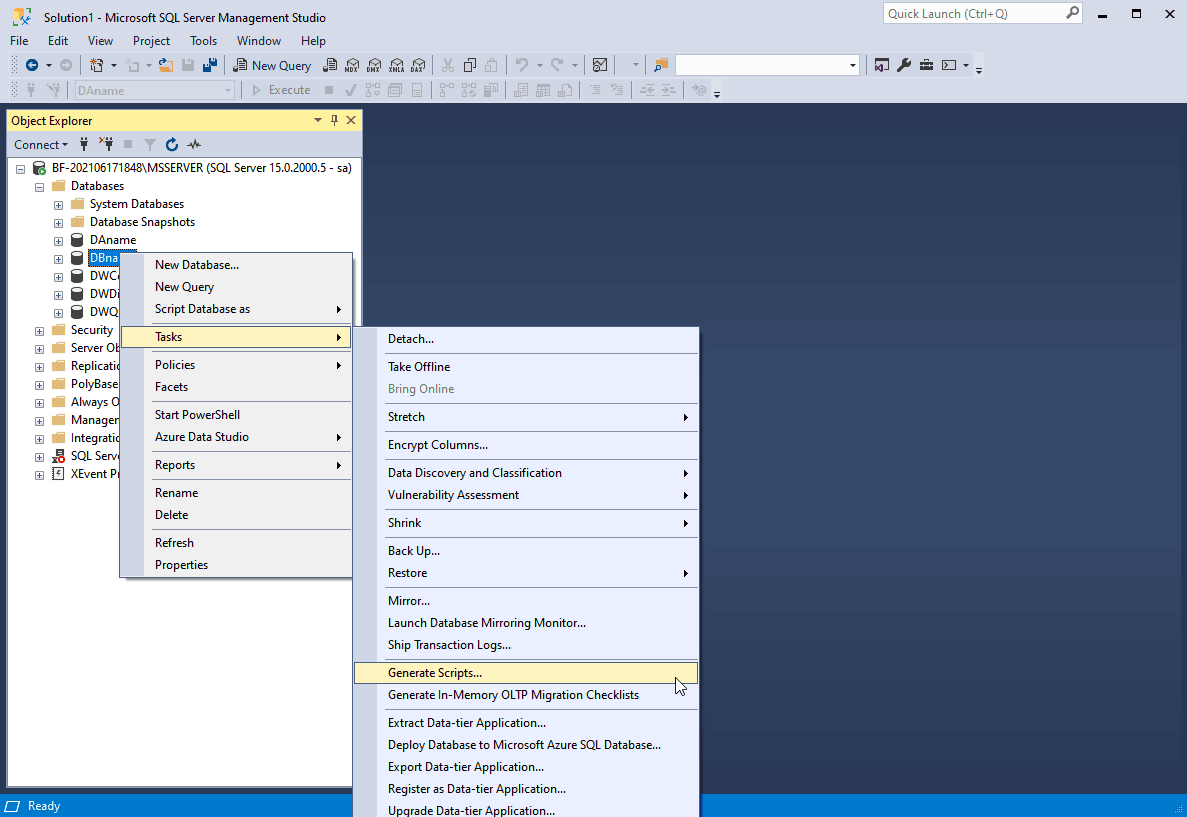
2. Expand Databases. Right-click the database name and select Tasks > Generate Scripts…
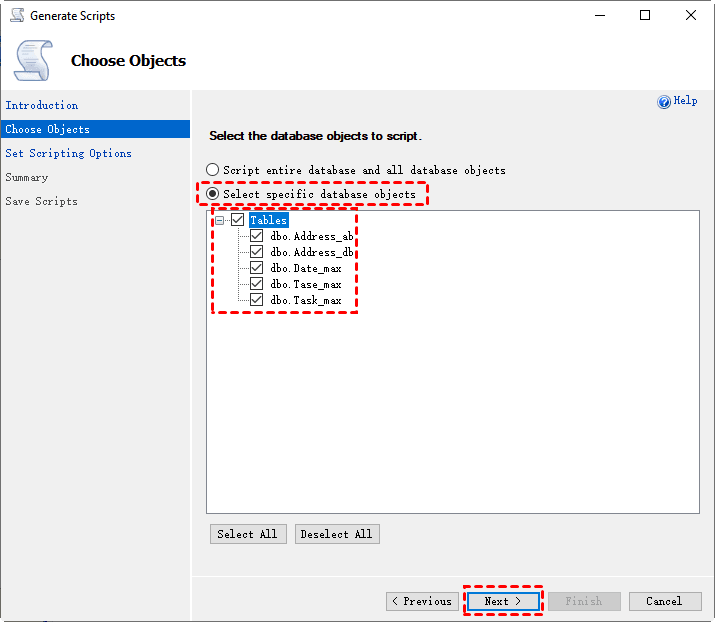
3. Select specific database objects, and check the tables you want to back up. Then click Next.
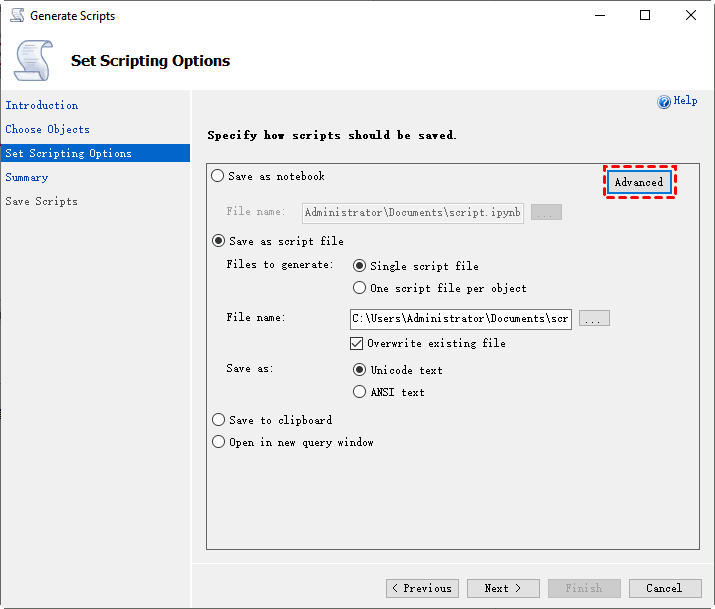
4. Select Save scripts to a specific location. And then click Advanced.
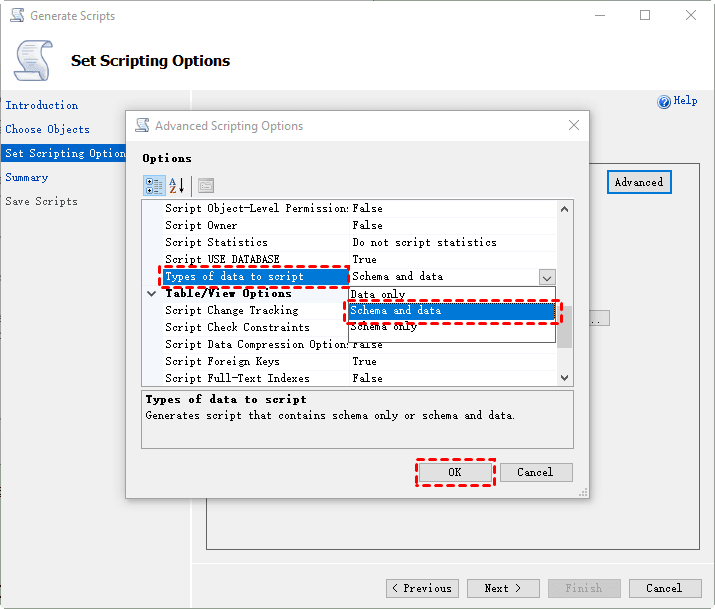
5. Find Types of data to script option in the pop-up window, select Schema and data next to it. Click OK to save.
6. Select Open in new query window option below. Then click Next.

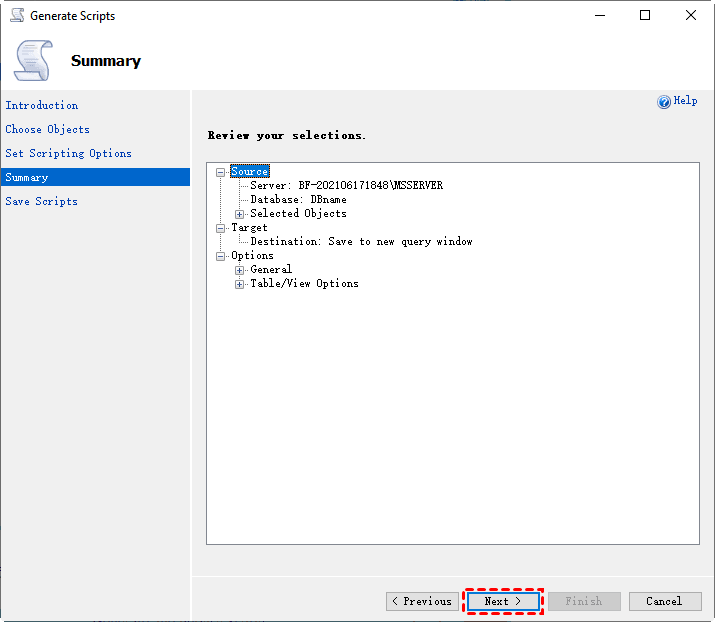
7. Review your selections and click Next to save scripts.
8. Click Finish and backup to SSMS interface. You can see the generated script is in Query window.
Change the database name in the front line, to copy the table to another database. Or you will come to “Database already exist” error. In this way you can also copy the tables to another server.
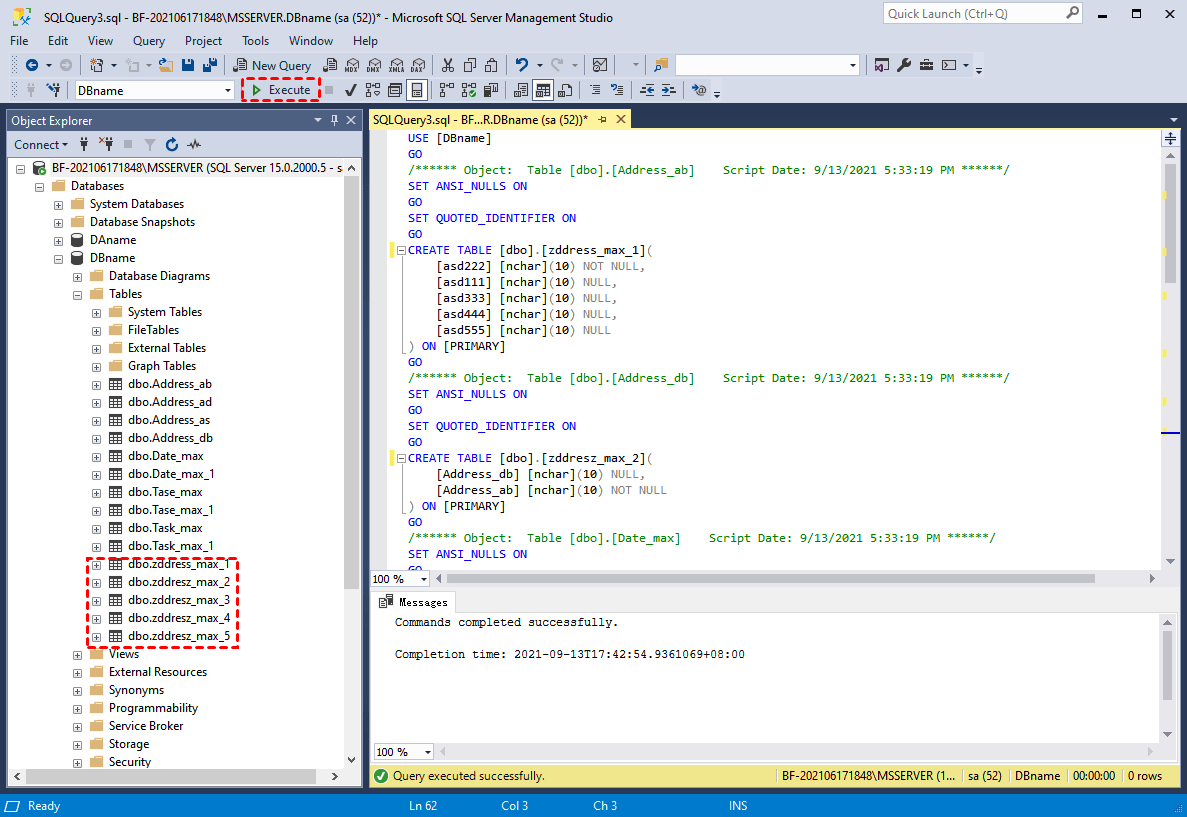
10. Click Execute on toolbar to copy these tables.
Best Alternative for SQL Server Management Studio
As you can see, when performing SQL Management Studio backups, some practical features are not available on the Express version, or old versions. So, if you are using the Express version, or if you want an easier, faster, and more efficient way to automatically back up your database regularly, AOMEI Cyber Backup can be a very good alternative.
- Intuitive interface and simple operations: All essential SQL Server backup options are displayed in an intuitive task interface with modifiable task titles to differentiate. Once created each backup task will be listed separately for further operations, such as changing the settings and restoring.
- Remotely backup database within LAN: AOMEI Cyber Backup allows you to remotely back up single or multiple databases, while monitoring the network speed and available disk space of these computers to avoid failures.
- Remotely restore to another computer: When restoring, backup files will be automatically organized into a list by backup type and time. And you can also choose to restore them to your local server, and another computer within LAN.
AOMEI Cyber Backup is a great solution to save the time and reduce errors of operating individually on different computers. It is efficient especially for enterprises. It applies to 2005\2008\2008 R2\2012\2014\2016\2017\2019\2022 and corresponding SQL Server Express. Thus, you can use one software to backup all of your SQL Server within simple steps.
Here’s a 30-day free trial for you:
How to Automate Backups of Multiple SQL Databases
🧿Prerequisites
1. To properly use AOMEI Cyber Backup Trial Edition, especially if you want to manage multiple computers within LAN, you need to access to Source Device > Add Microsoft SQL. If the database exists and the version is supported, it will appear automatically. Otherwise, you can download proxy program to local first. Then click Already installed proxy and select the unadded proxies.

2. Click "..."--> Authentication to validate the database instance. You can choose Windows Authentication or SQL Authentication. Enter the credentials and click Verify.
🧿Start to backup in AOMEI Cyber Backup
Click Backup Task on the left menu bar, then click Create New Task to start create database backup task. Please follow the simple steps to backup your SQL databases.
Step 1. Choose backup type as Microsoft SQL Backup, and you could also try VMware Backup or Hyper-V Backup.
Step 2. Enter a name for this SQL backup task.
Step 3. Select the databases you want to backup.
Step 4. Select a location as the destination path. You can choose a local or network path as a storage end.
Step 5. Click Schedule Backup to run your SQL database backups automatically and regularly. You can specify the backup methods and time.
Step 6. Enable Backup Cleanup to automatically remove history backup versions based on rule to save storage space.
Step 7. Enable Email Notification to receive email notifications when the task is abnormal or successful.
Step 8. Finally, click Start Backup to create the backup task and perform backup.
🧿How to Restore Database from Backup
Step 1. Click Backup Task on the left menu bar, locate the task you want to restore, and click … > Restore.
Step 2. Select a backup version that you want to restore database from. Then you can choose to Restore to original location, or Restore to new location.
Step 3. Click Start Restore to begin the restore progress.
Summary
This article is a quick start guide to SQL Server Management Studio. It introduces how to perform SQL Management Studio backups of different types, how to back up single or multiple databases, back up to different locations, create automatic backup and deletion tasks, and back up tables.
However, as you can see, there are many essential backup features that are not available on Express or older versions. Therefore, I recommend you AOMEI Cyber Backup Trial Edition, the best alternative to SQL Server Management Studio.
AOMEI Cyber Backup not only simplifies the backup operations, but also makes it easy to back up multiple databases. Most importantly, using it you can back up databases on another computer within LAN, or to restore backups to another server. It can effectively reduce management time and errors.

