


Create Backup Devices to Simplify SQL Server Backup Process
When you want to change the destination path of multiple backup jobs or scripts, it can be tedious to edit each backup task one by one. Therefore, I recommend that you define a logical backup device, that allows you to change multiple settings by changing only the definition of the backup device.
By Crystal / Updated on June 14, 2023
What is Backup Device in SQL Server?
Backup Device in SQL Server refers to the storage medium used to store single or multiple backup files. Normally it has a physical name, refers to the full path that the operating system uses to access to the device.
You can also define a simpler logical name that points to the physical device where to store your backups, it will be saved in system tables.
Basically, except for the name used to refer the storage path, there’s no difference between physical backup device and logical device.
In this article, we only talk about logical backup device.

Why to Use a Backup Device in SQL Server?
When using SQL Server databases, you may have multiple backup jobs or scripts need to perform, such as full backups, differential backups, transaction log backups, and so on. When you perform them at the same time, normally you need to manually set the backup location and file name for each job, which can be pretty tedious and time-consuming.
If you are under such circumstances, I recommend you define a backup device in SQL Server. In this way, you can define the destination path and file name beforehand, and then specify this backup device directly when backing up and restoring.
✦ When you want to change the backup storage location, you only need to change the backup device's physical location instead of re-specifing the path for each backup job. Therefore, it simplifies the backup process.
How do I Create a Backup Device in SQL Server?
To create a permanent backup device in SQL Server, you only need to define the logical name of the physical path you want to specify. After that, you can use this name to back up your SQL database to this physical path, or restore database from there.
Here I will introduce you 2 common ways to create a permanent logical backup device in SQL Server.
Creating a Backup Device with SSMS GUI
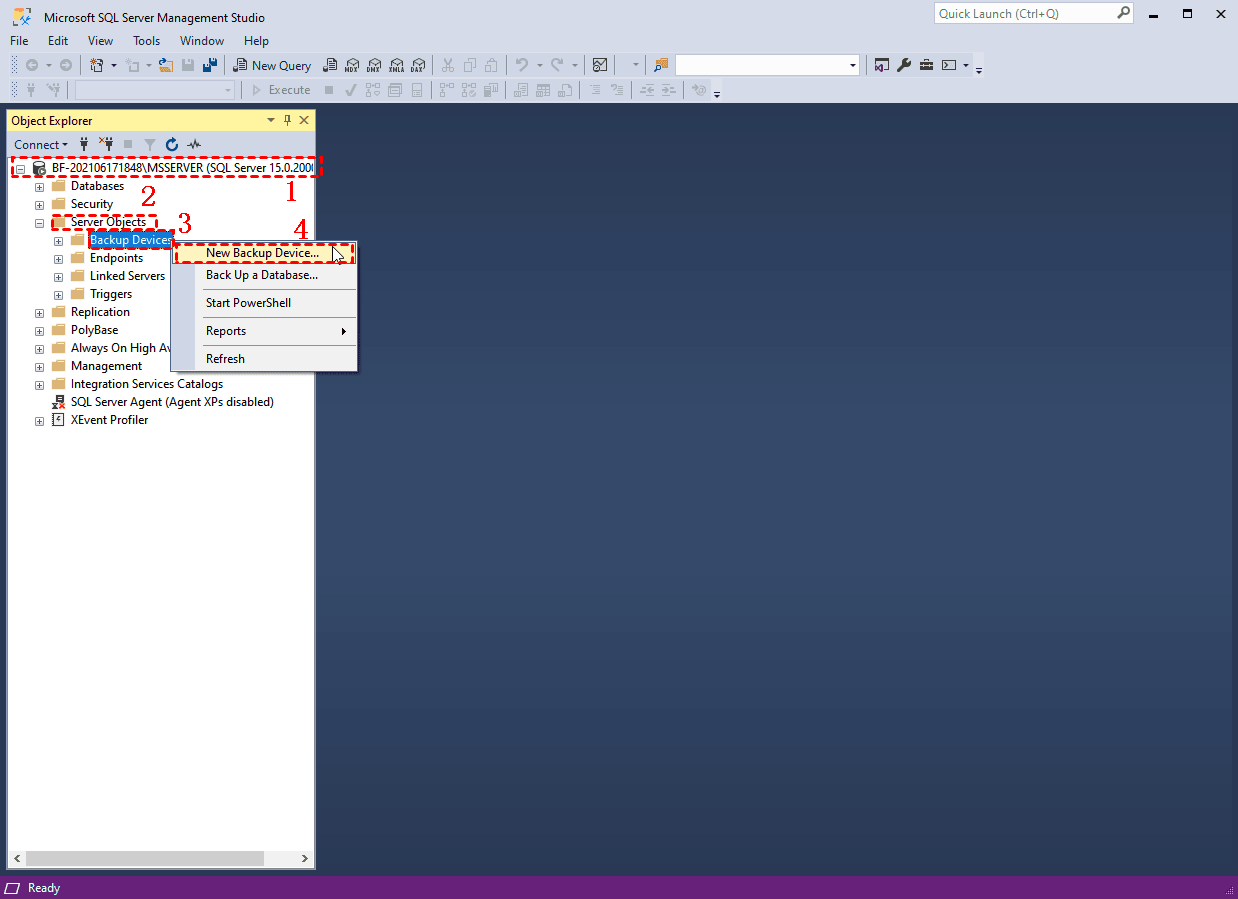
1. Launch SQL Server Management Studio (SSMS) and connect to your instance.
2. Expand Server Objects, right-click Backup Devices and select New Backup Device…
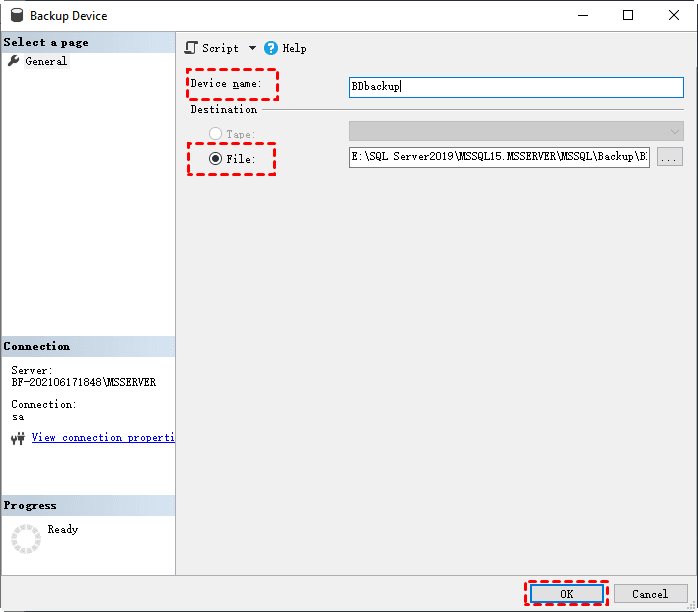
3. In the pop-up window, provide a logical device name you want in Device Name.
4. Click File… in Destination to specify the physical path of the device.
5. Then click OK to create this backup device.
You can check the created backup device in Server Objects > Backup Devices.

Creating a Backup Device in SQL Server with T-SQL
Except for SSMS GUI, you can also use sp_addumpdevice to specify a physical path as the backup device in SQL Server. The basic syntax is:
USE master
EXEC sp_addumpdevice 'device type', 'logical name', 'physical name'
Note:
Deivce type: refers to Disk or Tape.
Logical name: Refers to the name you defined when creating the SQL Server backup device.
Physical name: Refers to the full path and file name of the specified disk or tape device.
In the following, I will show you some examples, to explain how you should customize the statements to create the backup devices according to your demands.
✦ Steps:
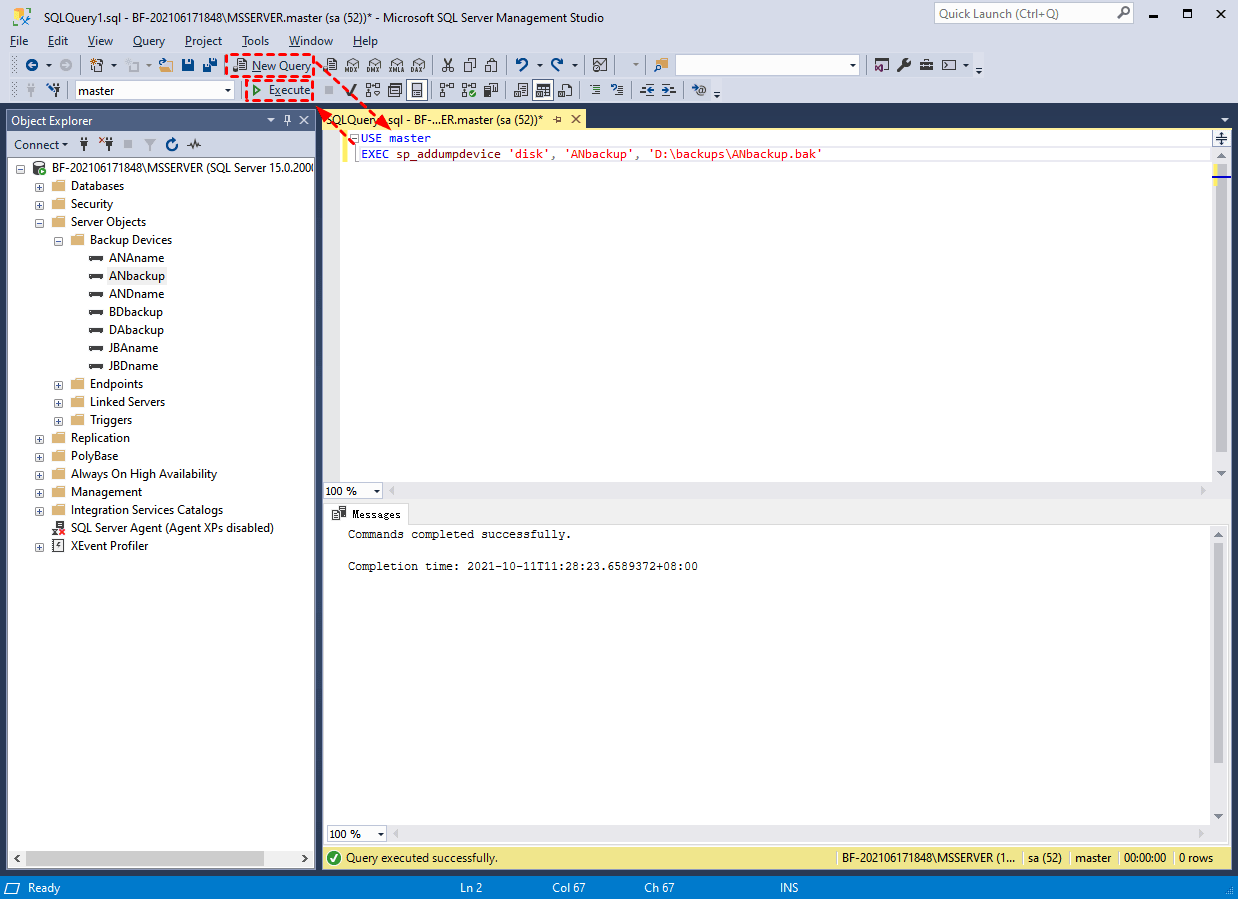
1. Launch SSMS and connect to your instance. Click New Query on the Standard bar.
2. Input the corresponding statements.
- Specify a disk backup device
Here is an example: I want to create a disk backup device with the physical path of D:\backups\ANbackup.bak, and name it as ANbackup. Therefore, I will input the following statements:
USE master
EXEC sp_addumpdevice 'disk', 'ANbackup', 'D:\backups\ANbackup.bak'
- Specify a tape backup device
Example: I want to create a tape backup device with the physical path of \\.\APtape, and name it as APbackup. So, I will input the following statements:
USE master
EXEC sp_addumpdevice 'tape', 'APbackup', '\\.\APtape'

Note: SQL Server will no longer support tape backup devices in future versions, please avoid using them in your work, and modify them to more appropriate devices according to your actual situation.
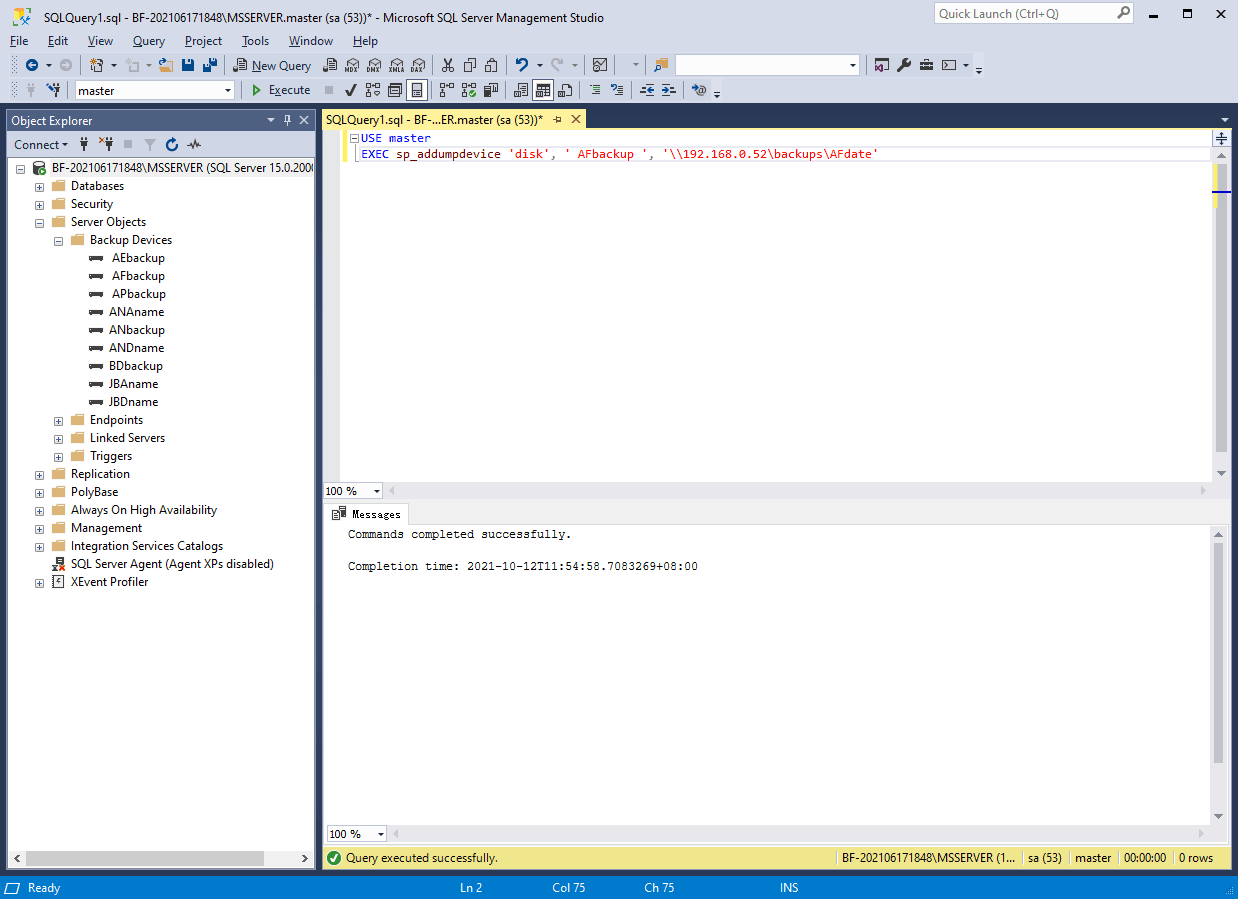
- Specify a network path for backup device
Example: I want to specify backup device as a network path, with the physical path of \\192.168.0.52\ backups\ AFdate, and the name AFbackup. So, I will input the statements:
USE master
EXEC sp_addumpdevice 'disk', 'AFbackup', '\\192.168.0.52\backups\AFdate'
3. Click Execute on toolbar to create this backup device in SQL Server.
Now you have specified a backup device. When backing up SQL databases, you can just specify the logical name of your backup device as the destination, instead of the complex physical names.
Note: If you want to change the backup destination path, you can just change backup device location by redefining the physical path to it, instead of extensively modifying the path in the jobs or scripts. This can effectively simplify the backup process.
How to Delete a Backup Device in SQL Server?
If you want to delete a backup device, you can also use SSMS GUI and T-SQL statements to achieve that. Here I will introduce you the detailed procedures.
Deleting backup device on SSMS GUI
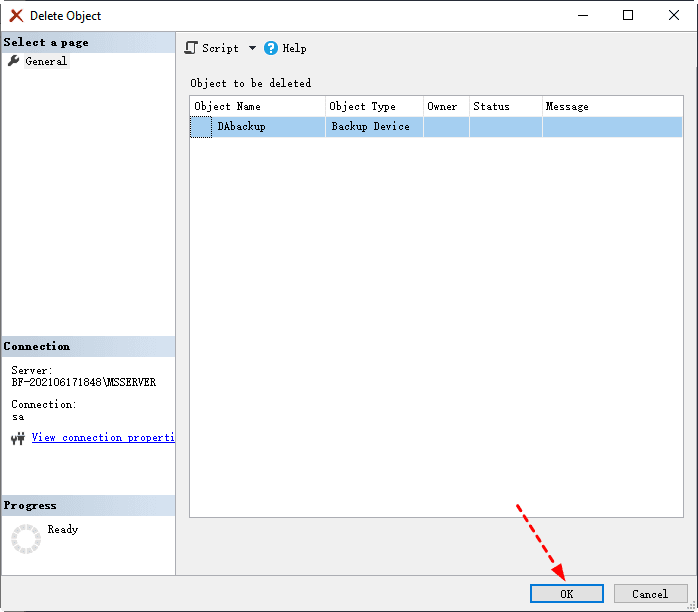
1. Launch SSMS and connect to your instance. Expand Server Objects > Backup Devices.
2. Right-click the backup device name and select Delete.

3. Click OK and this backup device will be removed from storage.
Deleting backup device in SQL Server with T-SQL
Just like creating, we use sp_addumpdevice and specify the DELFILE parameter to delete a backup device. The basic syntax is:
USE master
EXEC sp_dropdevice 'logical name', DELFILE
1. Launch SSMS and connect to your instance. Click New Query on the Standard bar.
2. Input the corresponding statements.
Example: I want to delete the backup device DAbackup. So, I will input:
USE master
EXEC sp_dropdevice 'DAbackup', DELFILE
3. Click Execute on the toolbar to delete the device.

Fixes for SQL Cannot Open Backup Device Operating System Error 5
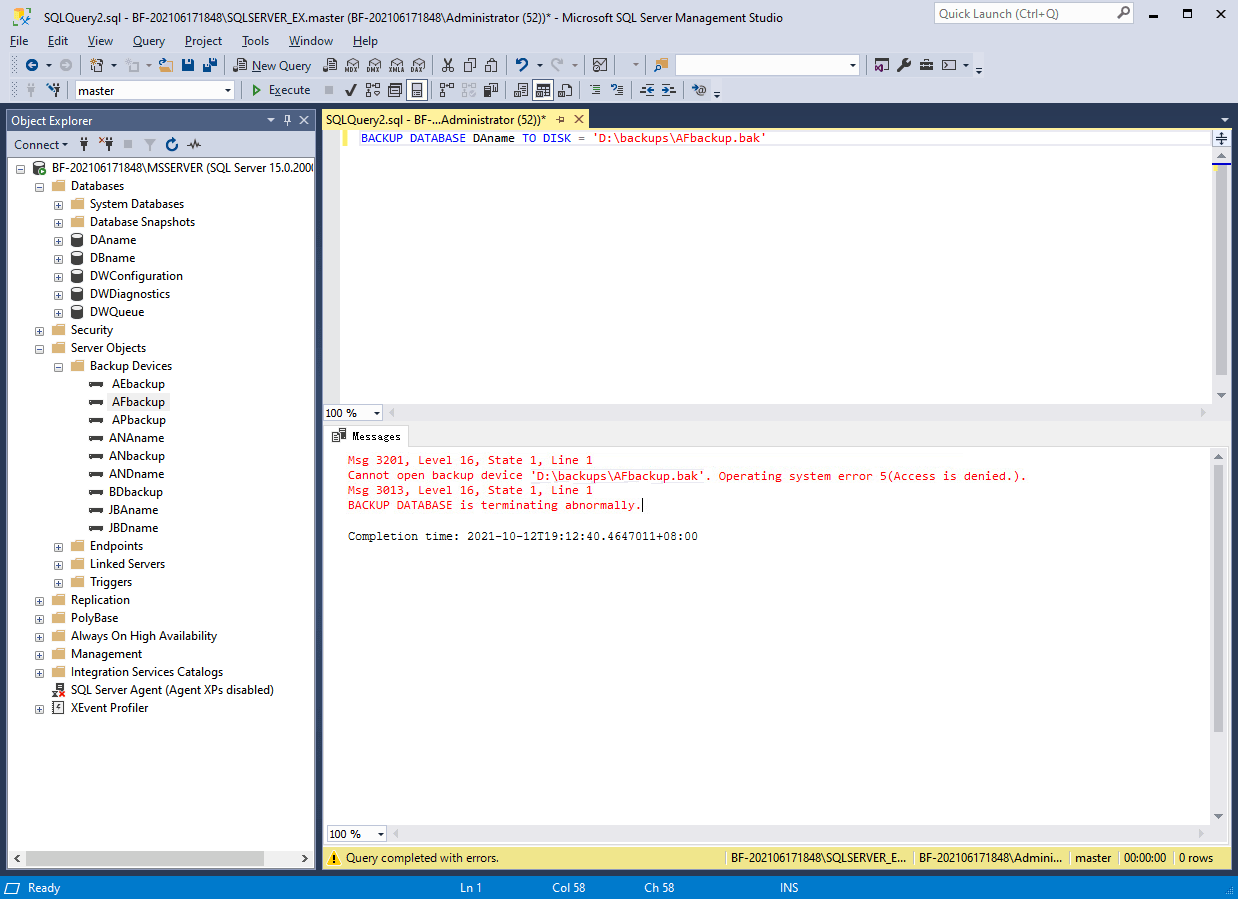
If you encounter the error message: “Cannot open backup device. Operating system error 5 (Access is denied)” when you backing up a SQL Server database to a backup device. There could be 2 possible reasons:
- The backup file is in Read-only status
- The NTFS permissions for the backup folder are not enabled
Here, I will show you how to fix the cannot open backup device access denied error.
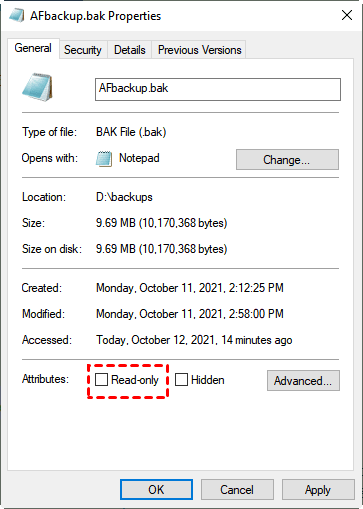
Fix 1. Uncheck the Read-only Attributes of the Backup File
1. Find the backup file in its folder, right-click it and select Properties.
2. In General tab, uncheck Read-only in Attributes. Click OK to save the change.
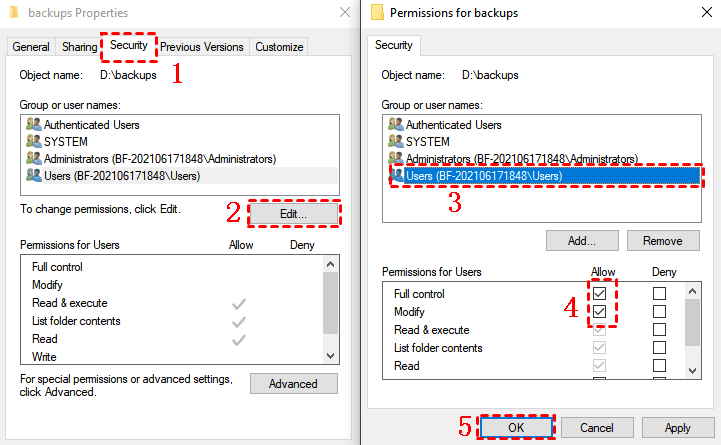
Fix 2. Enable the NTFS Permissions for the Backup Folder
If the error still exists after you unchecked Read-only, then please check if you have enabled the NTFS permissions for the backup folder.
1. Find the backup file in its folder, right-click it and select Properties.
2. Turn to Security tab, click Edit…
3. Select Users in the box, and Allow all the permissions below. Click OK to save.
Efficient Way for SQL Database Backup
Backup database SQL Server script with compression is not that friendly for novices, it’s complex and tedious, and any tiny mistake may fail this backup. It’s better that you are acquaintance with T-SQL, and know how to change it according to your requirements.
Otherwise, I suggest you try simpler ways, for example, software with visual management. It’s more convenient and most of all, you can change the settings as you like with simple clicks. I think AOMEI Cyber Backup is a great solution for following reasons:
✦ Easy-to-use: With the intuitive interface, it's easy to configure SQL backups without code.
✦Back up/Transfer Across Within LAN: Unlike SSMS, Cyber Backup can help you accomplish multiple backups of SQL 2005-2022 including SQL Express within LAN.
✦ Backup Schedule: You can schedule an automatic backup task to back up your databases for settled periods.
✦ Auto & Centralized Backup: Schedule SQL backups and run it automatically, also supports SQL backup / VMware backup / Hyper-V backup from a centralized console.
You could click the following button to use the freeware of AOMEI Cyber Backup without time limit.
How to Backup SQL Server Databases Using AOMEI Cyber Backup
✍ To properly use AOMEI Cyber Backup, you should note these prerequisites for Microsoft SQL backup:
- Computer with both AOMEI Cyber Backup Agent and Microsoft SQL Server installed
- Local disk or network share to store backup files
- Local disk or network share to store backup files
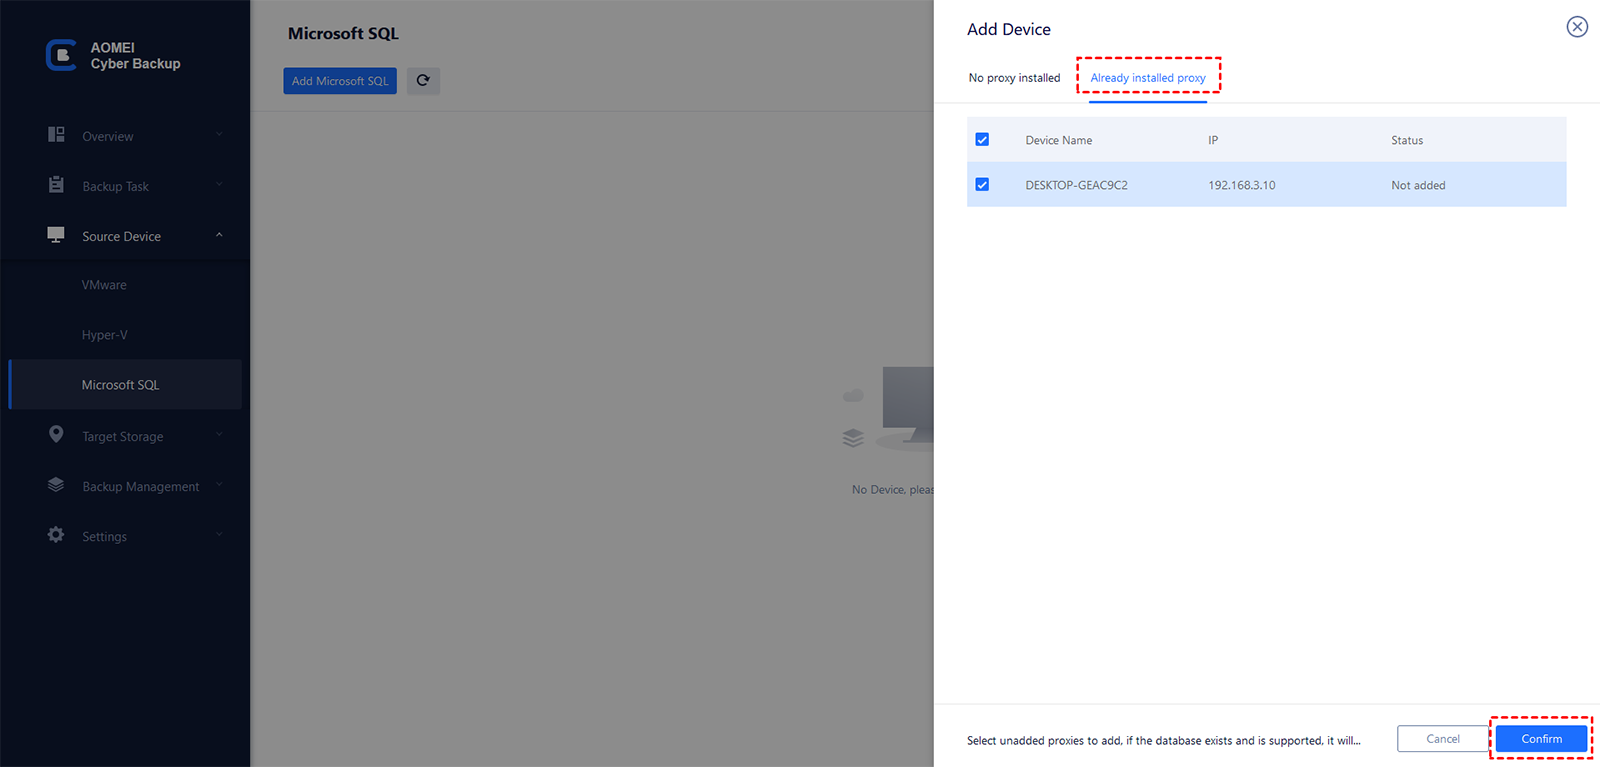
1. Access to "Source Device" > "Add Microsoft SQL". If the database exists and the version is supported, it will appear automatically. Otherwise, you can click "Add Microsoft SQL" > "Download proxy program", and install the program on the device with SQL Server installed. Then click "Already installed proxy" and select the proxies you want to add.
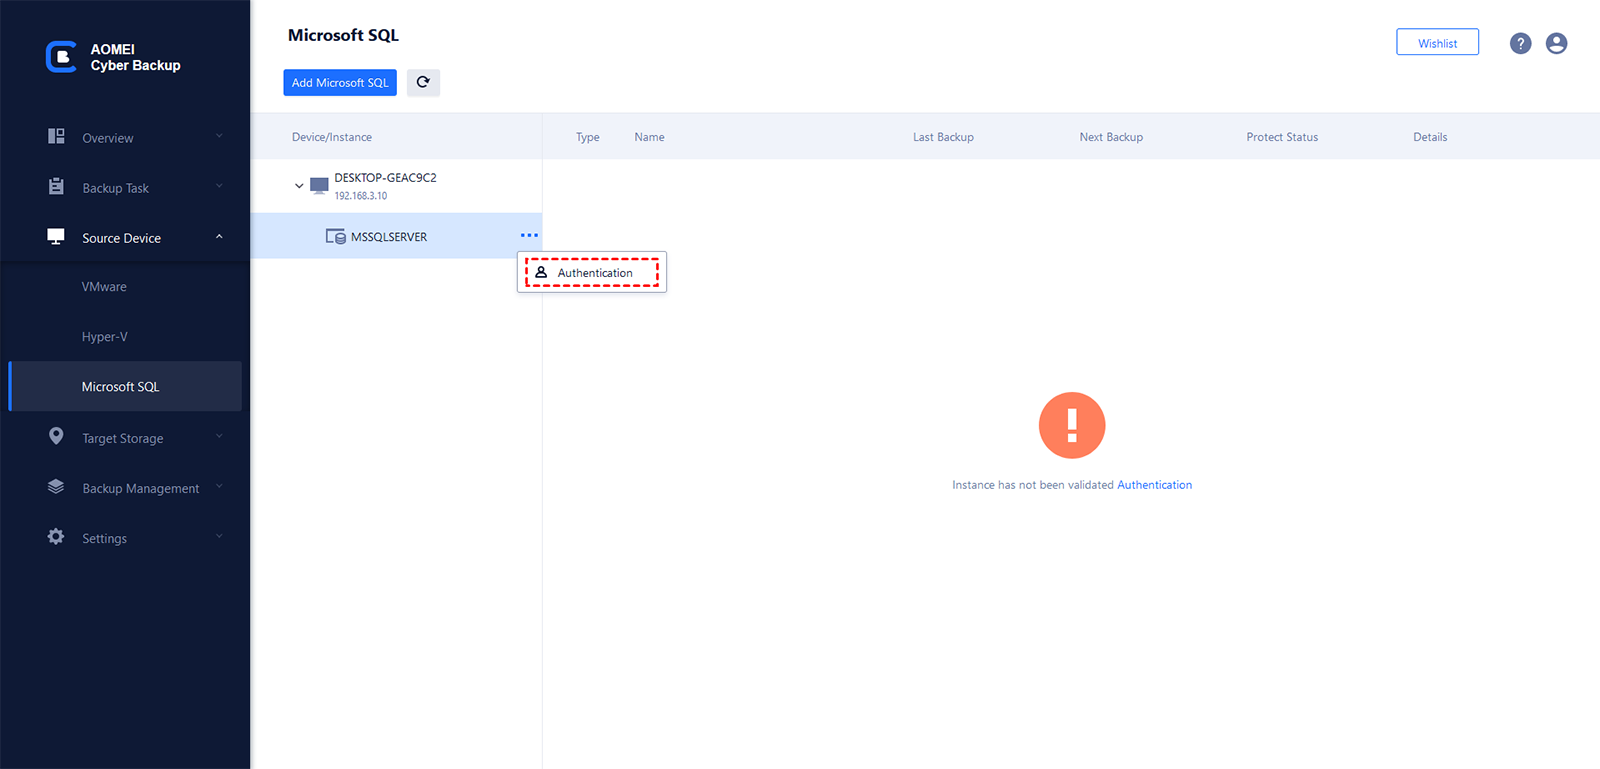
2. Click "..."-->"Authentication" to validate the database instance. You can choose "Windows Authentication" or "SQL Authentication". Enter the credentials and click "Verify".
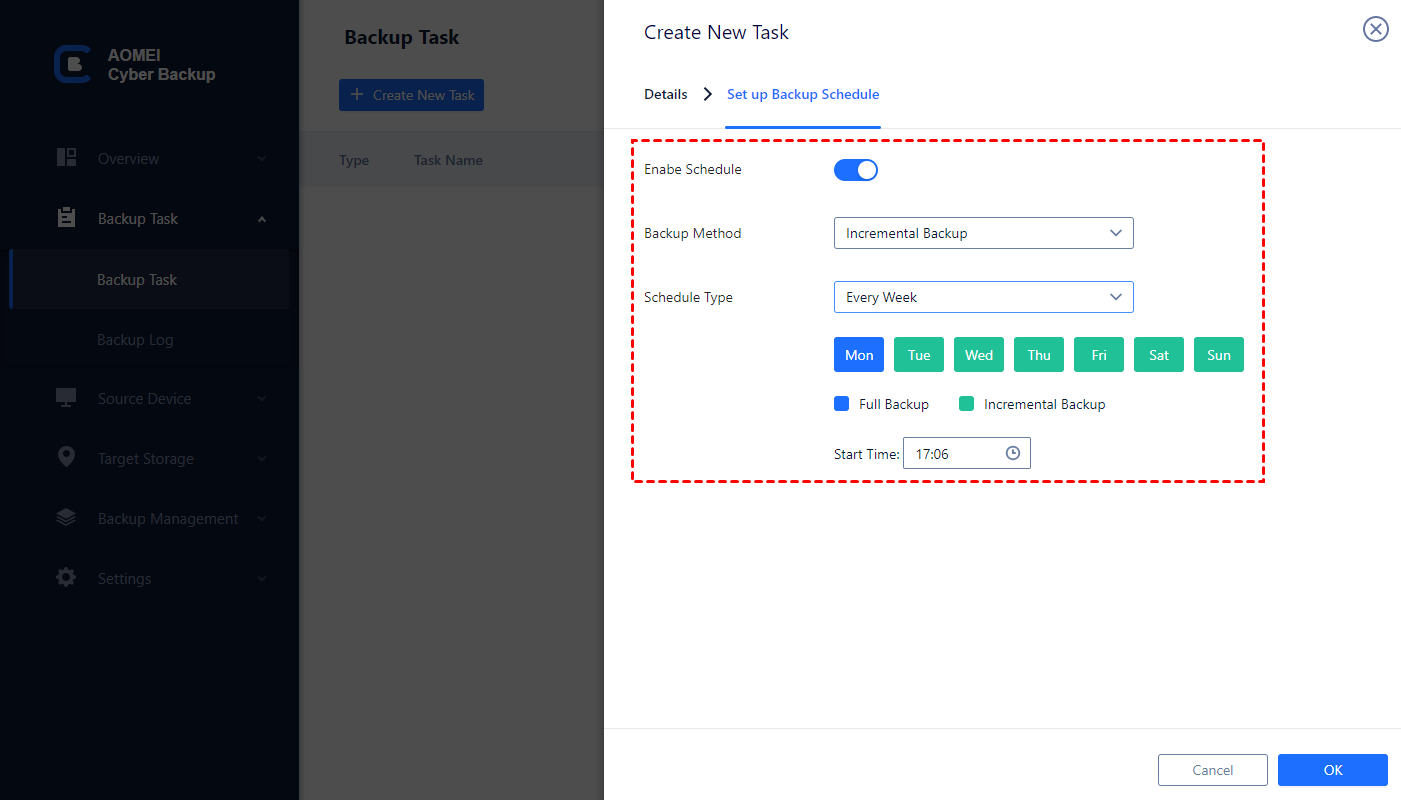
3. Go to schedule SQL database backup as following:
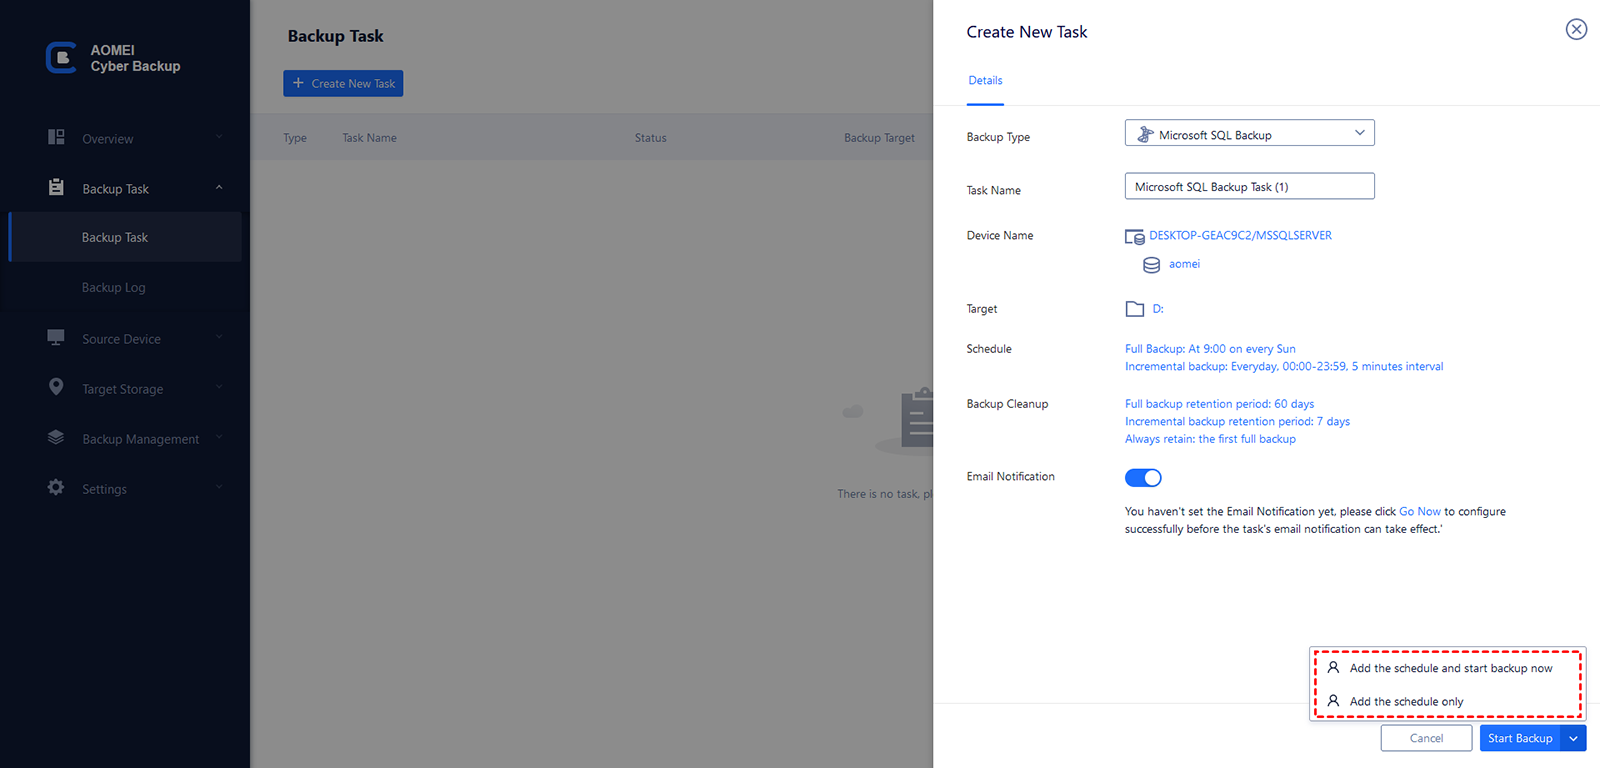
▪ Click "Backup Task" > "Create New Task" to backup your SQL databases.
▪ Choose backup type as "Microsoft SQL Backup", and you could also try virtual machine backup.
▪ Enter a name for the backup task, then go to select the databases you want to backup and specify a location as a storage end.
▪ Select backup methods as full/incremental/differential and specify the backup time as daily/weekly/monthly. Your SQL databases will be backed up automatically and regularly.
4. Click "Start Backup".
Summary
In this article, I introduced you what is a backup device in SQL Server, and 2 common ways to create and delete it, analyzed 2 possible causes to the common error 5 you may encounter. Hope it could help you.
SQL Server database backup has always been a huge topic. To meet different requirements, you may need to learn a variety of complex methods and tools. And when you want to simplify the procedure, you may need to learn even more knowledge.
So, if you don’t have enough time for learning, AOMEI Cyber Backup may be a better option by allowing you to centrally control SQL databases backup and restore. For enterprises, this can ensure both the security of your data and the efficiency of your work.

