


How to Create ESXi bootable USB and Install ESXi from USB
You may used to install VMware ESXi via CD/DVD, but what if the server do not have a CD drive? In this article, I will introduce how to install ESXi from USB.
By Crystal / Updated on August 30, 2024
Can you install ESXi from USB?
VMware ESXi is one of the most popular type-1 hypervisors. Many people know how to burn an installation ISO to a CD-ROM to install VMware ESXi. However, what if there is a server that does not have a CD drive, only USB ports? Can you install ESXi from USB?
The answer is YES. The steps to install ESXi from USB are basically similar to the steps to install from CD/DVD. The biggest difference is that you need to create ESXi bootable USB. In this article, I will demonstrate how to do this.
Except for installing ESXi from USB, there are several other VMware ESXi boot options.
VMware ESXi boot options
The following media are supported for booting the ESXi installer:
- Boot from a CD or DVD.
- Boot from a USB device.
- Boot from a network using the Preboot Execution Environment (PXE).
- Boot from a remote location using a remote management application: HP Integrated Lights-Out (iLO), Dell Remote Access Card (DRAC), IBM management module (MM), and Remote Supervisor Adapter II (RSA II).
*Similar boot options apply to VMware ESXi 6.5, 6.7 and 7.
How to install ESXi from USB in Windows via Rufus
Next I will explain how to install ESXi 6.5 from USB in two parts. You can use the same tool (Rufus) create bootable drive and install ESXi 7 from USB.
Step 1. Create ESXi bootable USB
In this part I will introduce how to burn ESXi ISO to USB before start using it to install ESXi. You need to prepare the following items in advance.
- VMware ESXi ISO image downloaded from VMware’s official website (click "Download Product" besides VMware vSphere and then "Select Version" to download the ISO of the version you want).
- Empty USB flash drive (minimum 8GB) that supports the installation of ESXi.
- Tools like Rufus to make the USB bootable.
How to create ESXi bootable USB via Rufus:
1. Connect the USB flash drive to your computer.
2. Launch Rufus, and select your USB drive as Device.
3. Click SELECT to specify the ESXi ISO image you download, and add a name to Volume label.
4. Select MBR as Partition scheme, BIOS or UEFI as Target system type, and select FAT32 as File system.
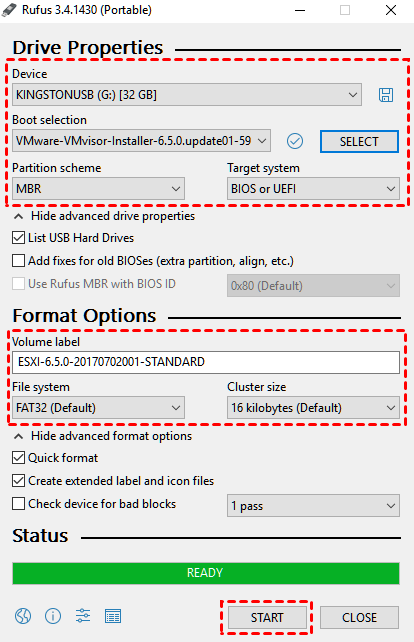
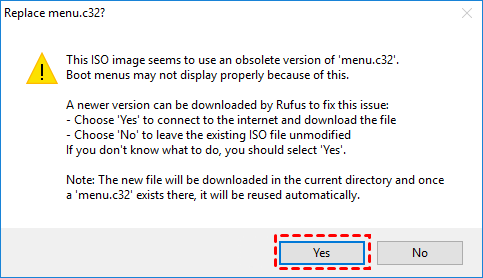
5. Click START. It will pop up a window informing that the boot menu on the ESXi ISO is obsolete, and it will connect to the Internet to download a new file to replace it. Click Yes to continue.
6. There may be another prompt informing you that the installation USB media will be reformatted and all data destroyed. Click OK to continue.

Step 2. Install ESXi from USB
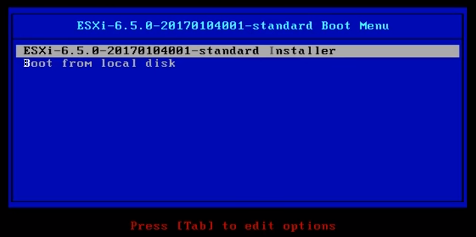
1. Connect your bootable USB drive to the host, and change the boot order to boot from the USB drive in the BIOS boot menu.
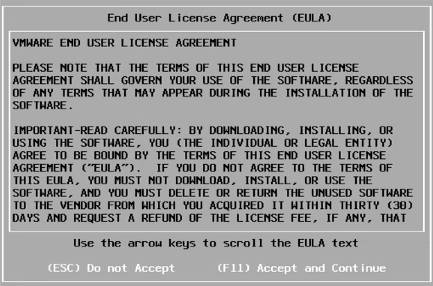
2. Accept the End User License Agreement (EULA) and proceed.
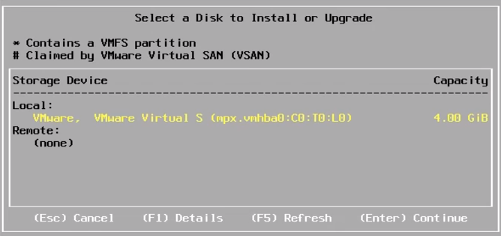
3. The installer will scan and display all drives on the host available for installation. Select the destination drive you want to install ESXi on.
Note: The USB drive will also as an option for destination drive. And yes, you can also select to install and run ESXi from USB stick.
4. Then select a keyboard layout.

5. And then enter a root password to continue.
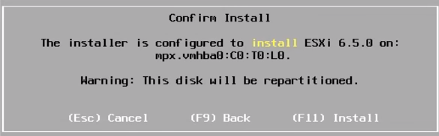
6. The installer will rescan the system, and then display the Confirm Install window. Select Install to continue.
7. Wait for the installation process to complete, and then eject the USB from the host and reboot the system.
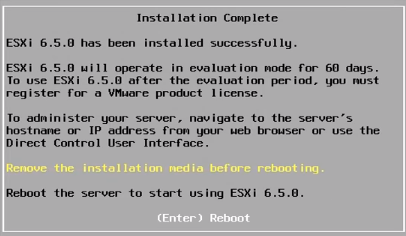
The installation is now complete. The next thing you still need to do is to configure the host as your own needs.
Always remember to protect your ESXi VMs
The importance of data protection needs no elaboration these days, but there are differences between physical and virtual machine backup solutions.
If you have a small number of virtual machines, or if you want to back up certain files in these VMs, then you can consider using the backup solution that comes with the client OS, such as Windows Backup and Restore; However, if you have multiple virtual machines and want to protect them easily and entirely, you may need a centralized and agentless backup solution.
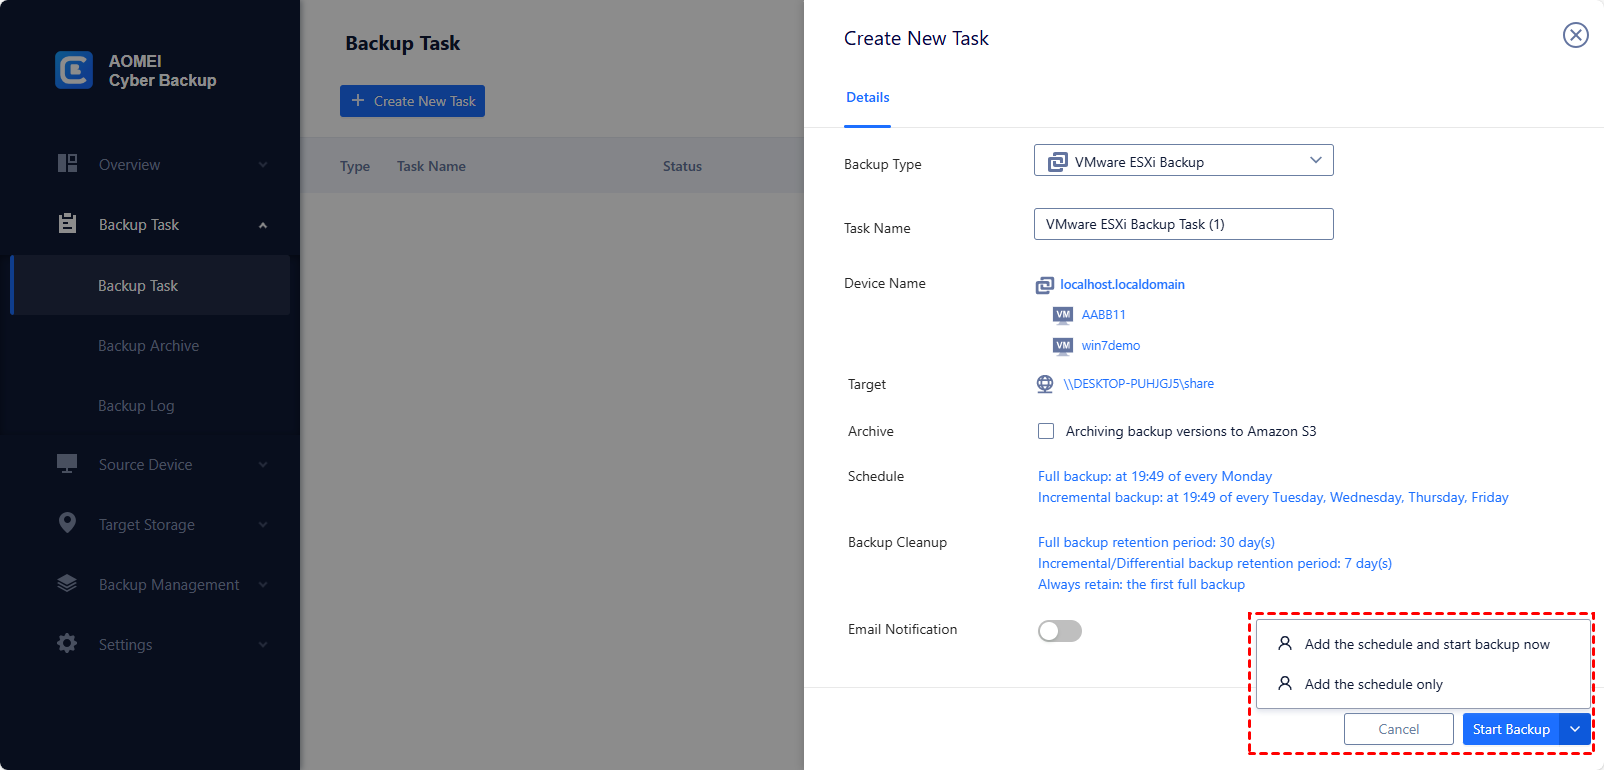
AOMEI Cyber Backup is such a free VMware backup software that can help you back up VMs in ESXi host effortlessly. Besides fast backup & restore, you can also set up a backup schedule to automate the task. It supports both paid and free versions of VMware ESXi.
With its user-friendly interface, you will learn how to operate it without any expertise. You can click the following button to download the freeware.
*You can choose to install this VM backup software on either Windows or Linux system.
Updated: Can you install ESXi on USB?
As mentioned earlier, you can select a USB drive as destination to run ESXi, but it is not the preferred choice.
Installing ESXi on a USB flash drive or SD flash card has the same minimum requirements as installing to a typical SCSI or SATA hard drive. For other details, please check ESXi hardware requirements.
Note that vSphere users have encountered a number of issues related to device reliability when SD cards/USBs are used as boot devices. Durability ratings no longer guarantee their viability as a boot option. Also, SD/USB devices themselves are not designed for enterprise-class use cases and can easily wear out over time.
Here's a glance at the situation in the newer ESXi versions.

Is USB boot deprecated in ESXi 7 onwards?
You can indeed install ESXi 7 from USB, but is it a good idea to boot ESXi from USB?
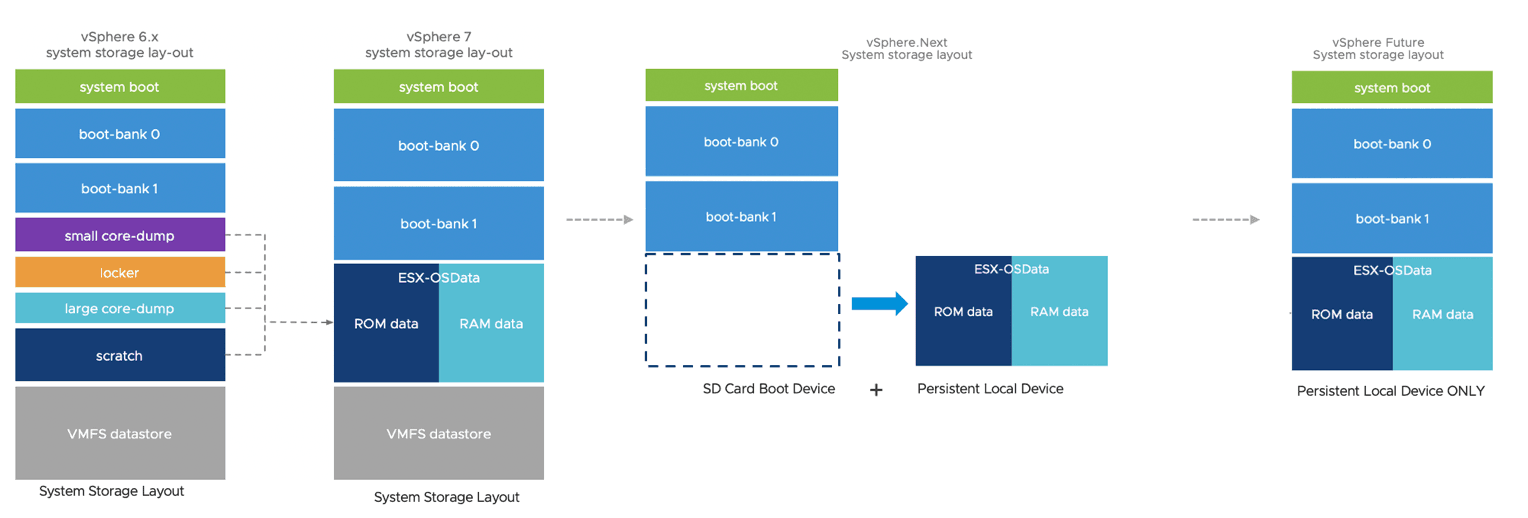
Simply put, vSphere 7 supports booting ESXi hosts from the Unified Extensible Firmware Interface (UEFI) - with UEFI, you can boot systems from hard drives, CD-ROM drives, or USB media. Nevertheless, it's recommended to use a persistent storage device with a minimum of 32GB as the boot device for optimal performance of ESXi 7 installation.
Legacy SD and USB devices are still supported with the following limitations:
👉 SD and USB devices are supported for boot bank partitions. For best performance, a persistent local device of at least 32GB is also required to store the /scratch and VMware Tools partitions of the ESX-OSData volume. The optimal size of a persistent local device is 128 GB.
👉 Starting with ESXi 7.0 Update 3, if the boot device is a USB or SD card and there is no local persistent storage such as HDD, SSD or NVMe device, the VMware Tools partition will automatically be created on the RAM disk.
👉 If you assign the /scratch partition to a USB or SD card with no local persistent storage, you will see a warning to prevent you from creating or configuring partitions other than the boot library partition on the flash media device. For best performance, set the /scratch partition on the RAM disk.
👉 You can also configure and move the /scratch partition to a SAN or NFS. If a local disk cannot be found, or if the boot media is a USB or SD device with no additional persistent data storage, then the /scratch partition is on the RAM disk, linked to /tmp, and ESXi 7.0 is running in degraded mode.
VMware will continue to support USB/SD cards as boot devices (both installs and upgrades) in vSphere 8.0 product releases including updates. SD/USB is supported as a standalone device on previously certified server platforms, but users can still provide additional persistent devices to store OSData partitions. In addition, in vSphere 8.0, the entire OSData partition can be moved out.
VMware is working closely with all major OEMs to ensure that future generations of server platforms do not support USB/SD cards as boot devices and to provide a more reliable mechanism to comply with the following VMware device and endurance requirements servers for boot devices.
Summary
Except for CD/DVD, there are still many VMware ESXi boot options you can choose from, such as USB, PXE, and other remote management applications. In this article, I introduced how to create an ESXi bootable USB and then install ESXi from USB. Hope it could be helpful to you.
After successfully installing VMware ESXi, you are ready to create and start using virtual machines. But in the meantime, please pay attention to securing the important VM data. It is essential to ensure the development and continuity of your business.
As for backing up VMware ESXi, a few effective native solutions cover multiple virtual machines. Therefore, many IT staff turn to third-party apps. You can try the free enterprise backup software - AOMEI Cyber Backup.

