


How to Upgrade VMware ESXi 6.7 to 7.0 via ISO or ESXCLI
VMware vSphere 6.7 is about to End of Life (EOL), before that day you may need to prepare to upgrade your ESXi host from 6.7 to 7.0. This article introduces 2 ways to do that with or without vCenter Server.
By Crystal / Updated on August 23, 2024
Is VMware vSphere 6.7 End of Life (EOL)?
If you are using VMware vSphere 6.7, then you probably know that vSphere 6.7 was supposed to reach the End of General Support (EoGS) on November 15, 2021, as originally planned by VMware. So, is VMware 6.7 end of life (EOL) now? Do you need to upgrade ESXi 6.7 to 7.0 right away?

According to VMware’s product announcement of vSphere 6, 7 support period on June 3, 2020, they have extended the general support period for vSphere by 11 months to October 15, 2022, due to the impact of COVID-19 on business environments. The original End of Technical Guidance (EoTG) for vSphere 6.7 remains unchanged on November 15, 2023.
They added the period of supportability for vSphere 6.7 to offer customers worry-free stability and an added buffer period for planning future upgrades to vSphere 7.0. Therefore, it is necessary to be ready for VMware ESXi upgrade 6.7 to 7.0. In this article, I will introduce how to perform and what you need to do in advance.
👉End of Life (EOL) for VMware products refers to the end of the following 2 phrases:
General Support Phase: Begins on the date of general availability of Major Release and lasts for a fixed duration. During it, customers can receive maintenance updates and upgrades, bug fixes, and technical assistance.
Technical Guidance Phase: Provided from the end of the General Support phase and lasts for a fixed duration. Technical Guidance is available primarily through the self-help portal and telephone support is not provided.
Compare VMware vSphere ESXi 6.7 vs 7
vSphere 7 is the biggest enhancement to ESX in over a decade. It is available in 2 editions: vSphere 7 (for traditional applications) and vSphere 7 with Kubernetes (for containerized applications).
Compared to vSphere 6.7, vSphere 7.0 mainly introduces the following new capabilities:
- Native support for Kubernetes: you can run containers and virtual machines on the same platform.
- vSphere Lifecycle Manager: new tools for simplified upgrades, patching, and configurations.
- Redesigned DRS: balance resources allocated to workloads in cluster in a more workload-centric manner.
- Enhanced vMotion: provides non-disruptive operations, irrespective of the size of VMs, specifically for large and mission-critical workloads.
- Identity federation with ADFS: provides secure access and account management…
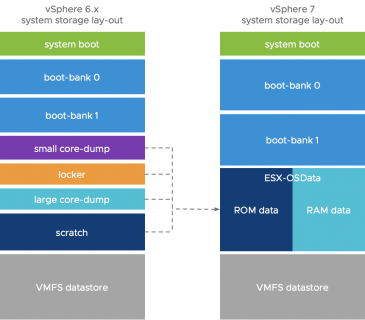
Specifically for ESXi, the main difference is that ESXi 7.0 has a completely new partition layout. The ESXi 7.0 has 4 partitions compared to the previous release which has had 8. Therefore, you cannot revert to the previous version via the VMware ESXi recovery mode.
Besides, VMware limits the number of cores per license to 32. This means if you buy a 1 CPU license you will only be able to have CPU with 32 cores; If the CPU has more than 32 cores, additional (per-CPU) licenses are required.
For more details, you can refer to VMware’s official document: VMware vSphere Feature Comparison
Preparations before upgrade VMware vSphere/ESXi 6.7 to 7
👉Before you start upgrading vSphere from 6.7 to 7.0, you may need to prepare the following in advance:
✤Check compatibility: such as compatibility with VMware ESXi, vCenter Server, VMware accessories and plug-ins.
✤Shut down all virtual machines: make sure there is no running VM on the ESXi host when you start the ESXi upgrade 6.7 to 7.0 process. To further protect the VM data, you can also backup[link] before start.
✤Check storage space for upgrade: Upgrades may fail if you don’t have enough free space.
✤The upgrade sequence: If your environment is distributed across multiple machines, the upgrades must be done sequentially, not concurrently. For example, first vCenter Server, then VMware ESXi.
✤Backup ESXi 6.7 VMs: Before you start doing some risky operations, it is necessary to back up your VMs in case of accidental loss. Thus, even if anything goes wrong, you can roll back to the previous version via the backup.
Method 1. Upgrade ESXi 6.7 to 7.0 via offline ZIP file and ESXCLI
If you want to upgrade ESXi 6.7 to 7.0 without vCenter, then this may be the method you need. Just download the offline bundle you need from the VMware website, use the ESXi web client to upload the ZIP file, and then upgrade ESXi 6.7 to 7.0 via CLI. Here's the step-by-step guide to do it.
✎Note: To use command line interface on the ESXi host, you need to enable ESXi Shell and SSH in advance.
Approach 1: Enter ESXi direct console -> “System customization” -> “Troubleshooting options” -> click on “Enable ESXi Shell” and “Enable SSH”.
Approach 2: Log in to the VMware Host Client web interface with your ESXi root credentials -> “Manage” -> “Services” -> start the “TSM” and “TSM-SSH” services.
How to upgrade VMware ESXi from 6.7 to 7.0 via offline method:
1. Download the full-down "ESXi 7.0 offline bundle" from VMware’s official site. Here you can download other ESXi versions as well. For example, you can also perform the ESXi upgrade 6.7 to 7.0 U3 via the corresponding bundle.
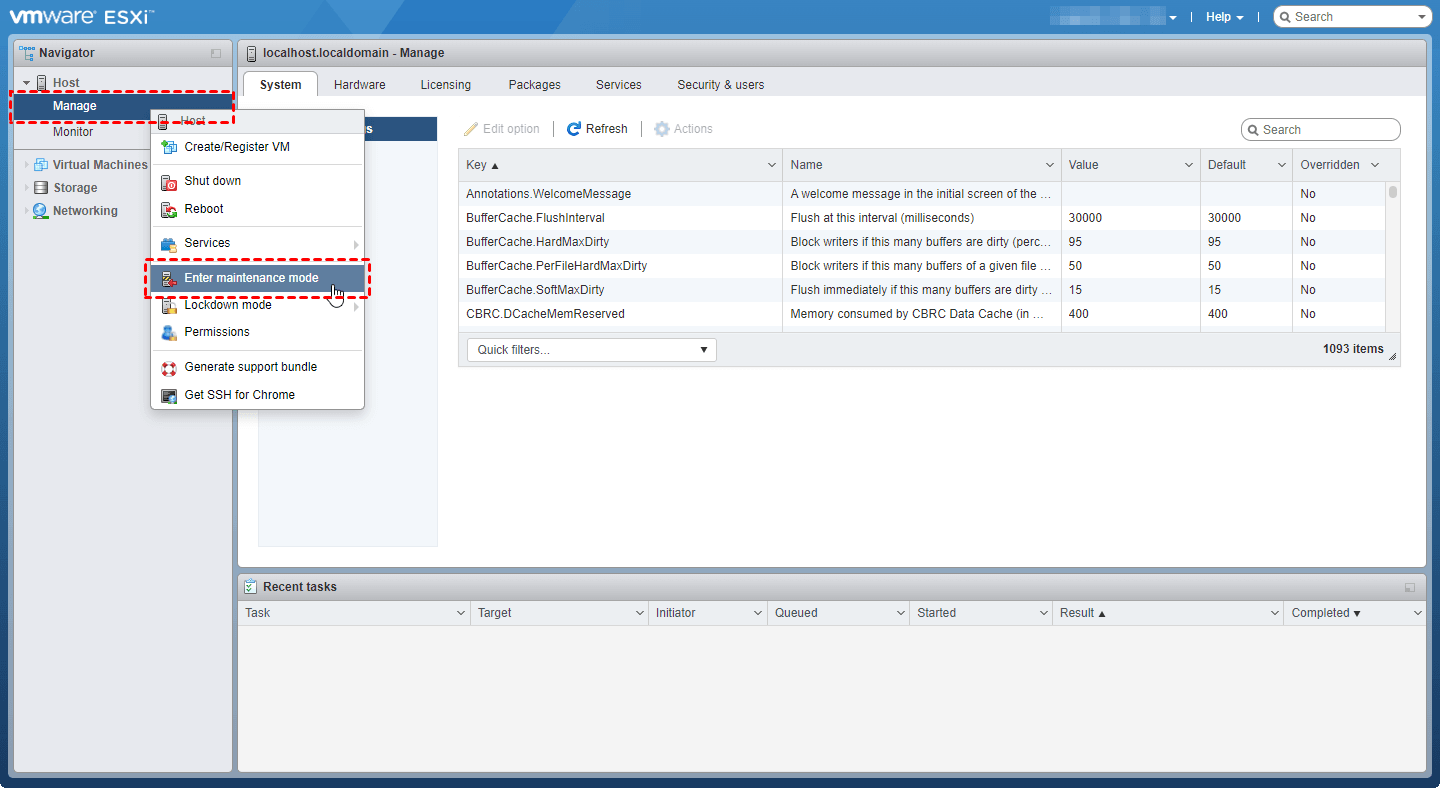
2. Access the VMware ESXi web client, right-click Manage from the left inventory and select Enter maintenance mode.
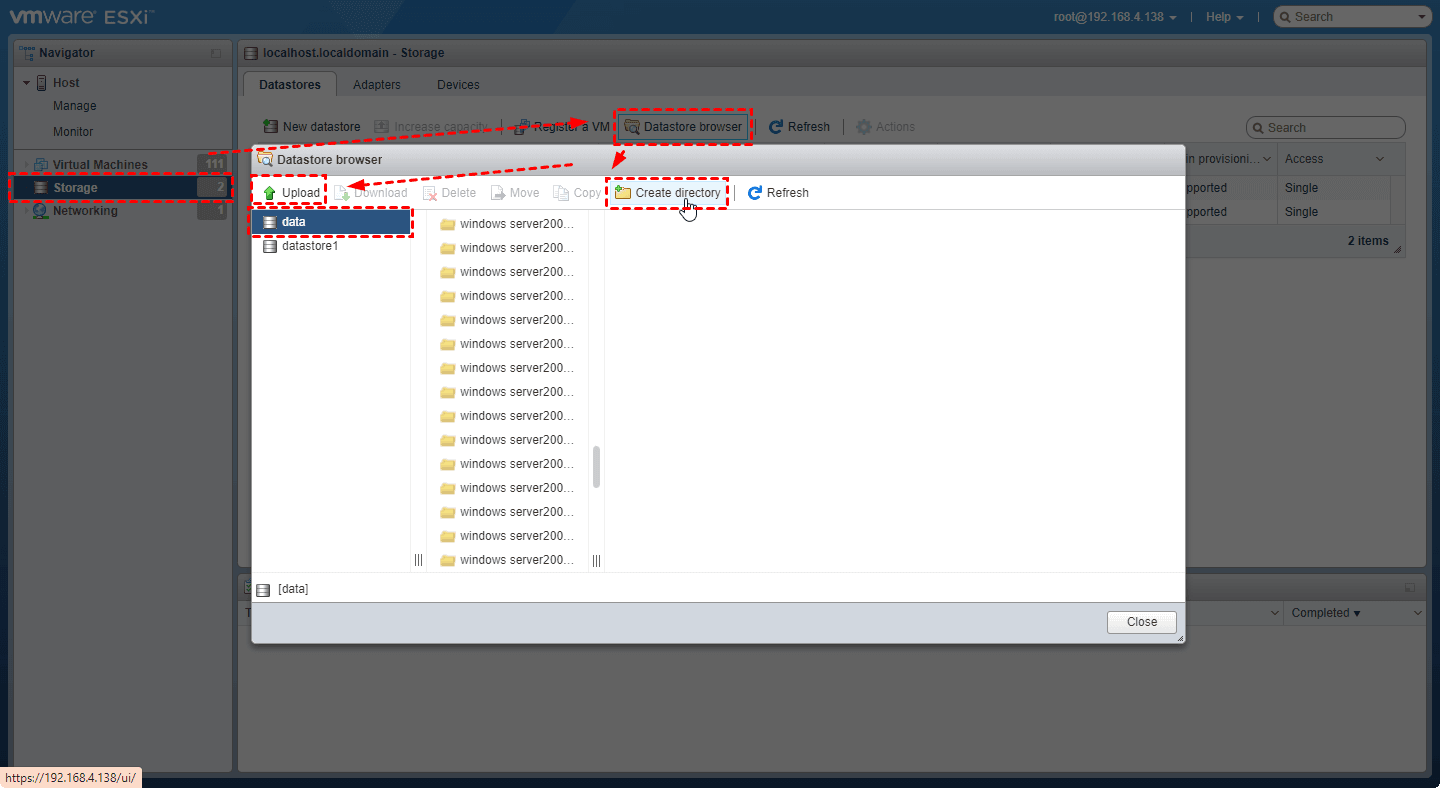
3. Navigate to Storage > Datastore > Datastore browser to upload the downloaded ZIP file to the ESXi datastore.
4. Run the following command to upgrade VMware ESXi 6.7 to 7.0:
Note:
ESXi profile name: contains the version and build number that is equal to the ESXi version and build number defined in the name of the ZIP file used for the ESXi upgrade.
You can run the command “vmware-v” to check the current version of ESXi running on your server.
Here's an example:
esxcli software profile update -p ESXi-7.0U2d-18538813-standard -d /vmfs/volumes/datastore1/ESXi7-bundle/VMware-ESXi-7.0U2d-18538813-depot.zip

5. Reboot the ESXi host to finish the ESXi upgrade 6.7 to 7.0.
Method 2. Upgrade ESXi 6.7 to 7.0 via ISO (Lifecycle Manager)
Here's another way to upgrade ESXi 6.7 to 7.0 with vCenter - you can use vSphere Lifecycle Manager to upgrade the ESXi hosts in an environment where you have VMware NSX-T Data Center enabled.
✎The requirements for ESXi upgrade via Lifecycle Manager:
✤The ESXi hosts to upgrade are version 6.5 or later
✤vCenter Server version 6.7 or earlier
✤VMware NSX-T Data Center 3.0
✤The vmknics on the ESXi host are properly configured and the DHCP server works properly
If these requirements are all met, you can refer to the following tutotrial to upgrade ESXi 6.7 to 7.0.
How to upgrade ESXi 6.7 to 7.0 using ISO:
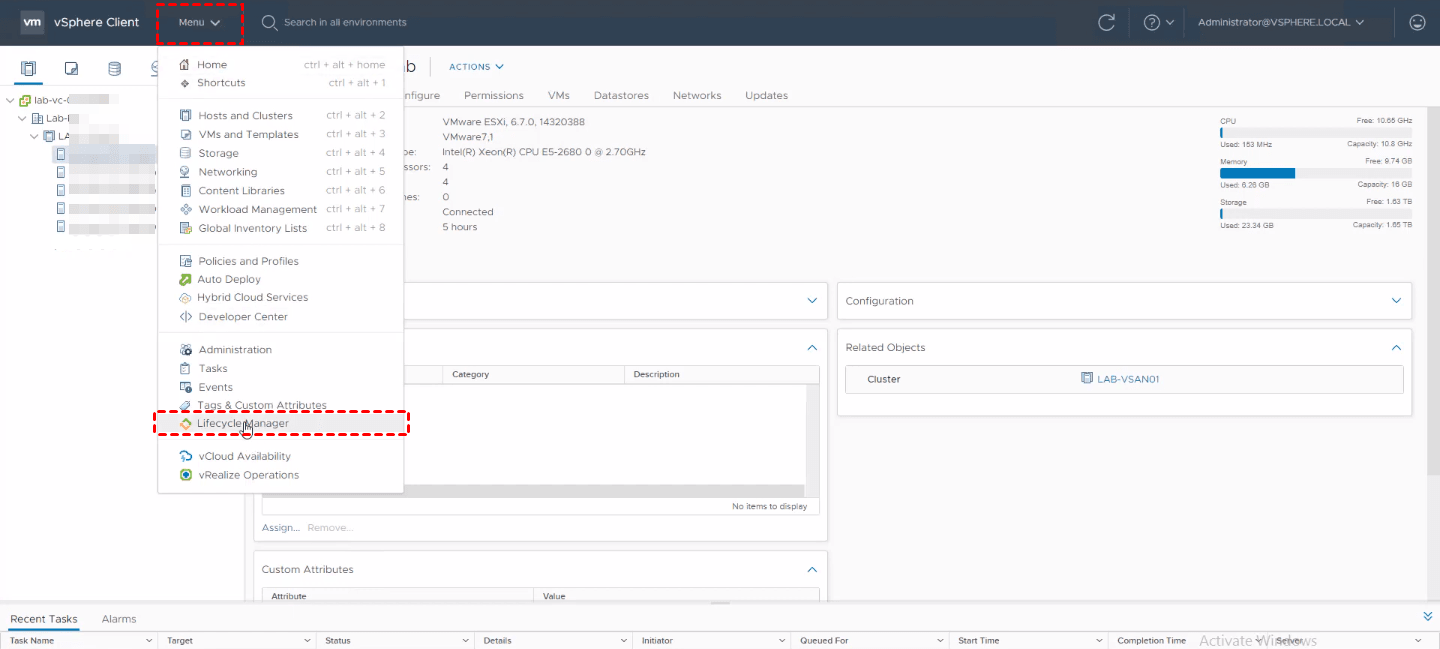
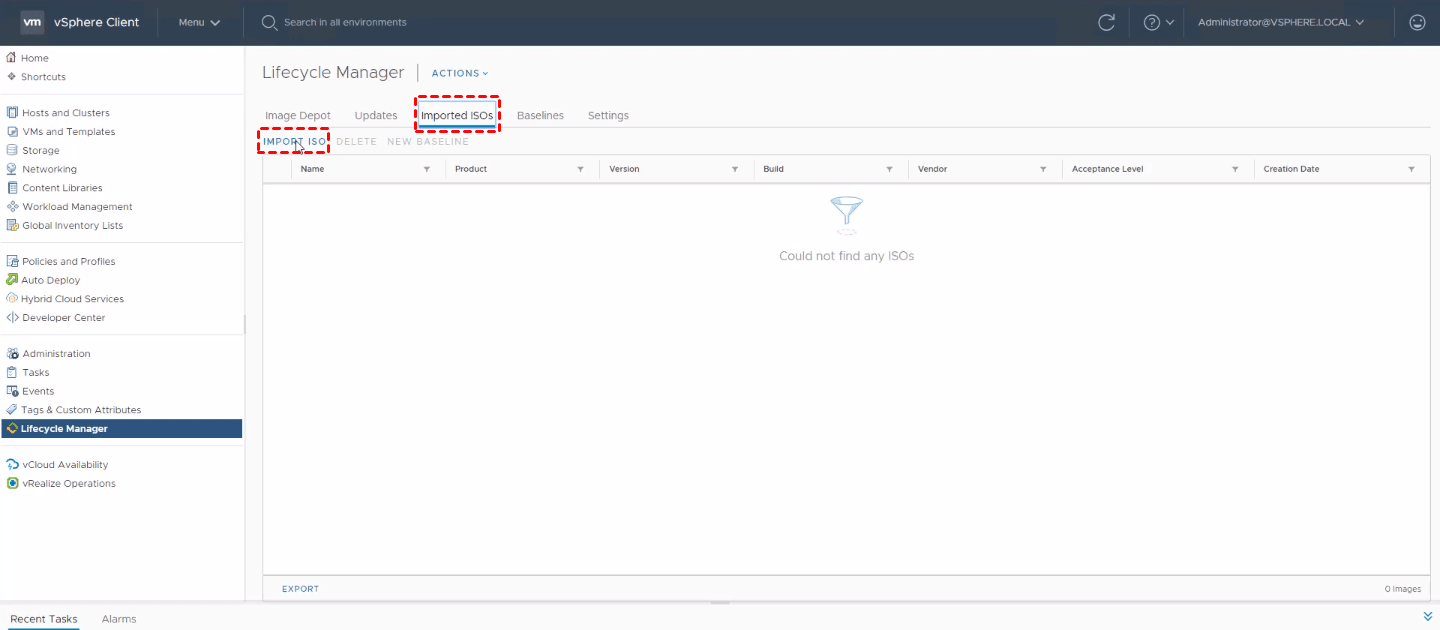
1. Launch vSphere web client and log in to the vCenter Server, then navigate to Menu > Lifecycle Manager.
2. Click Imported ISOs > IMPORT ISO to import the ISO image for ESXi 7.0.
3. Click BROWSE to select the ESXi 7.0 ISO file, click IMPORT to start.

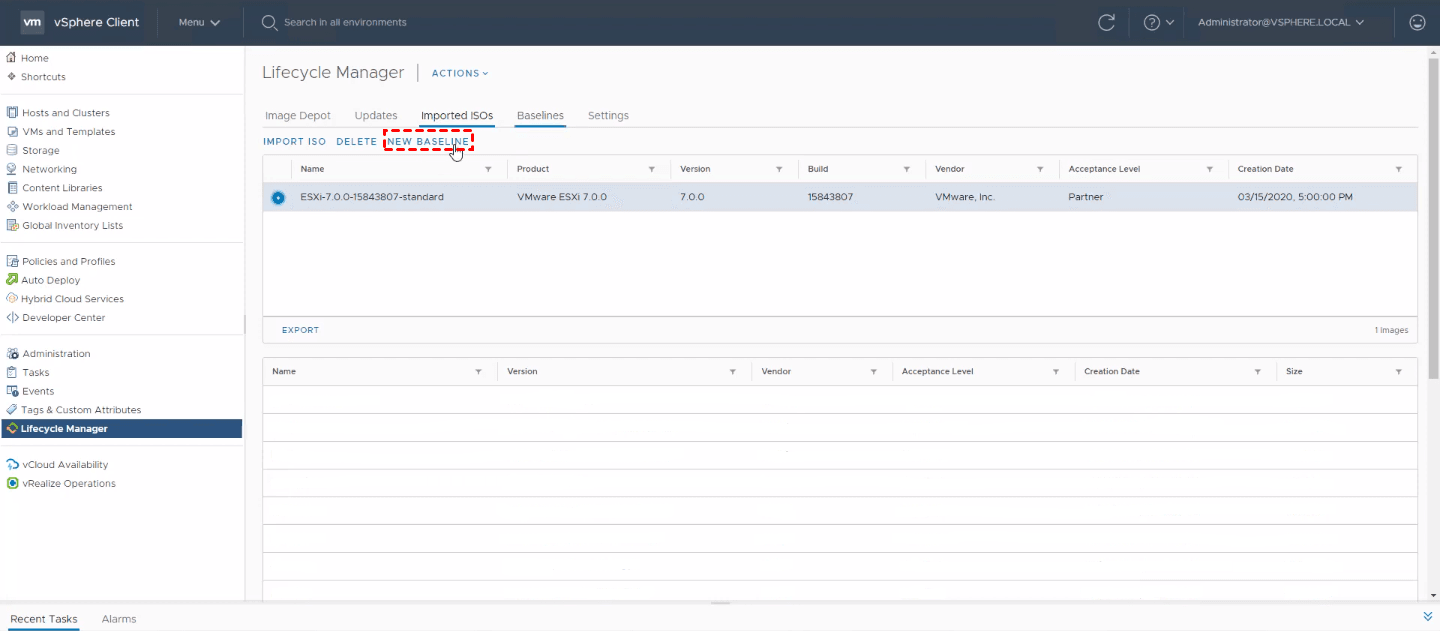
4. Select the imported ISO image and click NEW BASELINE.
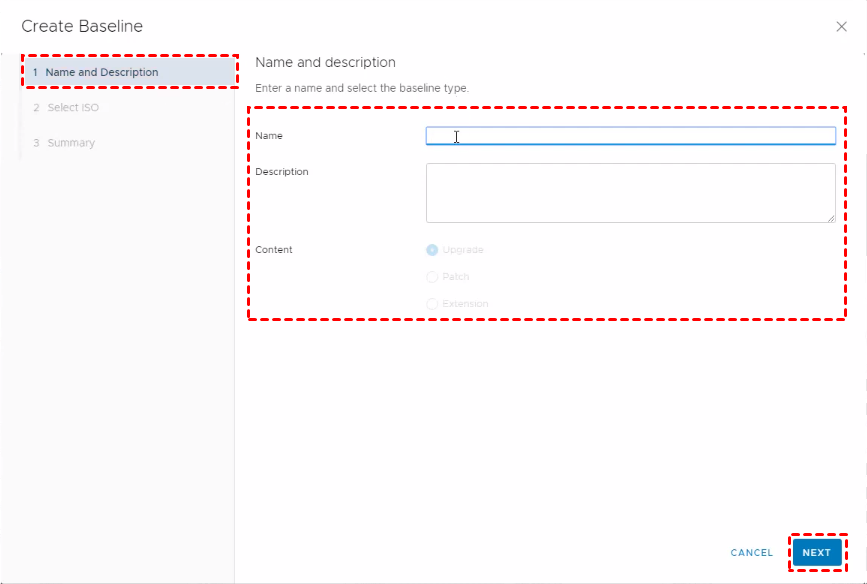
5. Provide a Name and optionally a Description in the pop-up window, select the Upgrade option as Content, and click Next to continue.
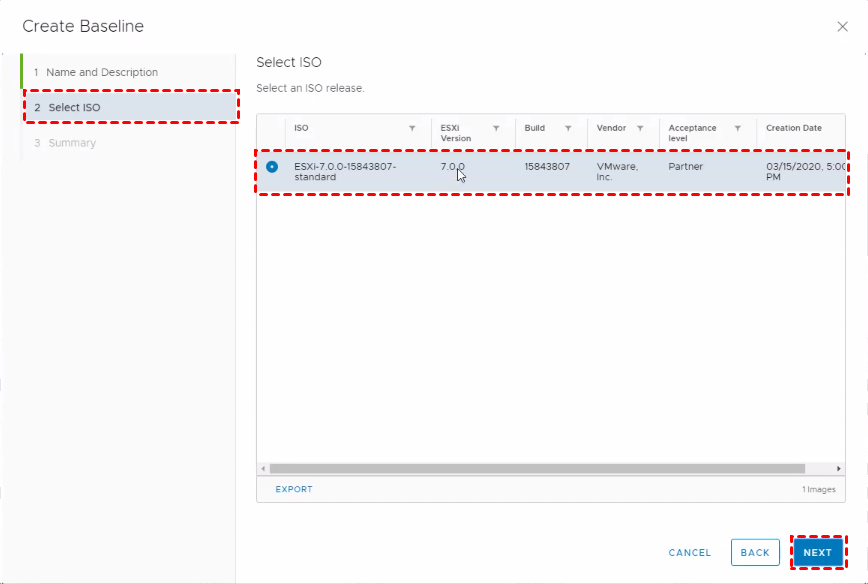
6. Select the ISO image to be used and click Next to continue.
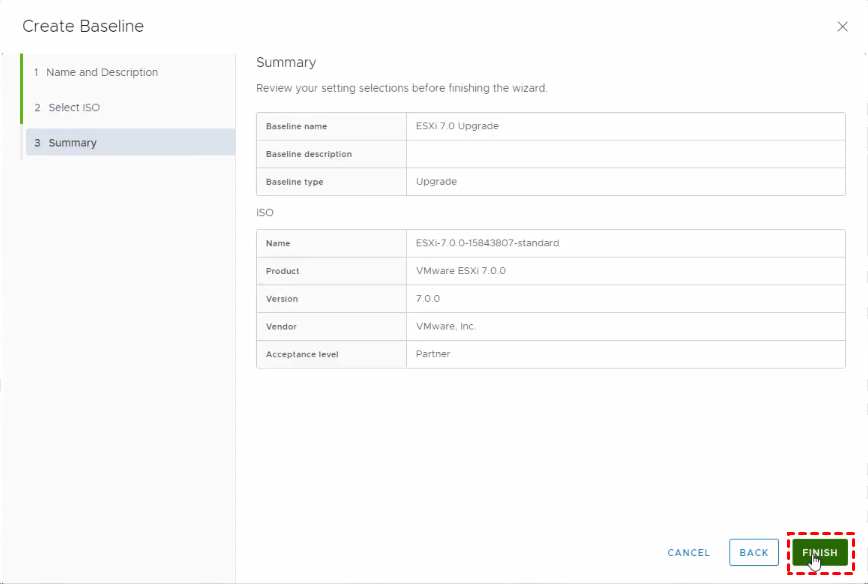
7. Review the Summary and click Finish to create the new baseline.
8. Select an ESXi host or a cluster, navigate to Updates > Baselines >Attached Baselines and click ATTACH to attach the baseline to the host or cluster.

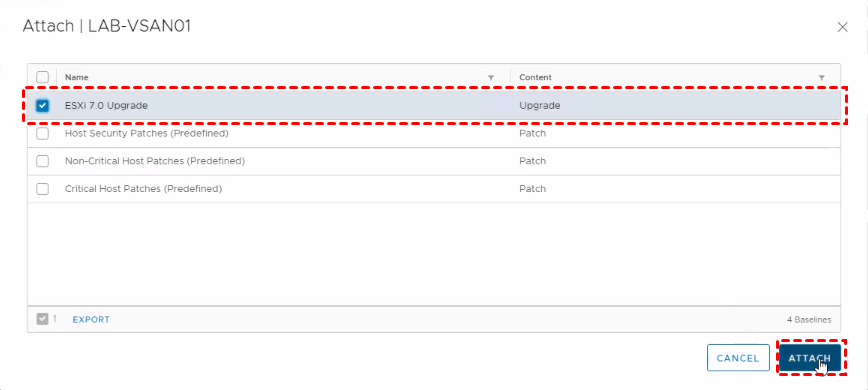
9. Select the ESXi 7.0 Upgrade Baseline we just created in the pop-up window, and click ATTACH.
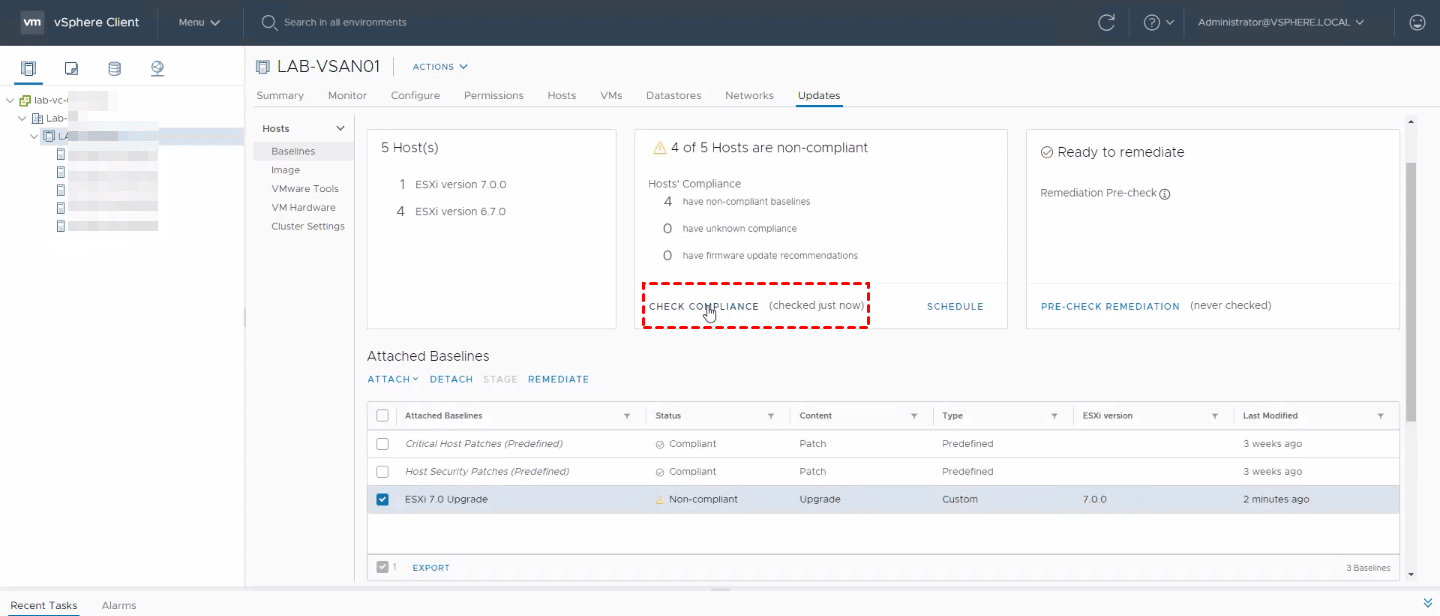
10. Click CHECK COMPLIANCE, it will show “Non-Compliant” for all hosts in the cluster. Then you can upgrade the ESXi host.
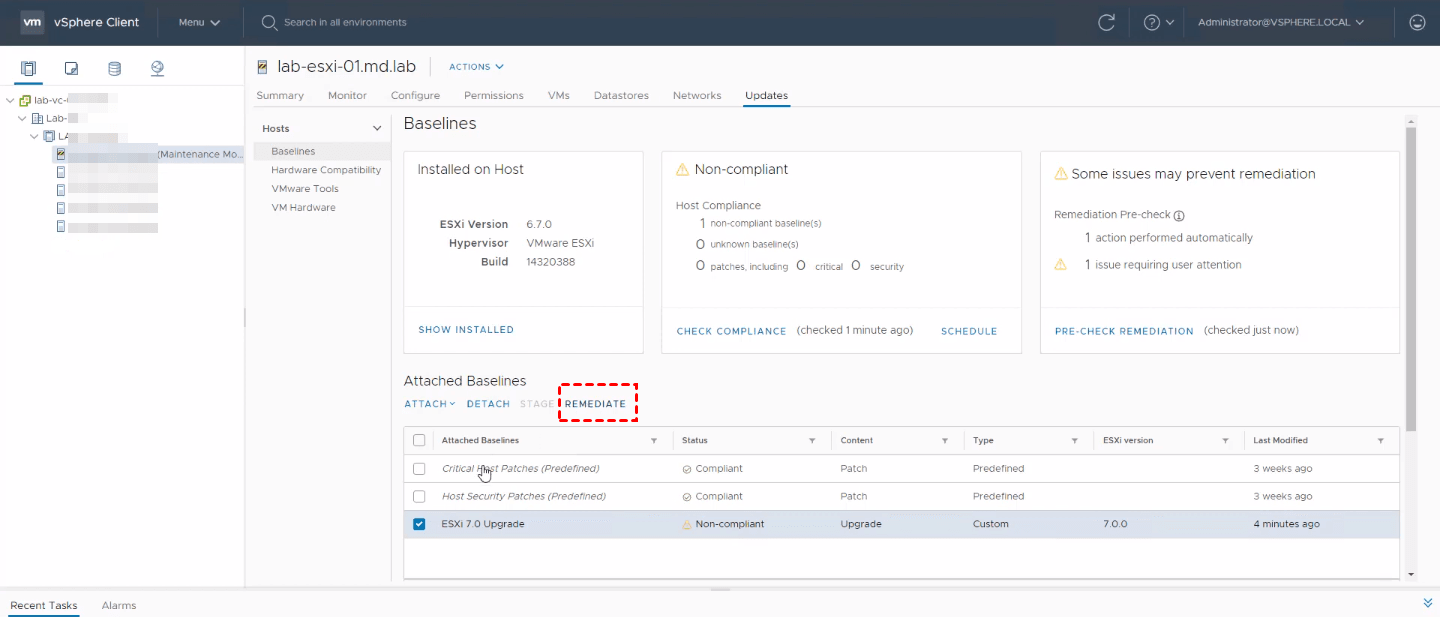
11. To remediate an individual ESXi host, Place the ESXi host into maintenance mode. Select the ESXi 7.0 Upgrade baseline and Click Remediate.
Note: You can also remediate the entire cluster.
12. Select the ESXi host in the pop-up wizard and click REMEDIATE to start VMware ESXi upgrade 6.7 to 7.0.
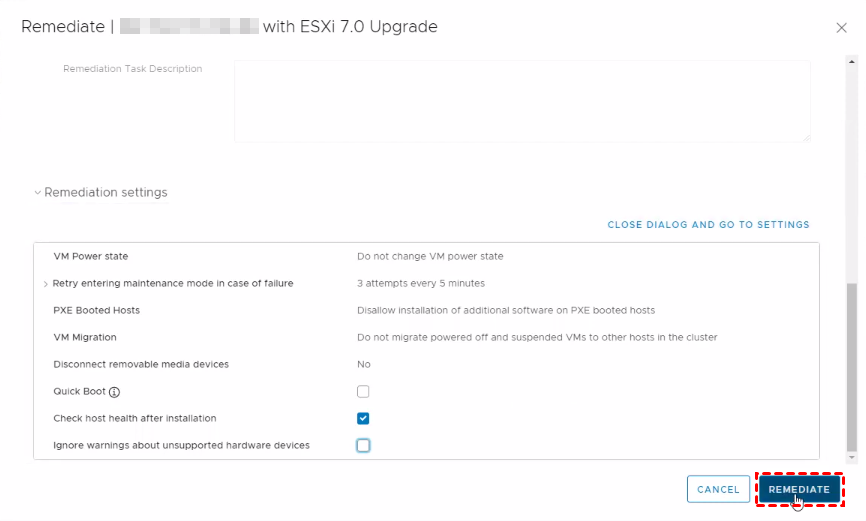
Once the upgrade is completed, the status of the attached Upgrade Baseline will become “Compliant”.
Do I need to license ESXi host after upgrade?
Note that only if you upgrade an ESXi host to a version that starts with the same number, you don't need to replace the existing license with a new one. For example, if you upgrade a host from ESXi 6.5 to 6.7, you can use the same license. But if you upgrade ESXi 6.7 to 7.0, you must apply for a vSphere 7 license.
When you upgrade ESXi 6.7 or 6.5 to 7.0 hosts, the hosts are in a 60-day evaluation mode period until you apply for the correct vSphere 7 licenses. You can acquire vSphere 7 licenses from My VMware. After you have vSphere 7 licenses, assign them to all upgraded ESXi 7.0 hosts by using the license management functionality in the vSphere Client.
For more details about it, please refer to: After You Upgrade ESXi Hosts
Importance: Backup your VMware ESXi VMs in case of accidents
As you may know, neither the free ESXi host nor vCenter Server provides the feature of virtual machine backup. if you use the free VMware ESXi, you will need additional support since it does not support vStorage APIs.
Here I introduce you to a free VMware backup software - AOMEI Cyber Backup. It supports both paid and free versions of ESXi 6.7 and 7.0, so you can continue to use it after the upgrade VMware 6.7 to 7.0.
It offers you the following benefits.
✦ Agentless Backup: create complete and independent image-level backup for VMware ESXi VMs.
✦ Support Free ESXi: support both paid and free versions of VMware ESXi.
✦ Multiple Storage Destinations: backup to local or network share destinations. And you can save backups to Amazon S3.
✦ Automated Execution: create backup schedules to automate virtual machine protection.
✦ Perpetual Free: you can use AOMEI Cyber Backup Free Edition with no time limit.
Next, I will demonstrate how to create an automatic backup task that covers multiple ESXi VMs. You can click the following button to download the freeware. Then we will guide you on how to use it to back up your VMware ESXi.
*You can choose to install this VM backup software on either Windows or Linux system.
1. Bind Devices: Access AOMEI Cyber Backup web client, navigate to Source Device > VMware > + Add VMware Device to add vCenter or Standalone ESXi host as the source device, and then click … > Confirm.
Note: Once bound the host you do not need to repeat this step later.

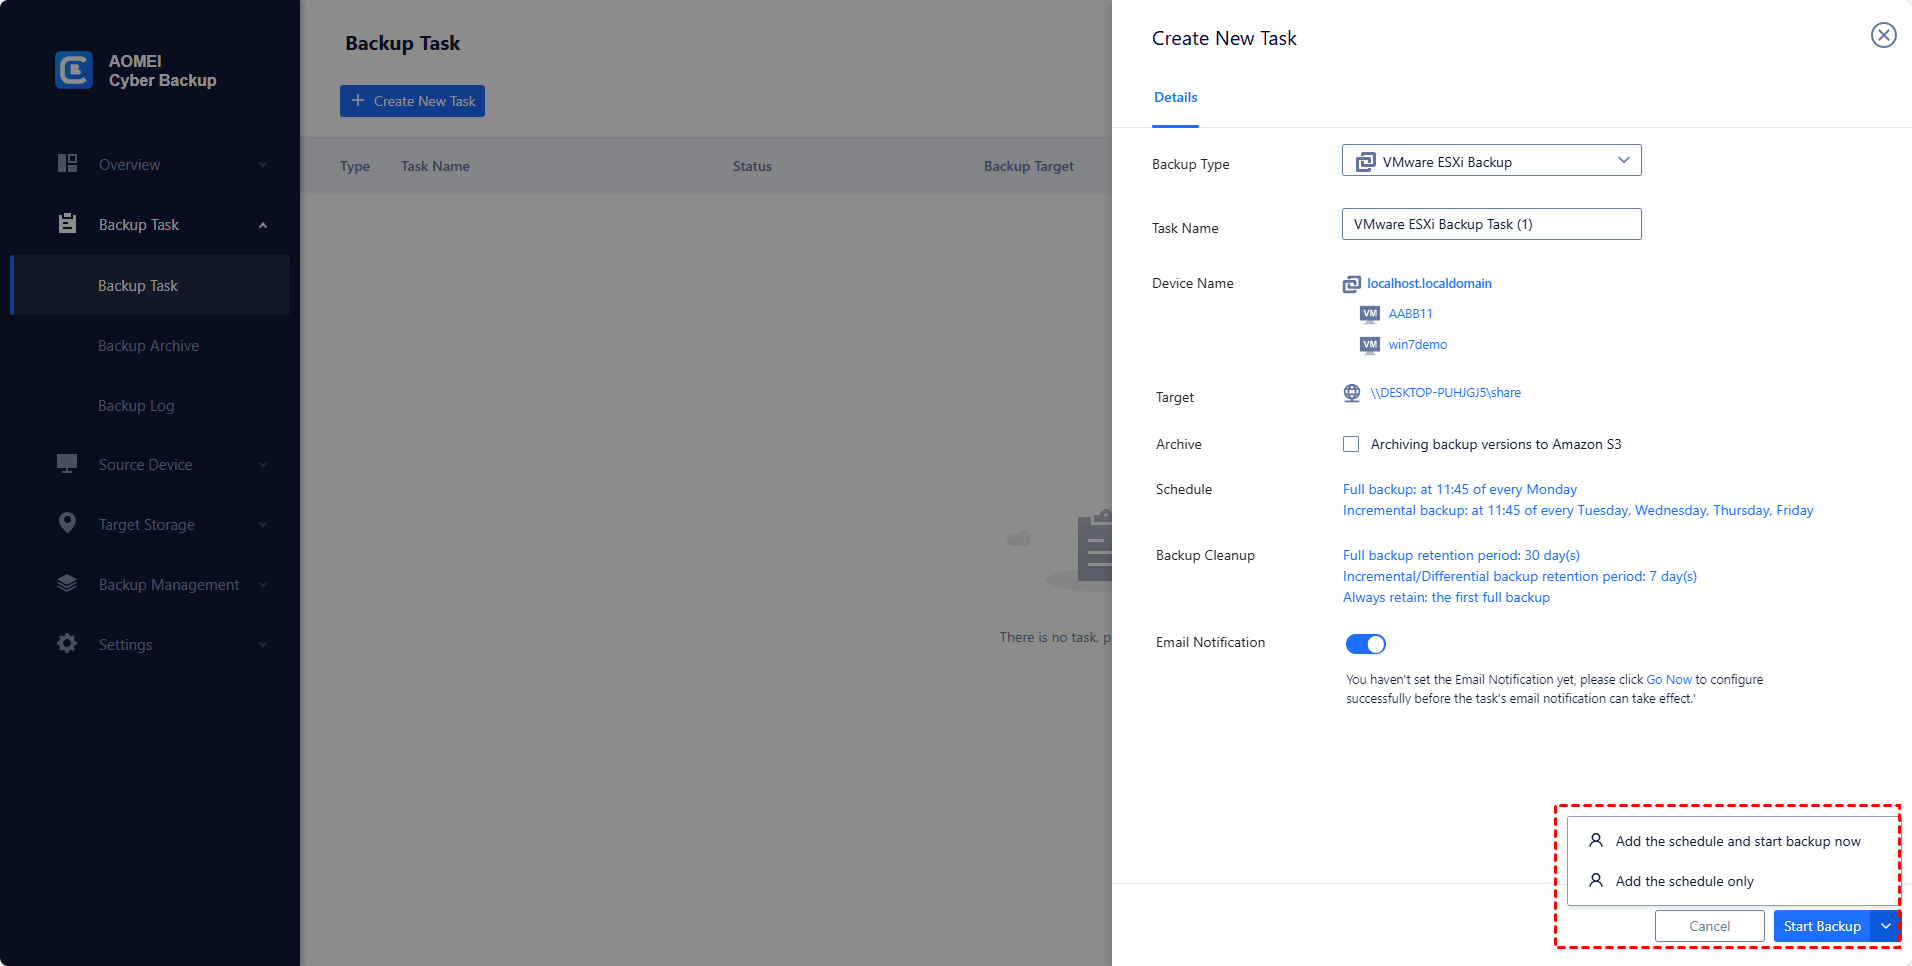
2. Create Backup Task: Navigate to Backup Task > + Create New Task, and then set the Task Name, Backup Type, Device, Target, and Schedule.
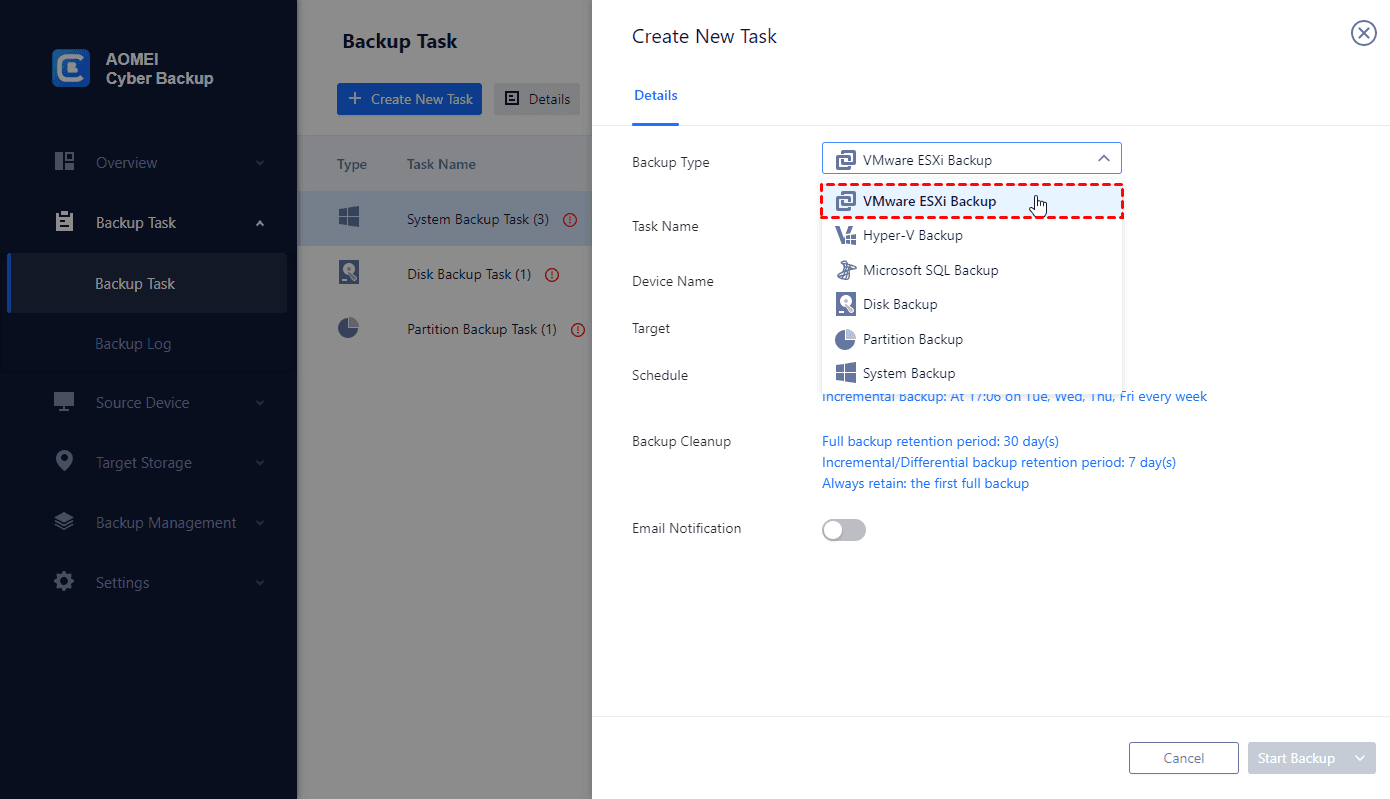
- Device: cover multiple VMs on the host in one backup task.
- Target: selecting to back up to a local path, or a network path. Used paths will be saved in Favorite Storage for handy selection.
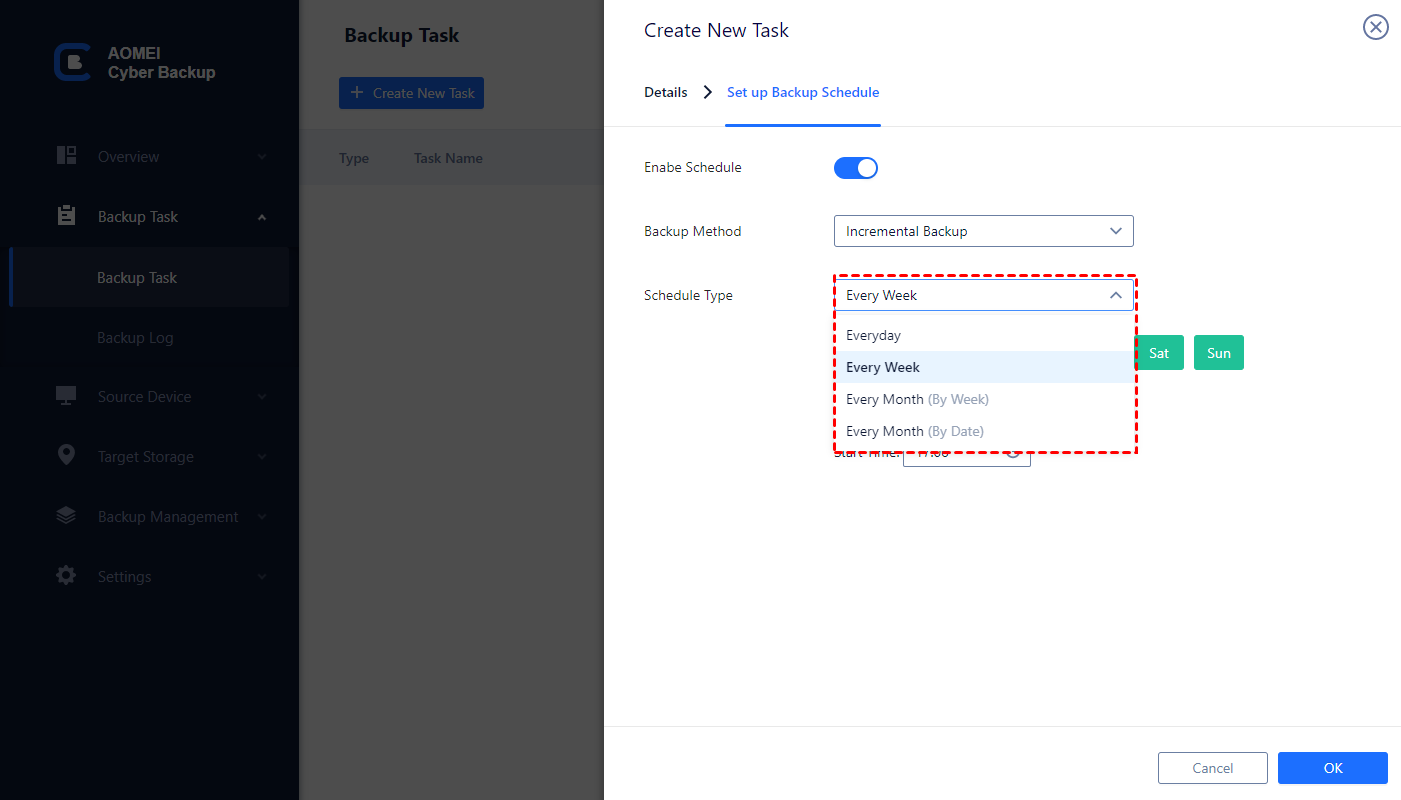
- Schedule: perform full, differential or incremental backup, and automate execution according to the frequency you specified.
3. Now you can click Start Backup and select Add the schedule and start backup now or Add the schedule only according to your need.
While the Free Edition covers most of VM backup needs, you can also upgrade to enjoy:
▶ Batch VM Backup: batch back up large numbers of VMs managed by vCenter Server or standalone ESXi hosts.
▶ Backup cleanup: Configure a backup retention rule to automatically delete old backup versions and save storage space.
▶ Restore to new location: Create a new VM in the same or another datastore/host directly from the backup, saving the trouble of re-configuring the new VM.
Summary
Although the VMware vSphere 6.7 End of Life (EOL) date has been extended, you may still need to upgrade your host as soon as possible. This article introduces 2 ways to perform VMware ESXi upgrade 6.7 to 7.0 with or without vCenter Server. Before you start, you could back up VMware ESXi VMs to further protect your VM data.

