


How to Attach USB Passthrough to Hyper-V VM (4 Ways)
If you have a lot of data that needs to be transmitted to a Hyper-V VM, you may be wondering if you can access the USB device from inside the Hyper-V VM? In this article, I will introduce 3 proven ways to do this.
By Crystal / Updated on June 4, 2026
What is Hyper-V USB passthrough
Hyper-V is one of the most popular type-1 hypervisors. If you want to use a USB device to transmit large amounts of data to a Hyper-V VM, then the Hyper-V USB passthrough is exactly what you need.
Hyper-V USB passthrough refers to direct access to USB devices from inside a Hyper-V VM. There are 3 proven ways to enable Hyper-V USB passthrough access:
- Take USB device Offline and attach to Hyper-V VM
- Access USB device in Enhanced Session Mode
- Enable Hyper-V USB passthrough via Remote Desktop Protocol (RDP)
Their operations are not simple as the built-in VMware feature, since the host and VM cannot access the USB drive at the same time. If you want an easier way, you can perform P2V data transfer using AOMEI Centralized Backupper.
Pros and Cons of Hyper-V USB Passthrough
Hyper-V USB passthrough allows virtual machines (VMs) to directly access USB devices connected to the host machine. It offers increased flexibility and functionality for virtualized environments but requires careful consideration of security implications and potential performance trade-offs. Here are the pros and cons of Hyper-V USB passthrough:
Benefits of Hyper-V USB:
❈ Device Compatibility: It is possible to use a variety of USB devices in a virtual machine, including external storage drives, printers, scanners and more.
❈ Improved Performance: Users can seamlessly connect and disconnect USB devices in virtual machines as needed without impacting the host system.
❈ Flexibility: USB passthrough allows virtual machines to access physical USB devices connected to the Hyper-V host for greater performance.
❈ Enhanced functionality: Some applications or software in a virtual machine may require direct access to a USB device for optimal functionality, such as a security dongle or specialized peripherals.
❈ Data Integration: Hyper-V USB passthrough provides excellent integration between virtual and physical environments, helping to remove barriers to using physical devices within Hyper-V virtual machines.
Limitations of Hyper-V USB:
❈ Security Risks: Directly exposing USB devices to VMs can pose security risks, especially if the devices are infected with malware or if they contain sensitive data.
❈ Resource Allocation: Assigning USB devices to VMs can consume host resources, potentially impacting overall system performance, especially if multiple VMs require access to USB devices simultaneously.
❈ Limited Host Access: Once a USB device is assigned to a VM, it may become inaccessible to the host system, which can be inconvenient if the device needs to be used outside of the VM environment.
❈ Configuration Complexity: While setting up USB passthrough in Hyper-V is relatively simple, troubleshooting compatibility issues or configuring advanced settings may require additional time and expertise.
Way 1: Take the USB disk offline and attach usb to a Hyper-V VM
When installing or repairing an operating system, accessing external devices, performing firmware updates, or system maintenance, you need to boot the Hyper-V virtual machine from a USB drive. This process allows direct access to external resources, but how do you boot a Hyper-V virtual machine from USB? Here are the detailed steps.
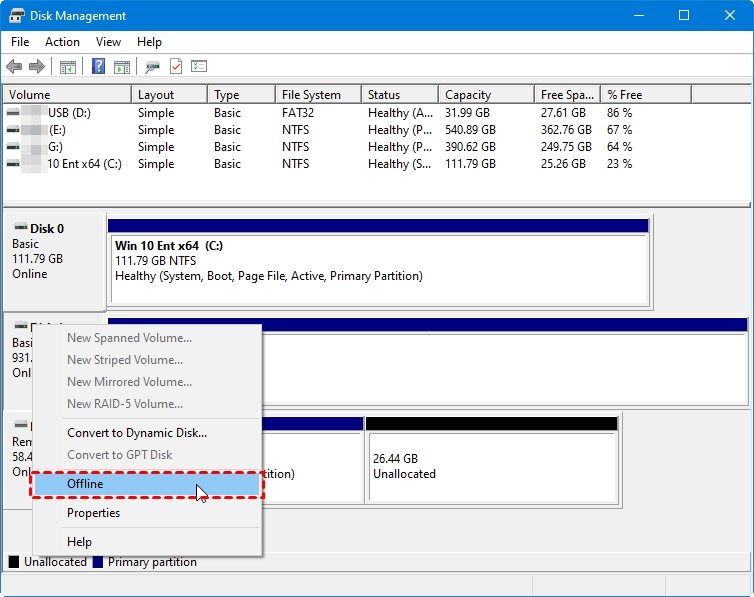
1. Open Disk Management console using diskmgmt.msc command.

2. Right-click on the USB disk and select Offline.
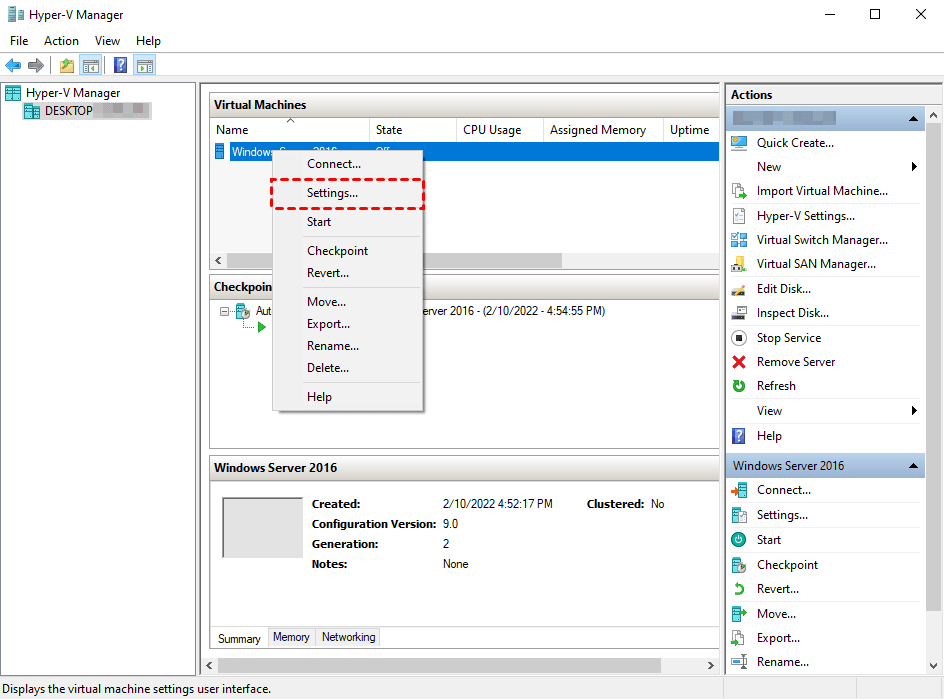
3. Launch Hyper-V Manager, right-click on the VM that needs access to the USB drive, and select Settings.
4. Navigate to SCSI Controller, select Hard Drive option you want to attach to the controller and click Add.
Note: You can only add drive to IDE controller while the VM is powered off, but you can add drive to SCSI controller whether the VM is off or on.

5. Navigate to SCSI Controller > Hard Drive from the left dropping menu, select Physical hard disk option and specify the USB disk to attach. Click OK to save.
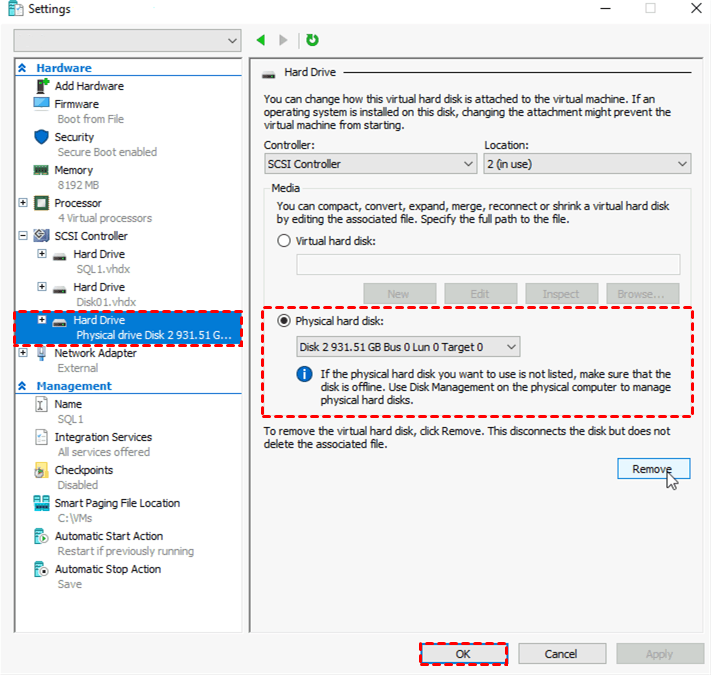
Note: If you want to remove the Hyper-V USB drive, navigate to SCSI Controller > Hard Drive, select the USB drive attached and click Remove.
Way 2: Access USB device in Hyper-V VM in Enhanced Session Mode
Note: If your Hyper-V host is a Windows 8.1 or Windows 10 computer, you can skip this step because Enhanced Session Mode is enabled by default.
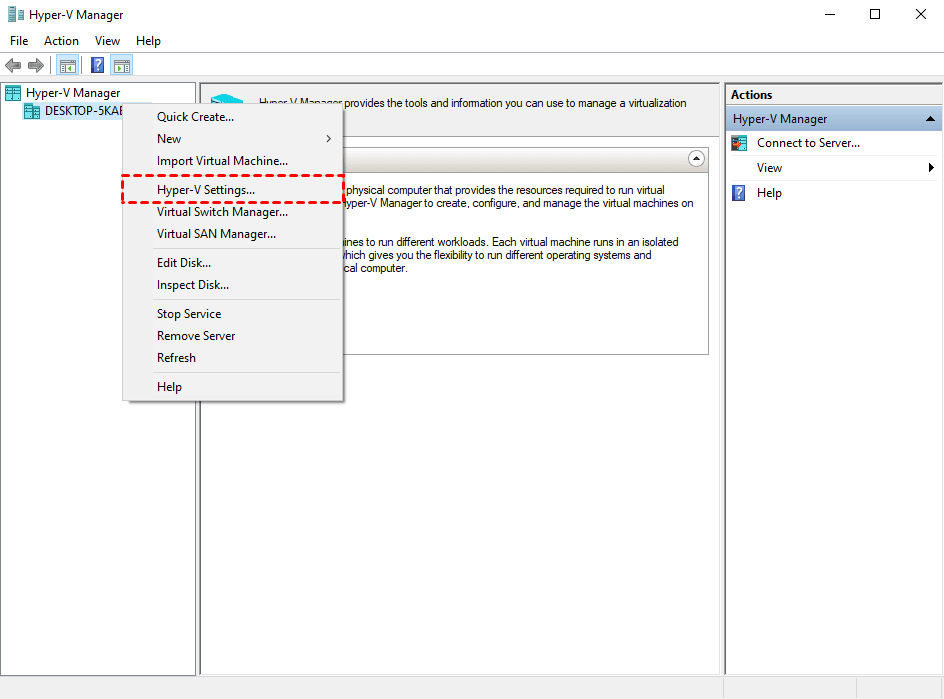
1. Launch Hyper-V Manager, right-click on the host name and select Hyper-V Settings…
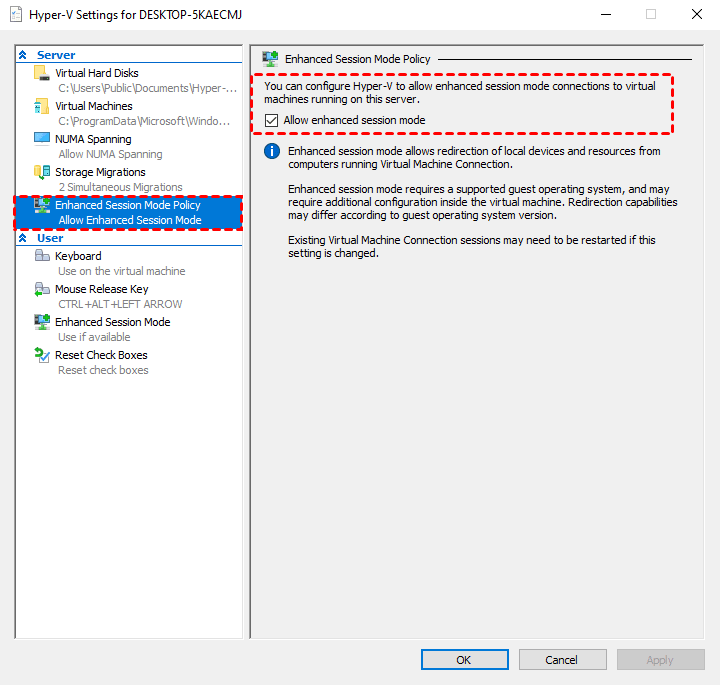
2. Navigate to Enhanced Session Mode Policy from the left Server inventory, and check the Allow enhanced session mode option.
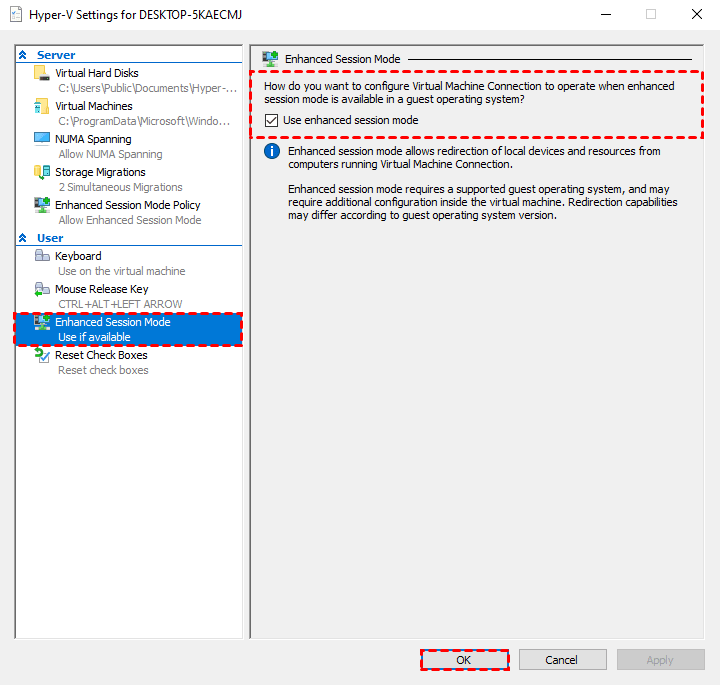
3. Navigate to Enhanced Session Mode from the left User inventory, and check the Use enhanced session mode option. Click OK to save.
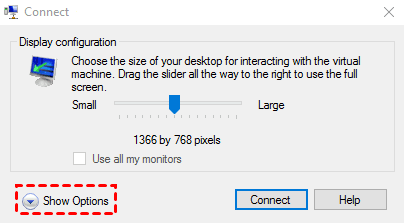
4. Power on the VM, a VMConnect configuration window will pop up. Click Show Options.
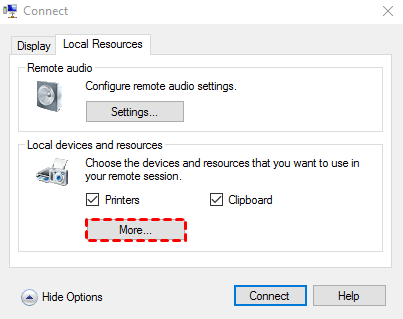
5. Navigate to Local Resources tab, and click More to select the USB devices you want to attach, click OK to save.
6. Back to Local Resources tab, click Connect to attach the USB devices.
Way 3: Enable Hyper-V USB passthrough via Remote Desktop Protocol
1. Power on the VM and navigate to Control Panel > System > Allow remote access.
2. In the pop-up window, check the Allow Remote Assistance connections to this computer and Allow remote connections to this computer options. Click OK to save.

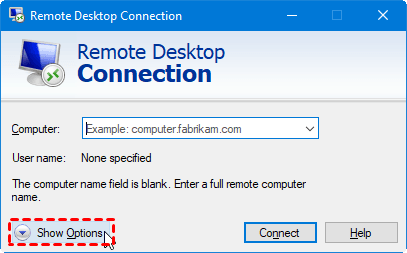
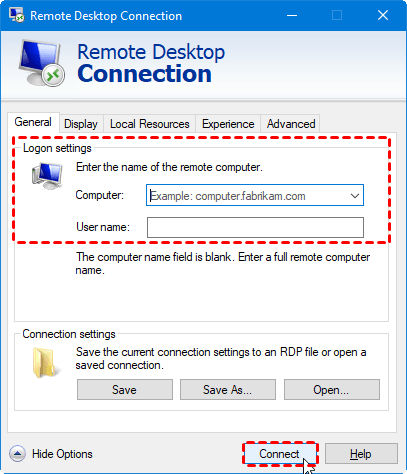
3. Open Remote Desktop Connection window using mstsc command. Click Show Options to expand.
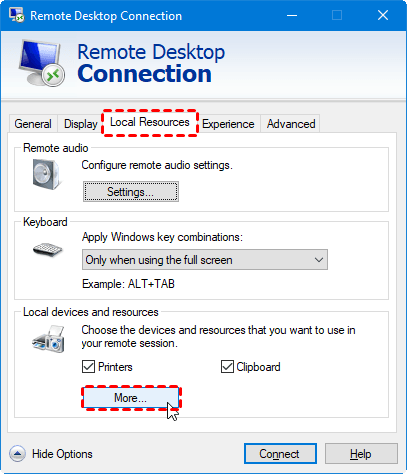
4. Navigate to Local Resources tab, click More.
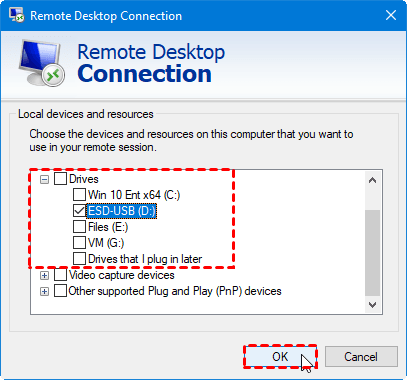
5. Expand Drives and select the USB devices you want to connect, click OK to save.
6. Navigate to General tab and type the VM’s IP address and Username, click Connect to start remote desktop connection.
Way 4: P2V data transmission via AOMEI Centralized Backupper
In addition to above 3 built-in methods of Hyper-V USB passthrough, you can use AOMEI Centralized Backupper to implement P2V data transfer.
It works by installing agents on physical and virtual machines, not only backup and restore files or folders to the Hyper-V VM, but also the entire USB drive, operating systems, partitions, and volumes. In addition, you can convert physical to Hyper-V virtual machines.
✦ Steps to backup USB drive to Hyper-V VM
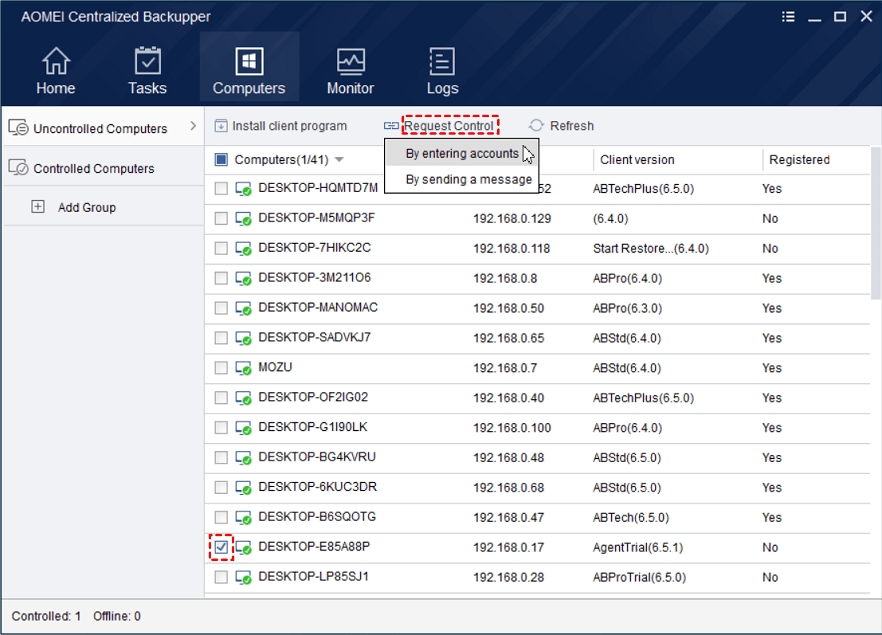
1. Launch AOMEI Centralized Backupper, navigate to Computers tab, select the physical machine and the Hyper-V VM (with a static IP) and click Request Control.
There will be a request window pop up on these machines. Once you are authorized you can backup and restore whenever you want.
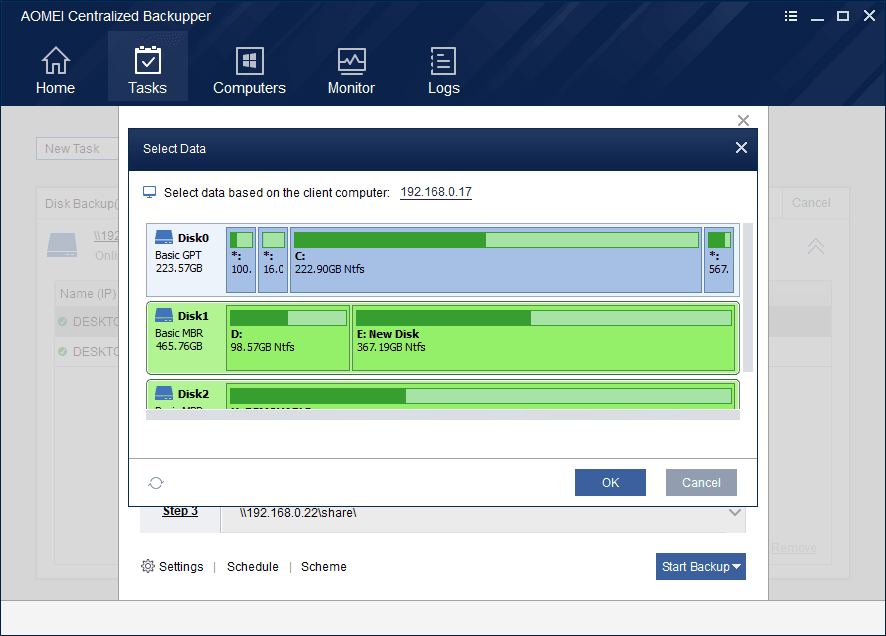
2. Navigate to Tasks > New Task> Disk Backup to create a backup task. Specify the computer, the USB drive attached, and a Share or NAS device to store the backup.
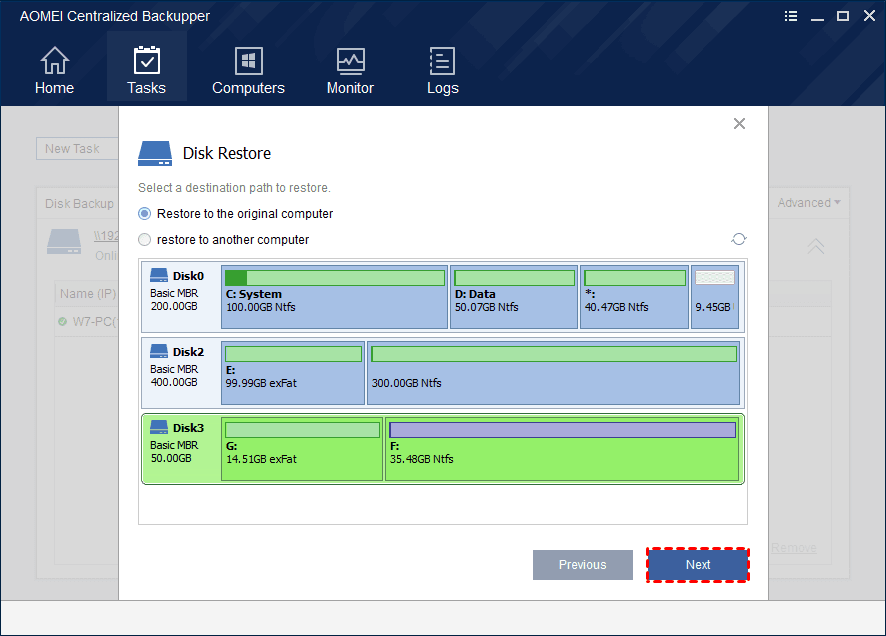
3. When restoring, click Advanced > Restore on the right top of the task to specify the Hyper-V VM you want to restore to.
✎ Centralized and Agentless Backup Solution for Hyper-V
If you want to create image-based backups for entire Hyper-V VMs, AOMEI Cyber Backup is always a powerful and easy-to-use backup software that protects your Hyper-V virtual machines in an agentless manner. More »
Summary
You may find that your Hyper-V VM does not recognize the USB drive, since it cannot be accessed by the host and VM at the same time. Maybe Hyper-V passthrough USB is exactly what you need.
In this article, I introduced what Hyper-V USB passthrough is, and shared 3 proven ways of how to access USB in Hyper-V VM. In these ways, not only you can transmit data from USB drive to your Hyper-V VM, but also attach other USB devices to the VM such as printers.

