


Microsoft Hyper-V | How to Convert Generation 1 to Generation 2
As Hyper-V generation 2 is more advanced than generation 1, have you ever considered converting your Hyper-V VMs from generation 1 to generation 2? In this article I will introduce how to do it.
By Crystal / Updated on July 1, 2022
Can you convert Hyper-V VM from generation 1 to generation 2
In previous versions of Hyper-V, there was only 1 generation of virtual machines. However, in Windows 2012 R2 and later versions, you got have an additional option of generation 2 to choose from when creating virtual machines.
According to Microsoft, generation 2 virtual machines have a simplified virtual hardware model, you might see a slight improvement in virtual machine boot and installation times with generation 2 virtual machines.
However, having already owned generation 1 virtual machines, you may be wondering if you can convert a Hyper-V virtual machine from generation 1 to generation 2?
Unfortunately, the answer is NO. When creating a virtual machine, you will see a warning that you cannot change a VM’s generation once you’ve created the VM. And Microsoft doesn’t provide any tools for Hyper-V convert generation 1 to generation 2, since they are so different.
But there are still workarounds. For example, you can perform file-based backup to back up everything on the generation 1 virtual machine and then restore them on a new generation 2 VM.
In this article, I will show you the specific steps. But before that, you may still need some preparations.
Why cannot convert: difference between Hyper-V generation 1 vs generation 2
Why cannot convert Hyper-V generation 1 VMs to generation 2? This is because they are very different in terms of boot. If converted carelessly, there is a risk that the virtual machine will not boot properly and even cause data loss.
There are 3 main differences between Hyper-V generation 1 vs generation 2.
- BIOS – UEFI BIOS: Hyper-V VMs of generation 1 run only under BIOS control, they can be booted from MBR virtual hard disks. In contrast, Hyper-V VMs of generation 2 has UEFI BIOS and GPT support, resulting in increased support for devices and features.
- IDE – SCSI: Generation 1 Hyper-V VMs only have an IDE virtual controller, as the BIOS does not support other controllers. And the guest OS cannot boot from the SCSI disk anyway. However, thanks to UEFI, generation 2 Hyper-V VMs can boot from SCSI virtual disks without any restrictions or conditions.
- PXE boot option: This function is available in both Hyper-V generation 1 and generation 2. However, booting through the PXE network is difficult for generation 1 Hyper-V VMs, since only the emulated legacy network adapter supports this boot. But generation 2 VMs boots seamlessly over the network due to UEFI support.
- VHD and VHDX: Generation 1 Hyper-V VMs support both VHD and VHDX format virtual hard disks. However, generation 2 virtual machines only support VHDX format virtual hard disks.
- 32-bit – 64-bit: Generation 1 Hyper-V VMs support both 32-bit and 64-bit operating systems. However, generation 2 virtual machines are not supported on 32-bit guest operating systems because the 64-bit-only UEFI firmware does not have a compatibility support module.
In summary, the most important difference between Hyper-V generation 1 vs generation 2 is that generation 1 uses an older BIOS and generation 2 uses UEFI. Therefore, to convert Hyper-V generation 1 to generation 2, you must convert VHDX from MBR to GPT and install a new UEFI bootloader. And this process is very complicated.
So, it is recommended that you choose an easier way, which is to back up everything on the generation 1 VM and restore it to a generation 2 VM with file-based backup software.
How to check Hyper-V virtual machine generation
If you have a Hyper-V virtual machine that was created a long time ago, you may have forgotten whether it is generation 1 or 2.
So, how to see if a Hyper-V virtual machine is generation 1 or generation 2? There are 2 ways to find out.
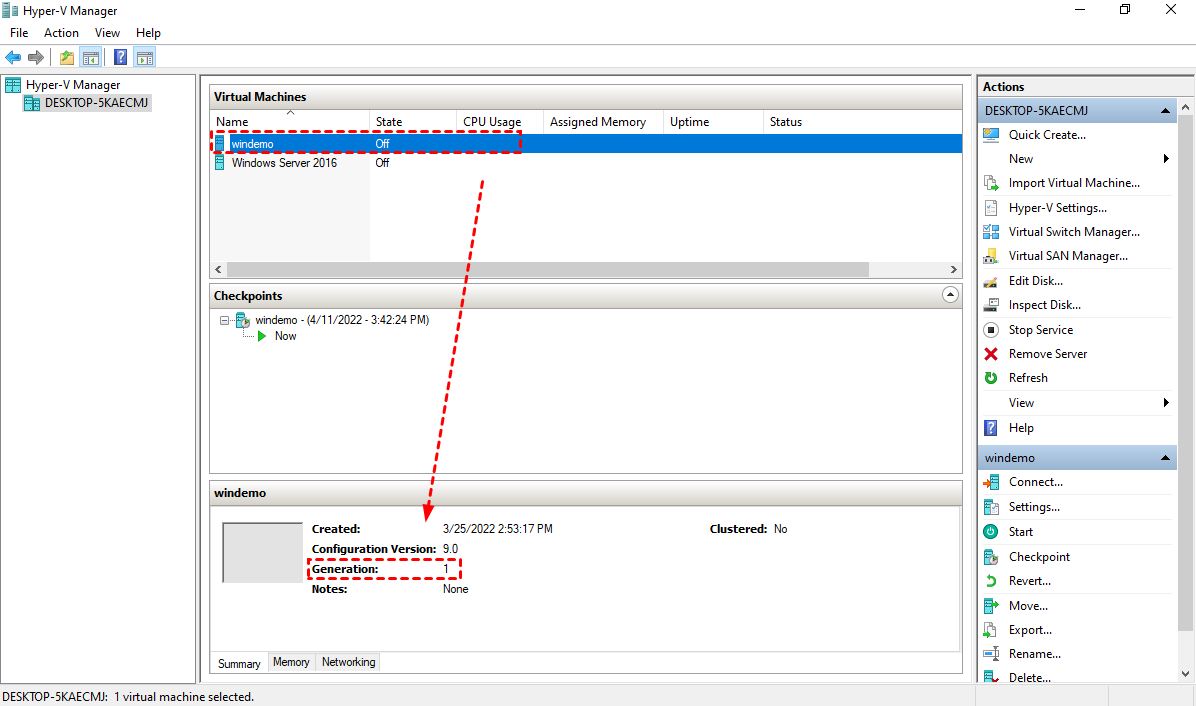
Check generation of Hyper-V VMs via Hyper-V Manager
Launch Hyper-V Manager, click on the name of target Hyper-V virtual machine you want to check, and you will see the generation of this VM at the bottom VM summary.
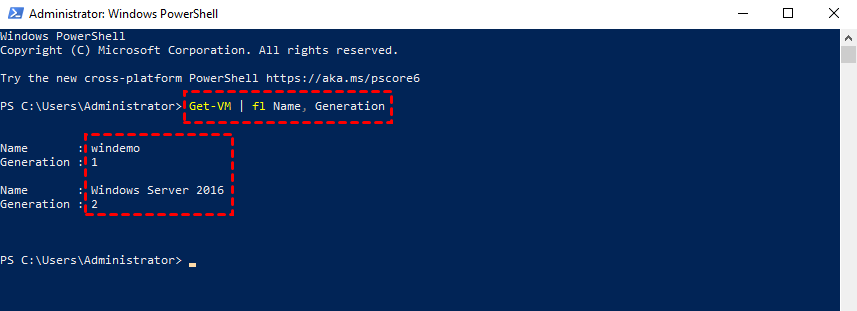
Check generation of Hyper-V VMs via PowerShell
Launch Windows PowerShell, and run the following command to get a list of all virtual machines and their generations:
Get-VM | Format-List Name, Generation
How to convert Hyper-V VM from generation 1 to generation 2
In this part I will show you an easier way to convert Hyper-V generation 1 to generation 2, which is backing up everything on the generation 1 VM and restore them to a generation 2 VM.
To perform it, first you need to create a new generation 2 Hyper-V virtual machine. It can be done on Hyper-V Manager with simple steps.
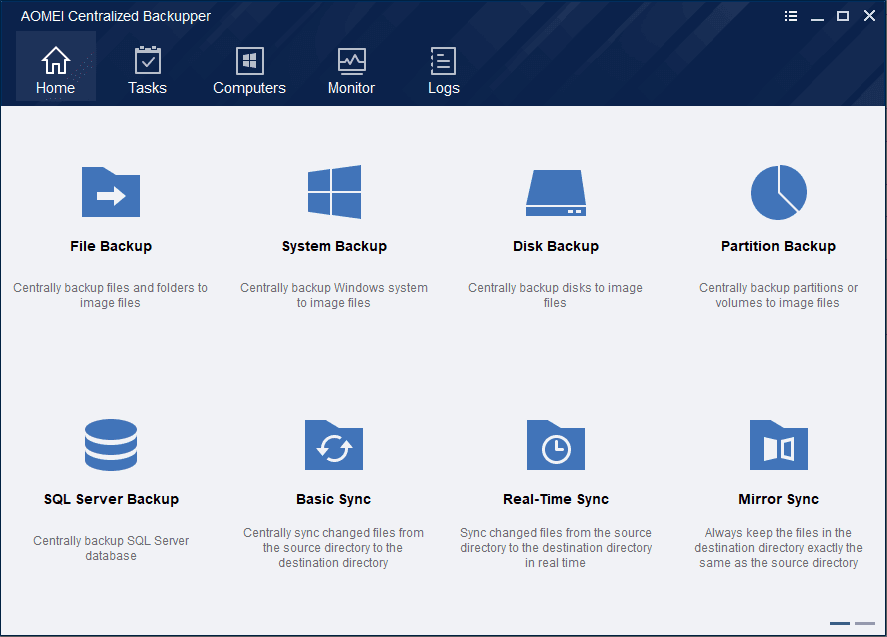
But you cannot accomplish backup and restore by simply copy and paste. The difference between backup and copy is that you cannot really copy everything. You may need a professional backup software to make sure there is no data loss. Here I recommend you AOMEI Centralized Backupper.
It helps you to perform File, System, Disk, Partition, SQL Server Backup in 3 simple steps. You can schedule the backup tasks or compress, encrypt the backup as you like.
Next I will demonstrate the steps of Hyper-V convert generation 1 to generation 2 with AOMEI Centralized Backupper. You can click the following button to start a free trail.
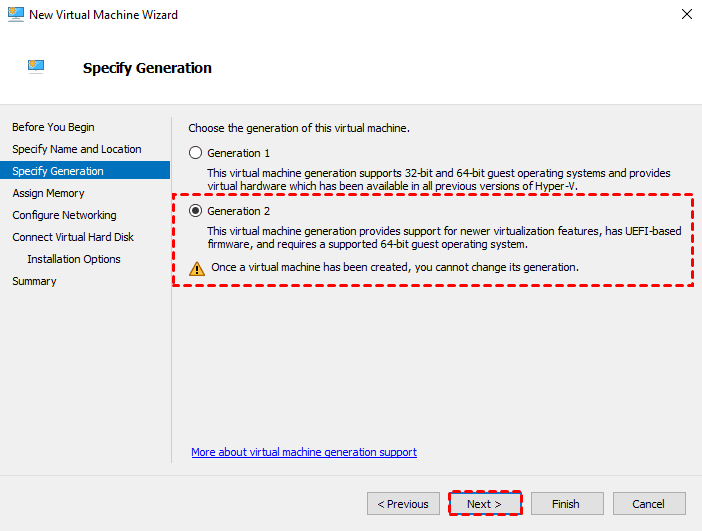
How to create a generation 2 Hyper-V virtual machine
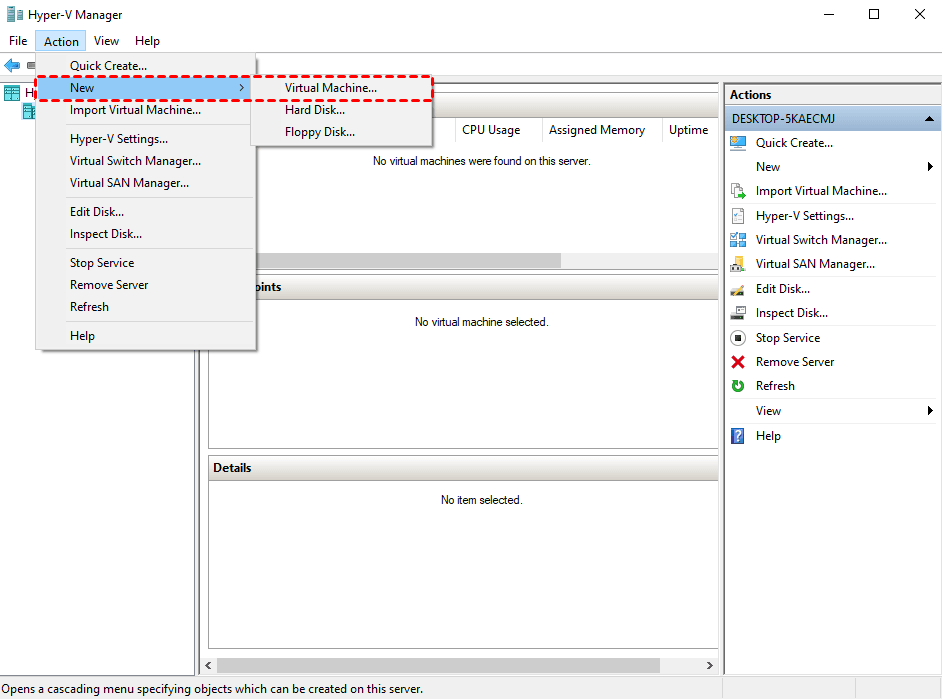
1. Launch Hyper-V Manager, click Action > New >Virtual Machine… to open the wizard. Click Next to continue.
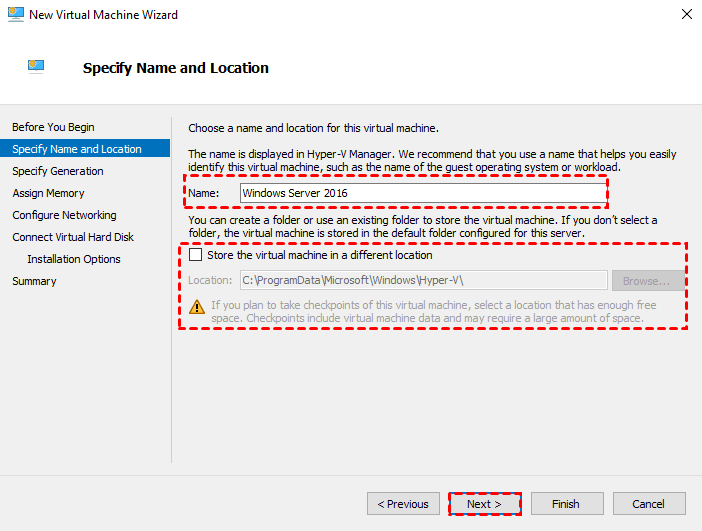
2. Specify a Name for the virtual machine. And by checking Store the virtual machine in a different location option you can change the default storage. Click Next.
3. Specify the generation of the new virtual machine as Generation 2.
And then click Next and follow the rest steps to create the new generation 2 Hyper-V virtual machine.
How to backup everything on generation 1 VM and restore to generation 2
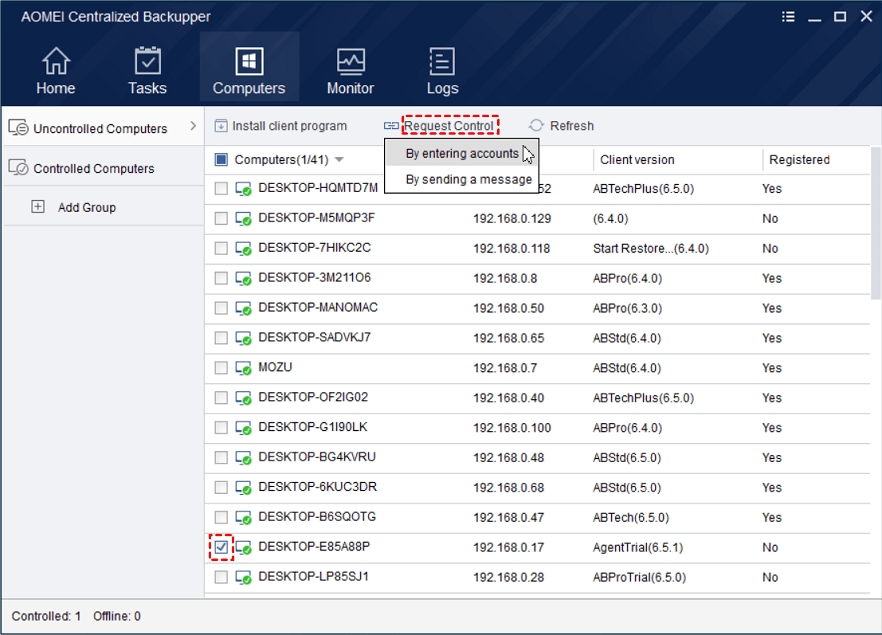
1. Launch AOMEI Centralized Backupper, and navigate to Computers > Uncontrolled Computers. Check the virtual machines (with static IP) you want to backup and restore from the Computers list, and click Request Control.
It will pop up a request window on both of the machines, once authorized you can back up whenever you like without repeat this step again.
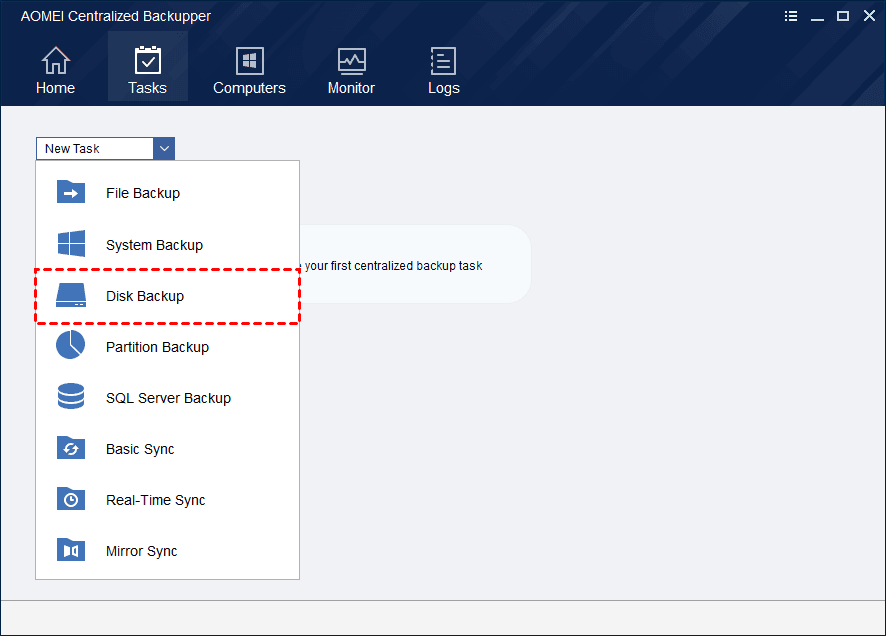
2. Navigate to Tasks > New Task > Disk Backup. You can change the task name by moving the cursor over the task name and click on it.
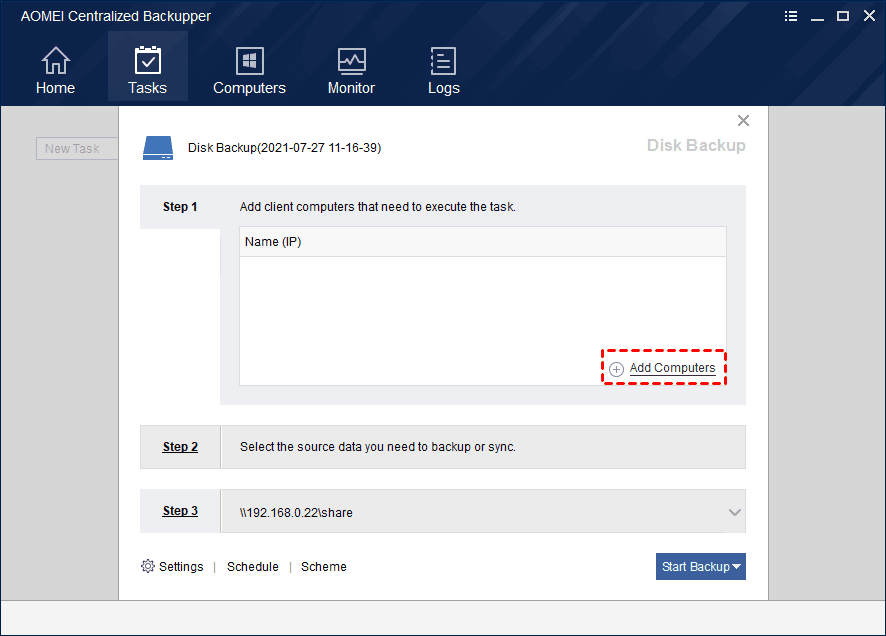
3. There are 3 steps to follow.
Step 1, click + Add Computers to specify the controlled machine as the source machine, click OK to confirm.
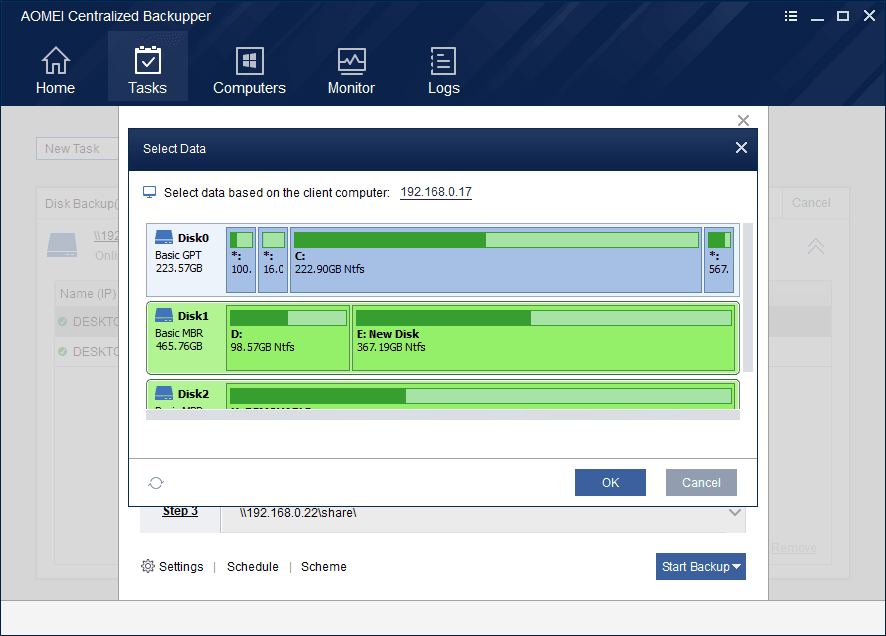
4. Click Step 2 to specify the source disk you want to backup.
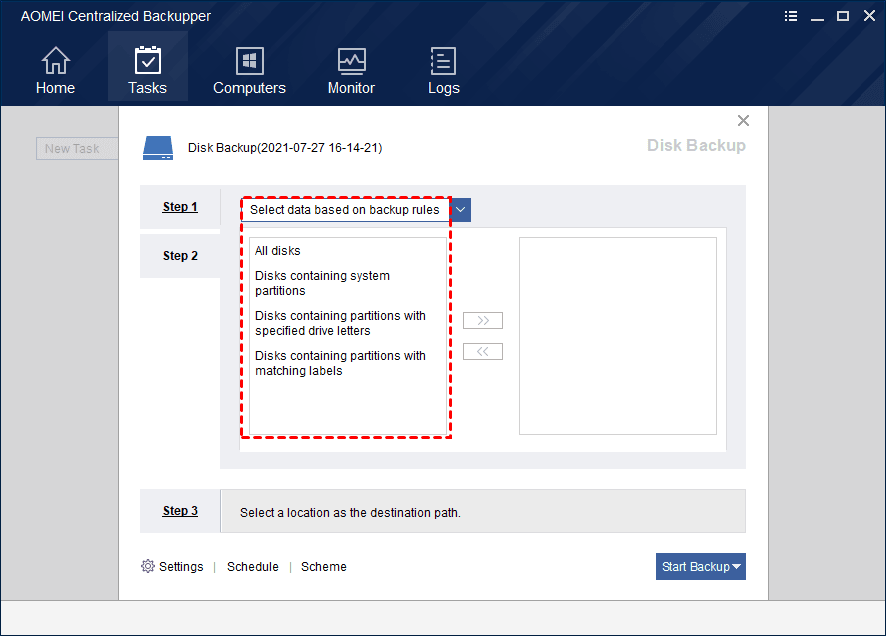
In addition, click on the inverted triangle sign ﹀ you can select to backup All disks, Disks containing system partitions, Disks containing partitions with specified drive letters, or Disks containing partitions with matching labels.
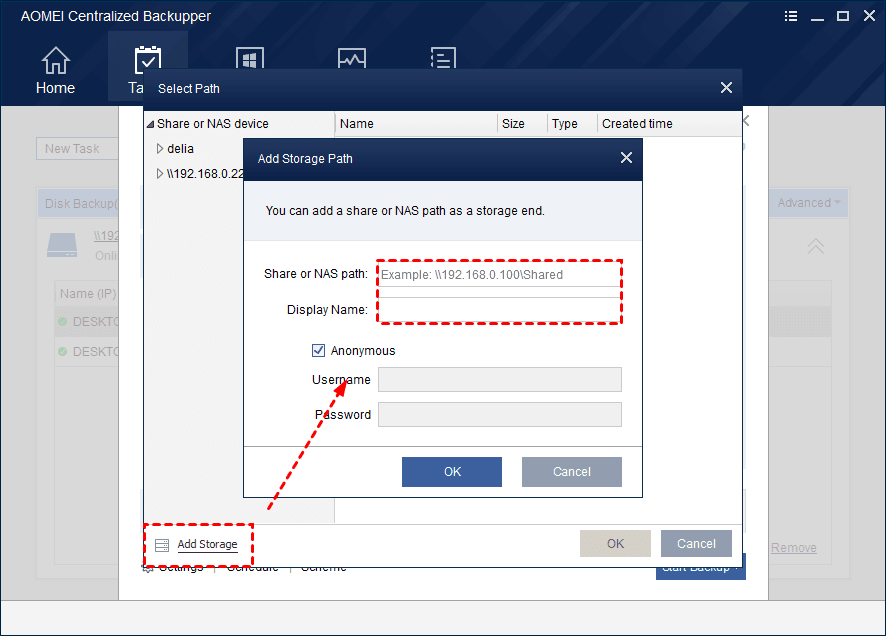
5. Click Step 3 to specify a Share or NAS device to store the backup.
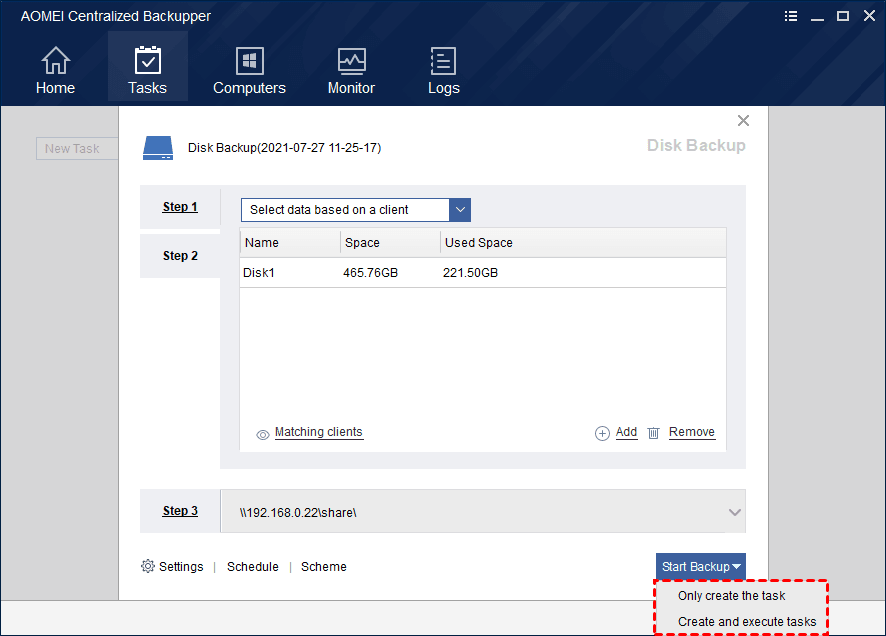
6. Then you can click Start Backup and choose to Only create the task or Create and execute tasks.
The created task will be listed separately in Tasks.
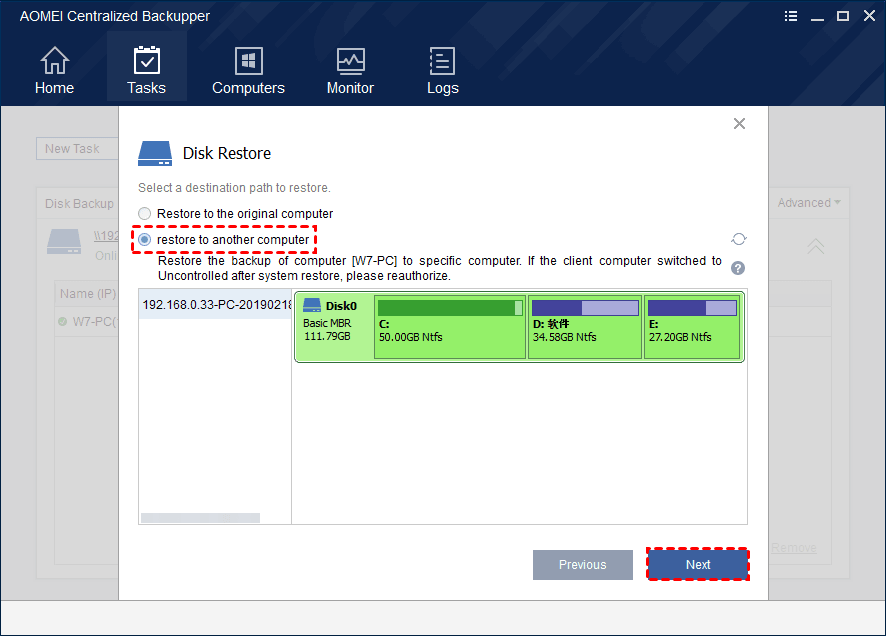
7. Click Advanced > Restore on the right top of the task, and select to Restore to another computer. Specify the new generation 2 Hyper-V VM you want to restore. Click Next to continue.
8. You can Edit Disk, or Align partition to optimize for SSD in this step. Then you can click Start Restore to restore everything you backed up to the generation 2 Hyper-V VM.

Summary
As Microsoft first introduced generation 2 Hyper-V VM in Windows 2012 R2, until now, there is still no native way for Hyper-V convert generation 1 to generation 2.
In this article, I explained the reason why generation 1 Hyper-V VM cannot be simply converted into generation 2, and introduced an easier workaround to solve this problem. Hope it could help you.
In this way you can also convert Hyper-V to VMware or vice versa. Except for Backup, AOMEI Centralized Backupper also centralized the features of Basic Sync, Real-Time Sync, and Mirror Sync. It definitely worth a try!

