


How to Create A VMFS Datastore in VMware | Step by Step
In vSphere Web Client, you can create and configure your datastores to provide better performance for your virtual machines. In this article, I will describe how to create a datastore in VMware and mount a shared VMFS datastore across ESXi hosts.
By Crystal / Updated on March 8, 2023
Create a datastore in VMware ESXi
VMware Datastore is a logical storage unit that holds virtual machine files, log files, virtual disks and ISO images. In VMware, you can use 2 types datastores: VMFS and NFS. Between them, VMFS is a block-based file system, and it’s the VMware’s highly optimized file system for the virtual storage, and NFS is a file system commonly used on NAD devices. To ensure the best performance, administrators should determine what kind of datastore is most suitable for a particular virtual machine.
In today’s article, I will focus on how to create a VMFS datastore in VMware. If your datastore is running out of space, please continue reading to learn how to create and configure a new datastore in vSphere Web Client.

How to create a datastore in VMware step by step
Before adding a datastore in VMware, you must install and configure any adapters that your storage requires, and then rescan the adapters to discover newly added storage devices.
How to add a datastore in vCenter 7:
1. Launch the vSphere Web Client and log in to vCenter 7.
2. Click Storage >> Datastores >> New datastores.
3. In the opened wizard, select Create new VMFS datastore as the storage type.
4. Enter a name (a 42-character limit for the datastore name), and select the device to use for your datastore. Click Next.
✍ Note: The device you select must not have any values displayed in the Snapshot Volume column. If a value is present, the device contains a copy of an existing VMFS datastore.
5. For partition options, you can select Use full disk or Custom. Then you can select the VMFS version including VMFS6/5.
6. Review the information and click Finish. The hosts that can access to the device could use the created new datastore in VMware.
✍ Note: After you create a datastore in VMware ESXi, expanding datastore capacity is your next step. According to many users, they experienced an error message: Failed to expand VMFS datastore in this process, so please check if the new datastore resides on the same volume as ESXi installation.
How to create a mountable shared datastore in VMware
If you want to share the VMFS datastore across ESXi hosts, you can create a datastore that is mountable in VMware. In case of host failure, vSphere HA can restart the VMs on another host. Sharing VMFS volume has these advantages:
- Use VMware Distributed Resource Scheduling (DRS) and VMware High Availability (HA).
- Use vMotion to migrate running virtual machines from one physical server to another.
How to create a datastore that is mountable in VMware
1. Open vSphere Client, and access to the datastore.
2. Right-click the datastore to mount and select Mount Datastore or Mount Datastore on Additional Hosts.
Tips: Whether you see one or another option depends on the type of datastore you use.
3. Select the hosts that should access the datastore and click OK.
4. To list all hosts that share the datastore, navigate to the datastore, and click the Hosts.
Datastore in VMware stores the virtual machine files. If hardware failure or power-outage happen, it cannot avoid data loss in datastore. So you should make a backup of virtual machine, which protect your business from data threats.
Safeguard VM in VMware datastore to avoid data loss for free
To ensure data security, it is critical to backup VMware datastore especially for your virtual machine files. With the built-in features, you can download VM file from datastore manually, but it’s time-wasting for enterprise VMs. So most users are trying to find a more effective backup tool.
AOMEI Cyber Backup, a free VM backup solution, offers auto backups for multiple VMware virtual machines. With its reliable backup strategies, you can easily restore VM from any history version. Meanwhile, it will bring these features for you.
Easy-to-use: All backup and restore processes are based on clicks from a centralized console without any complicated configuration and reinstallation.
Auto VM backups: Schedule VM backup methods and time, and run multiple tasks automatically.
Restore From Any Point: Offers instant disaster recovery since you are able to restore a virtual machine from any point, and recover a VM to another datastore quickly.
Support Free ESXi: AOMEI Cyber Backup supports both paid and free versions of VMware ESXi.
Perpetual Free: no time limit for AOMEI Cyber Backup Free Edition.
AOMEI Cyber Backup simplifies a complete backup task, and next I will demonstrate how to create one. Please download the free edition:
*You can choose to install this VM backup software on either Windows or Linux system.
Steps to back up and restore VMware virtual machine for free:
1. Log in to AOMEI Cyber Backup, and navigate to Source Device > VMware > + Add VMware Device to Add vCenter or Standalone ESXi host.

2. Click Backup Task >> Create New Task to set up the customized backup plan step by step. Click VMware ESXi Backup >> select host and VMs >> select backup location (network or local path).
● Configure the Backup Method which includes full backup, incremental backup and differential backup, then backup type as daily, weekly, monthly (by week) or monthly (by date).
● Click Start Backup to complete the task.
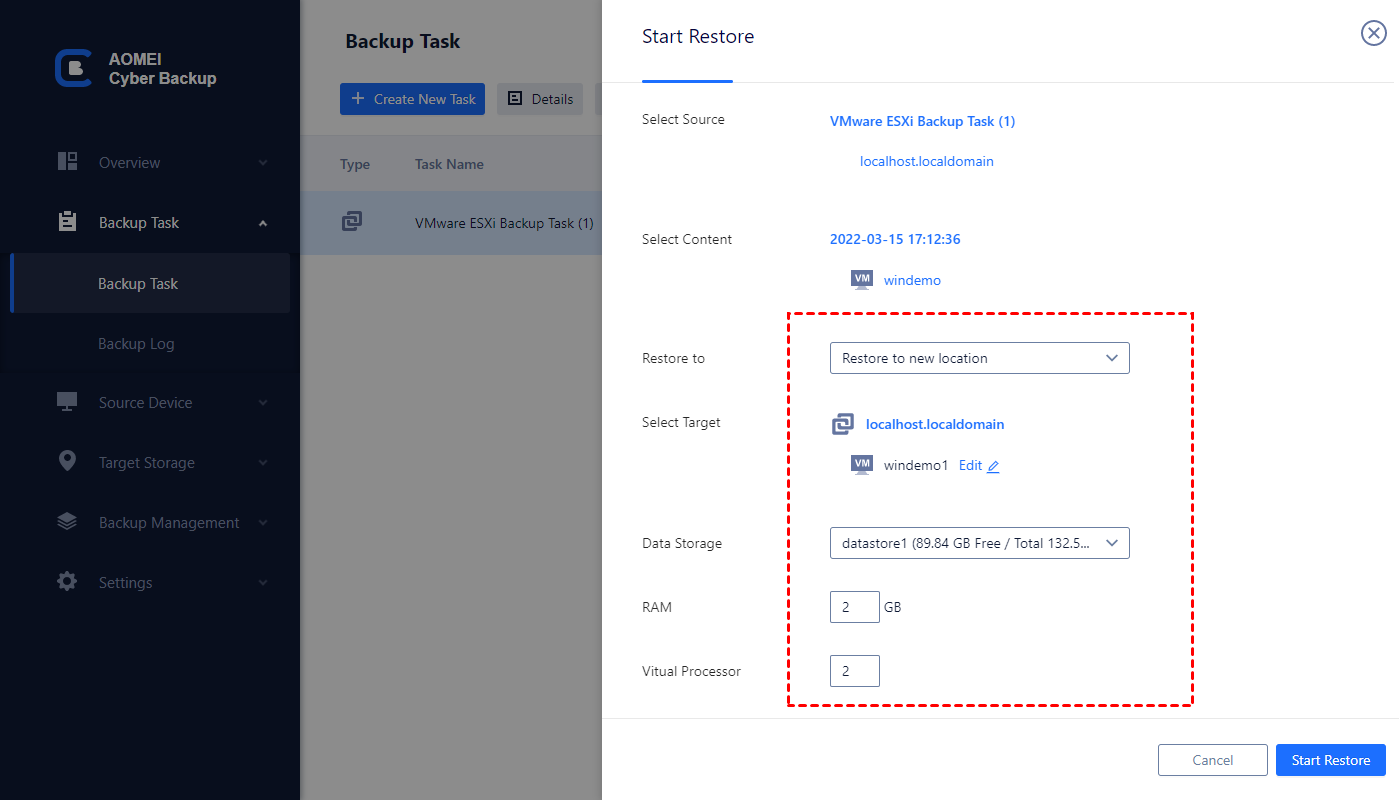
3. After backups, click Restore to achieve fast recovery from any backed-up history version. You can also specify which VM to restore, Restore to original location to create a new identical VM.
✍ While the Free Edition covers most of the VM backup needs, you can also upgrade to Premium Edition to enjoy:
Batch VM Backup: Batch backup large numbers of VMs managed by vCenter Server or on standalone ESXi hosts.
Backup Cleanup: Specify retention policy to delete unwanted VM backups automatically, thus saving storage space and cost.
Restore to new location: Easily make a clone of a virtual machine in the same or another datastore/host, without reinstalling or configuring a new VM.
AOMEI Cyber Backup always protects your virtual machines and business security with its efficient VMware backup solution. It also reduces business downtime and extra cost.
Summary
VMware datastores hold important VM files, and you should monitor the datastore space in case of running out of space. In this article, I have introduced how to create a datastore in VMware using vSphere Web Client, and how to mount a shared VMFS datastore across VMware ESXi hosts.
At the same time, VMware data protection is always important for any size business.

