How to Fix Windows Server 2016 Boot Loop after Update: 5 Ways
This article describes the reasons for Windows Server 2016 boot loop after update, several practical resolutions, and an easy way to backup Windows Server for disaster recovery.
By Jonna Updated on July 4, 2023
How can I fix Windows Server boot loop?
“I am in server loop hell. I have a 2016 Std server that is running Exchange (Hybrid mode) and yesterday evening, I ran Windows updates like normal. When the server rebooted, it went into 'preparing automatic repair' mode. Looking for any suggestions?”
During regular computer usage, it is common to encounter various issues, ranging from easy to more challenging to resolve. One particularly troublesome problem is the Windows Server 2016 boot loop after update.
But what triggers this reboot issue? Typically, the root causes can be attributed to the following common factors:
A failed Windows update
Outdated Windows driver
Installation of new software, such as an application or game
Corrupted RAM sticks
...
How to repair Windows Server 2016 boot loop after update in 5 Ways
If your Windows Server 2016 is stuck in boot loop, follow the methods below to recover your server.
⇒Preparation: Before addressing the reboot loop issue on Windows Server 2016, it's crucial to boot your server into the Recovery Environment. There are two approaches you can use:
Using installation media: If you have previously created a bootable USB for Windows Server 2016, insert the media into your server, power it on, and press any key to continue. On the Windows Boot Manager screen, select Windows Setup [EMS Enabled] and click Next on the Windows Server 2016 installation screen. Then, click on Repair your computer.
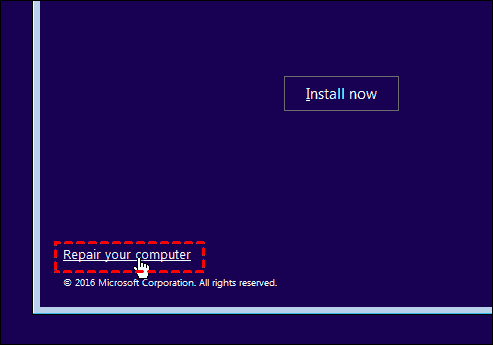
Without installation media: If you don't have access to a Windows Server 2016 installation media (DVD or USB), you can still boot into Recovery Mode by repeatedly turning the server on and off three times. When the server initiates Preparing Automatic Repair, wait for a few minutes until it boots into Recovery Mode then.
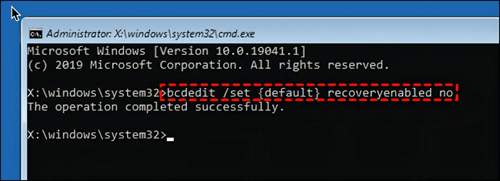
Solution 1. Disable automatic startup repair
To address the issue of Windows Server 2016 reboot loop after update, you can try disabling the automatic restart feature. While this may not directly resolve the boot error, it can prevent the system from continuously restarting. Here's how you can disable automatic restart:
Step 1. Boot your server into the Windows recovery environment with the steps above. Then, click Troubleshoot > Advanced options > Command Prompt in order.
Step 2. In the Command Prompt, type the following command and press Enter:
>> bcdedit /set {default} recoveryenabled No
Solution 2. Rollback recent updates with DISM command
If you wish to let Server 2016 repair boot loop after a failed update installation, you can try rolling back the update to resolve the problem. Here's how you can do it:
Step 1. Go to Command Prompt likewise in the Windows recovery environment, type the command below, and then press Enter.
>> DISM /image:C:\ /cleanup-image /revertpendingactions

Step 2. Once the command execution completes, type Exit and press Enter to exit the Command Prompt.
Step 3. Then click on Turn off your PC. After the server is completely powered off, press the power button to boot it again.
Step 4. When your server boots, it will attempt to roll back the update automatically. If the rollback is successful, your server should boot up normally without the boot issue.
Solution 3. Restore bad registry from backup
If you're experiencing Windows Server reboot loop after update due to missing or corrupted system registry files, you can follow the steps below to restore the registry files from a backup:
Step 1. To begin, let's first verify your system drive. If you're unsure whether your system drive is labeled as C, you can execute the command "dir c:" to check if it contains folders like Program Files, Users, and so on.
Step 2. Type copy d: \windows\system32\config\RegBack\* d:\windows\system32\config in Command Prompt and hit Enter.
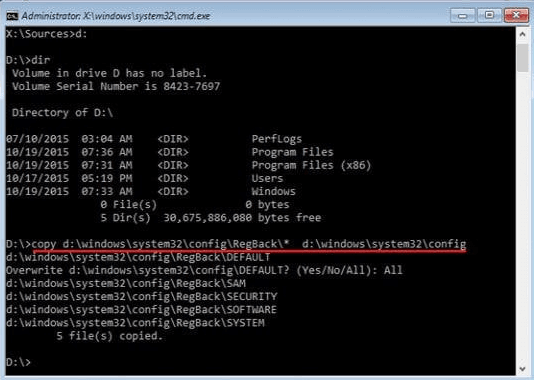
• Please make sure to replace the drive letter "d" with the appropriate letter corresponding to your OS installation. It should be modified in two places, as highlighted in bold.
• After hitting enter, you will be prompted to confirm overwriting your current registry. To proceed, type All and press Enter.
Step 3. Once the command execution is complete, enter the Exit command and select Continue to boot Windows Server 2016 normally.
Solution 4. Run Bootrec to fix damaged or corrupted BCD settings
Sometimes, Windows Server 2016 boot loop after update can occur due to errors in the installation or configuration of the bootloader. Fortunately, you can resolve this issue by following the steps provided below.
Step 1. Open the Command Prompt window, and type the following commands one by one. Press Enter after each command:
bootrec.exe /fixmbr
bootrec.exe /fixboot
bootrec/scanos
bootrec.exe /rebuildbcd

Step 2. After completing the previous step, you can perform a disk check to identify and repair any filesystem corruption. Enter the command below, replacing "c" with the appropriate drive letter for your partition:
chkdsk/r c:
Step 3. Restart your server and see if this solution works.
Solution 5. Perform a system restore
If you have a usable system restore point, restoring it is one simple way to fix Windows Server 2016 won’t boot after update.
Step 1. Boot your Windows Server from a bootable device.
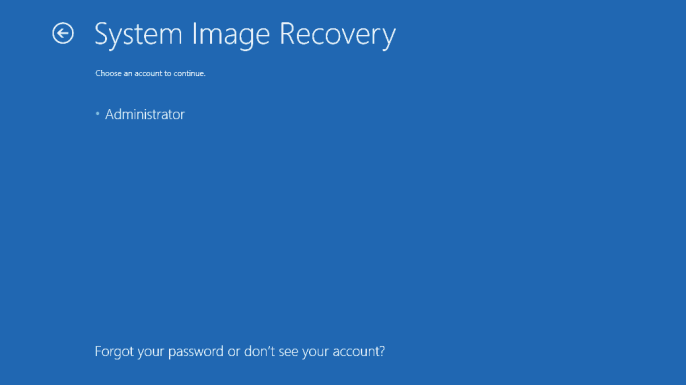
Step 2. Click on Troubleshoot after the Advanced options have loaded. Then select System Image Recovery.
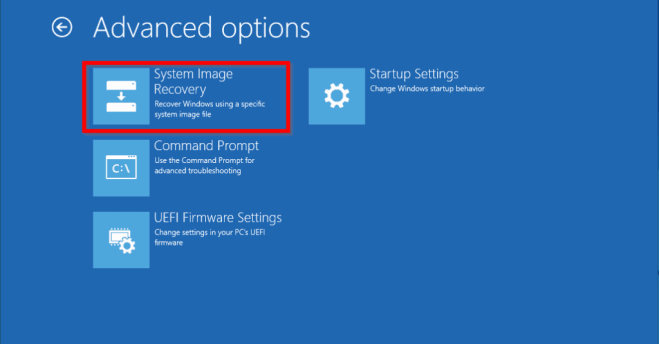
Step 3. On the System Image Recovery screen, choose the user with administrative privileges. Enter the password for the selected user and click Continue.
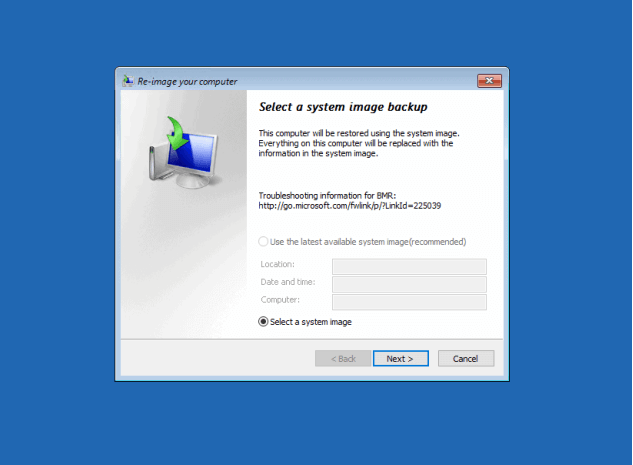
Step 4. If you have available restore points, they will be listed. Select a restore point that predates the problematic Windows update. Follow the on-screen instructions to restore your server using the selected restore point.
Step 5. When you finish, reboot your server.
Tip: Always backup your Windows Server for disaster recovery
Daily computer usage often leads to various issues. While some simple problems can be resolved quickly, more complex system issues can be baffling. To mitigate the risk of data loss resulting from system failures, it is advised to regularly create a backup image of your computer. This ensures easy recovery in the face of any disastrous events.
When it comes to reliable server backup and restore software, AOMEI Backupper Server stands out as a highly recommended option. In case of system errors, you can effortlessly restore your Windows system and files using the previously created system image. This software offers notable features that provide great benefits, such as:
✮Diverse backup types: This software offers a range of backup options, including System Backup, Disk Backup, Partition Backup, and File Backup.
✮Versatile backup paths: You have the freedom to backup data to various locations, including cloud devices, internal or external hard drives, NAS devices, and network storage, among others.
✮Data recovery: In the event of an unexpected incident, it empowers you to easily restore your system and get back your important files and folders.
✮Automatic backup: It allows you to set scheduled backup frequencies for your tasks, such as daily, weekly, monthly, event triggers, and USB plug in.
Download and install AOMEI Backupper Server on your computer, please follow these steps to create a system backup easily:
Step 1. Click on the Backup option in the left panel, then select System Backup.

Step 2. The software will automatically choose the system-related partitions as the source data for the backup. You simply need to click on the destination box to select a storage path for the backup image.

Step 3. Once you have selected the backup destination, click on the Start Backup button to initiate the system backup process.

Conclusion
The steps in this guide should fix Windows Server 2016 boot loop after update for you. It's not the end of the day and for data security, AOMEI Backupper can backup server files, hard drive, and system on Windows Server 2022/2019/2016/2012/2008 and restore data easily after system crash, hard drive failure, PC resetting, and more.

