2 Ways to Boot Windows Server 2012 to Recovery Mode
This guide covers 2 ways to boot Windows Server 2012 into recovery mode and offers you an easier way to backup and restore Server 2012.
By Jonna Updated on June 29, 2023
What is Windows Server 2012 Recovery Mode?
The Windows Recovery Mode, referred to as Windows Recovery Environment (WinRE) as well, serves as a specialized environment designed to resolve issues causing operating systems to fail to boot. It provides a range of options tailored to different versions of Windows servers. These options include the Command Prompt, UEFI settings, Startup Repair, System Restore, Startup Settings, etc.
There are numerous scenarios where booting into Windows Server 2012 Recovery Mode becomes necessary, such as:
◆ Fix boot errors
◆ Uninstall problematic Windows updates
◆ Restore the server to a previous restore point
◆ Troubleshoot issues with your computer
How to Boot Windows Server 2012 to Recovery Mode in 2 Ways
In this tutorial, we provide two practical methods for how to boot Windows Server 2012 in Recovery Mode, regardless of the specific reason you may have for needing it.
Method 1. Boot to Server 2012 Recovery Mode from Installation Media
To initiate a boot into recovery mode and perform a system restore on Windows Server 2012 using a USB or DVD, follow the steps outlined below:
Step 1. Plug your Installation recovery USB or DVD into your Server 2012.
Step 2. Set boot priority for installation disc or recovery USB and make Windows Server 2012 boot to system recovery options.
Step 3. Then, select Repair your computer after loading files.
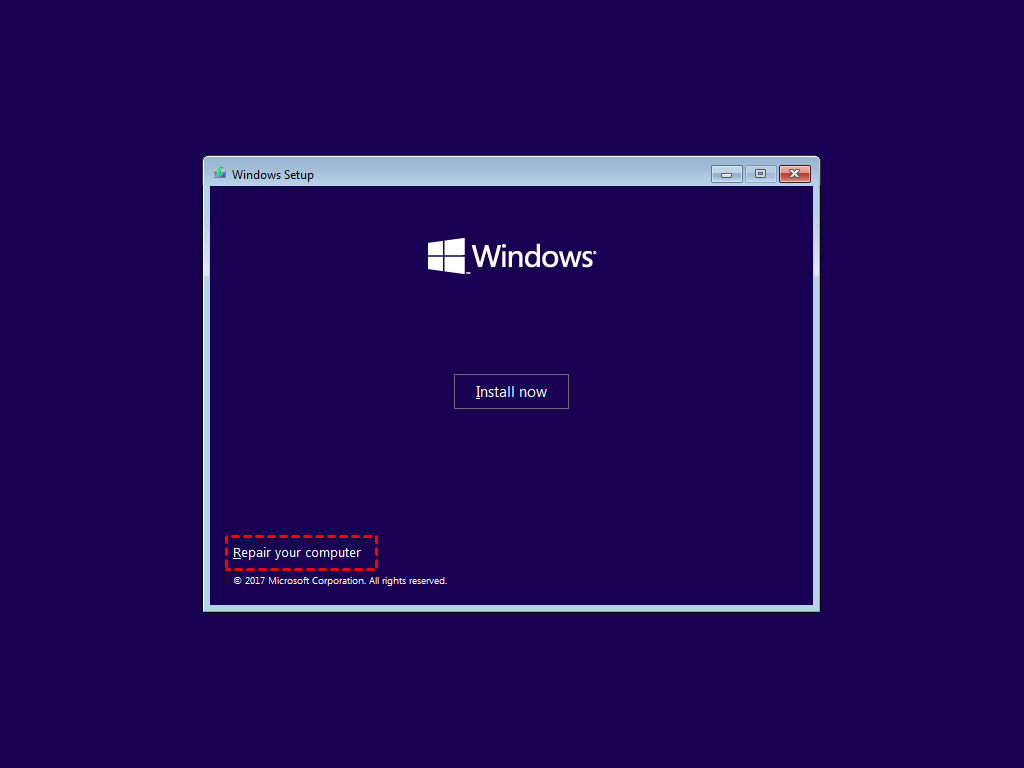
Step 4. After about one minute, Recovery Mode will be displayed as follows.
Here is an explanation of the available options within Windows Server 2012 Recovery Mode:
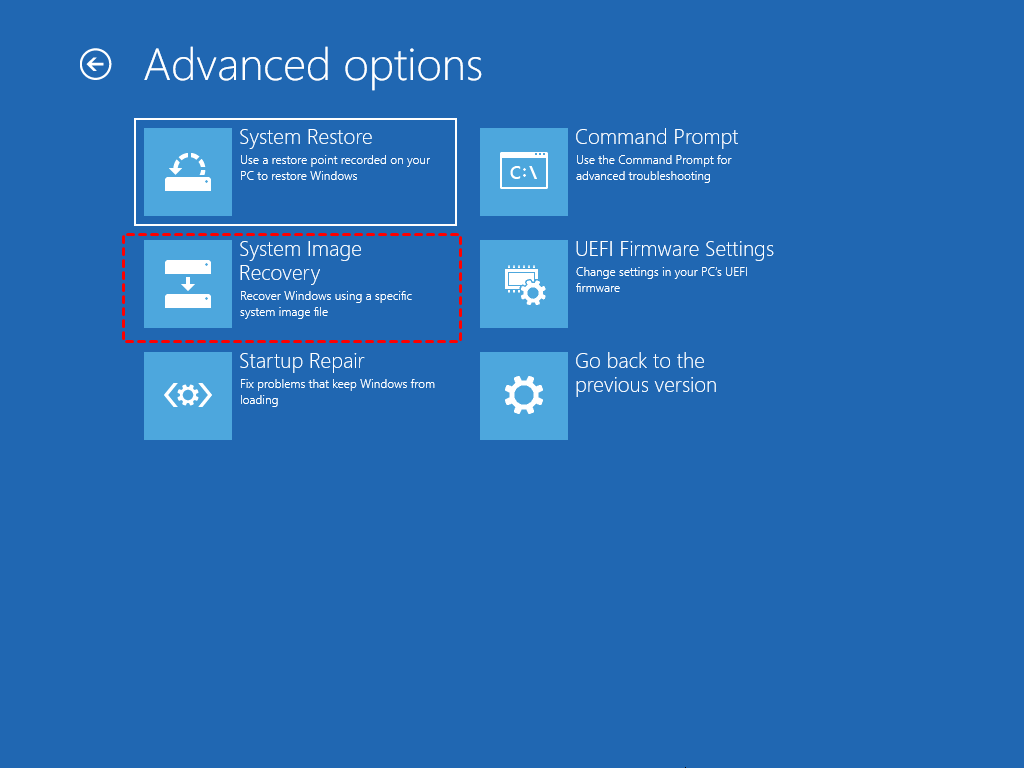
👉 System Image Recovery: System Image Recovery involves restoring your computer using a system image.
👉 System Restore: Choose this option if you previously enabled system restore and have accessible restore points.
👉 Startup Repair: Startup Repair is a valuable feature that provides access to Safe Mode boot options.
👉 Command Prompt: Selecting this option loads a command prompt interface. From here, you can execute various cmd commands to troubleshoot and fix problems.
👉 UEFI Firmware Settings: Choosing this option allows you to access the UEFI BIOS settings of your server. UEFI firmware settings provide configuration options for your hardware and system components.
👉 Go back to the previous version: This option enables you to revert to the previous version of Server that was installed on your computer before an upgrade.
Step 5. Select Troubleshoot > Advanced Options > System Image Recovery.
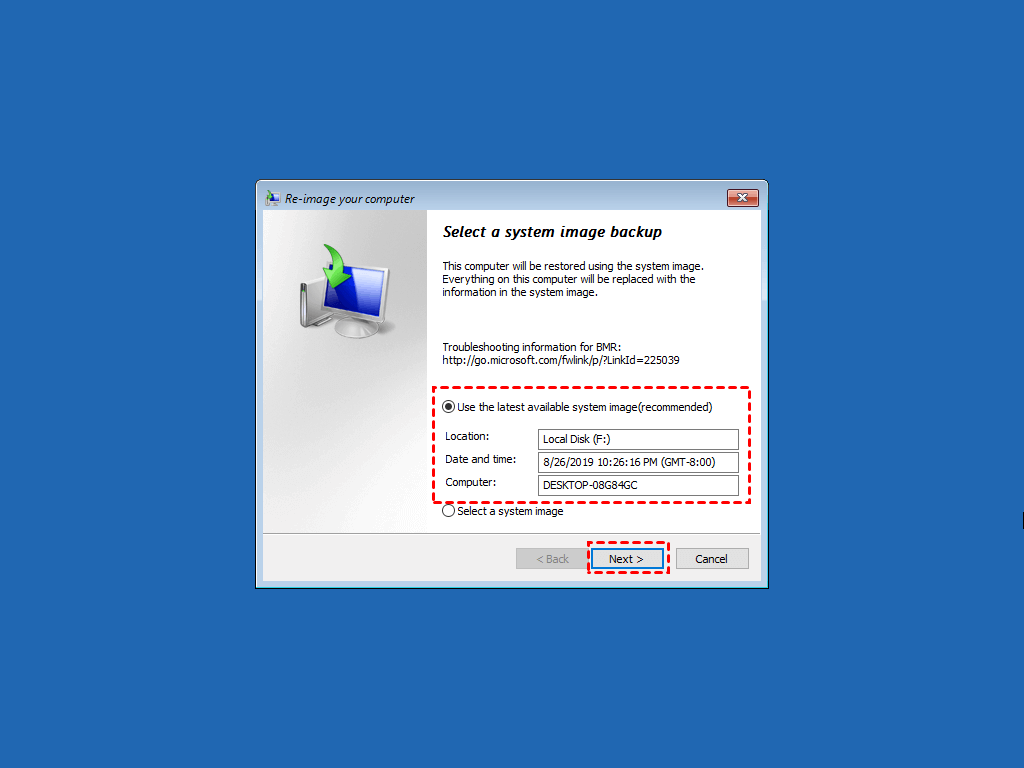
Step 6. Select the operating system - Windows Server 2012.
Step 7. At the Re-image your computer screen, select the image created by Windows Server Backup. Then, click Next and follow the on-screen instructions to initiate the system restore process.
Method 2. Boot to Server 2012 Recovery Mode without Installation Media
To let Windows Server 2012 boot to Recovery Mode without using installation media, follow these steps:
Step 1. Power on your server and wait until the white circles appear. Press the power button to turn off the server.
Step 2. Power on the server again, and once the boot circles appear, power it off once more. Repeat this process for the third time.
Step 3. On the third startup, the server will initiate the Preparing Automatic Repair process. After approximately a minute, the Recovery Mode page will be displayed, similar to the one accessed through the first method.
Step 4. To access additional Recovery Mode options, click on the Troubleshoot option, just as you would in the first method. Then, go on with the same steps to restore Server files.
Tip: Easier Way to Perform Windows Server 2012 Backup and Restore
AOMEI Backupper Server is a powerful backup and restore software that offers comprehensive features to safeguard your system and data. With support for various server versions, including Server 2003/2008 (R2)/2012 (R2)/2016/2019/2022, it provides reliable backup solutions for regular server backups.
Additionally, it allows you to create bootable media (either CD/DVD or USB) that enables you to boot your computer using the stored file system in the event of a system crash or boot failure. By utilizing this software, you can effectively protect your server environment and ensure the continuity of your critical data and systems.
√ Multiple backup modes - Not only System Backup, it also offers Disk Backup, Partition Backup, File Backup, and so on.
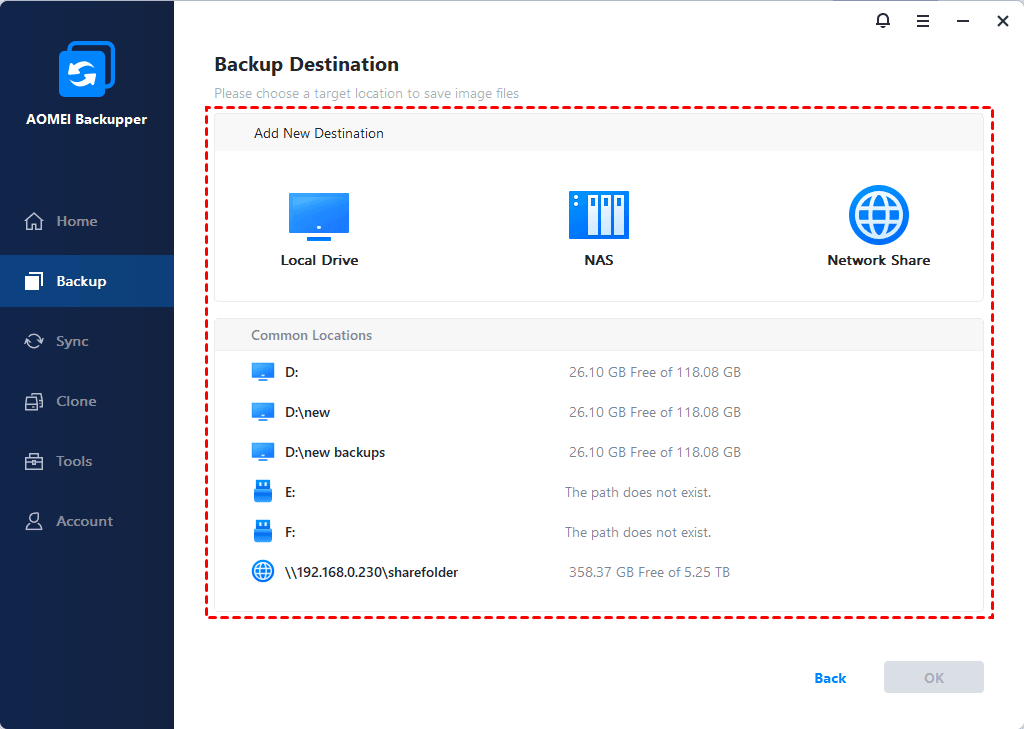
√ Different backup destinations - It supports you to backup Server 2012 to external hard drive, local disk, network location, NAS devices, USB drives, cloud services, etc.
√ Automatic and flexible options - Schedule backup, and full/incremental/differential backup are all supported. You can also configure backup compression, splitting, etc.
To create a system backup of your Windows Server 2012 using the free trial version of AOMEI Backupper, please follow the steps below:
Step 1. Open this backup utility, click Backup, and then System Backup subsequently.

Step 2. You can modify the Task Name to differentiate this backup task from others. By default, the relevant system partitions will be selected. You simply need to choose the destination path where to store the backup.
Step 3. Confirm the backup task, tap on Start Backup, and then wait for the backup process to complete.
How to restore Windows Server 2012 backup on AOMEI Backupper
Step 1. Click on Restore and then select Select Task.
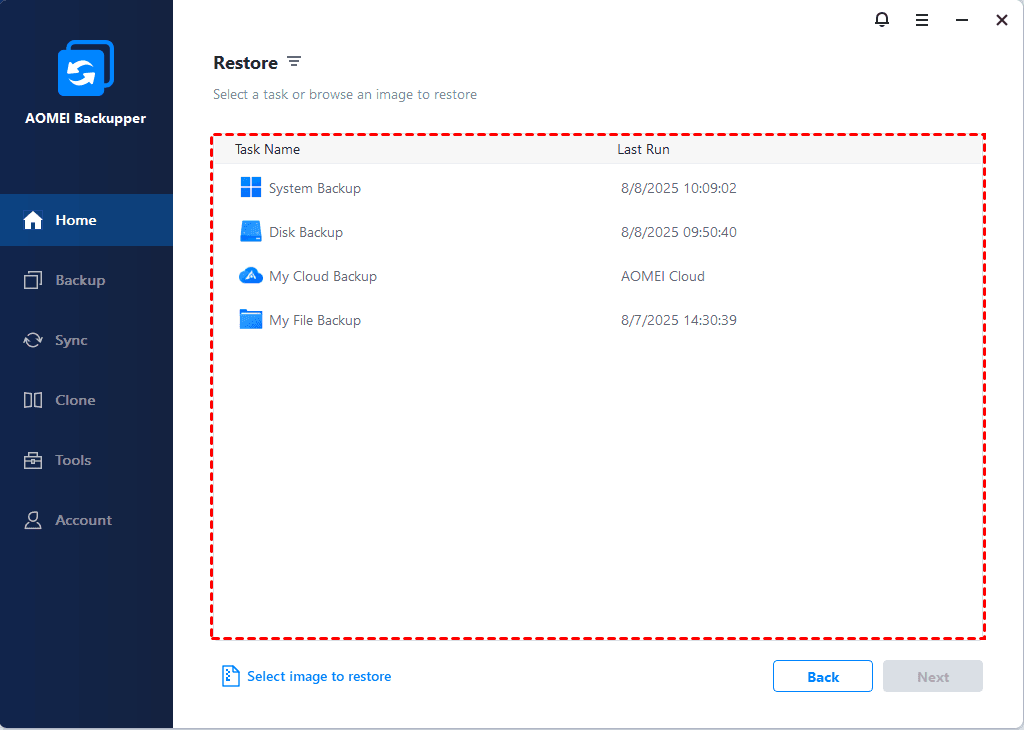
Step 2. Then, choose the system image backup that you want to restore, and click on Next. Then, select Restore this system backup > Next.
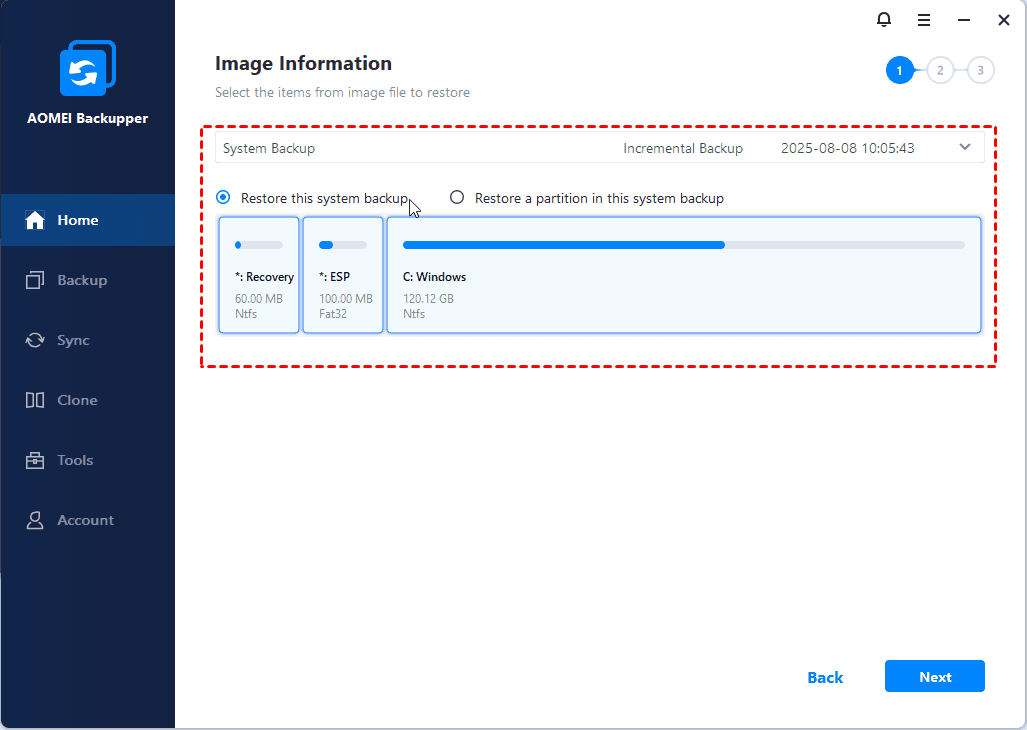
Step 3. (Optional) If your old disk is damaged or you want to restore the system to a different location, tick the option Restore system to another location in Step 2. Then, choose a new hard drive or partition for the restore process.

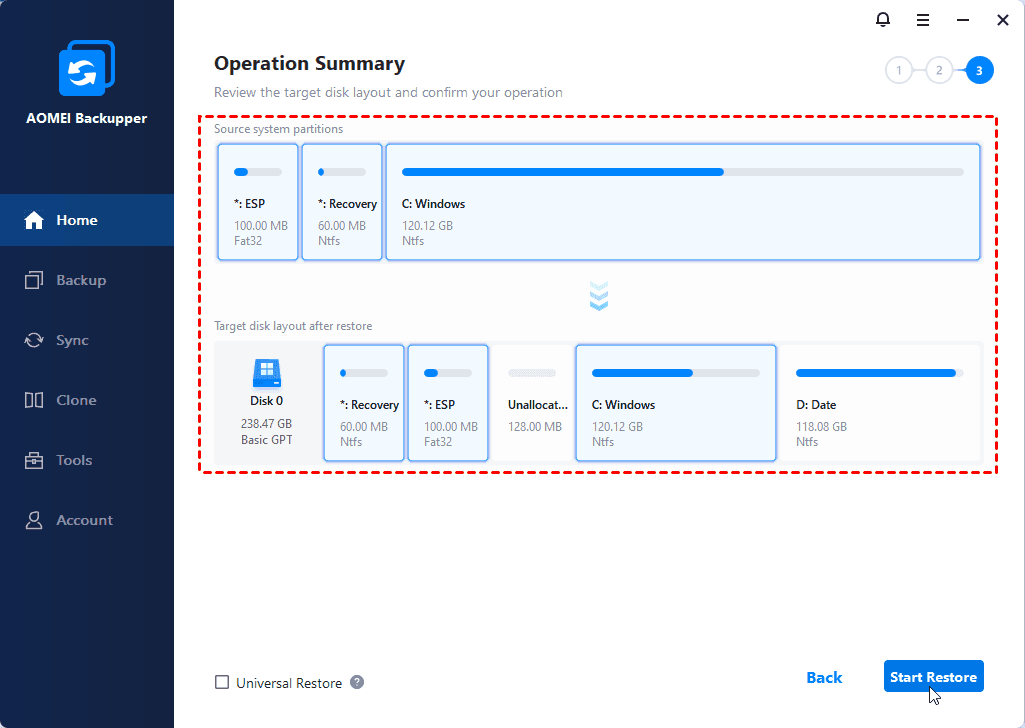
Step 4. Once you have confirmed, click on Start Restore to initiate the Windows Server 2012 recovery process.
In the End
In this guide, two methods were discussed for booting Windows Server 2012 to Recovery Mode: booting from your installation media or interrupting the normal boot process.
If you're looking for an easy-to-use Windows Server backup and restore software, AOMEI Backupper Server is highly recommended. With this tool, the image backups created using AOMEI Backupper are highly flexible and can be easily restored to their original location or any other desired location. This flexibility allows you to restore your backups to different hardware or migrate your system to a new drive without hassle.
To explore additional features of this software, you can take a look at the edition comparison page.

