Solved: PC Meets Requirements for Windows 11 But Won’t Install
Why my PC meets requirements for Windows 11 but won’t install? This article lists some possible causes and the corresponding solutions. Read on to learn more!
By Yuka Updated on November 9, 2022
Windows 11 is the latest major version of Microsoft's Windows NT operating system, released in October 2021. It is a free upgrade to its predecessor, Windows 10 (2015), and can be used on any Windows 10 device that meets the requirements of the new Windows 11 system.
Why PC Meets Requirements for Windows 11 But Won't Install?
Given the many new features introduced in Windows 11, such as a centralized taskbar and new design, exclusive multitasking and external monitor support, and Windows 11 support for Android apps. Many users tried to perform a free upgrade from Windows 10 to Windows 11.
However, some users have reported that their computers show that "this PC can run Windows 11", but there is no update. Or, their PC meets requirements for Windows 11 but won’t install. Why does this problem occur? Here is a list of a few possible reasons for you.
◑ Corrupted Windows 11 ISO file.
◑ The driver has expired when upgrading from Windows 10 to Windows 11.
◑ An external drive connected to the computer.
◑ Improper configuration of the installation media.
◑ Problems with the hard drive and its partitions.
◑ The hard drive is not in the right format.
How to Fix “PC Meets Requirements for Windows 11 But Won’t Install” Error
If your PC meets requirements for Windows 11 but won’t install, you can follow the method provided below to solve the problem. If your computer shows “this pc doesn’t currently meet Windows 11 system requirements”, but you still want to install Windows 11, you can refer to this article.
Method 1. Uninstall and Update All Drivers and Other Peripherals
- Click the Start button, then type Device Manager and click on the application from the results.
- Check to display the UHD adapter. Right-click and select Uninstall Device.
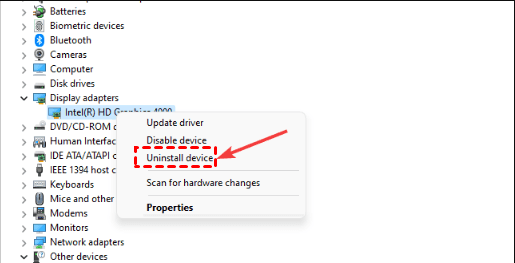
- Repeat step 2 for the USB driver and perform the same process for any other drivers that you suspect will cause problems.
- Restart your computer to apply the changes. Try installing Windows 11 again.
Method 2. Check Hard Drive Health for Hard Drive Errors
Some computer problems can be difficult to fix, especially when it comes to corrupt repositories or missing Windows files. If you are having trouble fixing the error, your system may have been partially corrupted. The result is that your PC meets requirements for Windows 11 but cannot be installed. You can fix PC errors by running some of the following commands.
#1. Use the CHKDSK Command
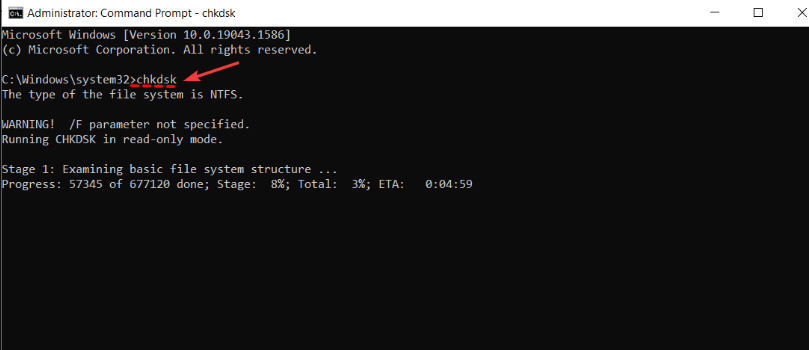
- Go to the Start icon, type cmd, and click Run as administrator.
- Type chkdsk and hit Enter to start the basic scan.
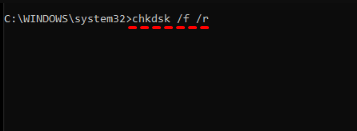
- After checking, run the following command on the command line to fix the error and try to install Windows 11 again.
- chkdsk /f /r
#2. Use the SFC and DISM Command
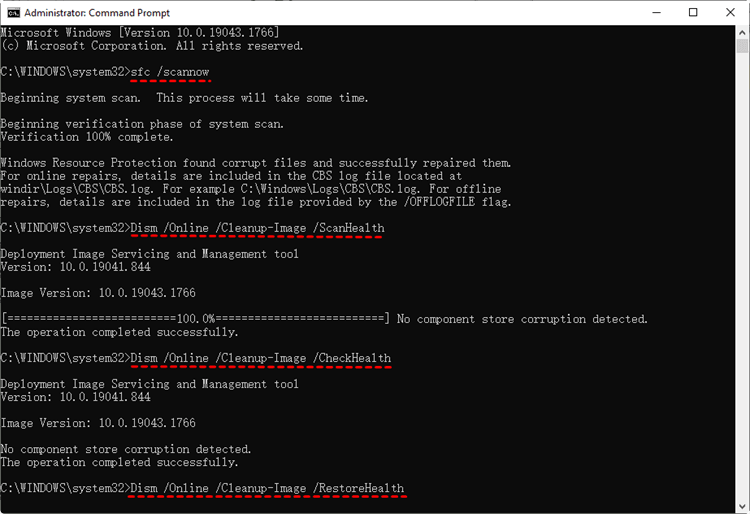
- Open Command Prompt window as mentioned above.
- In the Command Prompt window, type sfc /scannow and press Enter.
- Then enter the following commands in sequence and press the Enter key to execute the commands separately.
- Dism /Online /Cleanup-Image /ScanHealth
- Dism /Online /Cleanup-Image /CheckHealth
- Dism /Online /Cleanup-Image /RestoreHealth
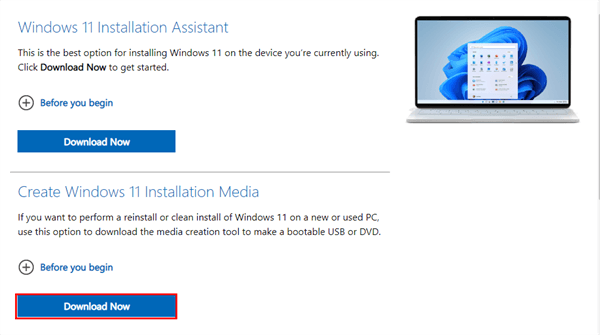
Method 3. Download the Correct Windows 11 ISO File
If you download an incorrect or corrupted ISO file, it may cause Windows 11 not to install even if your PC meets the requirements. To avoid this, download the ISO from the official Microsoft’s website. The latest version of Windows 11 is Windows 11 22H2, you can refer to this article to safely install Windows 11 22H2 update. It is truly free and you can trust that it is free of phishing codes that may cause malware attacks or installation failures.
Easily Protect Your PC Data Anytime, Anywhere
When you encounter the problem that your PC meets the requirements but Windows 11 won’t install, you surely want to solve the problem quickly and then experience the latest Windows11 operating system. However, when troubleshooting, we don't know what will happen. So I suggest you to backup your PC data before proceeding with the fix.
AOMEI Backupper Standard is a free backup software for all Windows PCs, including Windows 11/10/8/7 and vista, etc. You can use it to backup the system or data on your computer with just a few clicks. You can use it to backup your system or data on your computer with just a few clicks. Furthermore, you can use it to backup your system or data on your computer with just a few clicks. It is trusted by tens of thousands of users, mainly because of the following features:
🥃 Different backup methods. File backup, system backup, disk backup and partition backup. You can choose the desired backup method according to your needs.
🥃 Multiple backup destinations. The software supports you to backup to different destinations. You can backup to HDD/SSD (both internal and external), cloud drives, USB flash drives, NAS devices, and network locations.
🥃 Automatic backups. The software helps users continuously back up their data, so you never miss any changes. You can choose a daily, weekly or monthly frequency.
🥃 More powerful features. In addition to backup, it has cloning, restore, sync and more. You can also use it to create bootable media, which is very useful in case you have a serious problem with your computer such as a system crash.
Next, I will show you how to use this free backup software to protect your computer data using Disk Backup as an example.
- Download AOMEI Backupper and launch the software. Then you will see a dark blue main interface. Click Backup in the left pane and select Disk Backup on the right side. If you only want to back up important files, select File Backup here.

- Click +Add Disk and select the hard disk you want to backup.

- Select the destination location where you intend to store the backup image. (Optional), you can check the Options, Schedule Backup, Backup Scheme in the left corner.

- After confirming all settings, click Start Backup.
Final Words
If your PC meets requirements for Windows 11 but won’t install, you can refer to this article for help. This is just one of the common problems that many users encounter when trying to upgrade to Windows 11. Some users are also experiencing problems with Windows 11 22H2 update not showing up.
The problems faced by different users during the update process vary from person to person. But there is one thing that applies to all users - back up your computer before upgrading to Windows 11. If you fail to upgrade, you can restore your computer to its previous state by backing it up.

