How to Easily Create New Local Account in Windows 11 (3 Ways)
You can learn why create new local account in Windows 11 and 3 methods to achieve the goal as well as how to better protect the privacy and security of your data. Read on for more details.
by Clytze Updated on October 24, 2022
Why Create New Local Account in Windows 11?
Usually, users want to set up their devices with a Microsoft account because it offers many benefits, such as seamless integration with various services, and syncing of files and settings across devices. Especially if your computer is accessed by multiple users, or you work in a shared office environment.
Of course, you can set up multiple user accounts if you want to increase the security of your account. Windows users, in addition to a Microsoft account, have the option to create a local account to avoid using a Microsoft account, which means your settings and files will only be available locally on the device for a more private and secure experience.
Therefore, more and more users tend to create local accounts. You can read on to learn 3 easy methods to create new local account in Windows 11 and how to better protect the security and privacy of your files.
How to Create New Local Account in Windows 11
After understanding the reasons, next, this article will introduce 3 methods to create new local account in Windows 11 in turn. You can choose to use Windows Settings, Command Prompt, or PowerShell to achieve your goals. Each method will include detailed graphic tutorials. Keep reading for more details.
Method 1. Create New Local Account in Windows 11 via Windows Settings
Step 1. Press Win + I to open Windows settings.
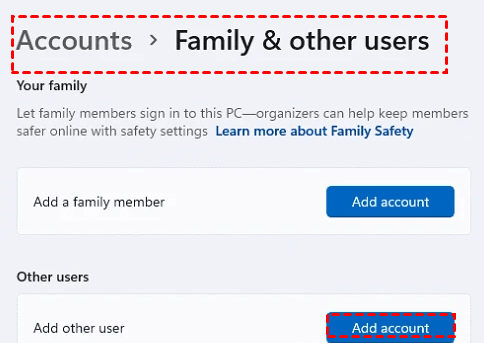
Step 2. Click Accounts > Family & other users > Add Account button.
Step 3. Select I do not have this person’s sign-in information to create new local account in Windows 11.
Step 4. Click Add a user without a Microsoft account to create a local user.
Step 5. Create new Windows 11 local account by confirming the user name and the password. To save the data click on Next, you have successfully use Windows 11 add user without Microsoft account.
Method 2. Create New Local Account in Windows 11 via Command Prompt
To create local account in Windows 11 via CMD, you can follow the steps below.
Step 1. Open Start and search for Command Prompt, right-click the top result, and select the Run as administrator option.
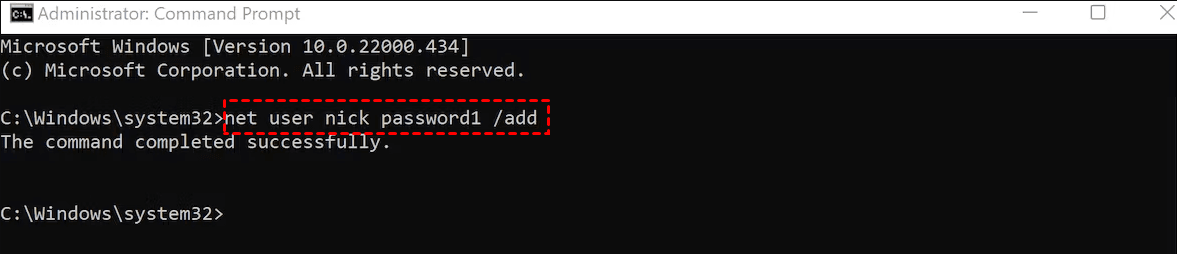
Step 2. Type the following command to create a new account and press Enter. Make sure to change USER-NAME and PASSWORD with the new user account.
net user USER-NAME PASSWORD /add
If you want to test the new changes, sign out, and you will notice the new user account sitting in the bottom-left corner of the screen. Then select the new user account and sign in.
Method 3. Create New Local Account in Windows 11 via PowerShell
Step 1. Open Start, search for PowerShell and select the Run as administrator option.
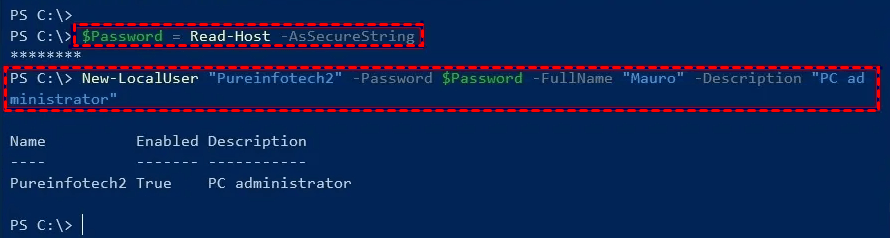
Step 2. Type the following command to temporarily store the password inside a string in the “$Password” variable and press Enter.
$Password = Read-Host -AsSecureString
Step 3. Type the password for the new Windows 11 account and press Enter.
Step 4. Type the following command to create the new account with PowerShell and press Enter. Change NEW-ACCOUNT-NAME for the account name and USER-FULL-NAME for the user’s full name. Also, replace DESCRIPTION with the description you want to use for the account.
New-LocalUser "NEW-ACCOUNT-NAME" -Password $Password -FullName "USER-FULL-NAME" -Description "DESCRIPTION"
Step 5. Type the following command to add the Windows 11 account to the correct user group and press Enter. Change NEW-ACCOUNT-NAME for the account name.
Add-LocalGroupMember -Group "Administrators" -Member "NEW-ACCOUNT-NAME"
In the above command, we add the new account to the Administrators group, which gives the user full access to the device. If you want the user to have limited access, add the account to the Users group, making the account a “Standard User.”
How to Better Protect the Privacy and Security of Your Data
Creating a new local account can keep your files more private, and using multiple accounts can improve account security. In order to better protect data security and privacy, it is recommended that you use the free backup software AOMEI Backupper Standard to help you.
You can backup your files to different destinations such as external disks, USB flash drives, etc to increase the security of your files. It also provides different backup methods. When you need to back up files regularly, the software will automatically choose an incremental backup method for you to improve backup efficiency and save disk space. It supports multiple Windows operating systems. If you want even more privacy, you can also upgrade to the professional version to encrypt specific files.
You can download this free software, install it and follow the steps below. If you are a Windows Server user, you can choose AOMEI Backupper Server. Next, take backup files to an external disk as an example to demonstrate the steps.
Step 1. Open AOMEI Backupper and Connect the external disk.
Step 2. Select Backup > File Backup.

Tip: If you have an AOMEI account, you can choose to backup files to AOMEI Cloud with its Cloud Backup feature. And it offers users 1TB of free storage in 15 days.
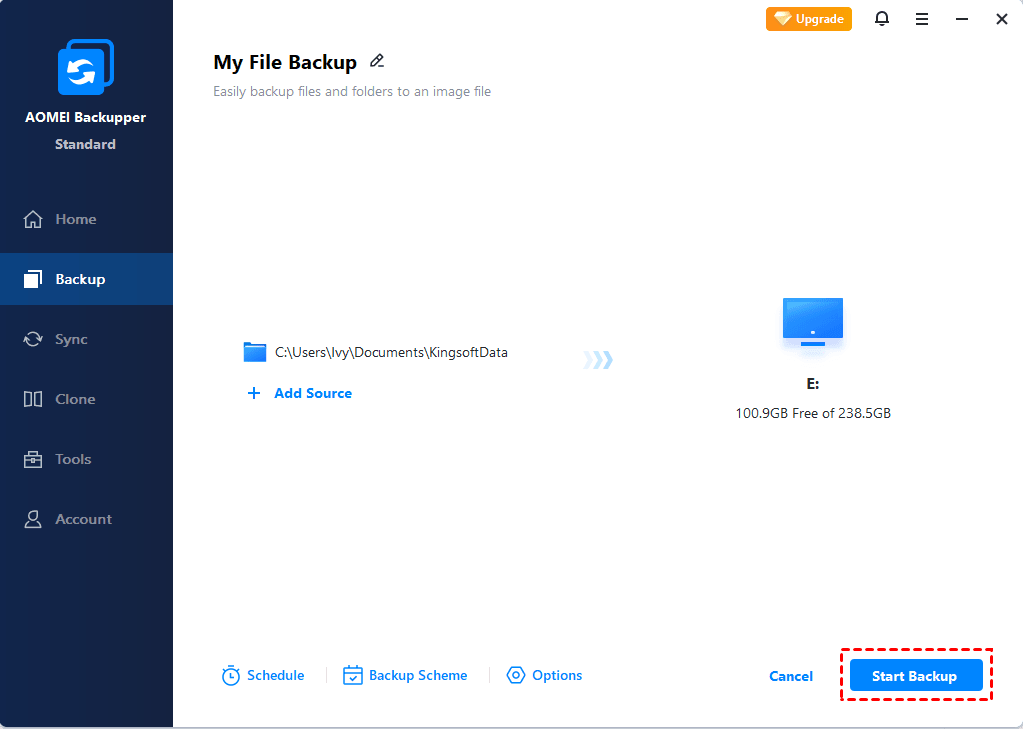
Step 3. Click Add File or Add Folder, then select the files or folders to be backed up.

Step 4. Choose the external hard drive as the backup destination.

Step 5. Click Start Backup.
Notes:
- Options: You can enable email notification, choose the compression level for the backup file and select splitting ways you want, etc.
- Schedule Backup: This feature allows you to set the frequency of your backup, such as Daily, Weekly, Monthly, Event trigger and USB plug in. The professional version supports the last two features.
- Backup Scheme: You can select different backup methods. And you can upgrade to AOMEI Backupper Professional to enjoy the differential backup method which can easily restore your scheduled backup. After the upgrade, you can also enable automatic backup cleanup feature to save disk space.
Summary
More and more users want to create local accounts to keep their files safe and private. This article describes 3 ways to create new local account in Windows 11, you can follow the graphic tutorials. In order to better protect the security and privacy of files, you can choose the free backup software AOMEI Backupper Standard to back up files to various paths. It also automatically backs up files regularly based on the backup frequency you set. It supports multiple backup methods and Windows operating systems.
In addition, it is also an excellent cloning software, providing System Clone, Disk Clone and Partition Clone and other functions to meet your different needs. You can download this software to explore more functions.