[3 Ways] How to Backup Laptop on Windows 10 (HP/Lenovo/Dell)
On this page, you will learn 3 methods on how to backup laptop on Windows 10 using two Windows native tools and a free and reliable backup software - AOMEI Backupper.
By Jonna Updated on November 2, 2023
Why Need to Backup Windows 10 Laptop?
Although the Windows 10 system is called Microsoft’s most robust and stable system, it's imperative to have a Windows backup strategy in place to safeguard against potential data loss. Hard drives can fail unexpectedly, software can go haywire, and the threat of malware and trojans looms large, posing risks to critical files. Data backups not only provide you with a secure copy of your vital data but can save you money, time, and stress in the long run.
But how to backup laptop on Windows 10, like how to backup a Dell/Lenovo/ASUS/HP laptop on Windows 10? Is there a Windows 10 built-in backup tool? What is the best way to backup your computer? If you are interested in these questions, please keep reading. The following content will figure you out.

Does Windows 10 Have a Built-in Backup Software?
Yes, Windows 10 has a native tool to backup your device and files. If you are looking for Windows 10 backup software to save essential files, you might not have to look too far. Over time, many versions of Windows have native backup tools that allow users to create primary backups of important files. For Windows 10, the built-in backup tools are File History and Backup and Restore.
Despite these tools being very practical for making some workable backups, the Windows 10 native backup tools have some limitations:
- Limited backup: The built-in backup tools can only backup files, folders, and system, not unavailable for other contents, like backing up disks and partitions.
- No cloud backups. Both Backup and Restore and File History restrict backups to local drives or network locations, lacking support for cloud-based backups.
- No single-file recovery. While File History does offer the ability to retrieve individual files, the Backup and Restore utility lacks this feature. Consequently, when recovering a file from a backup file set, you're obliged to restore the entire set.
How to Backup Laptop on Windows 10 in 3 Free Ways
No matter you want to learn how to backup data in laptop on Windows 10 or create a full laptop backup, there are available guides for you. And considering the limitations of Windows 10 native backup tools, we also provide you with a professional and reliable backup tool. Let’s get into business now!
Way 1. Create Windows 10 File Backup using File History
File History is the primary backup tool in Windows 10, which focuses on backing up personal files. By default, File History can back up the desktop, downloads, media, and other folders. It support backup destinations such as external hard drive and network locations.
For how to backup laptop data on Windows 10 with the File History backup tool, you can proceed with the following guidelines (here we take backing up laptop to external disk to show you detailed steps):
Step 1. To access File History, go to Settings -> Update & Security -> Backup.
Step 2. Connect the device that you wish to use as the backup location. Click the Add a drive button under Back up using File History, and select the drive you wish to use. This will turn on File History.
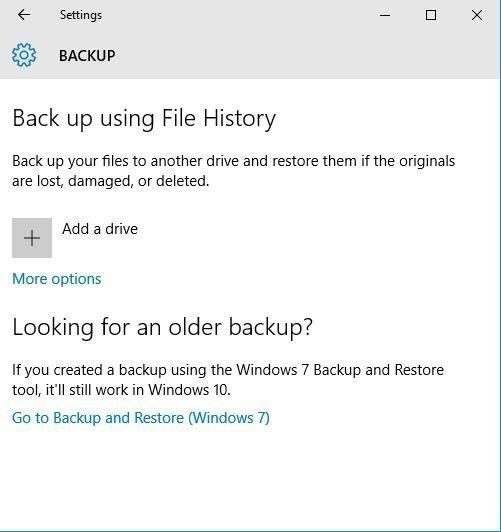
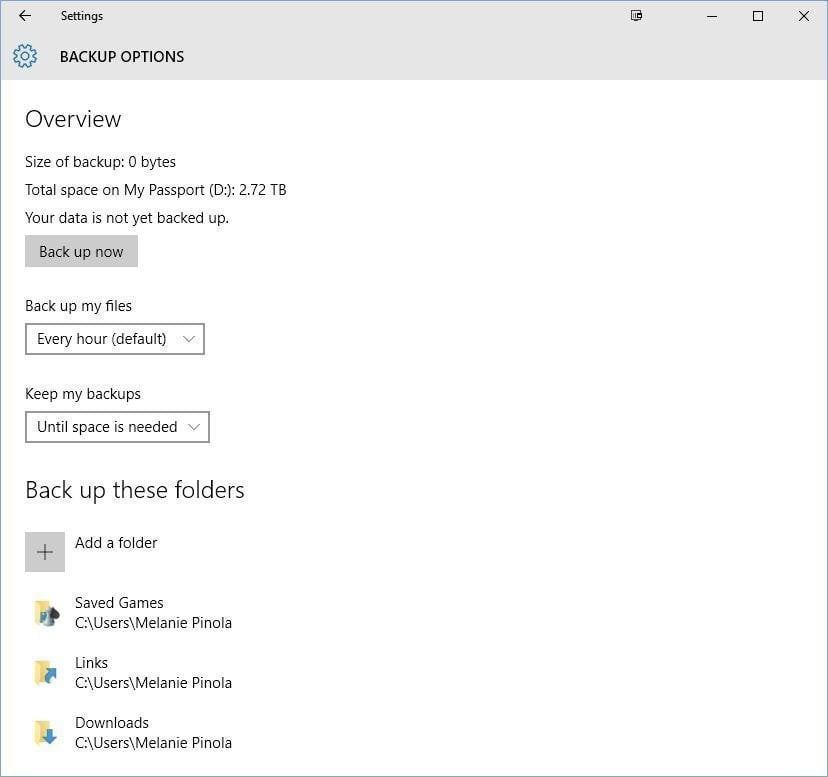
Step 3. For more backup settings, you can tap on the More options button, and select a backup frequency, backup retain period, folders to backup, etc.
Step 4. Finally, click on Back up now on the top.
- Tips:
- If you wish to backup to a different drive with this tool, you can click the Stop using drive position on the Backup options page, and click Add a drive to designate a new backup disk.
- There may be chances that Windows 10 File History is not working due to various reasons. In this case, you can look for fixes on the related page.
Way 2. Perform Windows 10 System image via Backup and Restore
Backup and Restore was first introduced in Windows 7 and has become one of the most frequently used solutions that used to backup data on Windows 10 computers. It allows to perform file/folder backup as well as create system images to external drive, DVD, network folder, and multiple locations.
For how to backup my Windows 10 laptop using this system image tool, here is what to do:
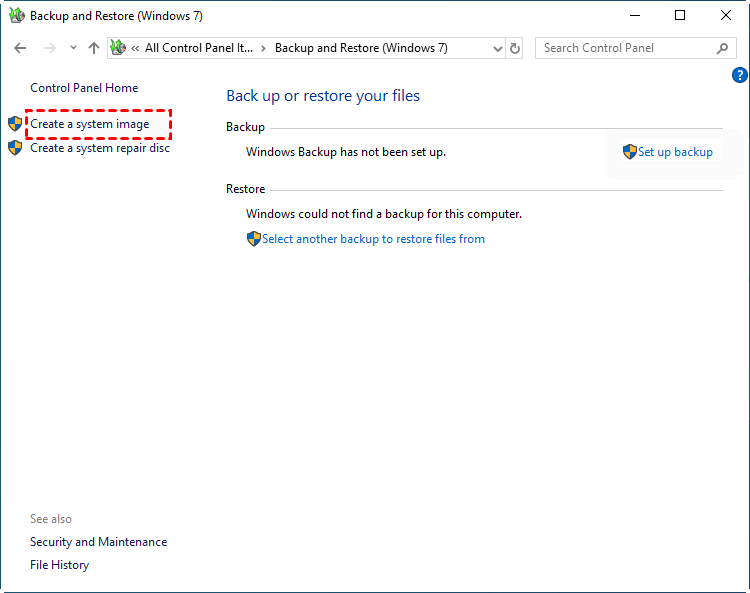
Step 1. Open Settings -> click on Update & Security -> tap on Backup -> hit Go to Backup and Restore (Windows 7).
Step 2. Click the Create a system image option from the left side.
Step 3. Select On a hard disk to choose a connected external drive as your backup destination or specify another storage device to save the image backup. Click Next.
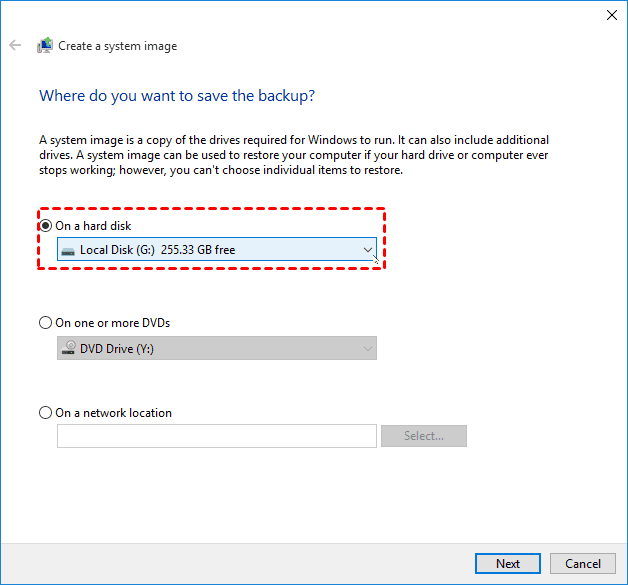
Step 4. (Optional) Select any other hard drives to include in the backup, and click Next.
Step 5. Then, click Start Backup to create system image backup for Windows 10 easily.
Way 3. Create Windows 10 Full Backup with Professional Software - All in One
Relying on professional backup software, such as AOMEI Backupper Standard, you can not only bypass the above-mentioned limitations of Windows native backup tools but also enjoy more backup features.
AOMEI Backupper Standard is an easy-to-use and multi-purpose backup utility. It allows you to automatically make system backups, disk backups, file backups, partition backups, etc. You can also create a backup of different files, including photos, videos, documents, audio, etc. You can restore system image when an accident happens. The following are some outstanding features of this tool:
- It supports scheduled backup at a fixed interval, including Daily, Weekly, Monthly, USB plug in, and Event triggers.
- By default, it employs incremental backup to save your time and backup storage space. (Differential backup is accessible in the Pro version)
- It is well compatible with operating systems including Windows 7, 8, 8.1, 10, 11, XP, Vista, etc., and storage devices like USB, HDD, SSD, NAS, cloud storage (Google Drive, OneDrive, Dropbox, etc.), and so on.
The following is a step-by-step tutorial on how to backup a laptop on Windows 10 by creating a full backup:
Step 1. Download AOMEI Backupper Standard freeware and launch the software.
Step 2. Click Backup on the left side, and then select System Backup.

Step 3. Select a destination like a local disk, external hard drive, USB, cloud drive, and NAS to store your backup image.

Step 4. Click Start Backup to begin creating system image in Windows 10.
- Tips:
- You can choose different backup methods under Backup Scheme. After you upgrade to the Pro version, you can enable Automatic Backup Cleanup feature, which can help you save disk space by deleting old backups.
Verdict
Through this article, we are sure you have understood how to backup laptop in Windows 10. Both built-in tools and third-party software - AOMEI Backupper is available for you. The third way is highly recommended, because it not only backs up and restores Windows system easily but also backs up files, partitions, etc., as per your need. You can enjoy more functions, such as scheduled backup, according to your needs.
Additionally, this tool offers a "Clone" feature that can help you copy data without restoring backup images. What’s more, you can create a portable version of AOMEI Backupper and run it from a flash drive. It also allows you to deploy images to multiple computers over the network at once. Please learn more information on the edition comparison page.

