


How to Backup vCenter 6.7 or 7.0 Using SMB Protocol
This article introduces the procedure used to create file-based vCenter Server backups, which would help you recover your environment after a failure.
By Crystal / Updated on June 28, 2024
Overview of vCenter backup protocols
VMware vCenter Server is a critical component in a virtualized environment, managing various virtual machines and infrastructure resources. Ensuring vCenter backup is vital for business continuity and disaster recovery. VMware provides several backup protocols and methods to safeguard vCenter data. In this overview, we'll examine common vCenter backup protocols and then focus on backing up vCenter using SMB (Server Message Block).
Common vCenter Backup Protocols VMware vCenter Server supports several backup protocols, each with its benefits and use cases:
- FTP/FTPS (File Transfer Protocol/FTP Secure): A common protocol for file transfer. FTPS provides additional security with SSL/TLS encryption.
- HTTP/HTTPS (HyperText Transfer Protocol/HTTP Secure): Allows data transfer over the web, with HTTPS providing encryption.
- SCP (Secure Copy Protocol): A secure method for copying files between hosts, often used for Unix/Linux-based systems.
- SMB (Server Message Block): A network file-sharing protocol primarily used on Windows systems but also compatible with other platforms like Linux through Samba.
Each protocol serves a specific use case depending on the network environment, security requirements, and other factors. Of these, SMB is a popular choice for backing up to network shares.

How to backup vCenter using SMB protocol (Tutorial)
SMB is a widely used protocol for file sharing on Windows and can be used for backing up vCenter Server to a network share, such as a NAS (Network Attached Storage), Windows Server, or a Samba share on a Linux system. Here, I will backup vCenter 7.0 using SMB protocol as an example. You can also use the similar steps for vCenter 6.7 backup to SMB.
💡 Tips:
Before you can perform a vCenter backup to SMB, configure the SMB server and make sure the SMB server have enough disk space to store the vCenter backup.
Step 1. Configure the vCenter backup location first
1. You should create user object (service account) on active directory domain controller, and configure storage location on your Windows system. Right-click the vCenter backups folder and select Properties.
2. Click the Sharing >> Advanced Sharing button. Then check the Share this folder in box, and enter a name and click the Permissions button.
3. Select the service account (vcBackcups-svc) and click OK.
4. Back to the folder properties window. Click Security and select the service account, then click the Advanced. You should Add the service account and give it Full control permission. Close the window.
Till now, you have configured the backup location.Then open VMware vCenter Server Management interface with 5480 port and Login.
Step 2. vCenter 7.0 backup using SMB protocol
Next, I will introduce the detailed steps of vCenter backup to SMB.
1. In vCenter Server Management Interface, click Backup >> Configure.
2. Enter the Backup location as the SMB protocol, where is the backups will be stored on the Windows machine.
Meanwhile, you can also backup vCenter to NFS.
3. Enter the service account username and password.
4. In the Schedule section. Select a time for the backup to run and how often you want to backup.
5. (Optional) Enter a password for encrypting the backups, especially in a production environment.
6. (Optional) The DB Health Check is selected by default. The DB Health Check helps you determine the status of the vCenter database.
7. Enter the number of backups you want to retain.
8. If you want to retain historical stats, events, and tasks, then pick that option in the Data section.
9. Review the settings and if you complete it, click Create tab.
You can monitor the process status of vCenter backup to SMB in Activity section. It takes time depending on the backup size to complete.
Once backup is completed this is how the backed up data looks like on the shared folder, In case of any critical non recoverable issues I can use it to restore reinstall vCenter server easily from VCSA ISO.
Tips: Some users reported the VAMI Backup with SMB error when using SMB protocol for vCenter backup. Now the issue is resolved in vCenter Server 7.0 Update 3c.
In a small business environment, there is no need to invest in vCenter backup at all. It is more affordable and convenient to choose a professional backup software to backup VMware virtual machines directly.
Batch backup VMs on vCenter for better data protection
With a single vCenter Server, you can manage up to 1,000 hosts and 10,000 running virtual machines. However, However, how can you ensure the data security of these VMs that are hosting important data? Therefore, I am here to introduce you to a robust VMware backup software - AOMEI Cyber Backup.
AOMEI Cyber Backup is a powerful and flexible VMware backup solution designed for VMware ESXi virtual machines (VMs). It provides an agentless, centralized backup approach, allowing you to manage backups for multiple VMs and hosts directly from a single interface. By integrating with VMware vCenter, AOMEI Cyber Backup offers an efficient way to streamline backup processes, reducing the need for manual intervention and agent installation.
Below is an overview of the key features and benefits of AOMEI Cyber Backup for VMware environments.
✔ Agentless Backup: Unlike traditional backup solutions that require installing software agents on each VM, AOMEI Cyber Backup connects directly to vCenter, enabling agentless backup. This reduces complexity and potential points of failure.
✔ Centralized Management: With the ability to add vCenter directly to AOMEI Cyber Backup, you can manage backups for multiple VMs and hosts from a centralized console. This streamlines backup administration and improves scalability.
✔ Backup Scheduling: AOMEI Cyber Backup provides flexible scheduling options, allowing you to set automated backups at specific times or intervals. This ensures regular backups without manual intervention.
✔ Fast Backup and Restore: The agentless design and efficient data handling allow for fast backup and restore operations, minimizing downtime during restoration.
✔ Alerts and Notifications: AOMEI Cyber Backup can send alerts and notifications for backup status or other critical events. This helps keep you informed about the health of your backup environment.
✔ Cost-Efficient: The agentless approach and centralized management can lead to cost savings by reducing infrastructure requirements and administrative workload.
AOMEI Cyber Backup supports VMware ESXi 6.0 and later versions. Next, I will show you how to batch backup VMs managed by vCenter Server with AOMEI Cyber Backup. You can click the following button to download the 30-day free trial.
Easier Steps to batch backup VMware VMs under vCenter Server
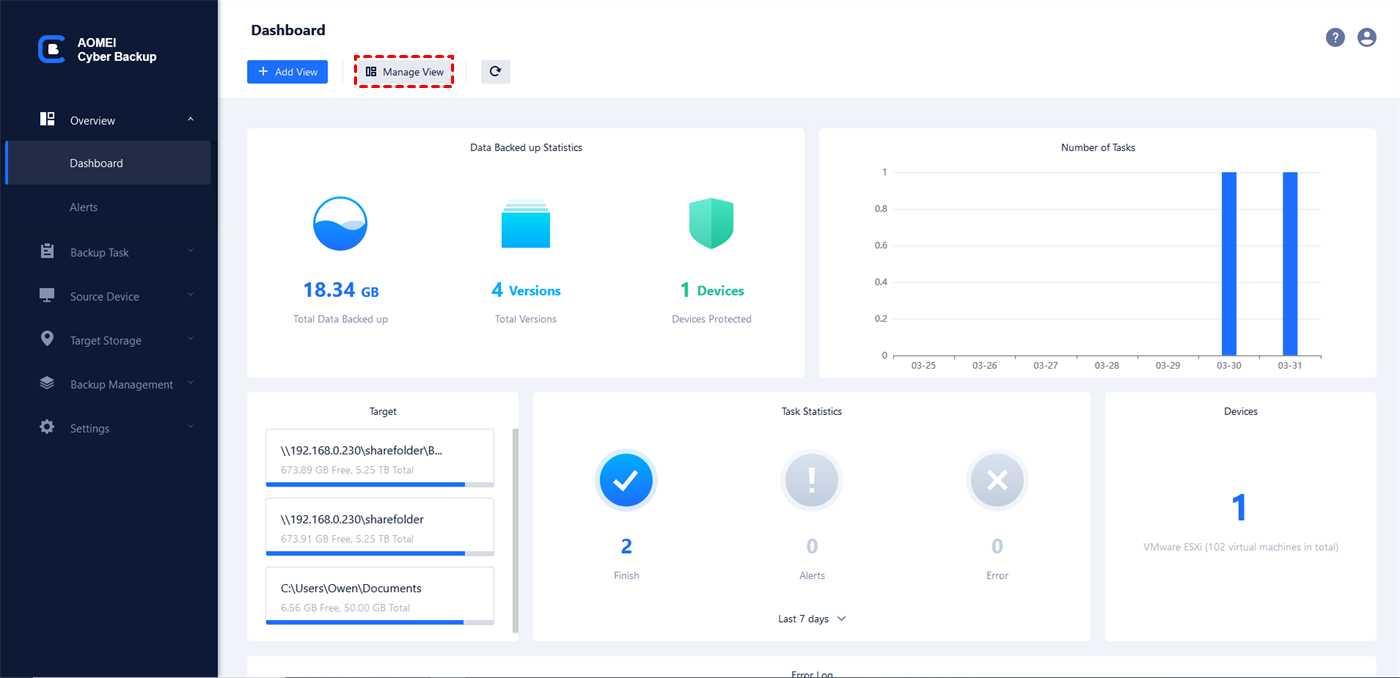
1. Bind Devices: Access to AOMEI Cyber Backup web client, navigate to Source Device > VMware > + Add VMware Device to Add vCenter or Standalone ESXi host. And then click … > Bind Device.

2. Create Backup Task: Navigate to Backup Task > + Create New Task, and select VMware ESXi Backup as the Backup Type.
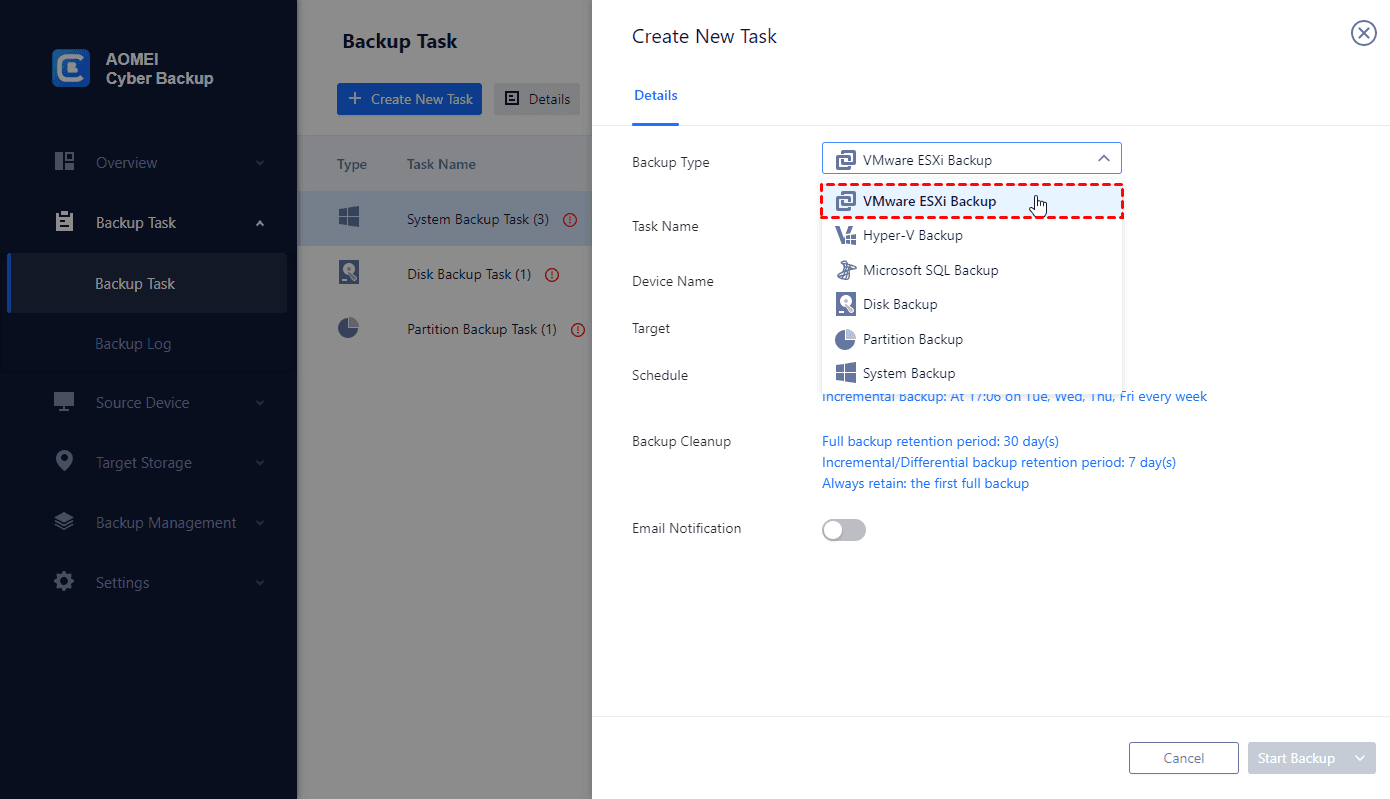
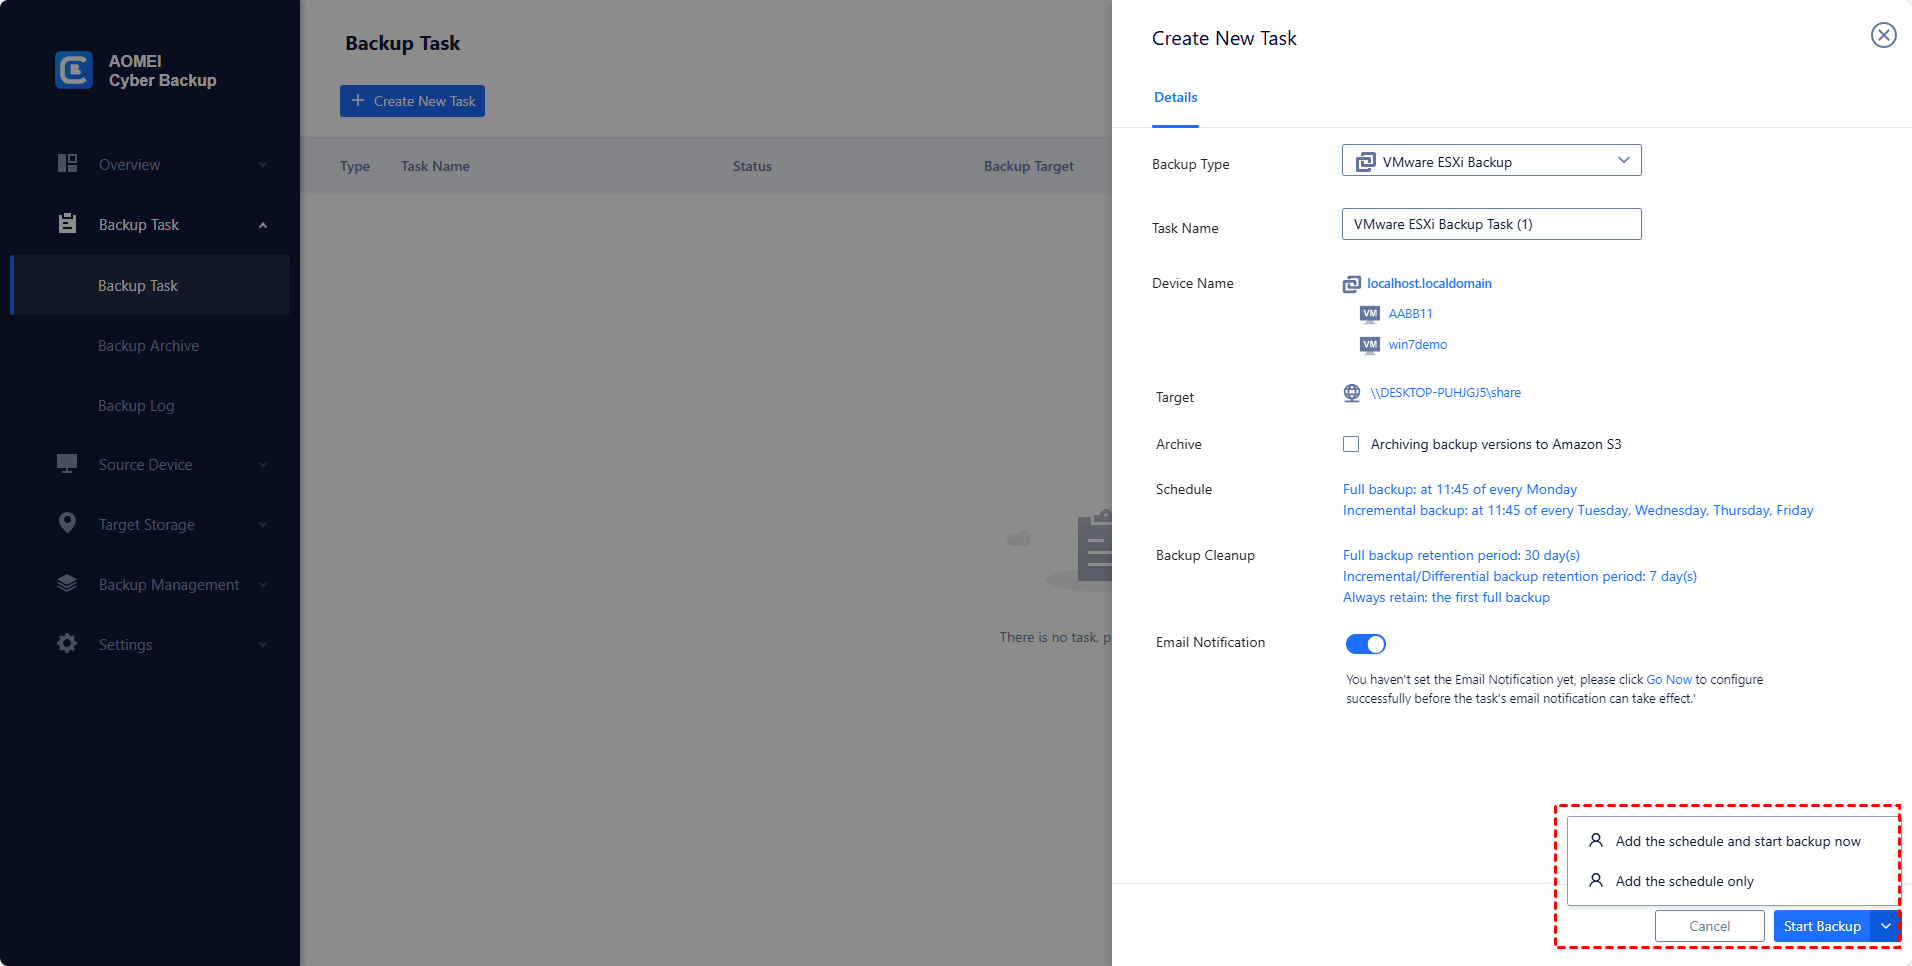
3. Set Task Name, Device, Target, Schedule, and Cleanup as needed.
▶ Task Name: you can chance the task name or use the default name with an ordinal.
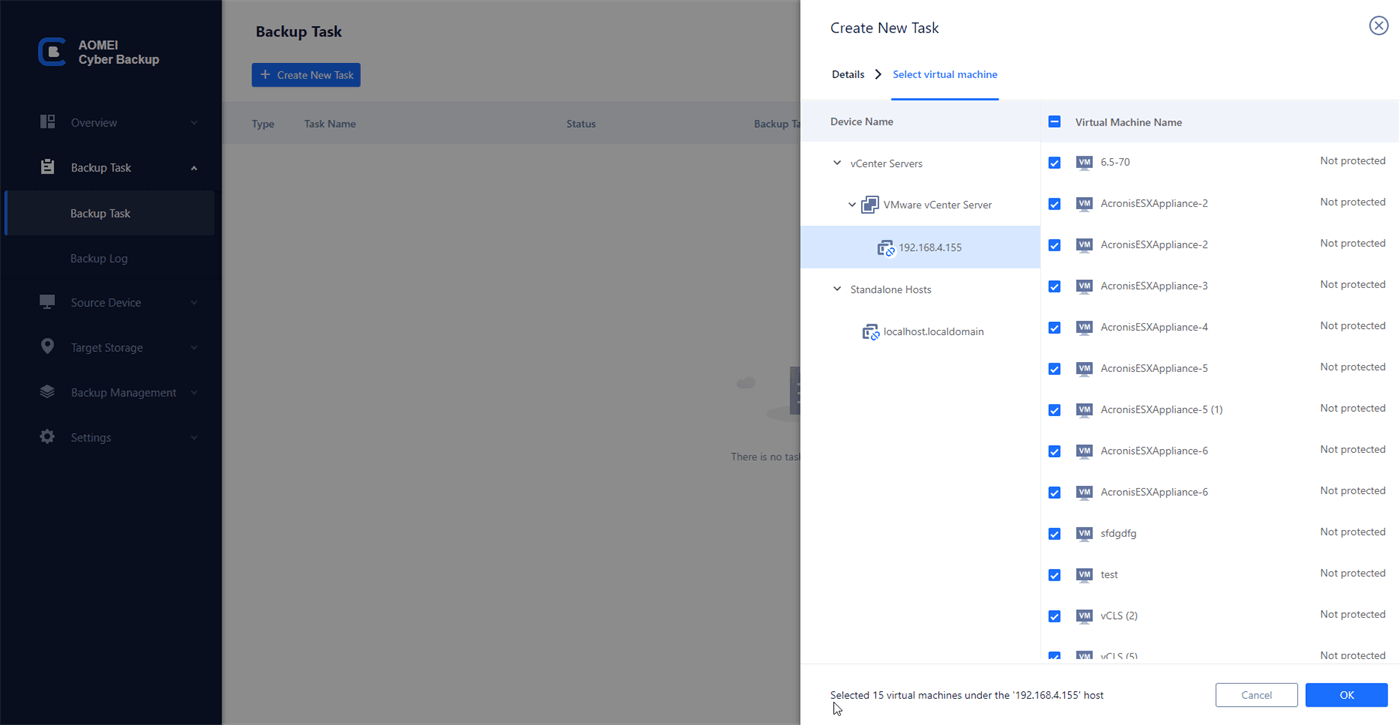
▶ Device: batch select large numbers of VMs managed by vCenter Server for centralized backup.
▶ Target: select to back up to a local path, or to a network path.
▶ Schedule (optional): offers full / incremental / differential backup methods and flexible time type for backup.
▶ Backup cleanup (optional): automatically delete the old backups and retain the new VM backups.
▶ Run Backup: Click Start Backup and select Add the schedule and start backup now, or Add the schedule only.
4. Restore: You can create a new VM by hitting Restore button, and it allows you to restore VM to original/new location directly from any selected backups, which saves the trouble of re-configuring the new VM.
Summary
This article covers the detailed steps of vCenter backup to SMB protocol. You need to configure the backup location correctly and then schedule the vCenter backup using SMB protocol. Backing up vCenter using SMB helps to restore vCenter Server environment after a failure or upgrading operation.
Besides, if you need to manage a large virtual environment, you may want to have multiple vCenter Servers to work simultaneously.

