


Error-Free Ways to SQL Server Restore from Compressed Backup
You may create compressed backups to save disk space and enhance efficiency, but can you restore them without error? This article introduces how exactly to restore ZIP/RAR/BAK files, and offers 3 fixes to problems you may encounter.
By Crystal / Updated on June 30, 2023
Overview for Compress SQL Server Backup
Since SQL Server 2008 and later versions enabled backup compression, basically there are 2 options you can choose to created compressed backups of your SQL database
Backup Compression in SQL Server (2008 and later versions): You will get BAK files, they can be directly restored by SQL Server.
Other Compression Software: You will get ZIP, RAR, and many other formats of compressed files. They cannot be directly restored.
So, how to restore compressed backup in SQL Server? Here I summarized 3 methods to restore a single database.
How to restore SQL database from ZIP/RAR files
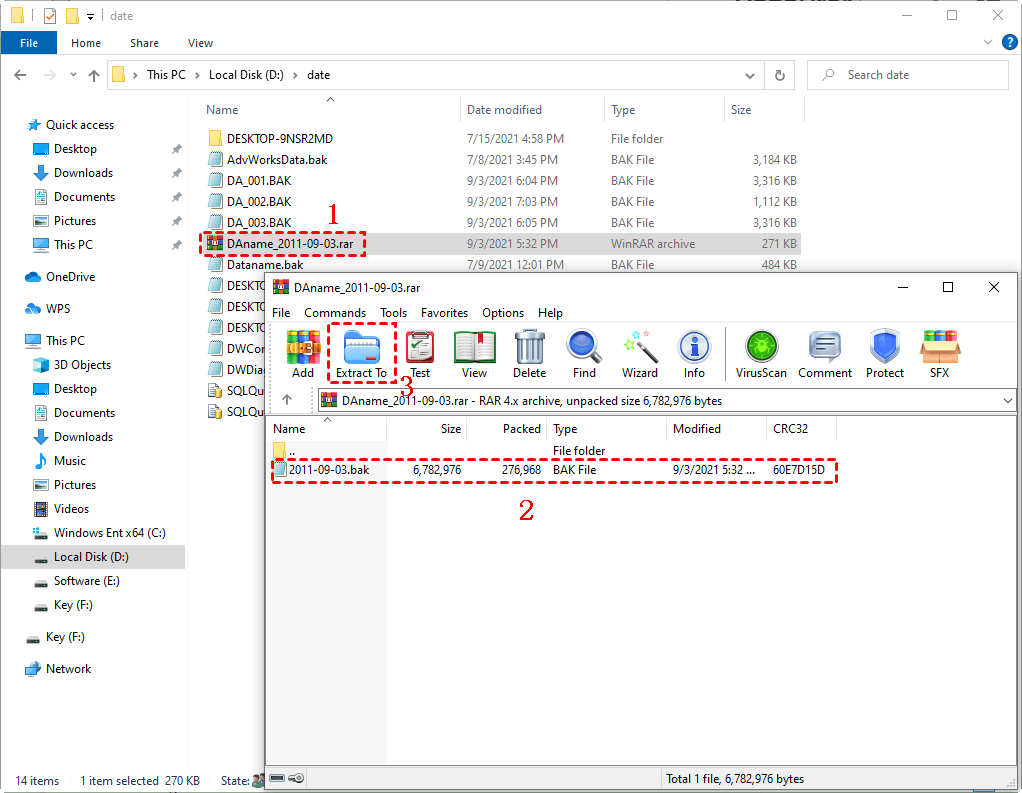
As I mentioned before, SQL databases cannot be directly restored from ZIP/RAR files, therefore you need to unzip them into BAK files first, the rest operations will be all the same.
Double-click the ZIP/RAR files to unzip them into BAK files.
How to restore SQL database from bak files
Since BAK files containing compressed data can be directly restored in SQL Server, the operations will be the same as usual. Here I summarized 3 common methods to do this.
Method 1. Restore compressed backup in SQL Server using SSMS GUI
In SQL Server, you can restore database from bak file using SSMS GUI. This is also the most intuitive way.
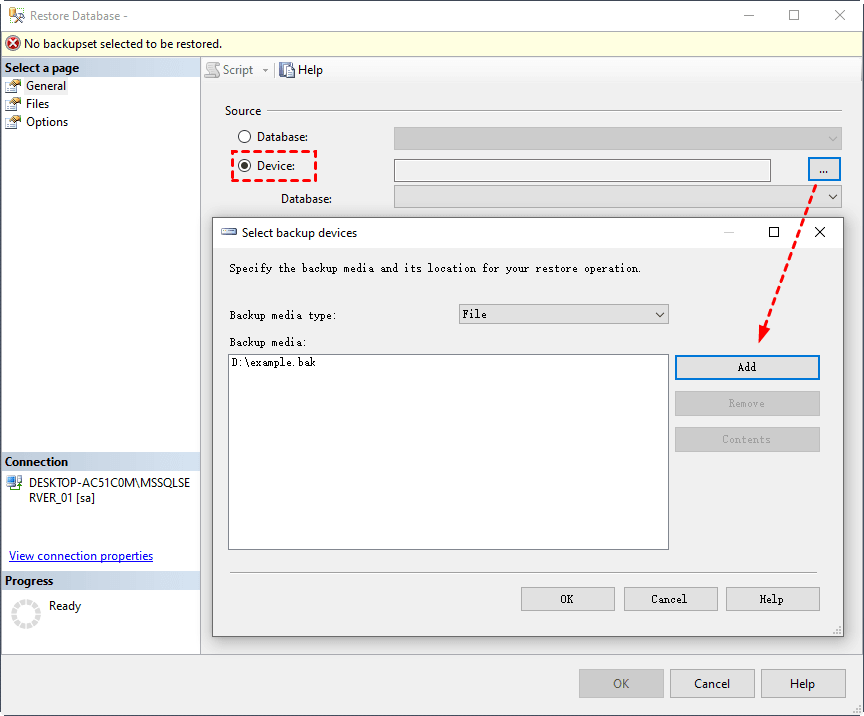
1. Launch SQL Server Management Studio (SSMS) and connect to your instance, right-click Databases and select Restore Database…

2. In prompt window, General page, select Device in Source section, and then click … button next to the blank.
Click Add to find the BAK file you want to restore. The rest information will be filled in automatically.
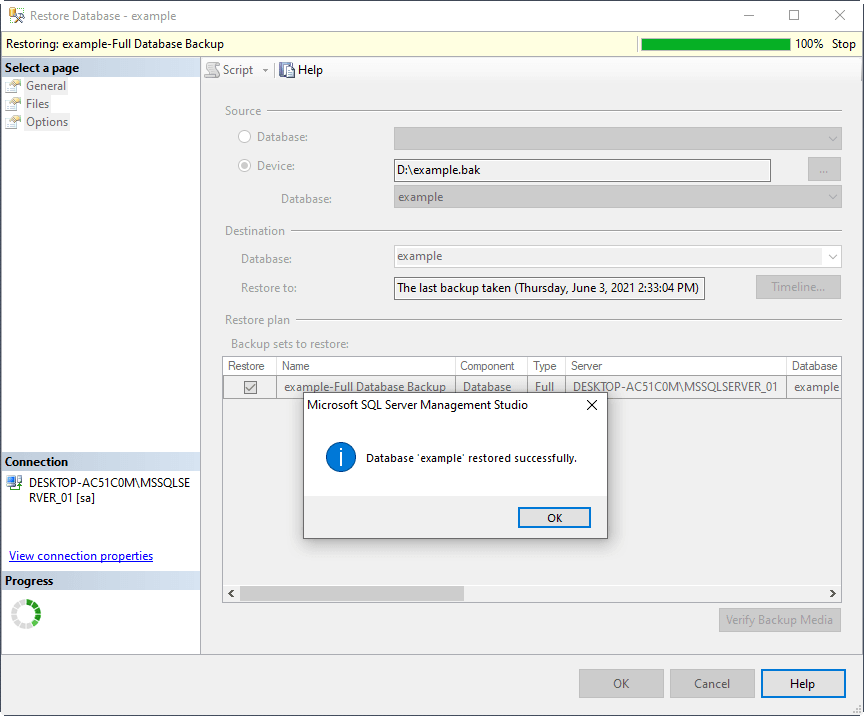
3. Then you can click OK to start.
Method 2. Restore compressed backup in SQL Server using T-SQL commands
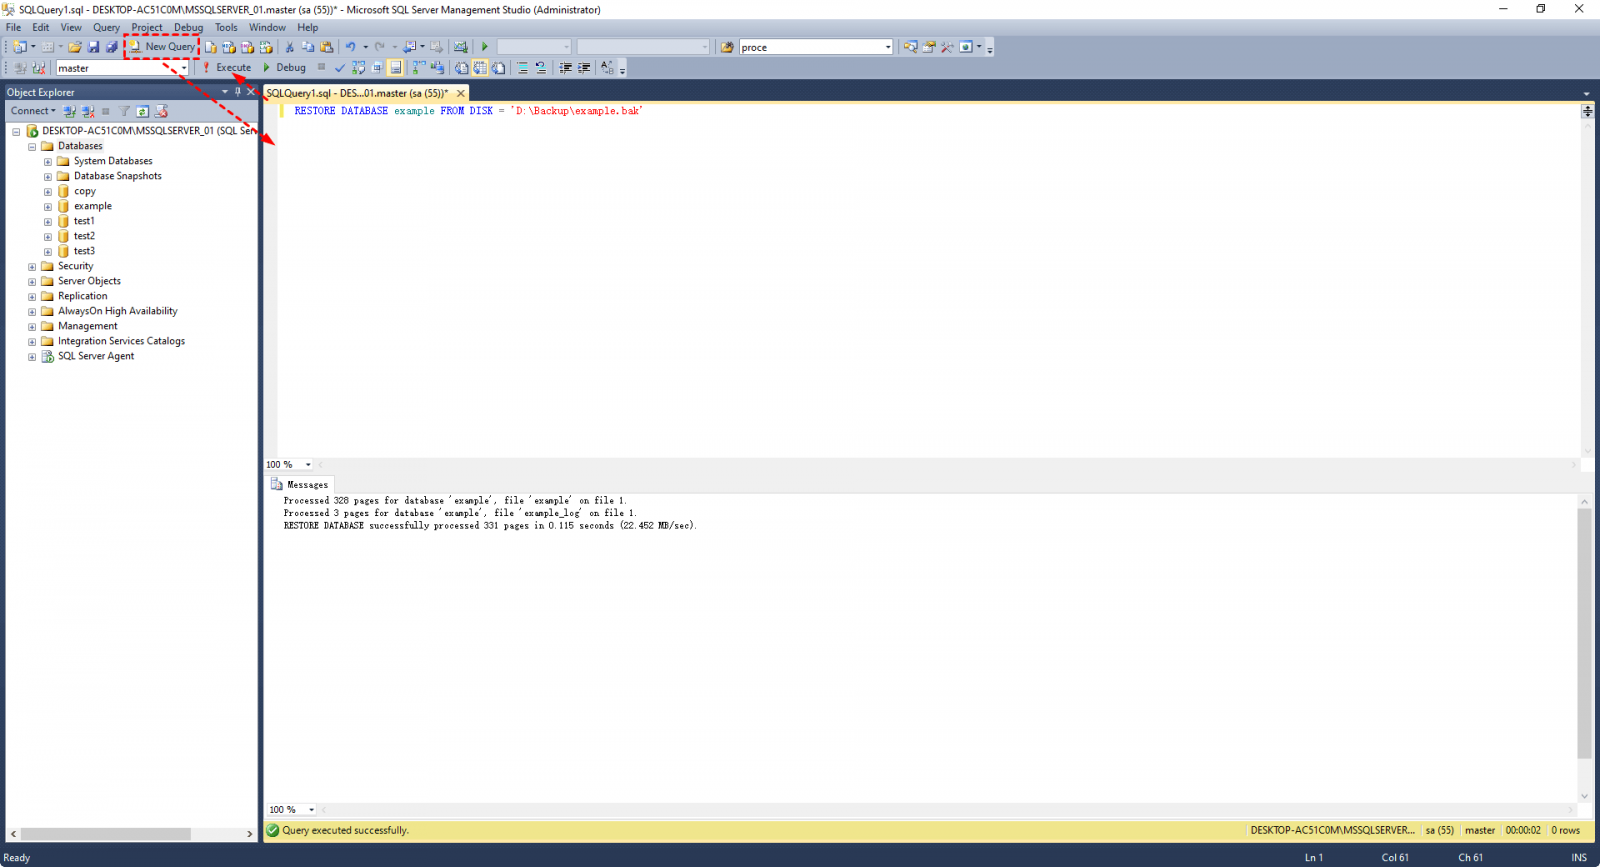
1. Launch SSMS and connect to your instance, click New Query on the upper bar. Input following commands:
RESTORE DATABASE databasename FROM DISK = 'filepath'
Note: If you want to overwrite the existing database, you can add WITH REPLACE after ‘filepath’. But be careful, this may cause data loss.
2. Then you can click Execute on the upper bar to start restore.
Method 3. Restore compressed backup in SQL Server using CMD commands
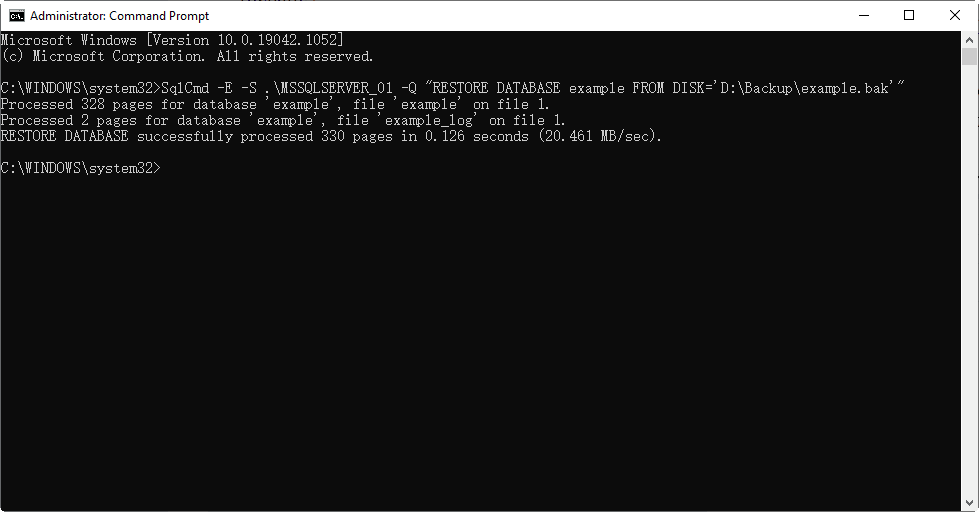
1. Use Win+R keyboard shortcut to open Run in windows, input CMD and click OK.
2. Input following commands in Command Prompt window:
sqlcmd -E -S instancename -Q “RESTORE DATABASE databasename FROM DISK=‘filepath’”
Note:
-E: refers to connecting to the database using a trusted connection without using a username and password.
-S: refers to the name of the instance which the SQL Server is going to connected.
-Q: refers to executing the query when the SqlCmd command is started, and then exits immediately.
Causes and solutions to common problems when restoring
Normally there are 3 types of problems you may encounter when using SQL Server restore from compressed backup. Here I list the causes and the specific steps of the solutions as follow.
If restore takes too long
● Possible cause: the lack of available disk space.
● Solution: Use Maintenance Plan to clean up the old backups stored on your disk regularly (Express version not available).
● Specific steps:
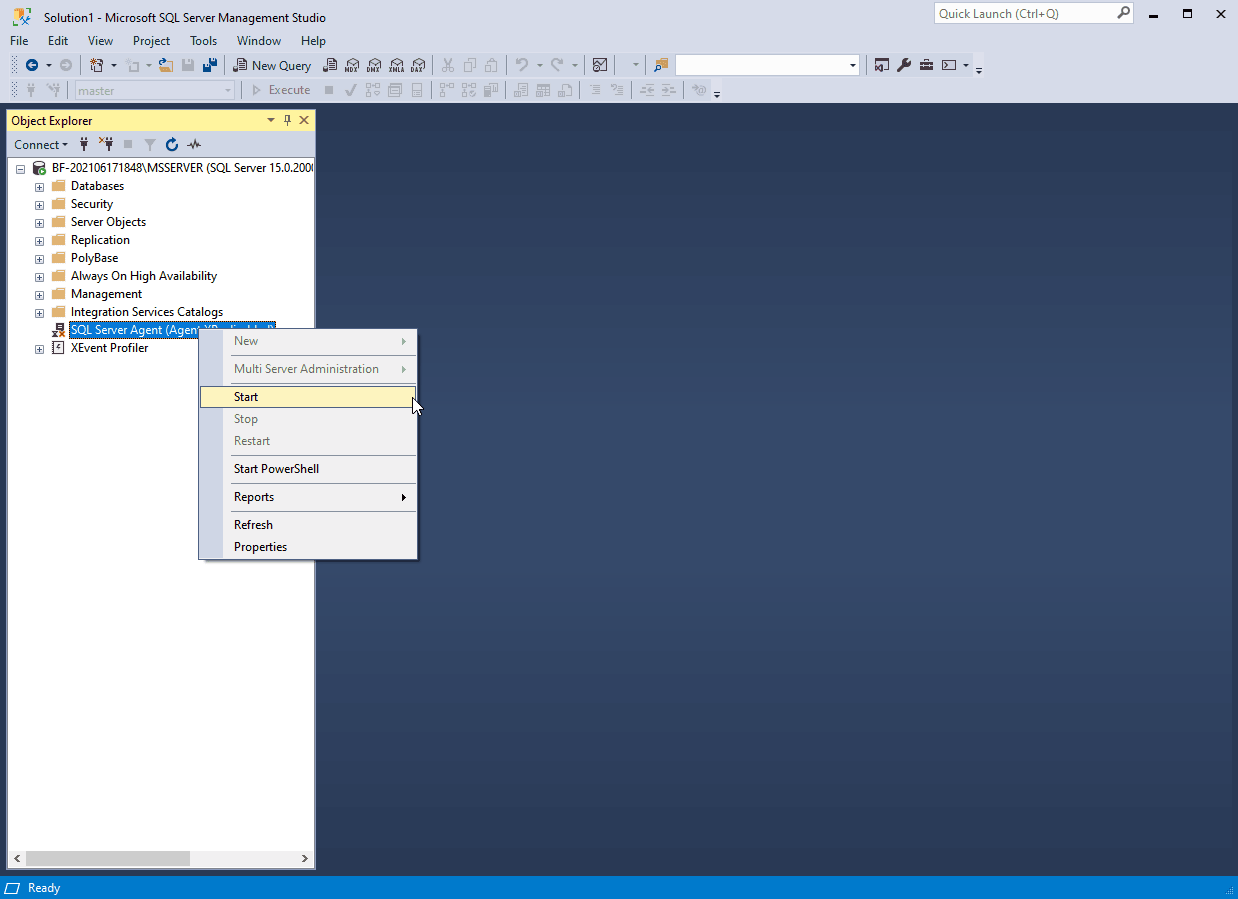
1. Launch SSMS and connect to your instance, right-click SQL Server Agent, select Start.
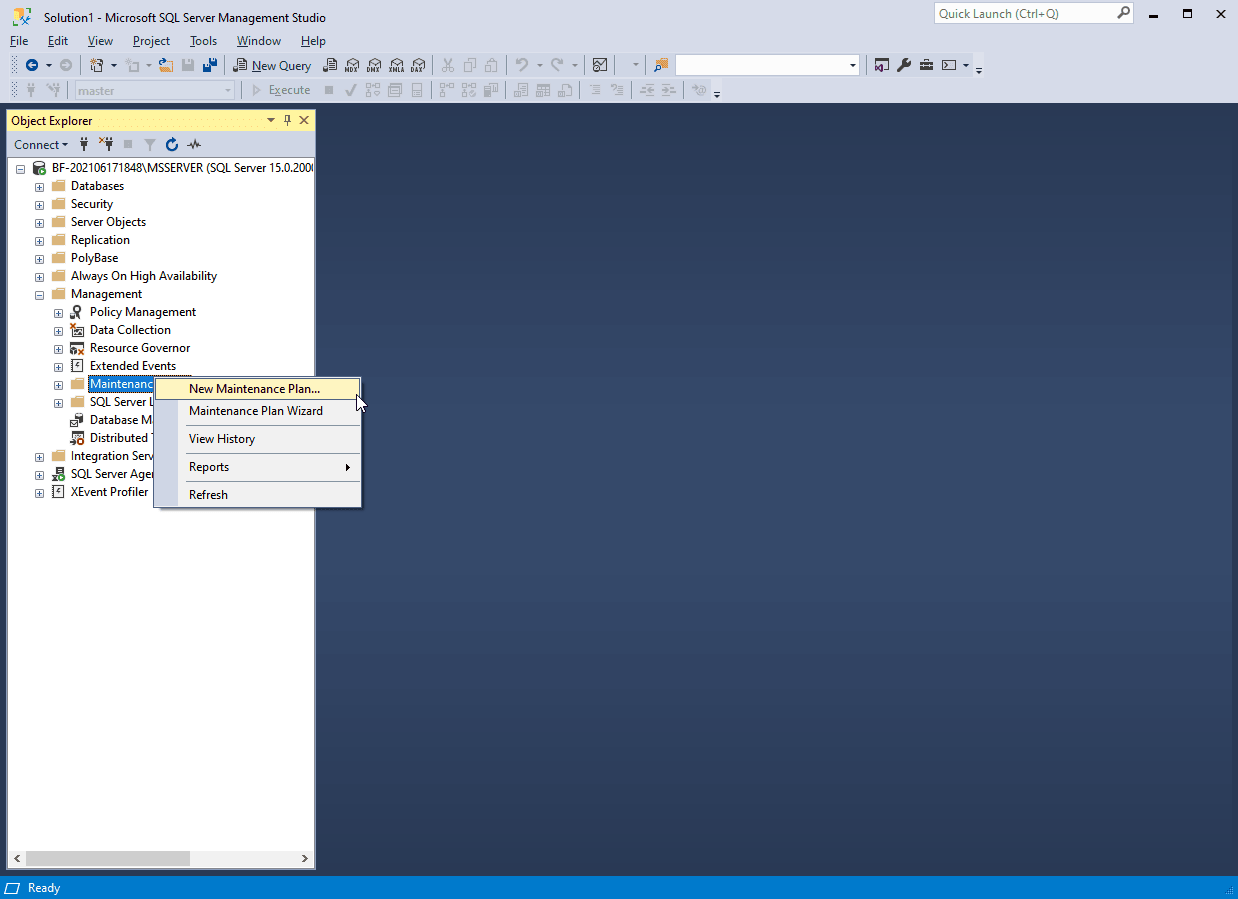
2. Open Management tab, right-click Maintenance Plans, select New Maintenance Plan…and name this plan in prompt window.
3. Click Toolbox on the upper bar, select Maintenance Cleanup task in the left tab and drag it into the right blank. Double-click the task.

4. In the prompt window, select Backup files as delete files.
In File location section, select Search folder and delete files based on an extension, then click … button to locate the folder where backups are stored, input bak in File extension to delete the backups.
Note: Input trn in File extension you can delete the transaction logs.
Input txt you can delete the text report documents.
If you want to delete them all, you need to drag multiple Maintenance Cleanup Task into the blank and set them up separately.
In File Age section, specify the time and the older files will be deleted. Then you can click OK to finish the settings.

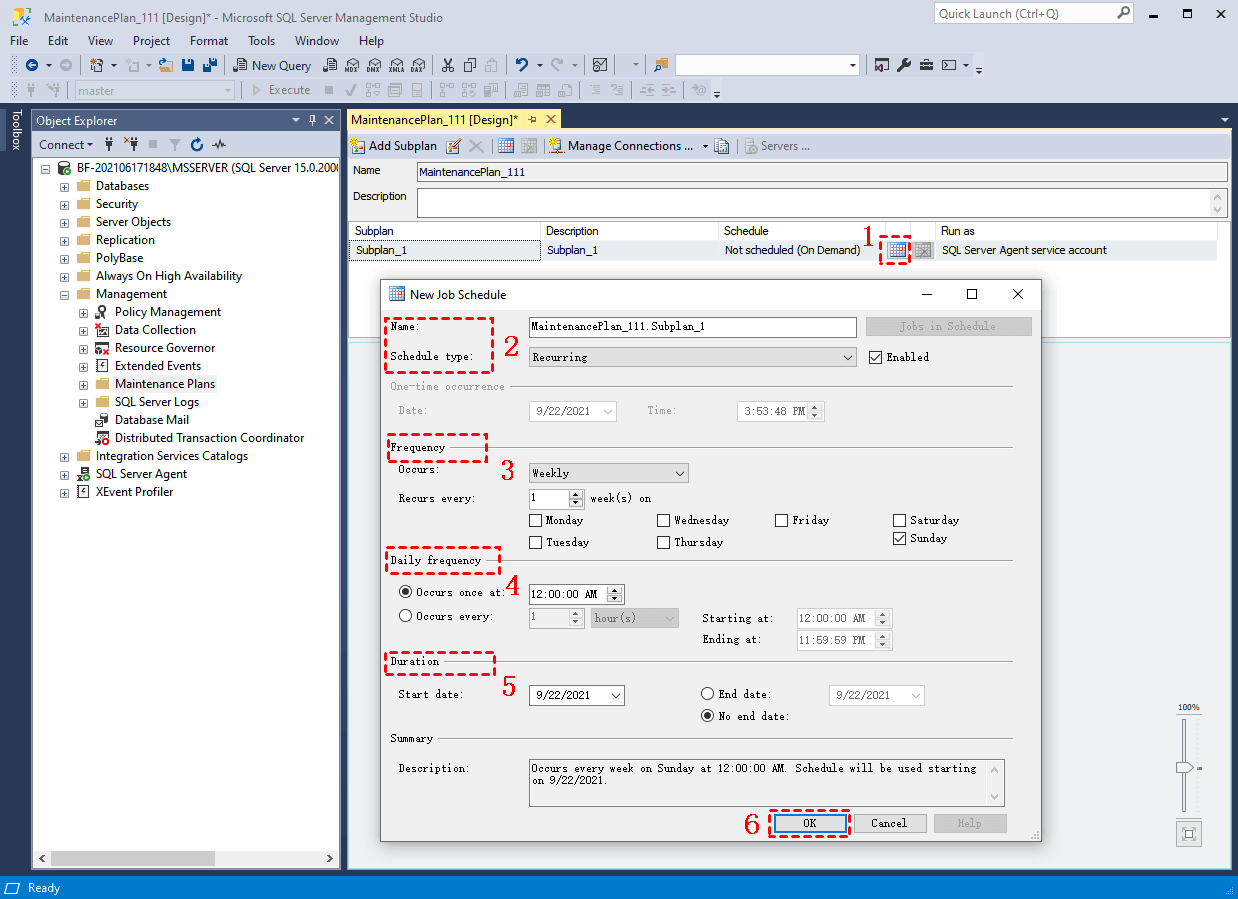
5. Click Subplan Schedule (calendar icon) on the upper bar to arrange the Frequency and Duration of this task. Click OK to finish the settings.
6. After this, you can use Ctrl+S windows shortcut to save this task. Then open up SQL Server Agent > Jobs tab to find the newly created task. Right-Click this task and select Start Job at Step… to execute this task.

If restore failed because database in use
● Possible causes: user didn’t close Query window after use, or another user is using this database.
● Solution: use T-SQL commands to kill all active processes.
● Specific steps:
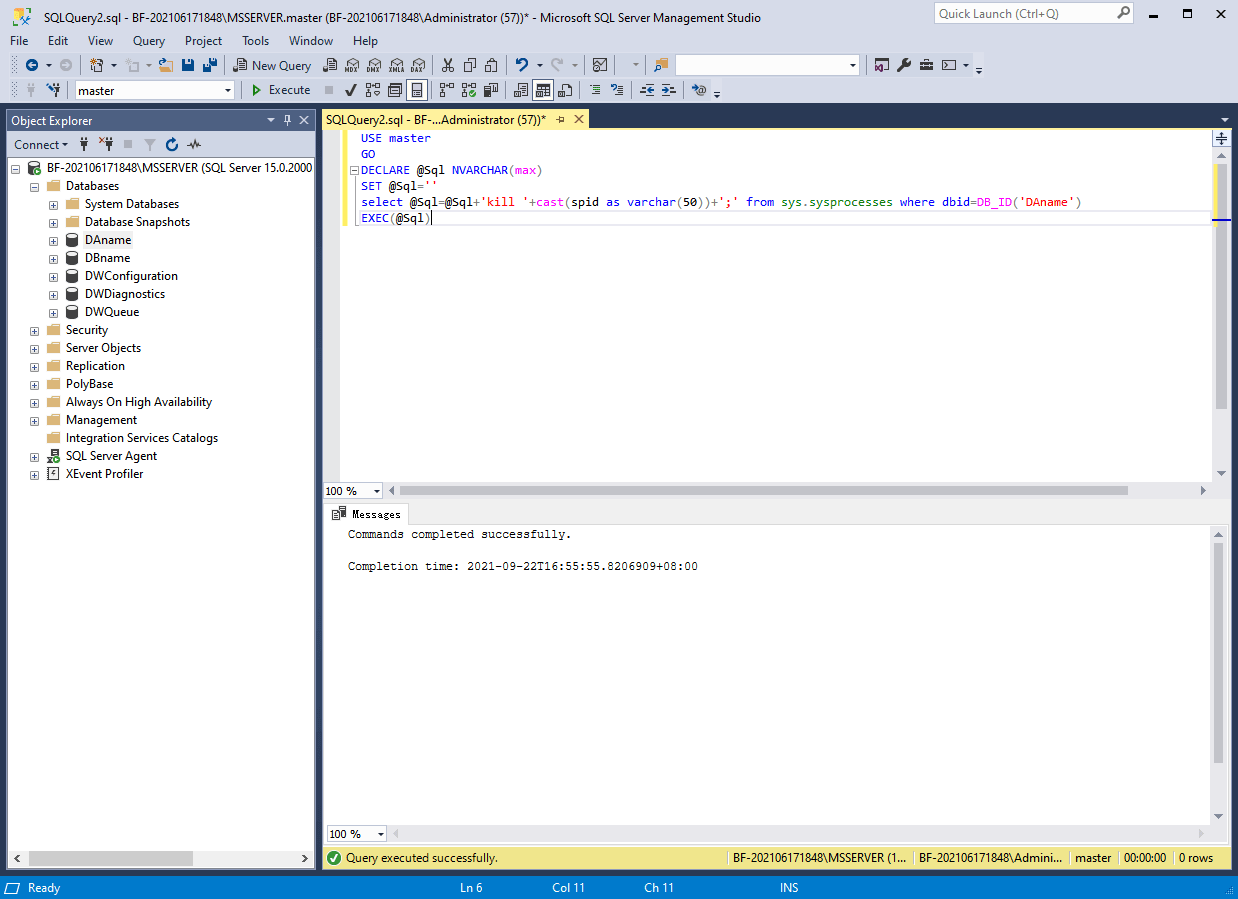
1. Launch SSMS and connect to your instance, click New Query on the upper bar, input following T-SQL commands:
USE master
GO
DECLARE @Sql NVARCHAR(max)
SET @Sql=''
select @Sql=@Sql+'kill '+cast(spid as varchar(50))+';' from sys.sysprocesses where dbid=DB_ID('databasename')
EXEC(@Sql)
2. Then click Execute. The active processes will be all be closed.
For more details to resolve this error, please refer to SQL Server restore database in use.
If the backup file is corrupted
● Possible cause: the backup file is corrupted. (By default, restore will stop when encountered error)
● Solution: Specify restore to skip error and continue the restore. When it’s accomplished, you may complete the database by using transaction log (versions before SQL Server 2005 not available).
● Specific steps:
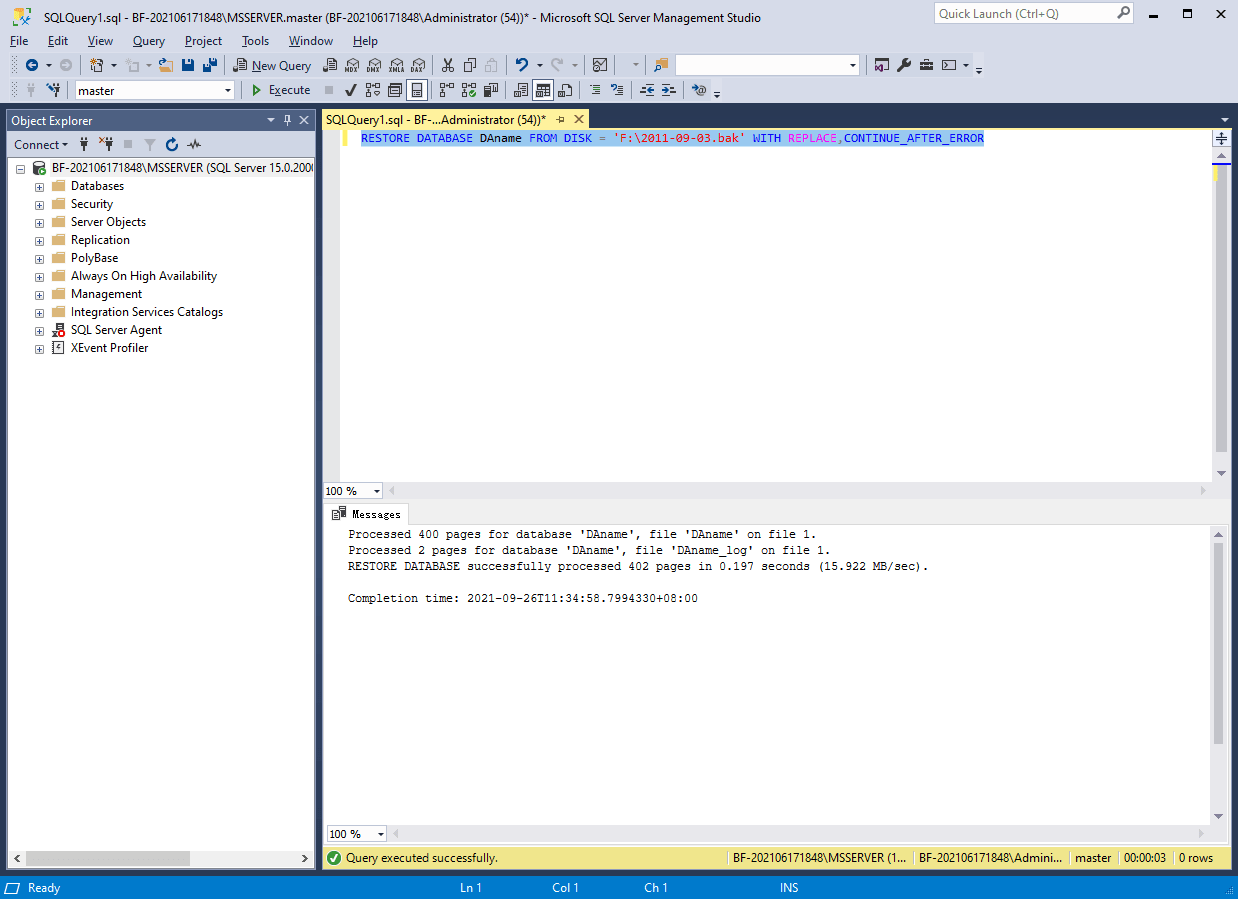
1. Launch SSMS and connect to your instance, click New Query on the upper bar, input following T-SQL commands:
RESTORE DATABASE databasename FROM DISK = 'filename' WITH REPLACE,CONTINUE_AFTER_ERROR
2. Then click Execute to start restore.
Note: CONTINUE_AFTER_ERROR is a new emergency remedy on SQL Server 2005 and later versions, therefore not available on previous versions. Besides, if the critical information is corrupted, the restore may still fail.
One effective alternative to backup and restore database with compression
As you can see, creating compressed backups is a very practical way to save disk space and improve efficiency, but you may come to errors when backing up and restoring. It can be even more troublesome to fix them. That’s why I recommend you AOMEI Centralized Backupper Database.
AOMEI Centralized Backupper Database is a professional backup software with intuitive interface and simple operations. It offers 2 levels of compression, which can save you more disk space. Besides, it is specially designed for enterprises, allowing one specialist to centrally operate and manage backups of all Windows PCs, workstations, and servers within LAN on one controlling computer. It can notably promote effectiveness and reduce manual errors.
Here’s a 30-day free trial for you:
To properly use it to manage and operate multiple computers within LAN, you need to follow these steps first:
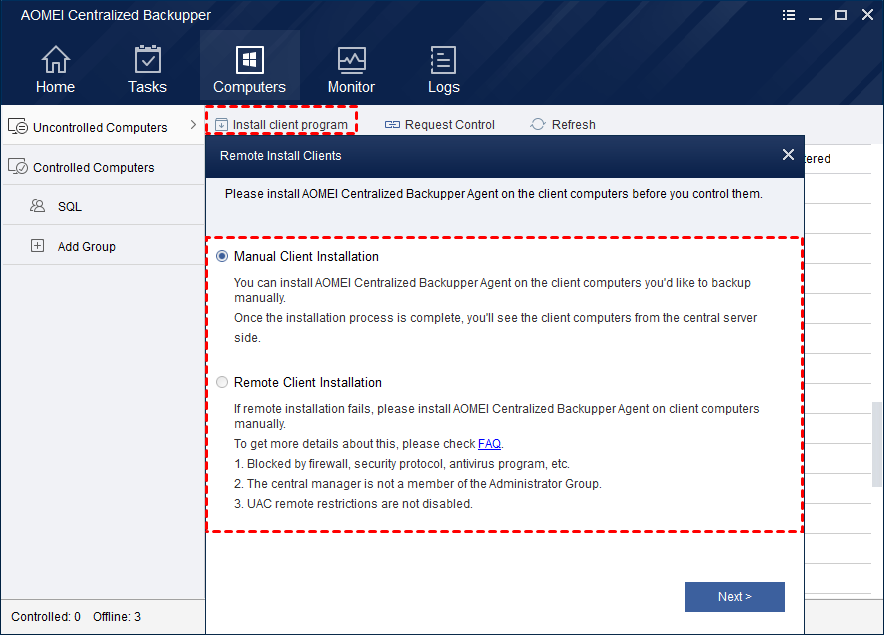
Launch AOMEI Centralized Backupper Database and install client program remotely or manually by clicking Computers > Install client program.
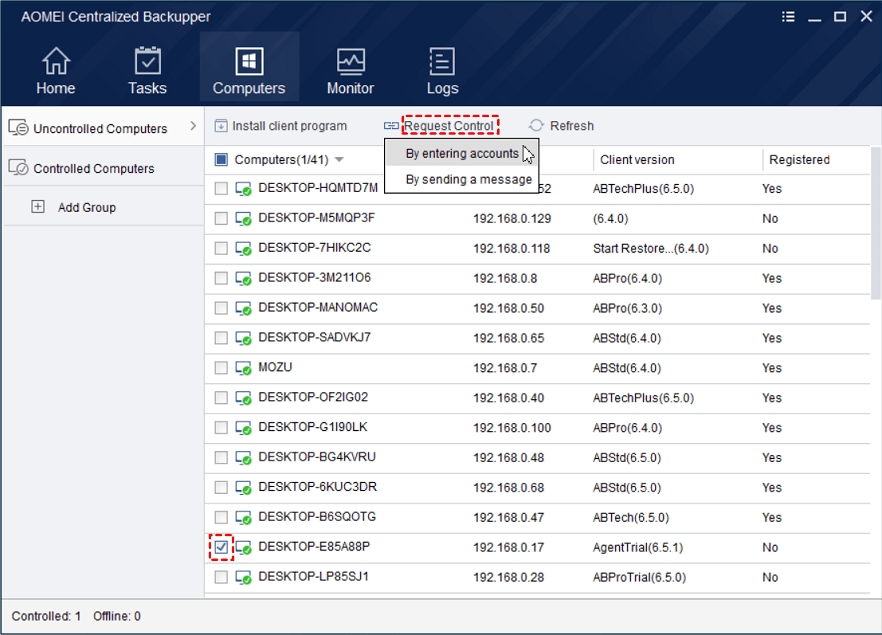
For the computers with client programs installed manually, you need to Request Control over them for the further operation.
Click Computers > Uncontrolled Computers to find the correct IP, then click Request Control on the upper bar. A prompt window will show on their computers, once all permission received you can start whenever you like.
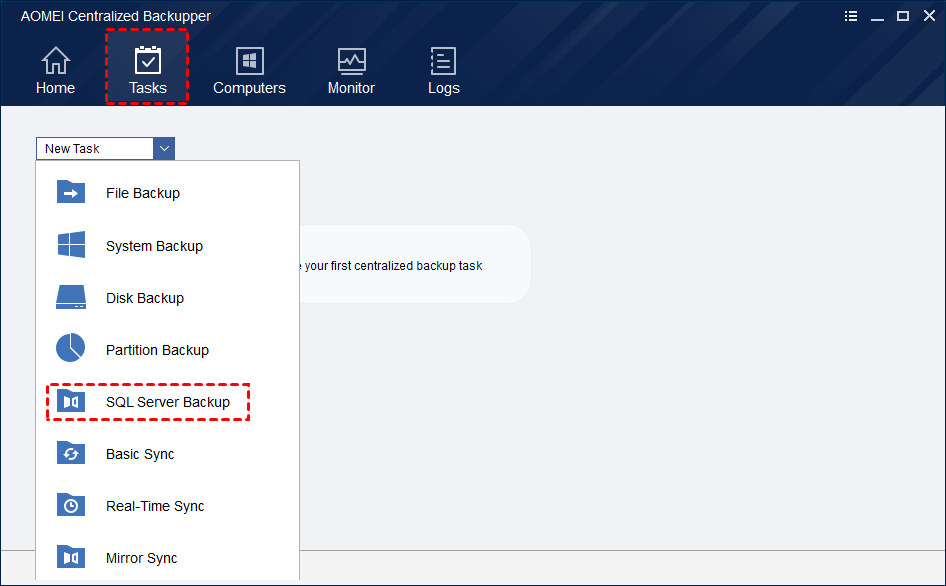
How to create compressed backup on centralized backupper database
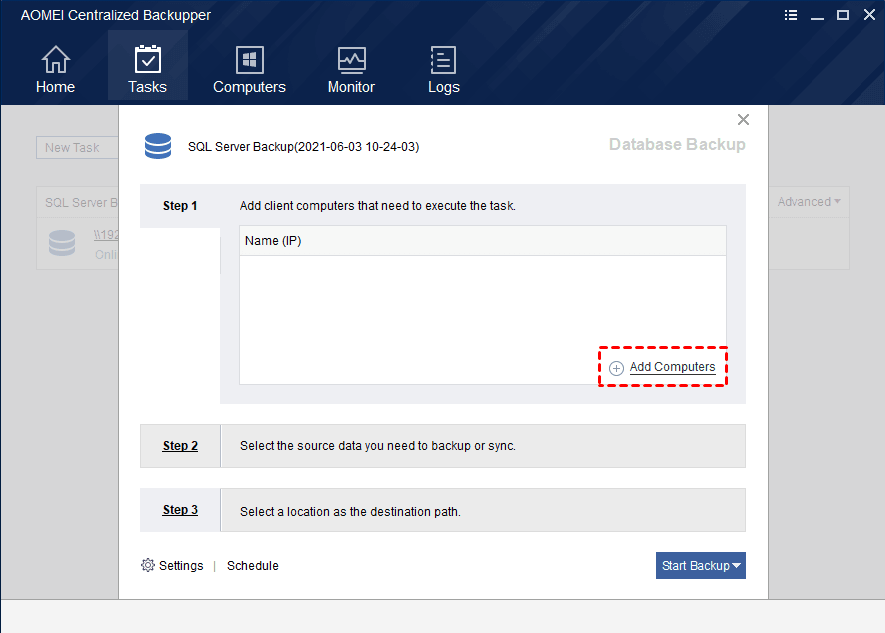
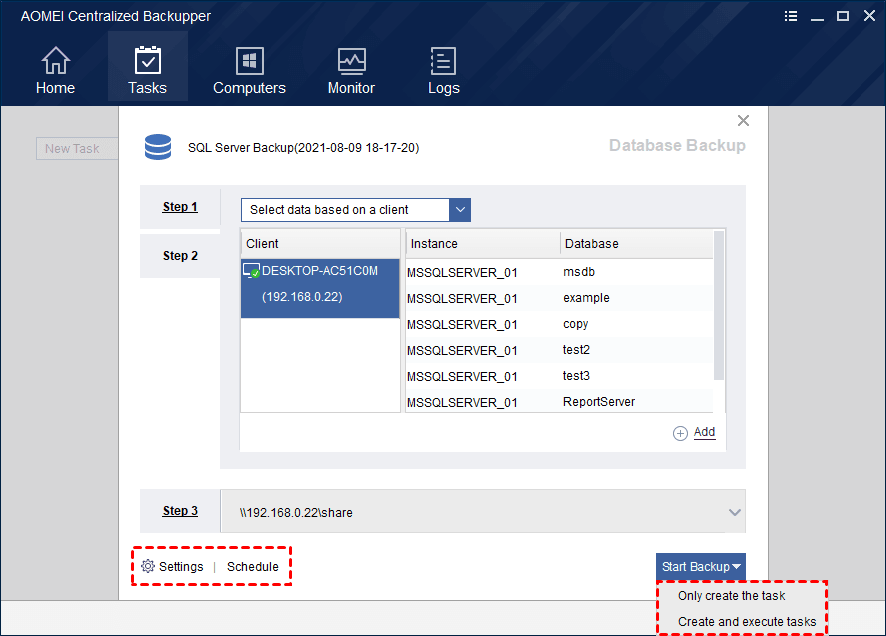
Launch Centralized Backupper Database and create the backup task by clicking Tasks > New Task > SQL Server Backup. Follow the 3 steps in the prompt window.
Step 1, click Add Computers to find the computer you want to execute the task. Then click OK.
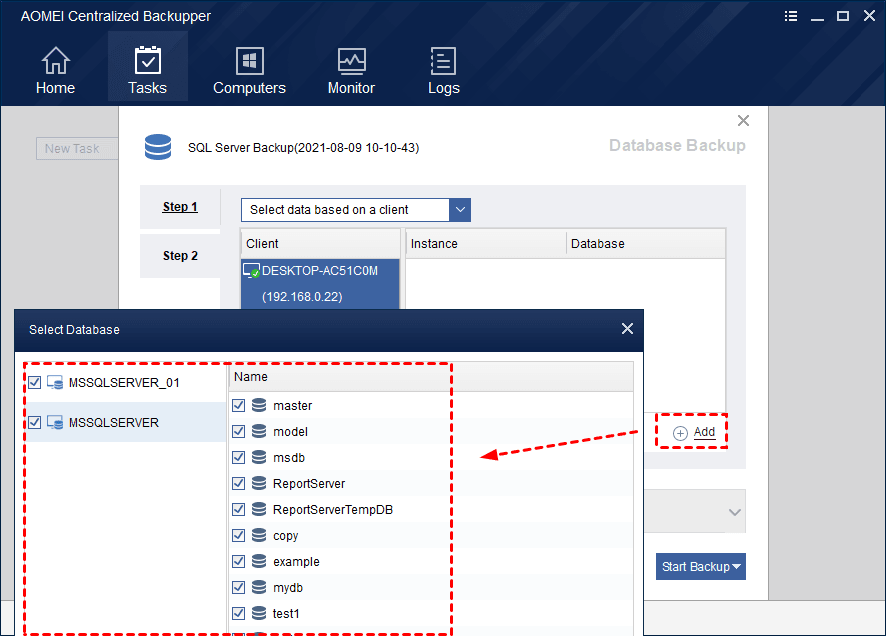
Step 2, click Add to select single or multiple instances and databases you want to back up.
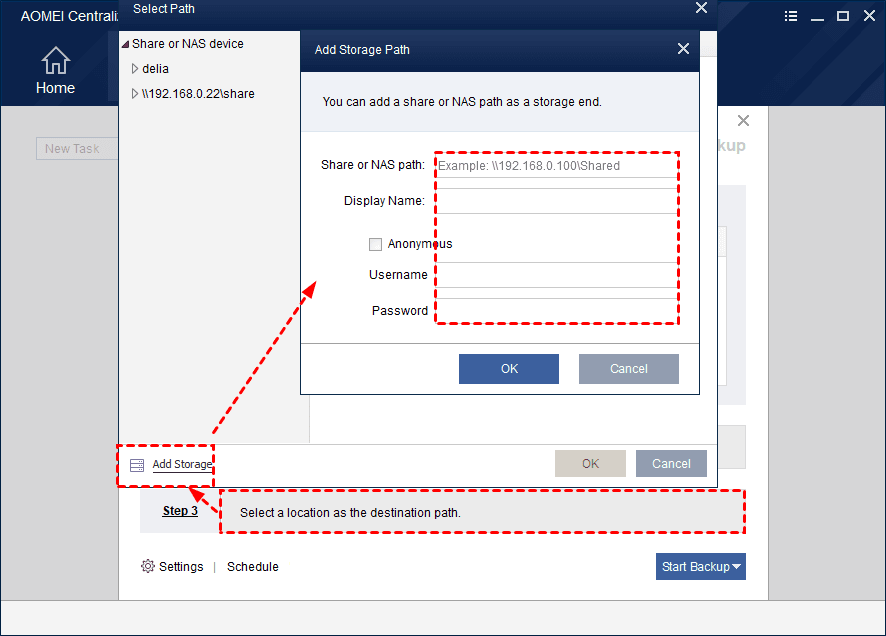
Step 3, select a location as the destination path, you can click Add Storage to add a Share or NAS Device as a storage end.
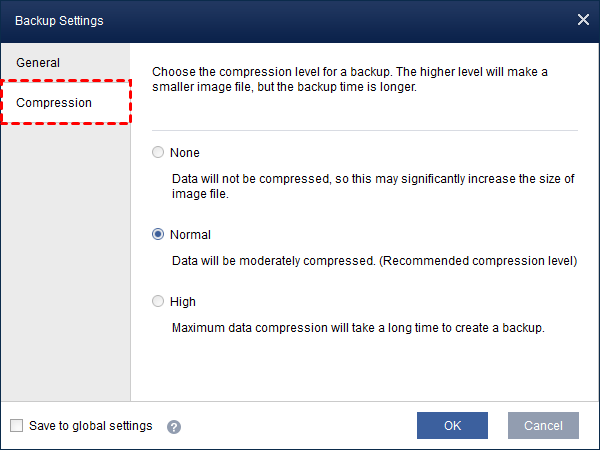
Click Settings you can enable encryption and choose the compression level for this backup. You can choose None, Normal, or Higher level. The higher the compression level is, the smaller the backup will be.
Then you can click Start Backup to Create and execute tasks. Once created, the task will show on the interface separately.
How to restore compressed backup on centralized backupper database
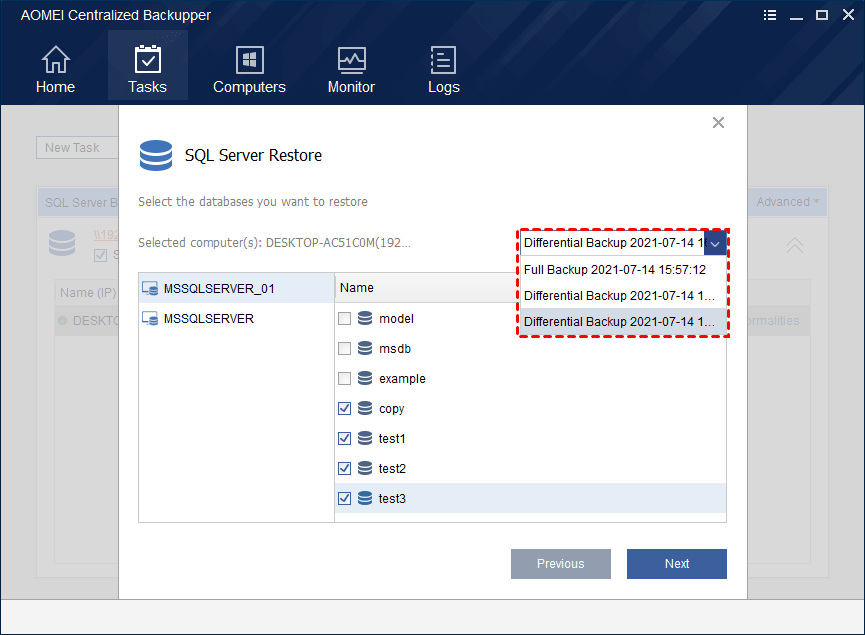
Click Tasks on the upper bar, and find the backup task, click Advanced on the upper right and select Restore in the dropping tab.

In the prompt window, select the instance and databases you want to restore.
You can also choose one specific full/differential backup on the upper right tab. Then click Next.
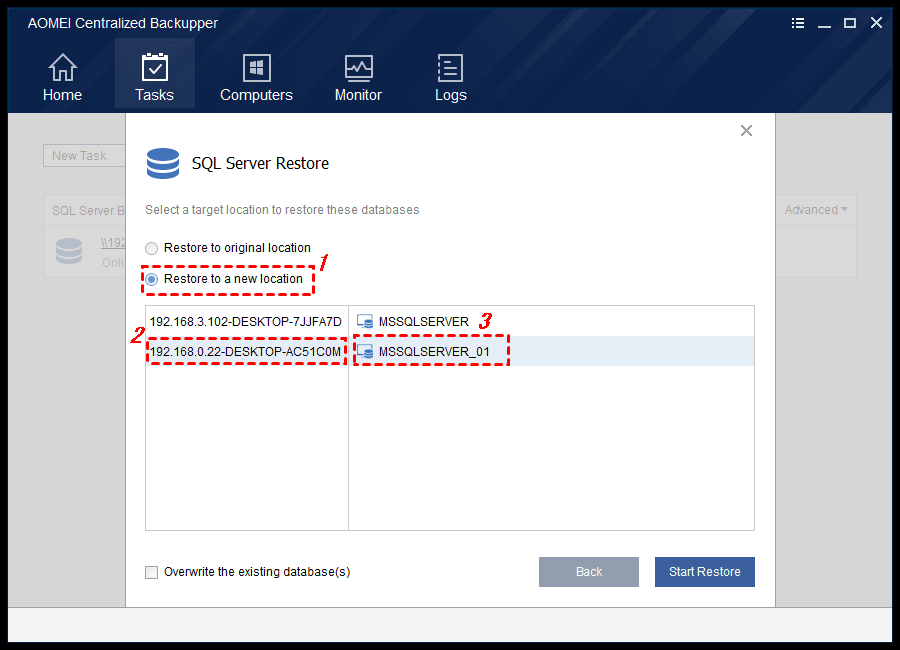
Choose to Restore to original location or Restore to a new location. If you choose later, you can restore the backup to another instance/server within LAN.
After these settings, you can Start Restore.
Summary
In this article, I introduced 3 ways to restore compressed backup, and 3 fixes to common problems you may encounter. Hope this could help you.
But if you want a simple and error-free way to backup and restore SQL Server database with compression, or you have the need to centrally operate and manage backups of multiple computers within LAN, AOMEI Centralized Backupper Database Edition can be a very good solution.
Except for SQL Server Backup, it also has other features like File Backup, System Backup, Disk Backup, Partition Backup, Basic Sync, Real-Time Sync, and Mirror Sync. It can save you plenty of time and cost.

