
Three Free Ways to Recover Pictures from Recycle Bin Effectively
This tutorial offers you several ways to recover pictures from recycle bin for recycle bin recovery.
By Penny / Updated on April 3, 2024
How to recover deleted pictures from Recycle Bin?
I deleted some of my pictures. But I want to restore these pictures. So how to recover deleted pictures from recycle bin?
Help! My deleted pictures are not in the Recycle Bin. Because I have emptied my Recycle Bin. Now I can’t find where are they? Could you help me to get them back?
These two cases vividly show us two scenarios for recovering deleted photos. So the following solutions also focus on how to recover pictures from Recycle Bin before empty and after empty.
Part 1. Recover pictures from Recycle Bin before empty
If you deleted your photos several days ago, and you have not pressed the Shift + Delete keys, or you have not emptied the Recycle Bin, you can recover deleted files from Recycle Bin within three simple steps.
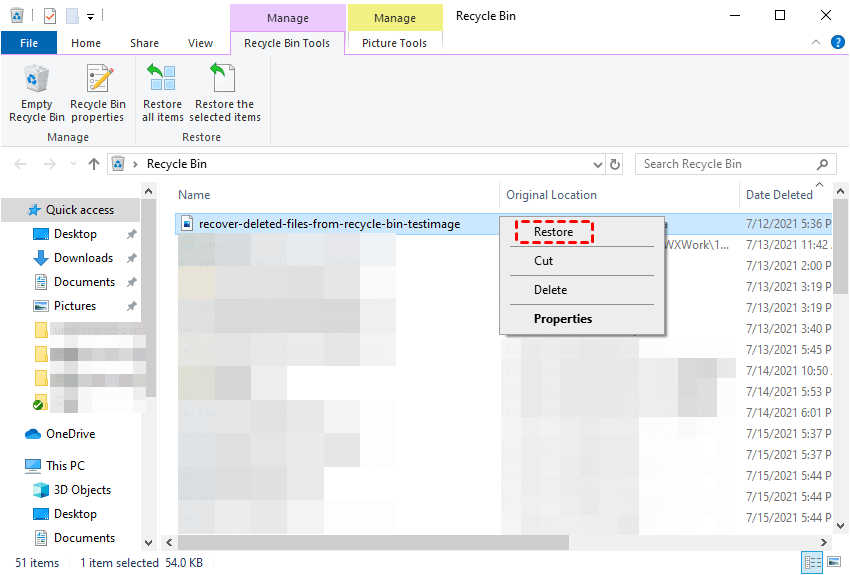
Step 1. Double click on the Recycle Bin icon on your Desktop.
Step 2. Select pictures you want to restore in the Recycle Bin.
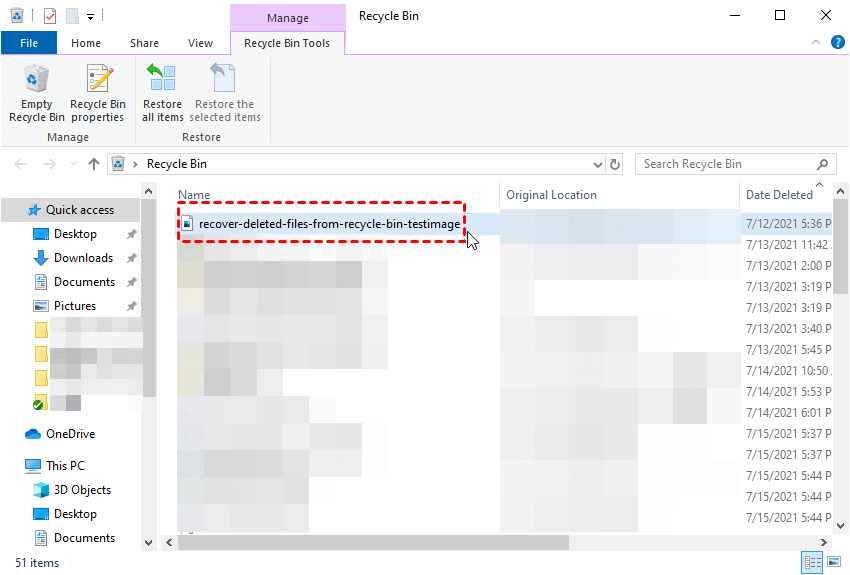
Step 3. Right-click on your selected pictures, then click “Restore”.
Part 2. Recover pictures from Recycle Bin after empty
If you have emptied your Recycle Bin, or you have pressed the Shift + Delete keys, then how to recover the deleted files from recycle bin after empty? You'd better read further to review all of the options, then you can make a rational and better decision.
Method 1. Recover pictures from Recycle Bin with Windows Backup and Restore
Windows Backup and Restore can generate file and folder backups as well as system image backups for use in data recovery even for data corruption, hard disk drive failure, or malware infection.
Compared with Windows Backup and Restore, some users might be more familiar with File History. Please note that Windows Backup and Restore only can backup files and folders. These three parts depict how to restore picture files with a valuable backup.
Part 1. Steps to make backups using Windows
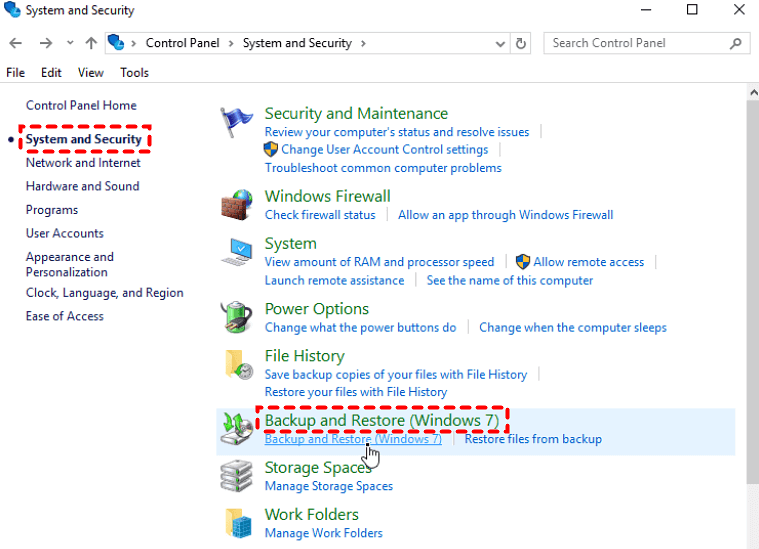
Step 1. Click the Winkey/Start button to start, then click Control Panel > System and Security > Backup and Restore (Windows 7).
Step 2. If you have never used Windows Backup before, click “Set up Backup” directly and follow the instructions on-screen.
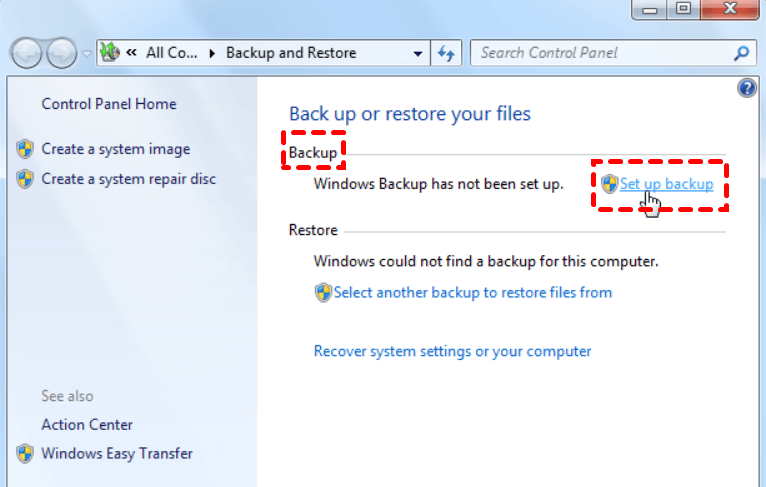
You can also wait for your backup to occur or create a new backup by selecting "Back up now".

Part 2. Steps to restore files using Windows backup
Step 1. Click Winkey/Start to start, then select Control Panel > System and Security.
Step 2. Click Restore my files to restore your pictures to the current location.
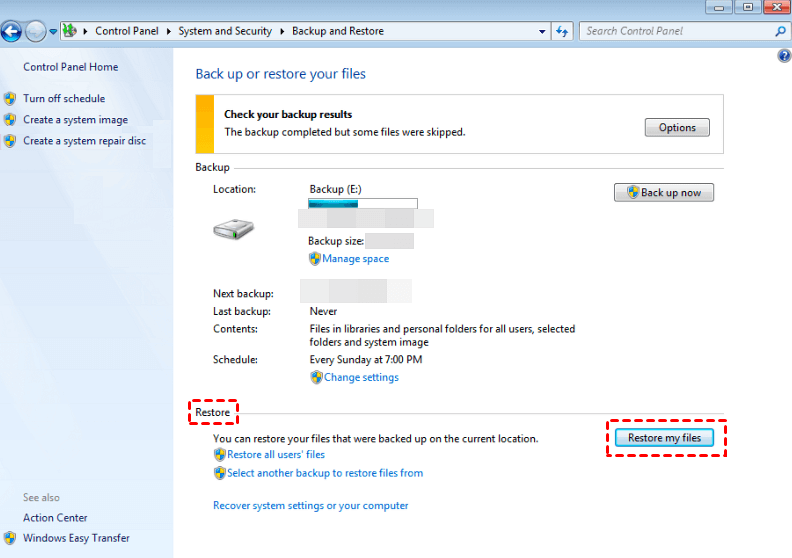
If you need, you can also Restore all users’ files to restore the pictures of all users.
Method 2. Recover pictures from Recycle Bin with Windows File Recovery
Here comes another highly-praised file recovery software, Windows File Recovery. This command-line software enables you to recover deleted picture files from your HDD (internal or external drives hard drives), USB flash drive, and SSD (solid-state drives). But this program is only available for Windows 10 build 19041 or later from the Microsoft Store.
You can select a comprehensive mode among these four modes (Regular, Extensive, Segment, or Signature). All file systems (NTFS, non-NTFS, FAT, ex-FAT, and REFS) could be supported by this utility.
More importantly, this command-line utility requires you to adjust the basic command line winfr source-drive: destination-drive: [/mode] [/switch] for varied situations, then enter your needed command lines in Command Prompt window. That means this software needs you to recover the deleted files using CMD.
- ★Tips:
- The source and destination drives must be different. That suggests your recovered files need to be saved in a new location from the scanning drive.
- Avoid using your PC as much as possible if you’ve found your pictures are not in your Recycle Bin.
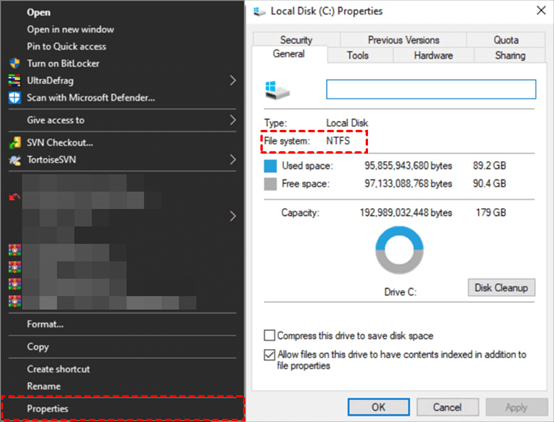
- Check your file systems with these clicks: Click "This PC", then right-click on the source drive that includes your pictures before permanent deletion, and click "Properties".
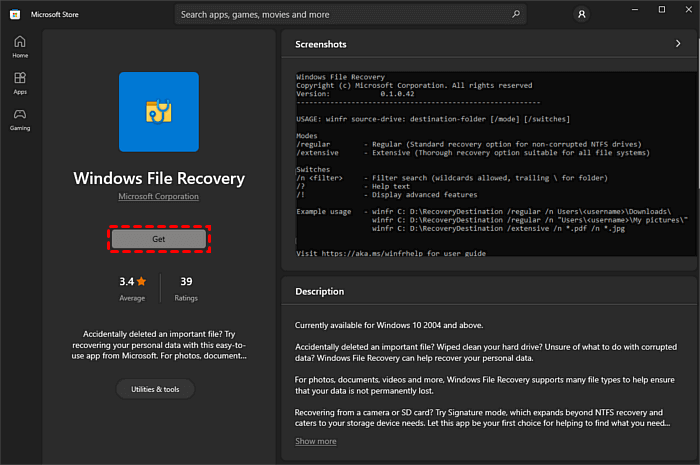
Step 1. Click the “Get” button to download Windows File Recovery from the Microsoft Store, then install it on your computer.
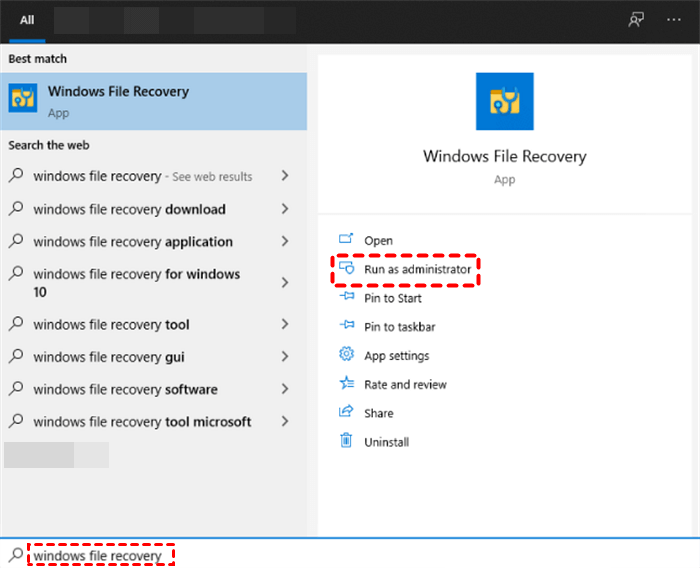
Step 2. Enter "Windows File Recovery" in the search box, and click “Run as administrator”.
Step 3. Select a suitable mode with this guideline after checking your file system.
- If you deleted your files recently, select the Regular mode directly. Apart from that, you can select the Extensive mode.
Step 4. Combine command lines with the following common syntaxes.
|
Switches |
Meaning |
Supported mode(s) |
|
/n |
Filter the scan range: scans for a specific file with its file name/path/type, etc. |
All |
|
/y: |
Recover specific extension groups. |
Signature |
|
/k |
Recovers system files. |
NTFS Segment |
|
/u |
Recovers undeleted files, for example, from the Recycle Bin. |
NTFS Segment |
For instance, if you plan to recover JPEG and PNG pictures from the picture folder on C drive to E drive, you can input winfr C: E: /n \Users \username\Pictures \*. JPEG /n \username\Pictures \*.PNG
Step 5. Press “y” to continue. Please wait patiently, then you can click your destination drive or folder to confirm your recovered pictures. If you want to stop the recovery process, press Ctrl + C.
Free WinfrGUI to recover pictures
Without a doubt, Windows File Recovery is multifunction. However, newcomers might be reluctant to try it because there is no graphical user interface. WinfrGUI provides a user interface for users. Meanwhile, it’s a reliable tool because it has invoked all the functions of Windows File Recovery.
WinfrGUI permits you to recover the deleted/lost Media files, Office files, and Zip files from SSD/HDD/USB before data coverage. But you cannot get the original file path and file names after performing the data recovery.
- Notes:✎...
- If you suddenly stopped the scanning process, WinfrGUI still can recover data from the scanned data. Please don’t worry about this.
- WInfrGUI only can work with Windows 10 and later versions.
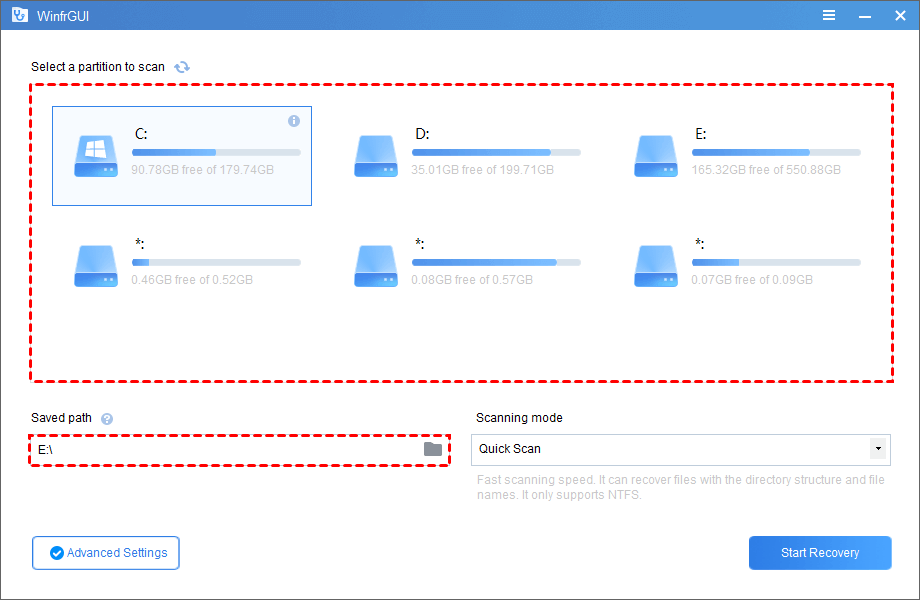
Step 1. Download and install WinfrGUI on your computer. Then select a partition to scan, then select another destination place to save your recovered pictures.
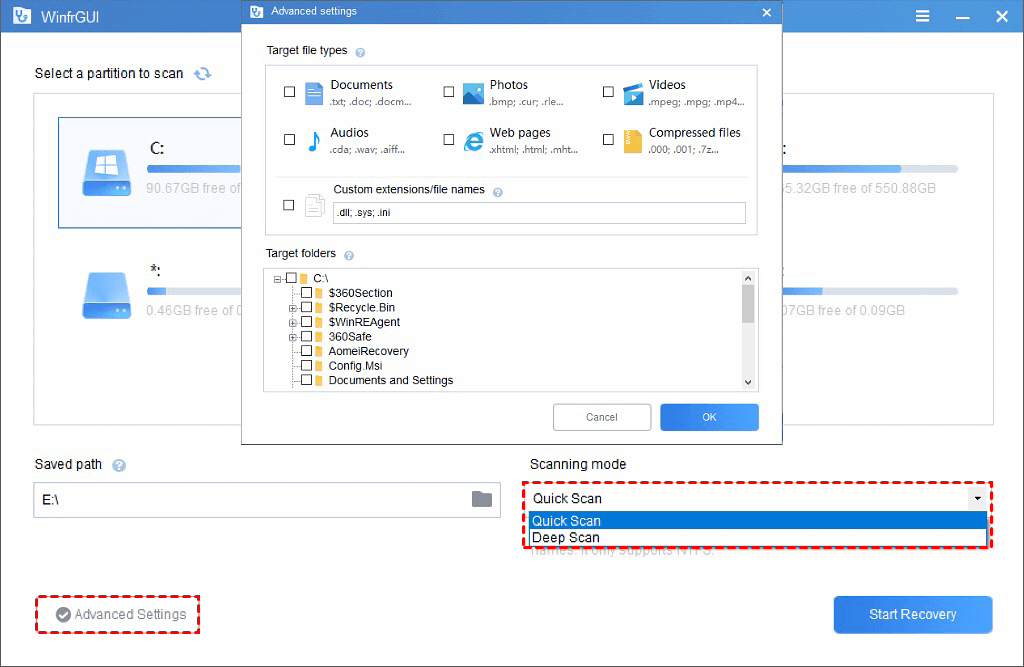
Step 2. Select Quick Scan or Deep Scan first. Then click the “Advanced Settings” button and select “Photos”.
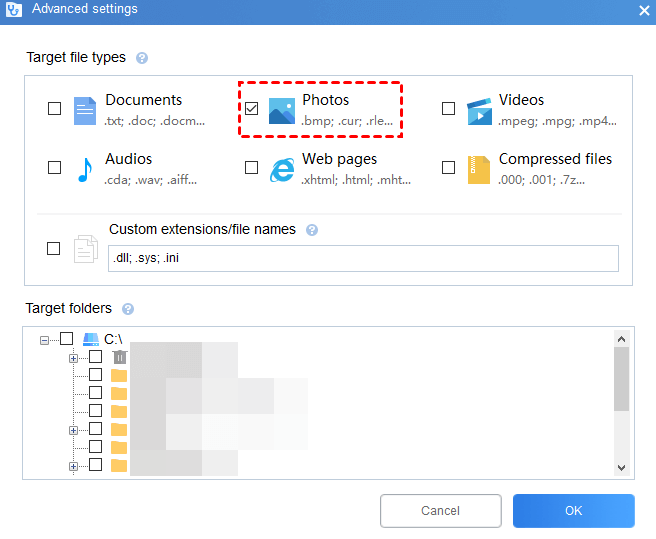
Step 3. Select “Photos”.
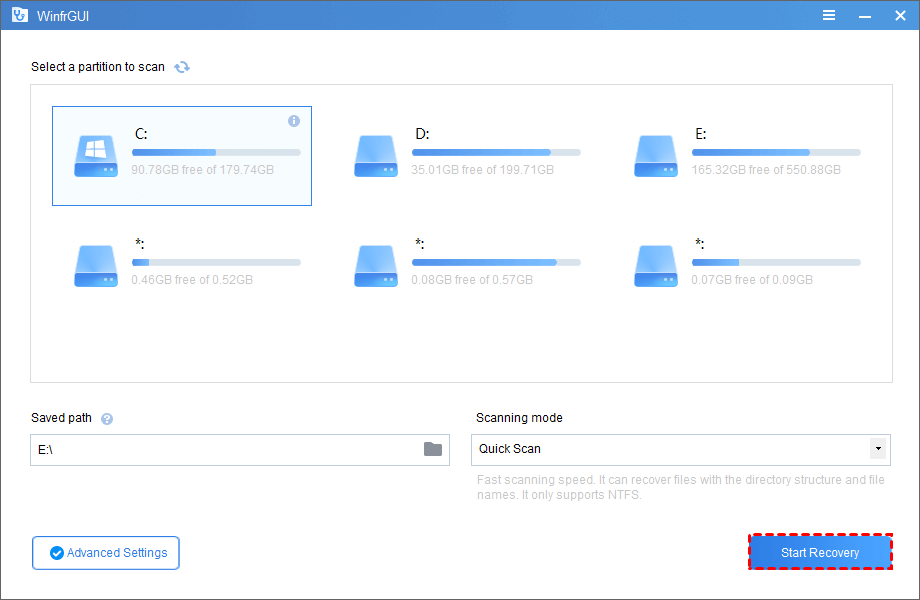
Step 4. Click the “Start Recovery” button. After scanning, your recovered files could be saved in your destination drive which you’ve chosen before.
Method 3. Recover pictures with MyRecover
Free WinfrGUI indeed can retrieve the deleted pictures, but it is impossible to keep their original file names and format. But MyRecover could tackle your issues perfectly. For the lost files, the original format is also retrievable.
As one of the best Windows data recovery software, it enables you to recover pictures in batches. There are many other fascinating functions, maybe you can get an overview of them.
❥Recover the deleted/lost files from SSD/HDD/USB in Windows 11/10/8/7 and Windows Server.
❥Support permanently deleted files recovery, and formatted files recovery. Eg: You can use it to recover formatted files from USB.
❥Recover 200+ types of data: Word, PPT, Excel, Photos, Audios, Emails, Webpages, and Compressed files.
❥Quick Scan and Deep Scan can detect all the deleted files and other files on your electronic devices.
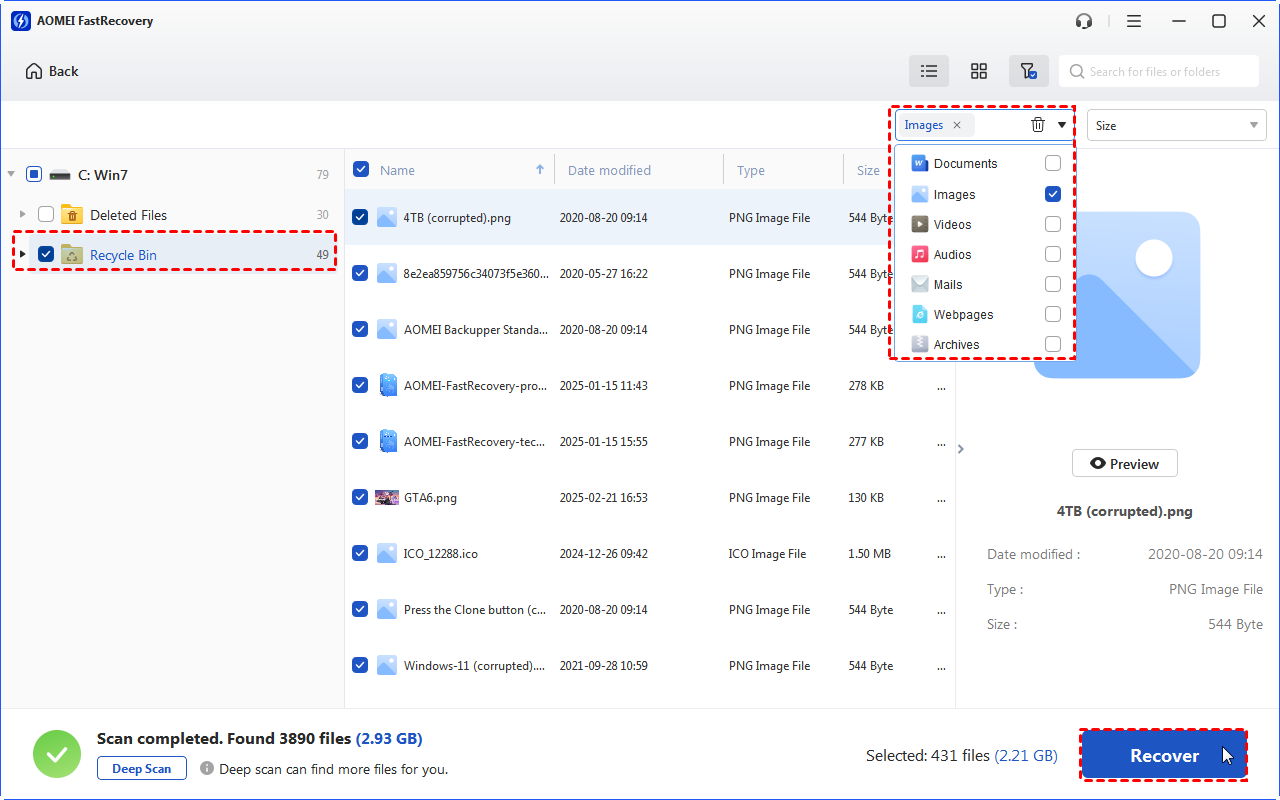
Step 1. Launch MyRecover on your PC. Hover the mouse over the drive saved deleted files before, and click Scan.

Step 2. The window will show all the deleted files and other lost files after performing Quick Scan and Deep Scan. During scanning, you can also search for your needed pictures.

Step 3. Go to the Deleted Files/Other missing files folder > Recycle Bin. Then click "Recover x files" to get your selected pictures back. Please remember to store them in a new location.
Wrapping up
How to recover deleted pictures from Recycle Bin freely? This tutorial shares three free and other efficient ways with you for recycle bin recovery. Generally speaking, you need to pay a visit to your Recycle Bin to avoid further unnecessary steps.
If you’ve found your deleted pictures are not in your Recycle Bin, you’d better stop using your computer as quickly as possible. Then you can skip part 1 and move to part 2 to select a suitable data recovery software. In this case, MyRecover could be the most recommended software.