How to Perform Windows Server File Encryption
You can learn how to use BitLocker to perform Windows Server file encryption. Finally, we recommend a professional server backup software to keep your data safe.
By Miya Updated on August 15, 2023
Why You Need to Encrypt Windows Server Files?
Performing Windows Server file encryption offers several important benefits and is crucial for maintaining the security and integrity of sensitive information. Here are some reasons why you need to encrypt Windows Server file data:
- Data Protection: Encryption helps protect your data from unauthorized access. In case of a security breach or if physical access to the server is gained, encrypted data remains unreadable without the decryption key. This reduces the risk of data theft or exposure.
- Safe Data Storage: Encrypting data stored on Windows Server protects it from physical theft or unauthorized access to hard drives or backup media. In case of hardware loss or theft, encrypted data remains secure and unreadable.
- Public Network Security: If your Windows Server is connected to public networks or remote locations, encrypting file data provides an essential safeguard against network eavesdropping and data interception.
By encrypting Windows Server folder, you can significantly enhance the security of your organization's sensitive information, protect against data breaches, comply with regulations, and instill confidence in your data management practices.
What Is & Why You Choose BitLocker to Encrypt Files?
BitLocker Drive Encryption often receives significant attention in relation to end-user devices like tablets, laptops, and desktop computers. However, it is equally crucial to prioritize its implementation for data protection on Windows Servers. Have we established a comprehensive strategy to safeguard our server-stored data using disk encryption?
While server racks generally offer better physical security, preventing unauthorized access and theft of servers, there remains a potential vulnerability with hot-swappable hard drives commonly found in rack mount servers. This creates an easy opportunity for individuals with malicious intent to remove hard drives that may contain sensitive data.
Additionally, protecting server data becomes more challenging when dealing with shared rooms or closets where office equipment is stored. By leveraging BitLocker, we can ensure the confidentiality and integrity of our sensitive information in these environments, mitigating the risks associated with unauthorized physical access and potential data breaches. Next, we will show you how to install BitLocker and use it to perform Windows Server file share encryption.
How to Perform Windows Server File Encryption with BitLocker
In this section, we will show you how to use BitLocker to encrypt file system in Windows Server 2019, including showing you how to install and run this tool and use it for encryption services.
Part 1. How to Install BitLocker via GUI & PowerShell
By default, Microsoft does not include BitLocker Drive Encryption in Windows Server. To install it, we have the option to either utilize the graphical user interface (GUI) or execute a PowerShell command.
1. Use GUI to Install BitLocker
Step 1. Open Server Manager and click on Add Roles and Features and click Next on the Before You Begin screen and proceed to the installation type selection. Leave the default option of Role-based or feature-based installation and click Next again.
Step 2. Select the appropriate server and click Next to continue. Then skip the selection of server roles by clicking Next.
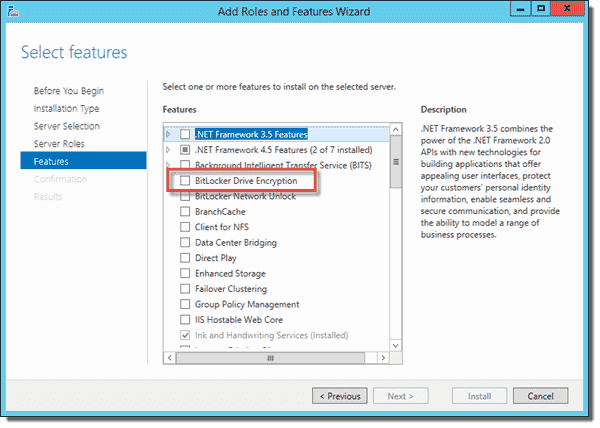
Step 3. In the Features window, locate and select the checkbox for BitLocker Drive Encryption. Finally, click Next to proceed with the installation.
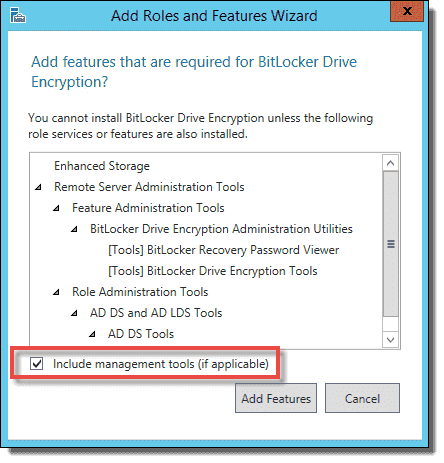
Step 4. When prompted, ensure to check the box labeled Include management tools (if applicable) and then proceed by clicking on Add Features.
Step 5. Once we return to the Select Features window, click Next. As part of the installation process, a reboot will be required. To enable an automatic restart if necessary, select Restart the destination server automatically if required and proceed by choosing Install. When prompted with the reboot warning, click Yes to accept it, and then click Install one final time to initiate the installation.
2. Use PowerShell to Install BitLocker
To install BitLocker Drive Encryption using PowerShell, follow these steps:
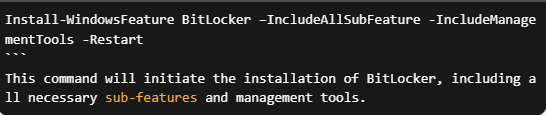
Open the PowerShell console with Administrator rights and run the following command:
Install-WindowsFeature BitLocker –IncludeAllSubFeature -IncludeManagementTools -Restart
```
This command will initiate the installation of BitLocker, including all necessary sub-features and management tools.
The installation process will require a restart. Confirm the restart by responding accordingly when prompted. Once the server restarts, BitLocker Drive Encryption will be installed and ready for use.
Part 2. How to Use BitLocker to Encrypt Windows Server File
The final step in configuring BitLocker on our server involves encrypting the drive. Similar to the installation process, we can accomplish this either through the graphical user interface (GUI) or by utilizing PowerShell to perform Windows Server file system encryption.
✔ Preparations:
Similar to client systems, the usage of BitLocker on servers requires a Trusted Platform Module (TPM) version 1.2 or later. While TPM version 2.0 offers additional features like Connected Standby, it is less commonly utilized on most servers. In the absence of TPM, it becomes necessary to employ a USB startup key or startup password for the server during each boot.
- To ensure seamless management of BitLocker recovery keys in case of server issues, it is essential for the server to be domain-joined. This allows for reliable backup and recovery of the BitLocker recovery keys.
- When it comes to encrypting boot volumes, physical hardware is the preferred option. Microsoft does not provide support for using BitLocker Drive Encryption with booting VHD/VHDX files, though it remains available for data drives. The same limitation applies if VMware is being utilized.
- By adhering to these considerations, we can effectively implement BitLocker encryption on our servers, leveraging the appropriate TPM version, domain-joining, and utilizing physical hardware for boot volume encryption when necessary.
1. Enabling BitLocker on the OS Drive using GUI
To encrypt the operating system drive using the GUI, follow these steps:
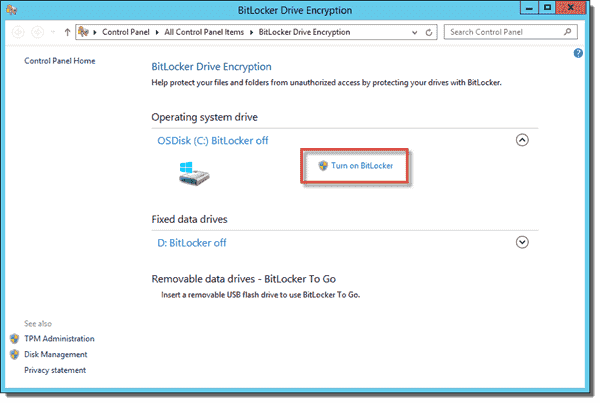
Step 1. Open the Control Panel and adjust the view settings to display either Large or Small icons. Locate and select the BitLocker Drive Encryption option.
Step 2. Within the BitLocker settings, navigate to the Operating System Drive section and click on Turn on BitLocker to initiate the encryption process for the operating system drive.
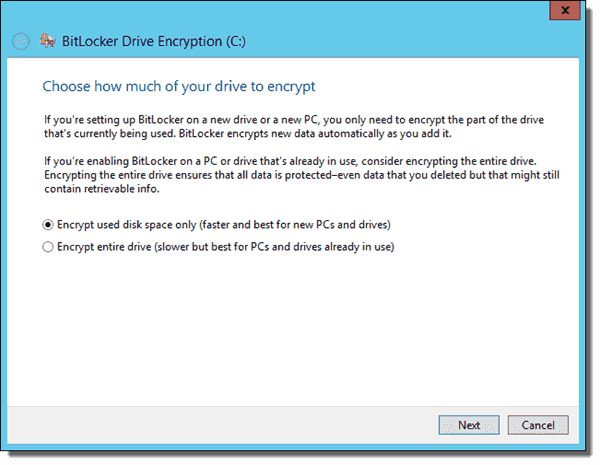
Step 3. Next, we need to choose between two options: Encrypt used disk space only or Encrypt entire drive.
✍ Tips:
1. If you are working with a new server, selecting Encrypt used disk space only will expedite the encryption process since it focuses on encrypting only the data that is currently in use.
2. However, if you are working with a server that has been in use, it is recommended to choose the Encrypt entire drive option to ensure that all space, including free space, is encrypted for comprehensive data protection. Once we have made our selection, click Next to proceed.
Step 4. On the final screen, we have the option to run a hardware system check by selecting the Run BitLocker system check box. If we choose to enable this option, a reboot will be required. Once ready, click Start Encrypting to initiate the encryption process.
2. Enabling BitLocker on the OS Drive using PowerShell
To enable BitLocker on the operating system drive, execute the following command in PowerShell:
Enable-BitLocker -MountPoint "C:" -UsedSpaceOnly -RecoveryPasswordProtector
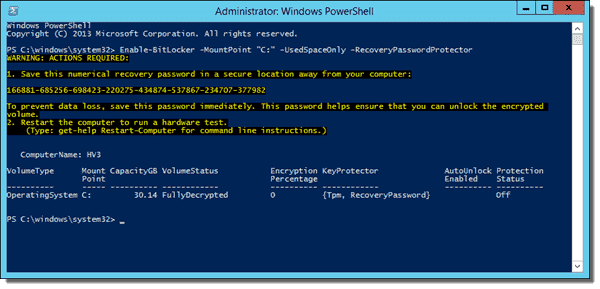
Tip: When working with an existing server that has been in use, it is advisable to exclude the -UsedSpaceOnly parameter to ensure that all drive space on C:\ is encrypted, including any old data that may reside in now-unused portions of the disk. Additionally, to bypass the mandatory hardware check reboot, we can include the -SkipHardwareTest parameter.
Backup Your Windows Server Files with Encryption using AOMEI Backupper
By the above, I think you already know how to perform Windows Server file encryption. In fact, besides encrypting our data, backing up our data is actually more important. We can choose some professional backup software to backup our data, including system, files and everything you want to backup.
Here I recommend you a professional server backup software - AOMEI Backupper Server. This simple software can provide all-round security protection for your Windows Server file data. Let's take a look at its special features.
✌ Provide a range of backup options: System, Disk, Partition, and File Backup. This allows you to not only back up files in Windows Server, but also create backups of the system image and more.
✌ Support multiple backup features: Schedule backups on a daily, weekly, monthly, event triggers or USB plug in basis; perform incremental or differential backups to only back up changed files; delete old backup images using methods like quantity, time, or daily/weekly/monthly cleanup.
✌ Enable backups to various destinations: Local disks, external hard drives, USB flash drives, NAS devices, and network locations can all be used as backup destinations.
✌ Offer additional useful tools: You can create bootable USB for Windows Server with features like Create Bootable Media, while the AOMEI PXE Boot Tool allows for booting multiple computers from the network.
✌ Support multiple Windows versions: This software can backup files in Windows 11/10/8.1/8/7/Vista/XP and Windows Server 2022/2019/2016/2012 (R2)/2008 (R2)/2003.
Backup Windows Server folders via AOMEI Backupper step by step:
Step 1. Begin by downloading the 30-day free trial of AOMEI Backupper Server. Follow the installation wizard to complete the installation process, which should be completed swiftly.
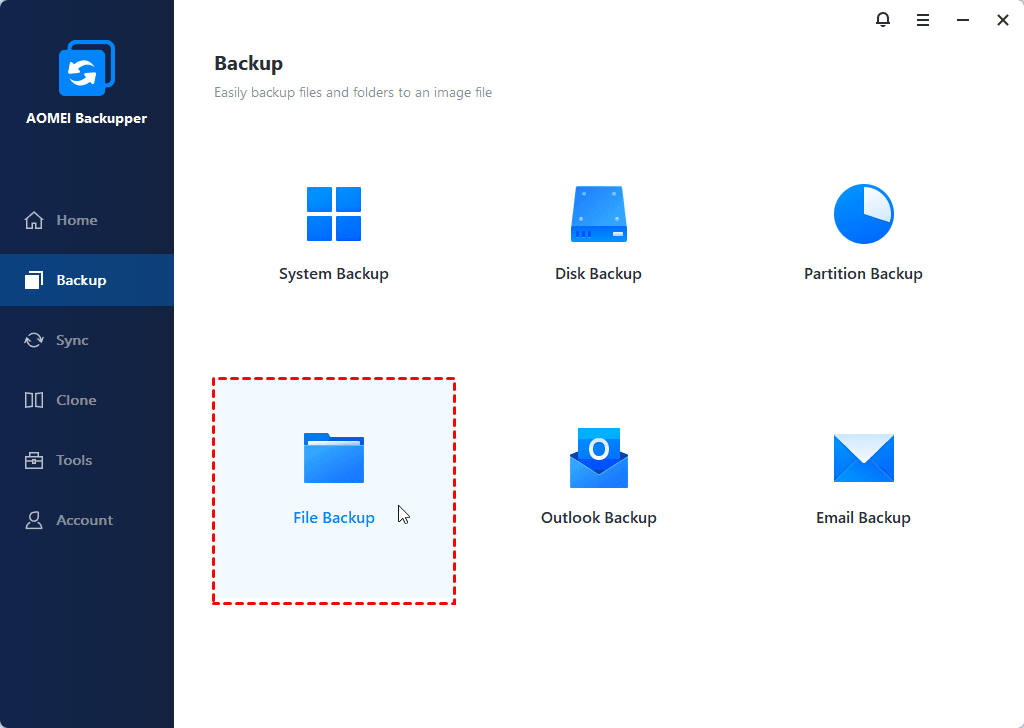
Step 1. Navigate to the Backup option and then choose File Backup from the available selections.
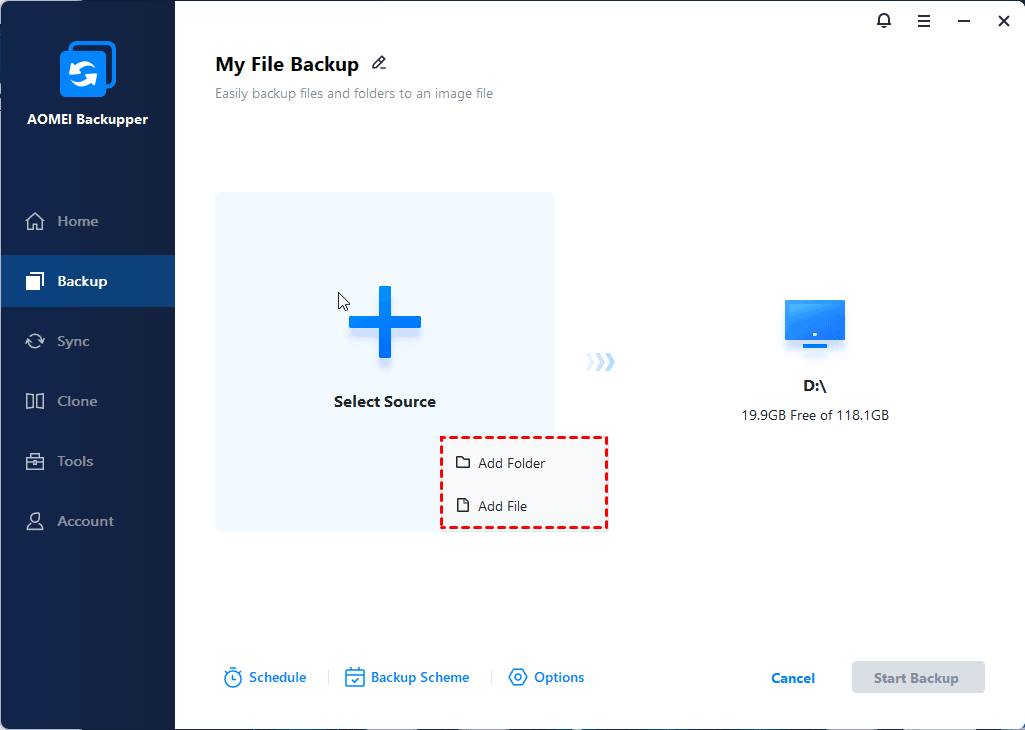
Step 2. Provide a distinctive name for the backup task to differentiate it from other tasks. Next, click on either Add File or Add Folder to choose and select the specific files or folders you wish to include in the backup.
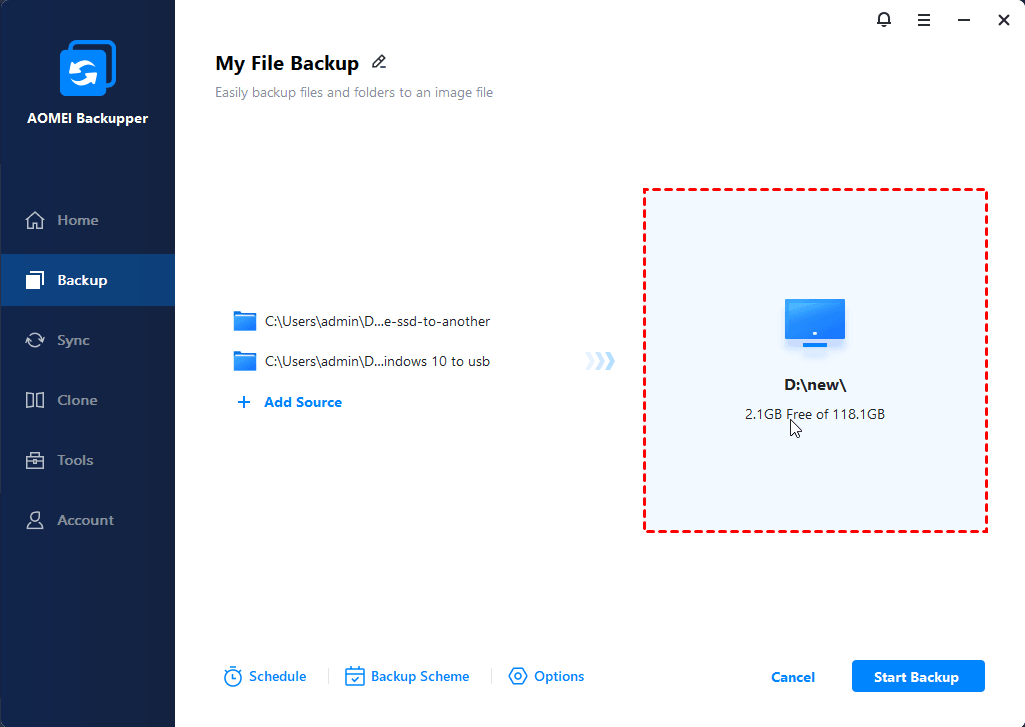
Step 3. Choose a destination location where you would like to store the image file. You have the flexibility to back up your files to various options such as backup files to an external hard drive, USB flash drive, network drive, NAS, and more.
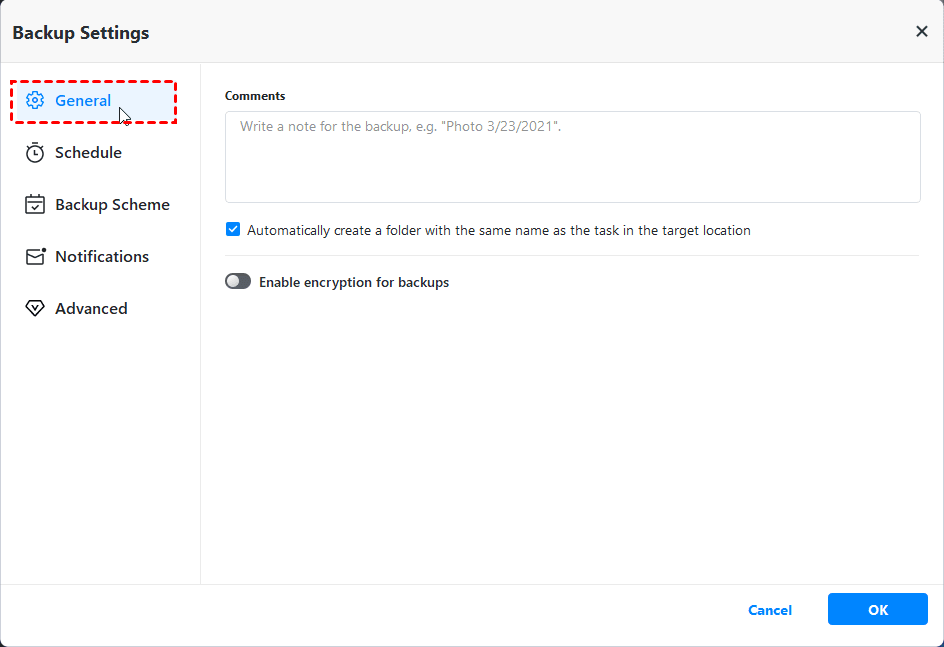
Step 4. To encrypt your Windows Server file backups with password, you can click Options > enable encryption for backups > type the backup password > confirm the backup password > click OK to set it up.
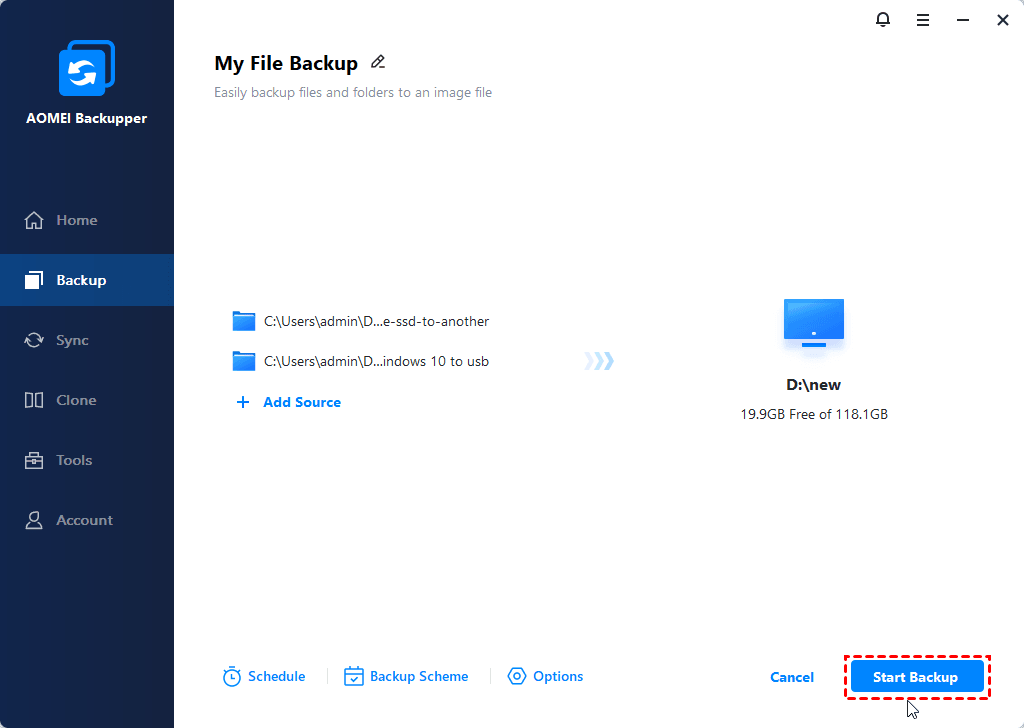
Step 5. Once you have reviewed and confirmed the backup settings, proceed by clicking Start Backup to initiate the file backup process in Windows Server.
Summary
This page has offered you a detailed way to perform Windows Server file encryption. Finally, we recommend you a professional server backup software - AOMEI Backupper Server. And it provides you with multiple backup features such as schedule backup, backup scheme, etc. You can also create Windows Server 2019 recovery disk by using it.
Download the free trial of AOMEI Backupper at once!

