Fixed: Windows Server Copy Paste Not Working (Top 6 Ways)
Here is a collection of fixes to solve the Windows remote desktop copy and paste not working, if you have the same problems, then just read it!
By Maggie Updated on July 10, 2023
Error: Windows Server copy and paste not working
When encountering the issue of not being able to copy and paste files in Windows Remote Desktop Services, it can indeed be frustrating, especially when file transfer is a primary requirement. To resolve this problem, you can try the following methods to address the " Windows Server copy paste not working " error

How to enable copy-paste in Remote Desktop on Windows Server
Here are several ways to troubleshoot remote desktop copy paste not working Windows Server 2016 and other server versions, now you just need to follow our guide.
Method 1. Configure the remote desktop connection settings
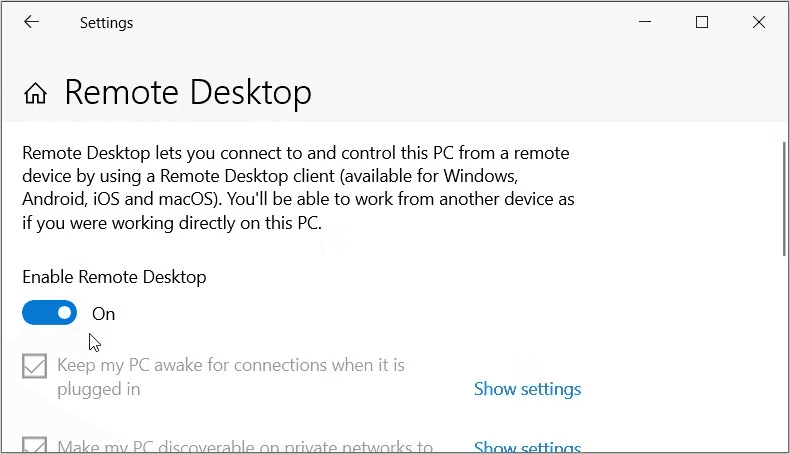
Step 1. Open Settings > System> Remote Desktop > turn on Enable Remote Desktop.
Step 2. Close it temporarily, and type Remote Desktop Connection in the Start menu search bar and open it.
Step 3. Select Show Options in the bottom-left corner.
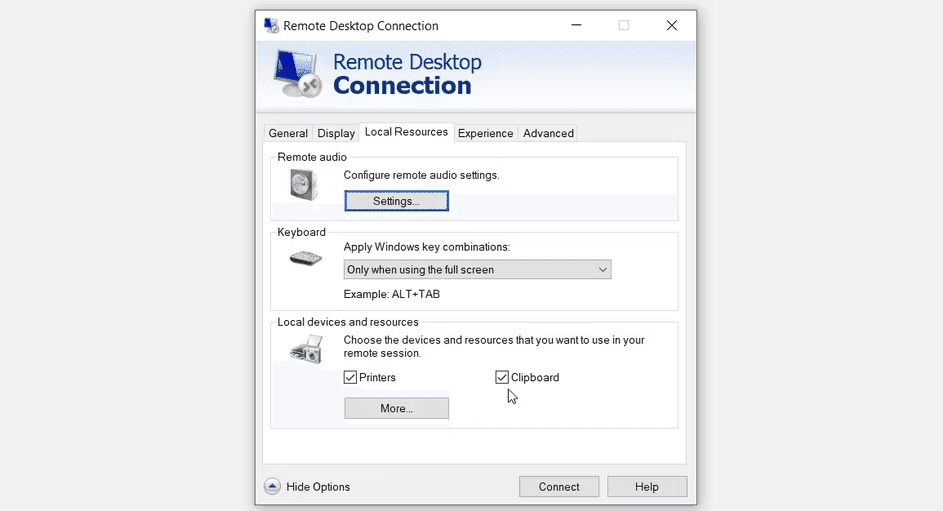
Step 4. Navigate to the Local Resources tab.
Step 5. Click the drop-down menu in the Keyboard section and select Only when using the full screen option.
✍Note: This will ensure that you’re able to use key combinations like Ctrl + C and Ctrl + V when copying and pasting.
Step 6. Check the Clipboard box in the Local devices and resources section. This will enable the clipboard and ensure that you’re able to copy and paste files.
Method 2. Configure the clipboard settings
When you encounter copy and paste issues and want to enable copy paste remote desktop windows server 2016, there are certain system settings you can adjust to resolve the problem. Here's a guide on how to do it:
Step 1. Please press Win + I to open Windows Settings > locate at System.
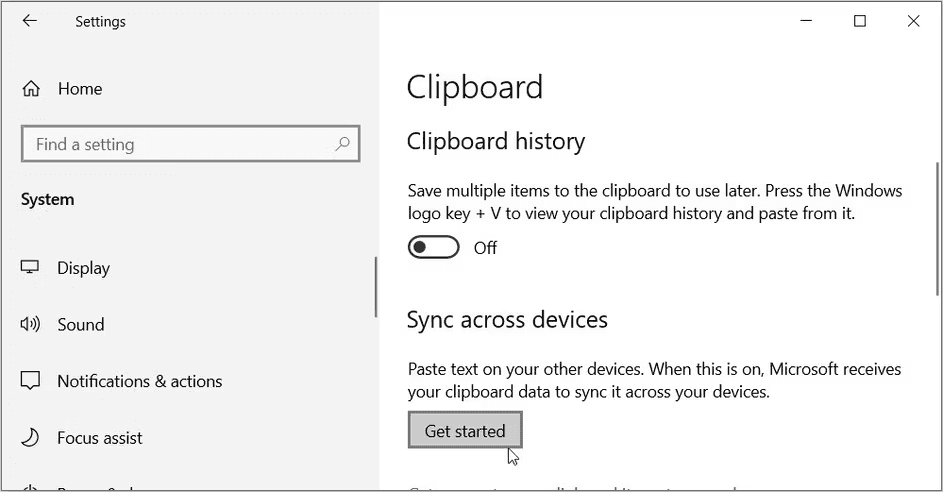
Step 2. Select Clipboard on the left-hand side.
Step 3. Locate and click the Get started button below the Sync across devices option. This should help you easily copy and paste your data across devices.
Method 3. Updating the Windows Network Drivers
The issue at hand might also be caused by corrupted network drivers. In such instances, you could resolve the problem by updating or reinstalling these drivers.
Step 1. Press Win + X to select Device Manager from the list.
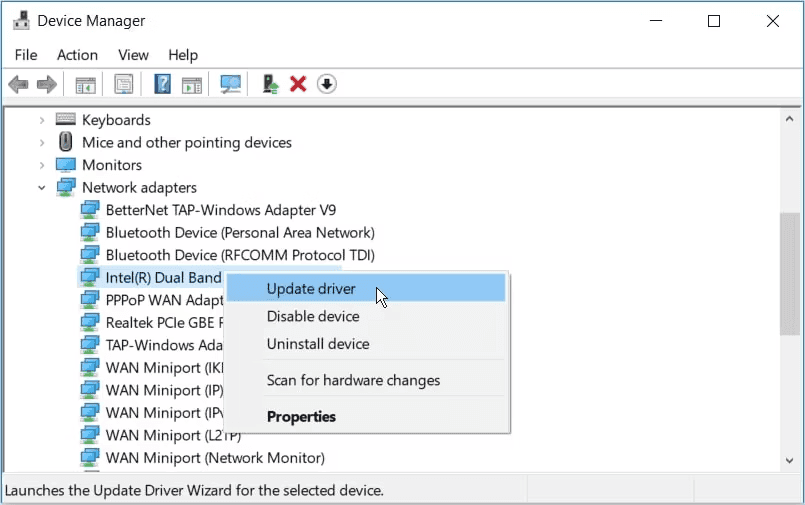
Step 2. Double-click the Network adapters option.
Step 3. Right-click on the relevant network driver and select Update driver.
Step 4. Click the Search automatically for updated driver software option and then follow the on-screen steps.
Method 4. Configure remote desktop connection settings in the local group policy editor
Tweaking some settings in the Local Group Policy Editor (LGPE) could also help enable copy paste remote desktop windows server 2019. Now, here’s how to configure the Remote Desktop Connection settings in the LGPE:
Step 1. Press Win + R to open the Run command dialog box.
Step 2. Type gpedit.msc and press OK to open the LGPE.
Step 3. Navigate to Computer Configuration > Administrative Templates > Windows Components > Remote Desktop Services > Remote Desktop Session Host > Device and Resource Redirection.
Step 4. Locate the Do not allow Clipboard redirection policy setting on the right. When this option is enabled, you won’t be able to copy and paste files between the local and the remote device.
Step 5. Double-click on the Do not allow Clipboard redirection option.
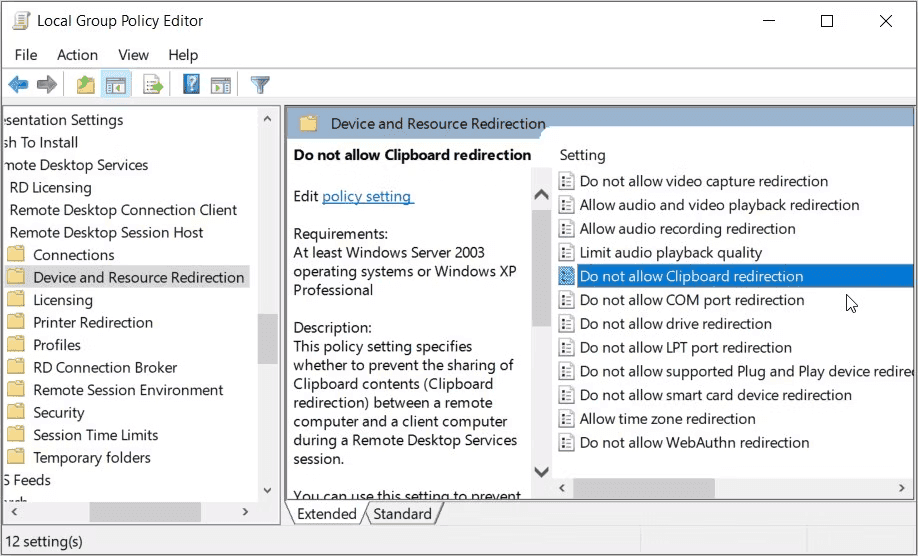
Step 6. Select Disabled or Not Configured on the next screen. Then, press Apply and then press OK to save these changes.
Method 5. Configure the remote desktop connection settings in the registry editor
The Registry Editor can also help you fix the issue. we kindly suggest you backup the registry first in case of any irreversible loss if you careless made one mistake.
Now, here’s how to configure the Remote Desktop Connection settings in the Registry Editor:
Step 1. Press Win + R to open the Run command dialog box.
Step 2. Type Regedit and press OK to open the Registry Editor. Type the following command into the address bar:
Computer\HKEY_LOCAL_MACHINE\SOFTWARE\Policies\Microsoft\Windows NT\Terminal Services
Step 3. Right-click on a blank space on the right and select New > DWORD (32-bit) Value.
Step 4. Name the value as DisableClipboardRedirection and press Enter. When this value is enabled, you won’t be able to copy and paste files between the local and the remote device.
Step 5. Double-click on the DisableClipboardRedirection value.
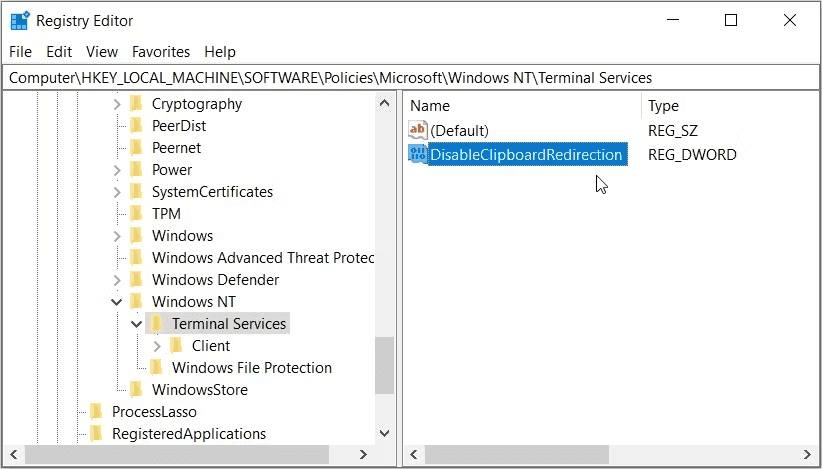
Step 6. On the next window, set the Value data as 0 (zero) to disable the DisableClipboardRedirection value. Then press OK to save these changes.
Next, follow these steps to configure some additional settings:
Step 1. Open the Registry Editor and navigate to the Terminal Services folder as per the previous steps.
Step 2. Right-click on a blank space on the right and select New > DWORD (32-bit) Value.
Step 3. Name the value as DisableDriveRedirection and press Enter. When this value is enabled, you won’t be able to share files or folders between the local and the remote device. Now, this automatically means you won’t be able to use the copy-and-paste functionality.
Step 4. Double-click on the DisableDriveRedirection value.
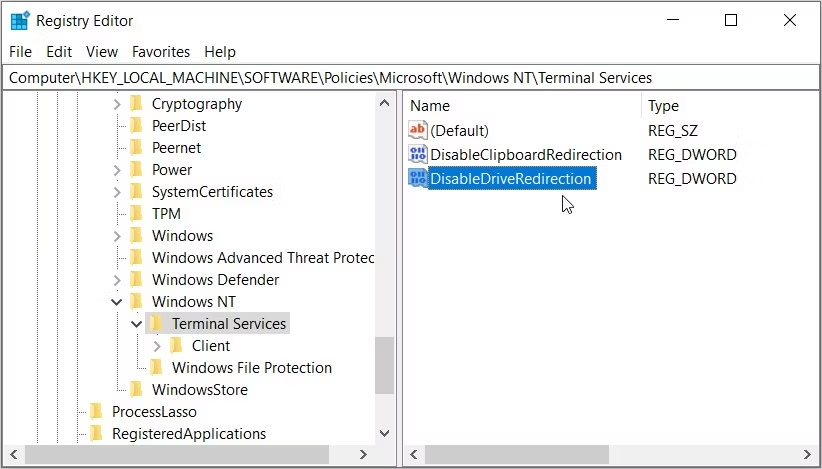
Step 5. Next, set the Value data as 0 (zero) to disable the DisableDriveRedirection value and then press OK.
Step 6. Finally, restart your device to save these changes.
Method 6. Sign in to Windows using a different account
If all else fails, signing in to your device using a different account could help. But in most cases, this solution will come in handy if the current account you’re using has issues.
Here are the steps for signing in to Windows using a different account:
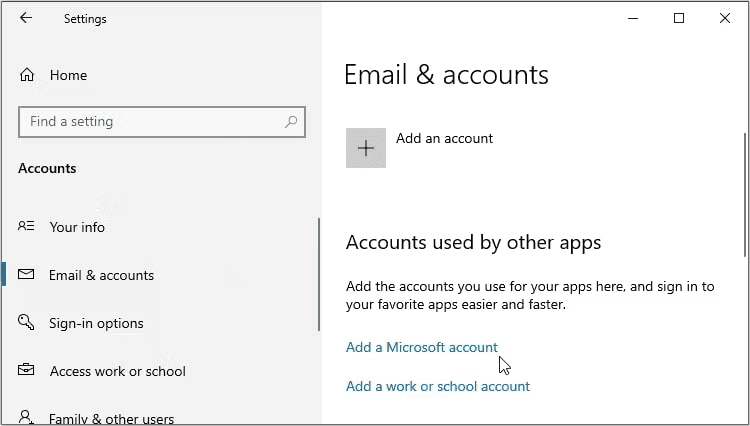
Step 1. Type Settings in the Start menu search bar.
Step 2. Select Accounts and then select Email & accounts on the left.
Step 3. Click Add a Microsoft account on the right and then follow the on-screen steps.
Bonus tip: the best way to transfer files on Server
However, copy and paste can be really time-consuming and laborious when you consider transferring files. Here are powerful and professional sync software, AOMEI Backupper Server to help you synchronize everything on Windows Server effortlessly.
✔It offers 4 sync solutions: Basic Sync, Real-time Sync, Mirror Sync, and Two-Way Sync. You can choose any of them to sync your computer and sync USB with Google Drive easily.
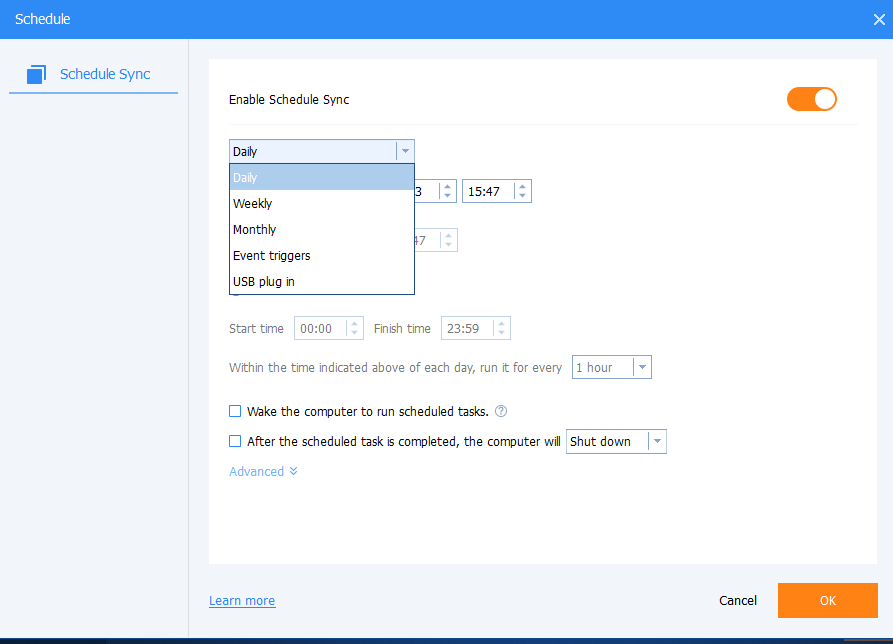
✔Schedule Sync: You can customize your sync needs, and then it will automatically perform data sync in daily/weekly/monthly/event trigger/USB plug-in mode.
✔For compatibility: it can run smoothly on all file systems, such as NTFS, FAT32, FAT, ReFS, etc. And all the Windows systems, including Windows Server 2003, 2008, 2011, 2012, 2016, 2019, 2022, SBS (including the R2 version), and Windows 11/10/8/7/XP/Vista.
Now download AOMEI Backupper and sync your server files.
Step 1. Launch AOMEI Backupper and select Basic Sync after choosing Sync tab on the left page.

Step 2. Click Add Folders to select the files you want to sync. And then select the drive you want to receive the files. You can choose between Local drive/ NAS Drive and Cloud drive as you need.
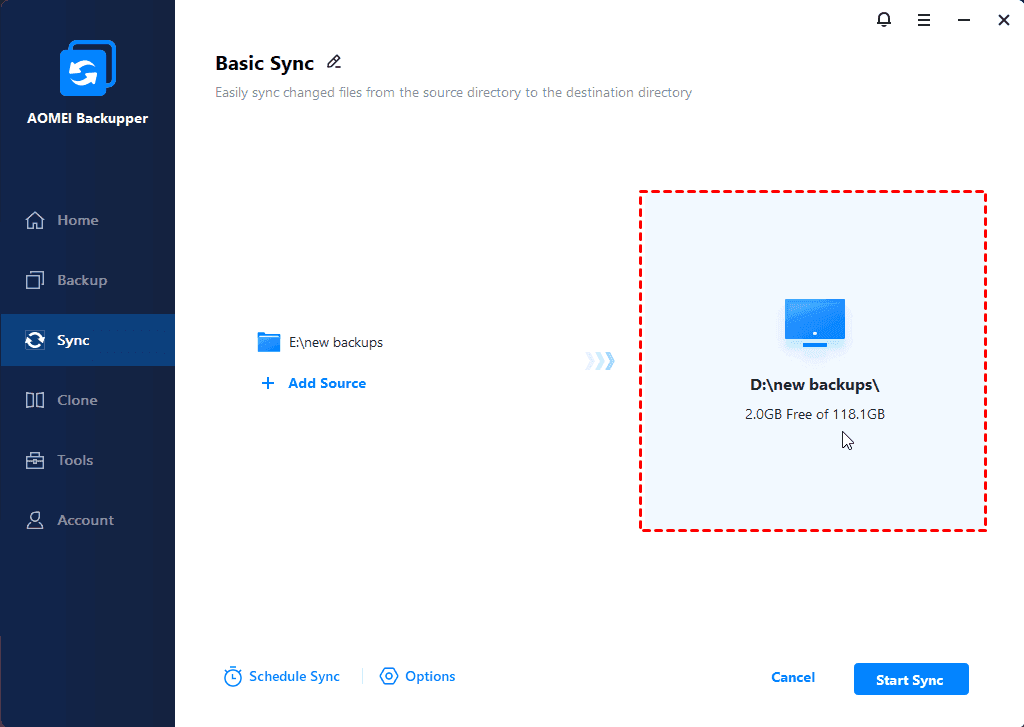
Step 3. You can also set automatic sync by clicking the Schedule Sync tab. After customizing your need, click Start Sync to finish this sync task.
Final words
Now you can successfully troubleshoot Windows Server copy paste not working issue via the above 7 ways. To save your efforts and free up your hand, you can turn on professional software AOMEI Backupper Server to sync your files among different drives.
This software can also provide one more protection layer for you when computer accidents happen like WD MY Cloud not showing on network Windows 11. You can make a scheduled backup plan via this software.

