How to Create Bootable USB for Windows Server (Two Ways)
You can learn to use two methods to create bootable USB for Windows Server. If you are a novice, it is recommended to use the second easy method - using third-party software.
By Miya Updated on June 28, 2023
Benefits of creating a bootable USB for Windows Server
If your Windows Server computer experiences a crash and is unable to boot normally, you can create a bootable USB for Windows Server using ISO files. This can function as a recovery disk to help restore your operating system and enable your computer to start up successfully.
Below, I will outline two methods for creating a Windows Server bootable USB. The first method involves using the Windows USB/DVD download tool, while the second method involves using a more advanced tool. Please carefully review both options.
How to create Windows Server bootable USB from ISO
In this part, we would provide you with a step-by-step guide on how to create a bootable USB drive for system recovery in Windows Server from an ISO file. The method is also applicable for creating bootable USB in Windows Server 2022.
To create a bootable USB for Windows Server using ISO files, you can utilize the Windows USB/DVD Tool provided by Microsoft. Please follow the steps listed below.
Warning: All data on the USB drive will be erased during the process of copying the ISO files, so please backup files on USB drive if necessary.
Step 1. Download the Windows USB/DVD Download Tool from the Microsoft official website onto a working computer in case the current computer fails to boot. Additionally, download the .NET framework 2.0 to ensure successful execution of the Windows USB/DVD Download Tool.
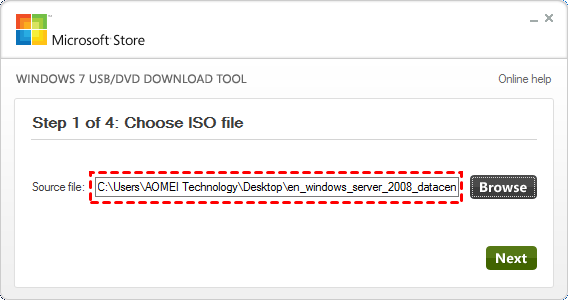
Step 2. Launch the Windows USB/DVD Download Tool. Click on "Browse" and select the Source file. Then, click "Next".
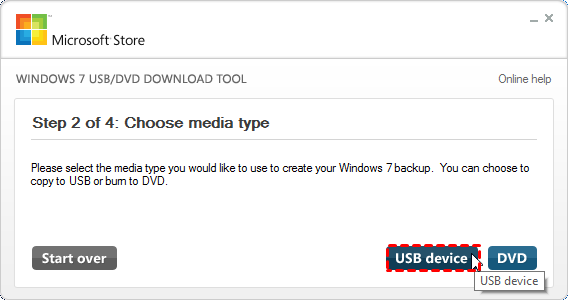
Step 3. Select the media type, either USB device or DVD. In this case, we will choose "USB device".
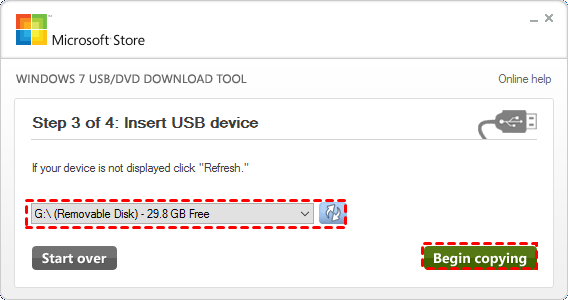
Step 4. Select the USB drive you intend to use for creating the Windows Server bootable drive. Afterward, click on Begin copying.
Once the process is complete, you can insert the bootable USB drive into the computer experiencing boot issues. To restore Windows Server from a backup on the machine, please follow these steps:
Step 1. Boot the Server computer using the created bootable USB drive and press any key when prompted.
Step 2. Choose the appropriate language options, time and currency format, and keyboard layout. Then, click on Next.
Step 3. On the Install Windows screen, click on Repair your computer.
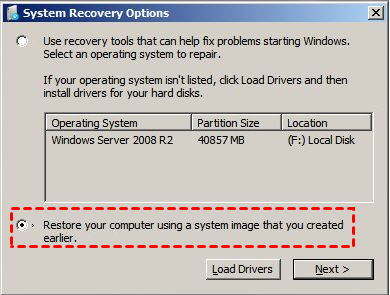
Step 4. Select Restore your computer using a system image that you created earlier and click on Next.
Step 5. Select the desired system image backup and follow the on-screen instructions to complete the restoration process. By default, the most recent image will be selected. However, you can choose a different one by clicking Select a system image. Follow the prompts to restore your computer to an earlier state and resolve any boot problems.
Attention: Please note that this process will not work across different versions of Windows Server. In other words, you cannot use a Windows Server 2019 bootable USB to restore Windows Server 2012, nor can you use a 32-bit version of Windows Server 2008 to repair a 64-bit computer for recovery purposes.
How to create Windows Server bootable USB with third-party software (easier way)
To overcome the limitations of the Windows USB/DVD Download Tool, we would like to introduce an advanced tool called AOMEI Backupper Server.
This software can assist you in creating a versatile bootable USB drive for all server computers, both 32-bit and 64-bit. With this tool, you can easily restore all versions of Windows Server, including 2003, 2008 (R2), 2011, 2012 (R2), 2016, 2019, and 2022. Unlike the Windows USB/DVD Download Tool, you do not need to prepare an ISO file in advance, as it will handle the bootable media creation process.
Similar to the Windows USB/DVD Download Tool, a prerequisite for successful recovery is having a Windows Server system image backup. Therefore, you must have at least one system image created by AOMEI Backupper. If you do not have one and your current system is corrupted, you can still create a system image on another working computer that runs the preferred operating system and then restore the system to a new computer with dissimilar hardware.
Here are steps to create Windows Server bootable USB
Step 1. Connect an empty USB drive to a working computer, and download the AOMEI Backupper Server Free Trial onto your computer.
Step 2. Install and launch AOMEI Backupper Server, and select Tools followed by Create Bootable Media.

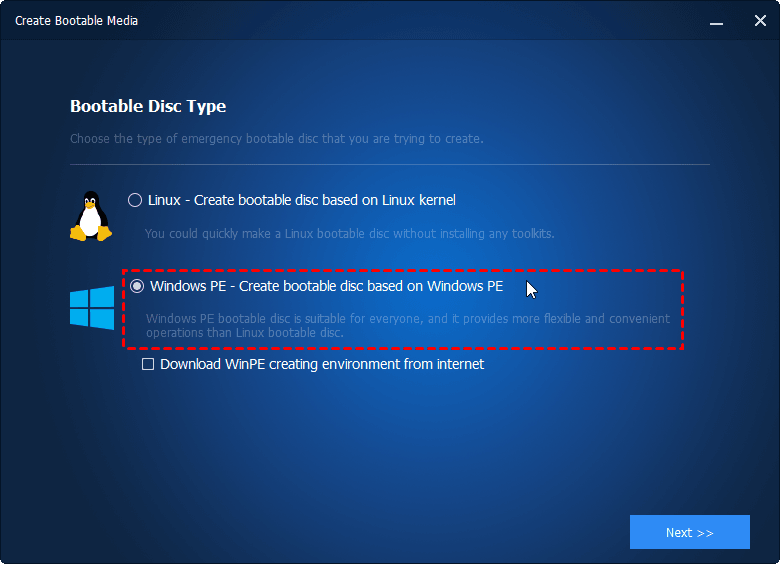
Step 3. Choose the Bootable Disc Type between Linux and Windows PE. For creating a bootable USB Windows Server drive, select the second option.
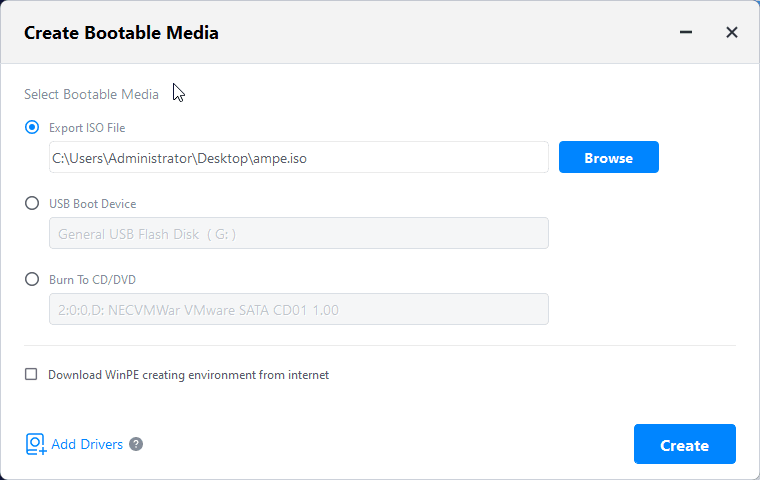
Step 4. Select the bootable media. In this case, we will choose USB Boot Device and click on Next.
Notes:
☞ If you intend to create a bootable USB for Windows Server from an ISO file, choose Export ISO File. However, you will need to burn the ISO files to a CD/DVD using a burning tool after completion, which can be somewhat complicated.
☞ If you need to initiate deployment for multiple computers, you can utilize the AOMEI PXE Boot Tool.
Once the bootable Windows Server recovery disk has been created, insert it into the computer with the failing Windows Server and boot the machine from it. Additionally, make sure to connect the disk containing the system backup that you wish to restore.
Here are steps to restore Windows Server
Step 1. After booting from the bootable USB created by AOMEI Backupper, you will be directed to the main console of the program. Click on Restore and then Select Image File to locate your system image.

Step 2. On this screen, select Restore this system backup and click on Next.
Note: If the hard drive of the current computer is damaged, please prepare an alternate disk as the restoration path. Make sure to select Restore system to other location.
Step 3. Review the pending operation and click on Start Restore if everything appears correct.
Notes:
☞ If the system image was created on a computer with different hardware than the one you are currently restoring, the Universal Restore feature will be enabled by default. This is to ensure that your computer can successfully boot after restoration.
☞ If the destination disk is an SSD drive, selecting SSD Alignment can enhance its reading and writing performance.
☞ If the target disk is larger, click on Edit Partitions to adjust the size of the destination disk.
During a system restore, the program will prompt you to restart the computer. The restore operation will then be completed under Restart mode. Please be patient and wait until the process reaches 100% completion.
Summary
The Windows USB/DVD Download Tool is useful in creating a bootable USB Windows Server from an ISO file. However, AOMEI Backupper Server offers greater flexibility. With this software, you can create a bootable USB without downloading an ISO file primarily, and it is universally compatible. This means that you can use it on various server and PC systems, including Windows Server 2008/2012/2016/2019/2022 and Windows 11/10/8/7/XP/Vista, etc.
Additionally, the system recovery process is very convenient. In addition to its user-friendly graphical interface, it also allows you to restore Windows Server backup images to computers with dissimilar hardware, even when you don't have a system backup for the failing computer.
For IT technicians or small companies, the advanced version - AOMEI Backupper TechPlus. It is available to help you protect unlimited computers within a single computer. Furthermore, it is capable of restoring system images to multiple computers simultaneously, eliminating the need to repeat this tedious process. To enjoy more useful features, download AOMEI Backupper Server and give it a try!

