How to Fix Windows 11 Update Error 0x800f0922 (7 Ways)
You can learn why Windows 11 update error 0x800f0922 and 7 methods to fix it. And Each method will include a graphic tutorial. Scroll down for detailed information.
by Jonna Updated on January 17, 2024
Why Windows 11 Update Error 0x800f0922?
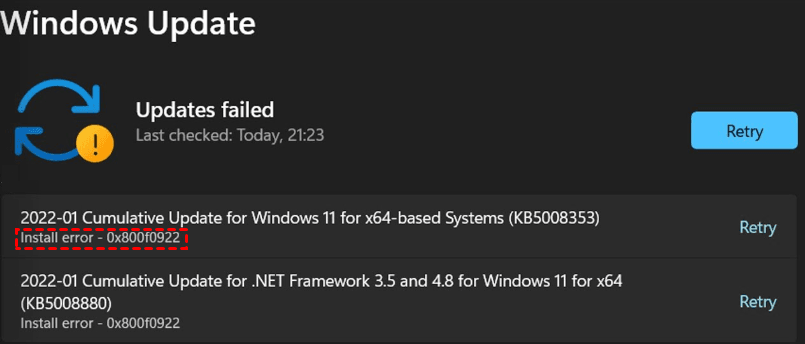
With the gradual increase of Windows 11 users, some bugs have gradually appeared. Recently, many Windows 11 users reported that they encountered update error code 0x800F0922 during the update process and interrupted their update process. This error is now very common on both Windows 11 and Windows 10 platforms. Windows 11 cumulative update failed when you were alerted by the message Windows 11 update error 0x800f0922. To fix this error, we first need to understand the common causes of this problem.
- Disabled application preparation service
- corrupt system files
- Disabled .Net Framework Components
- Improperly configured Windows Update components
- corrupt cached data
- Virtual Private Network (VPN) Issues
- Malware infection
- Insufficient space in the system reserved partition
How to Fix Windows 11 Update Error 0x800f0922
After knowing what might be causing this error, you can read on below to learn how to fix error 0x800f0922 in Windows 10/11 in 2 easy ways to fix this error, which are using Windows update troubleshooter, disabling Windows Defender Firewall, and replacing the old disk with a larger one. Each method includes a detailed graphic tutorial.
👉 Fix 1. Use Windows Update Troubleshooter🔥
👉 Fix 2. Disable Windows Defender Firewall
👉 Fix 3. Run SFC and DISM repair tools🔥
👉 Fix 4. Reset Update Components on Windows 11
👉 Fix 5. Enable .NET Framework
👉 Fix 6. Free up Space on Windows 11🔥
👉 Fix 7. Replace the Old Disk with a Larger one
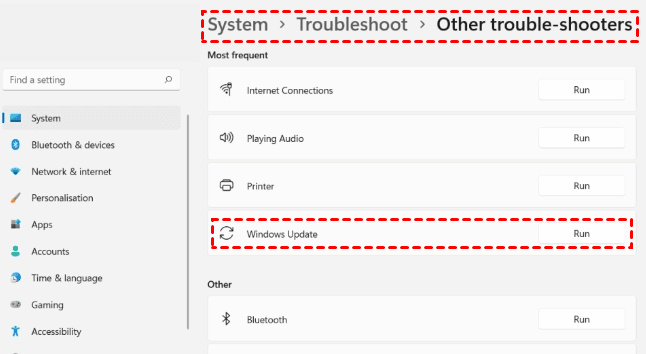
Fix 1. Use Windows Update Troubleshooter
Windows troubleshooter can fix some issues related to networking, Bluetooth, blue screen, audio, keyboard, Windows Update, etc. So, if you receive the message of Windows 11 update error 0x800f0922 or other update error like Windows 11 update stuck, you can first try to fix the problem with Windows' built-in troubleshooter.
Step 1. Click the Start icon and choose Settings to open this app.
Step 2. Under the System tab, click Troubleshoot > Other-troubleshooters.
Step 3. Tap on Windows Update and click the Run button. This troubleshooter will run to automatically detect and fix issues that lead to the install error 0x800f0922.
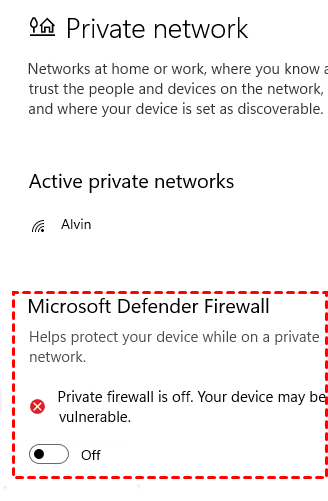
Fix 2. Disable Windows Defender Firewall
Your firewall can also sometimes interfere with the installation of pending updates, resulting in Windows 11 update error 0x800f0922. While this is relatively rare, you shouldn't rule out this possibility. You can try disabling the firewall and see if it fixes the problem. You can follow the steps below.
Step 1. In Windows 11, go to Settings > Privacy & security.
Step 2. Click Windows Security > Open Windows Security.
Step 3. Tap Firewall & network protection, choose the network that is currently active and disable the toggle of Microsoft Defender Firewall.
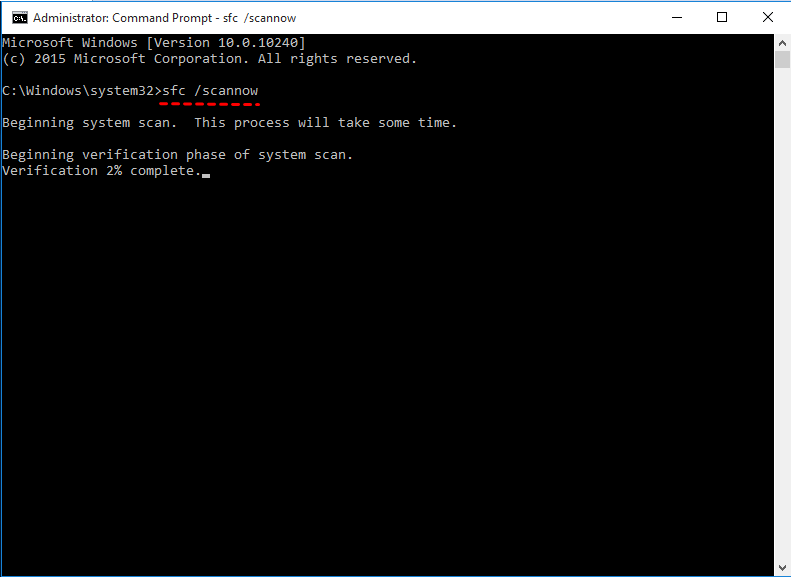
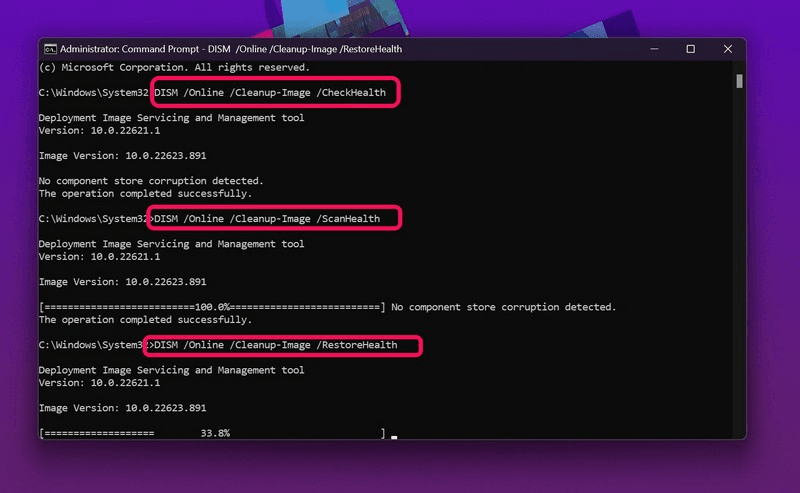
Fix 3. Run SFC and DISM repair tools
The 0x800f0922 Windows Update error could be caused by corrupted system files. For this situation, you can run Command Prompt with the frequently used SFC and DISM commands to fix them.
Step 1. Search for "Command Prompt" in Windows 11, and run it as administrator.
Step 2. Type the following SFC command and press Enter to check and fix system files:
- sfc /scannow
Step 3. When the scanning process is finished, enter the following commands one by one and press Enter:
- DISM /Online /Cleanup-Image /CheckHealth
- DISM /Online /Cleanup-Image /ScanHealth
- DISM /Online /Cleanup-Image /RestoreHealth
Step 4. After all commands are completed, close Command Prompt and reboot your computer to check if the Windows update error 0x80070002 is fixed.
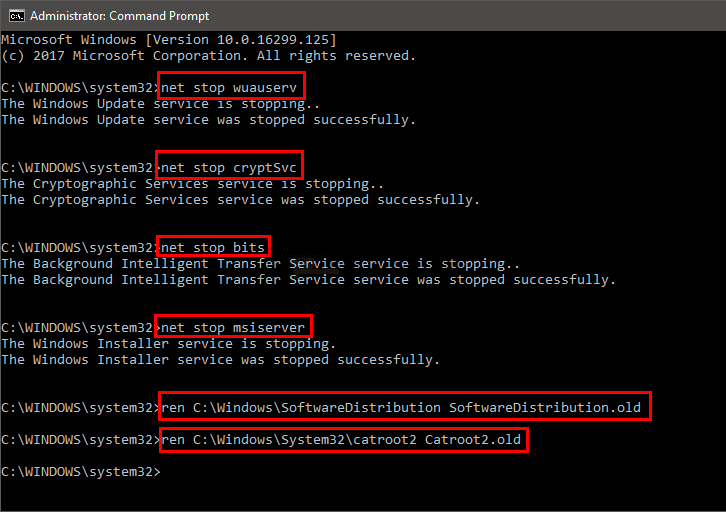
Fix 4. Reset Update Components on Windows 11
The 0x800f0922 failed to install error can also result due to corruption in the Windows Update components. To detect and remove the corruption, you can reset the Windows Update components with the following steps:
Step 1. Run Command Prompt as an administrator.
Step 2. Enter the following commands one after the other with Enter to disable the update components:
- net stop wuauserv
- net stop cryptSvc
- net stop bits
- net stop msiserver
- ren C:\\Windows\\SoftwareDistribution SoftwareDistribution.old
- ren C:\\Windows\\System32\\catroot2 Catroot2.old
Step 3. Now, enter the commands below one by one to re-enable the Windows update components:
- net start wuauserv
- net start cryptSvc
- net start bits
- net start msiserver
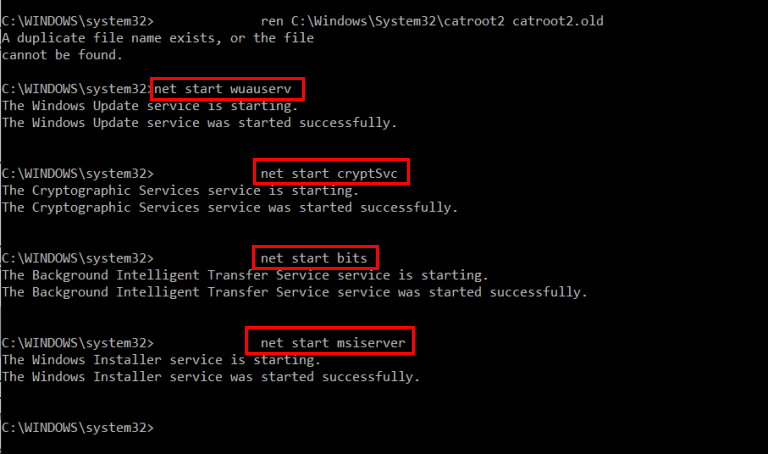
Step 4. Then, exit the command prompt and restart your computer, and see if the 0x800f0922 failed to install error persists.
Fix 5. Enable .NET Framework
If the Windows Update install error 0x800f0922 still persist, the reason could be a disabled .NET Framework. Enable it as follows:
Step 1. Type Windows Features in the Windows 11 search box and select Turn Windows features on or off.
Step 2. In the new window, tick any checkboxes related to .Net Framework. For example, .Net Framework 3.5 and .Net Framework 4.8 Advanced Services, and click OK.

Fix 6. Free up Space on Windows 11
When there is not enough space to download and install the Windows updates, you are likely to meet the install error - 0x80070002 during Windows 11update. You can rely on the Disk Cleanup tool to free up your disk space.
Step 1. Type Disk Cleanup in the Start menu and open the app.
Step 2. Select the drive containing Windows 11 OS, usually C drive, and then click OK.
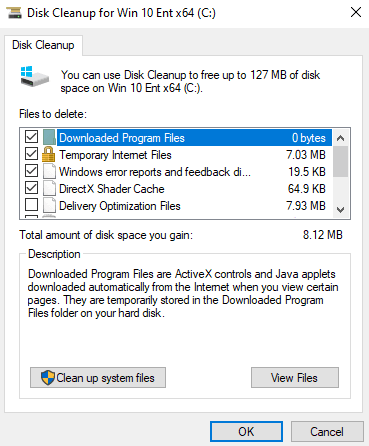
Step 3. Tap on Clean up system files. Then, go to the app again, select the files you want to delete under the Files to delete section, and click OK.
Fix 7. Replace the Old Disk with a Larger one
Insufficient disk space can cause Windows updates to fail, such as Windows 11 update error 0x800f0922. You can try to free up some disk space to solve this problem. Usually, it helps to clear junk files and temporary folders. If deleting the files is not enough to free up enough space, you can replace the old disk with a larger disk. The free cloning software AOMEI Backupper Standard can help you achieve the goal easily. This way, you can both fix the problem and access all previous data on the new disk.
- Secure boot: You can boot your computer successfully from the cloned disk after cloning.
- Intelligent clone: By default, it will only clone the used sectors so that you can not only easily clone disk to a larger disk but also clone larger drive to smaller drive.
- Live clone: The software allows the cloning tasks to run in the background so that you can use your computer normally during the cloning process.
- Sector by sector clone: When you want to clone the disk to a larger one, this feature will clone all sectors whether they are used or not.
- Various systems: It supports multiple Windows systems, such as Windows 11/10/8/7/XP/Vista, etc.
First, you need to download this freeware and install it. If you are a Windows Server user, you can select AOMEI Backupper Server.
Step 1. Open AOMEI Backupper Standard, and click Clone > Disk Clone.
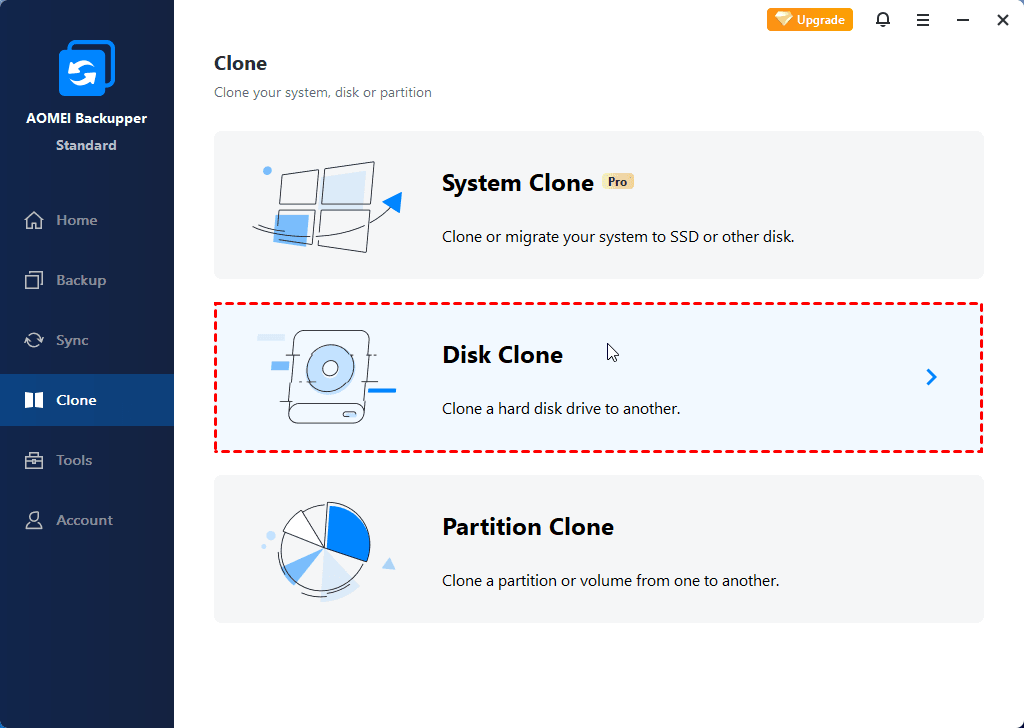
Note: The standard version only supports data disk clone. If you need to clone a system disk, you can upgrade to the Pro version.
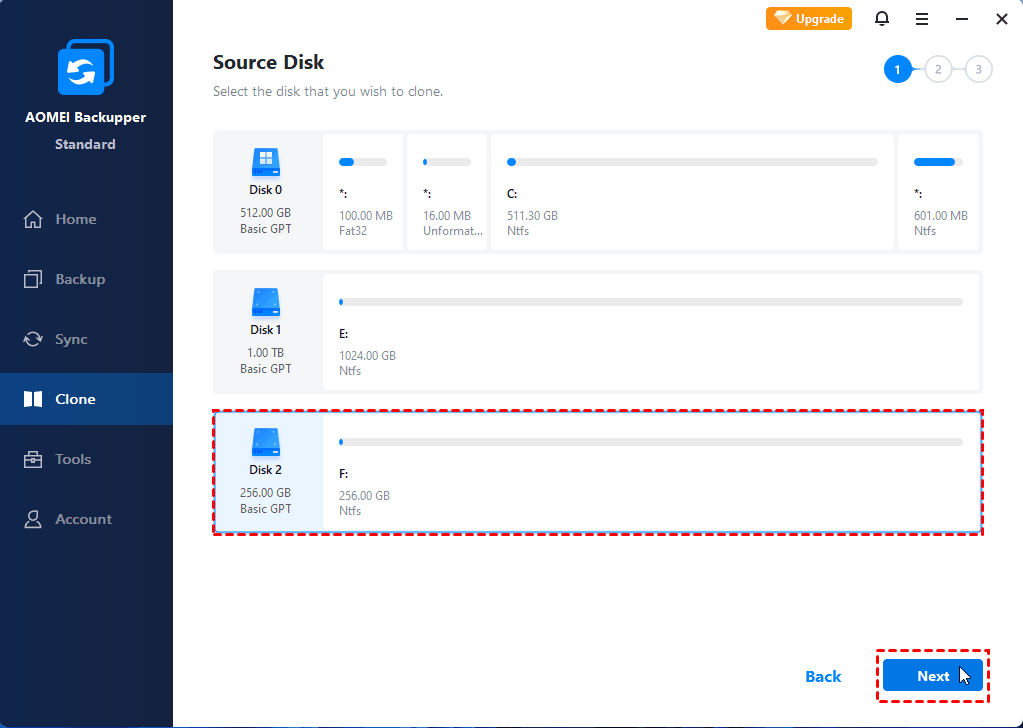
Step 2. Choose your original disk as the source disk. Then, click Next.
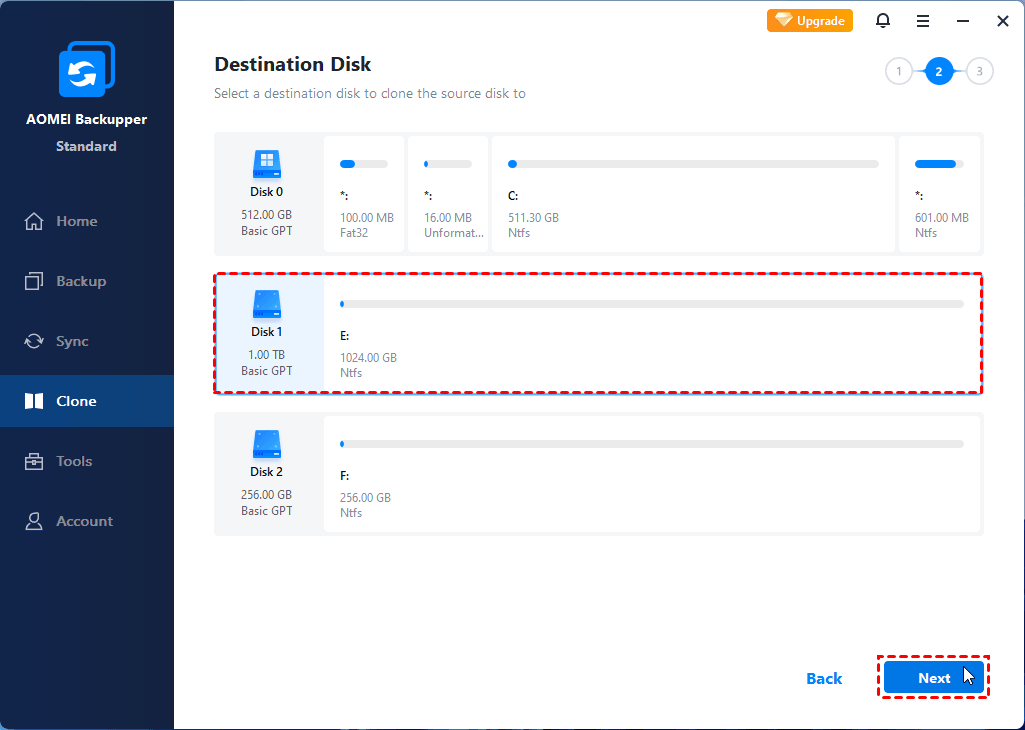
Step 3. Choose the larger disk as the destination disk. Then, click Next.
Step 4. Confirm your operations and click Start Clone.

Tips:
- Edit Partitions: This feature can change the partition size. If you need, it can help you convert the destination GPT disk to MBR and vice versa.
- SSD Alignment: If your target disk is an SSD, you can tick the SSD Alignment option to accelerate the reading and writing speed of the SSD.
- Sector By Sector Clone: If your target disk is the same as or larger than the source disk, you can use this feature that can clone all sectors whether they are used or not.
✍ Further reading
Windows 11 update errors happen now and then. For example, CVE-2022-41082 allows authenticated attackers to trigger malicious code in the context of the server’s account through a network call and CVE-2022-41073 can allow attackers to gain system privileges. You may fix these vulnerabilities by installing November 2022 Patch Tuesday.
What's more, to ensure your computer data safety, it is recommended to create a backup before errors occur. Actually, AOMEI Backupper is not only powerful disk clone software but also specialized backup software. You can use it to create system backup, disk backup, file backup, etc.
It is also helpful in late Windows 10 update (KB5021233) error (0xc000021a) since you can easily get rid of the blue screen with a backup.
Summary
If you are also getting a Windows 11 update error 0x800f0922 message during the installation of Windows updates, then you can read this article to learn why this error occurs and 7 methods to fix it. While you are troubleshooting this error due to insufficient memory, you can clone the disk to a larger disk with free cloning software – AOMEI Backupper Standard to get more free disk space.
Apart from easily cloning disks to large disks for you, it can also clone large disks to small disks if you need to. After cloning, you can successfully boot the computer from the cloned disk.
In addition, it also provides System Clone and Partition Clone functions to meet your different cloning needs. You can download this software to experience more functions.

