How to Transfer Photos to External Hard Drive on Windows 10
If you want to learn how to transfer photos to external hard drive on Windows 10, this article will be of great help to you. 4 effective methods are provided.
by Yuka Updated on November 1, 2022
Need to Transfer Photos to External Hard Drive
Transfer Photos/Videos from Windows 10 Library to External Hard Drive?
“Hello and Happy New Year!! I got the free version of Windows 10 installed on my laptop, but been trying to transfer photos & videos from my Windows 10 library onto my external hard drive but just can’t seem to do this, any help would be so grateful!”
Now, many people like to take photos or shoot videos to record their lives. With the passage of time, more and more photos and videos are stored on the computer, and the memory space occupied by them is also increasing. At this time, many users choose to transfer these photos or videos to other storage devices for the following reasons.
◑ Make a backup of the photos and videos. If your computer is damaged or crashed, having a backup can help prevent permanent loss of photos.
◑ Free up computer space. After a long time of accumulation, the space occupied by your photos and videos is increasing, which may affect computer performance. Therefore, you choose to move photos library to external drive to increase the available space on your computer.
◑ Make your photos portable. Transferring photos to external hard drive allows you to take photos with you anywhere. This is very important for those who want to use these photos at home or at work.
4 Methods to Transfer Photos from Windows 10 to External Hard Drive
There are many external storage devices that can store your photos, the most common are external hard drives, USB flash drives, SD cards, etc. In the following, I will show you how to transfer photos from Windows 10 to external hard drive. The difference between them may lie in the transmission speed and the difficulty of operation.
Take a closer look at each method for more information.
Method 1. Transfer Photos through Traditional “Copy” and “Paste”
We start with the simplest method, but this method may be the most time-consuming. The traditional "copy" and "paste" do not require any complicated techniques, just follow the steps.
Step 1. Turn on the computer and connect the external hard drive. Make sure it can be detected by the computer. If there is a need for an adapter, you should certainly get one.
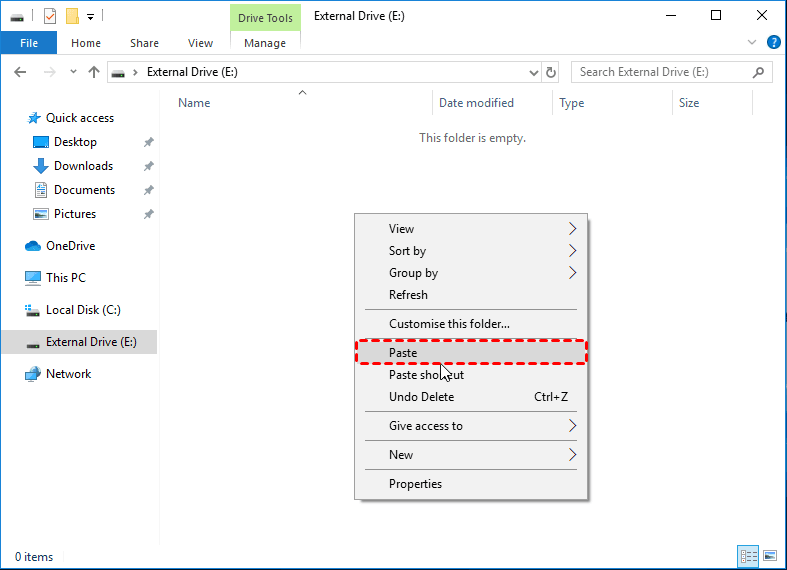
Step 2. After the connection is successful, open the file explorer and search the folder of the files you want to copy. Select it and right-click to copy the file, or press "CTRL+C".
Step 3. Then double-click the external hard drive and right-click to paste or press " CTRL+V " to paste the file here.
Method 2. Copy Photos to External Hard Drive Using CMD
If you do not want to use third-party software, you can use CMD to transfer photos from a PC or laptop to an external hard drive. Command Prompt offers an XCOPY utility that can copy the folder, all the content, and any other subfolder.
Step 1. Turn on the computer and connect the external hard drive. Make sure it can be detected by the computer.
Step 2. Create a folder on your computer and put all the photos you want to transfer in this folder. Here I create a folder name “Photos” on C: drive.
Step 3. And then create a folder on the external hard drive where you want to store the photos. Here the folder is “Photos” on E: drive.
Step 4. Click Start and type cmd in the search box. Right-click Command Prompt from the list and select Run as administrator.
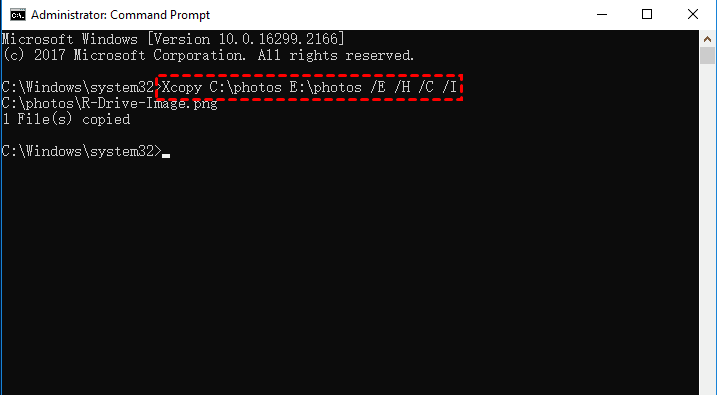
Step 5. Now, when you're in the command prompt, you can type Xcopy command as below to tranfer photos to external hard drive on Windows 10.
▶ Xcopy C:\Photos E:\Photos /E /H /C /I
Tips✍:
✧ /E – Copy subdirectories, including any empty ones.
✧ /H - Copy files with hidden and system file attributes
✧ /C - Continue copying even if an error occurs.
✧ /I - If in doubt, always assume the destination is a folder. e.g. when the destination does not exist.
After a while, the photos were successfully transferred from the PC to the external hard drive at one time.
Method 3. Transfer Photos to External Hard Drive Using File History
Windows built-in backup tool-File History also allows you to transfer photos to an external hard drive. Follow the steps below to learn how to transfer photos to external hard drive on Windows 10.
Step 1. Connect the external hard drive to the computer.
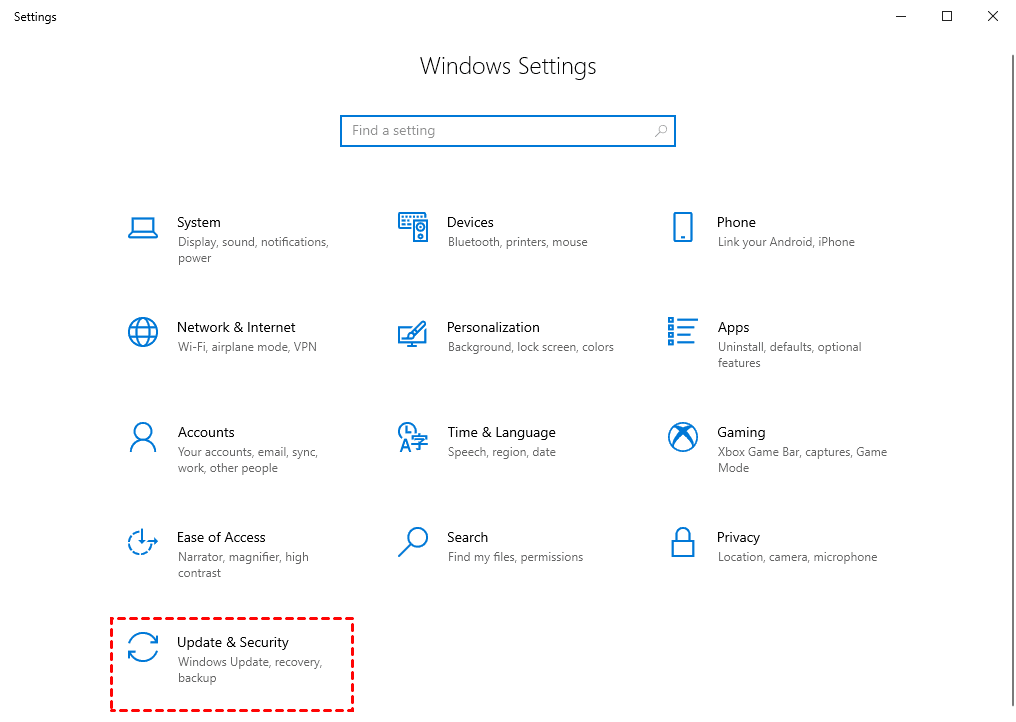
Step 2. Open Settings from the Start menu and go to Update & Security.
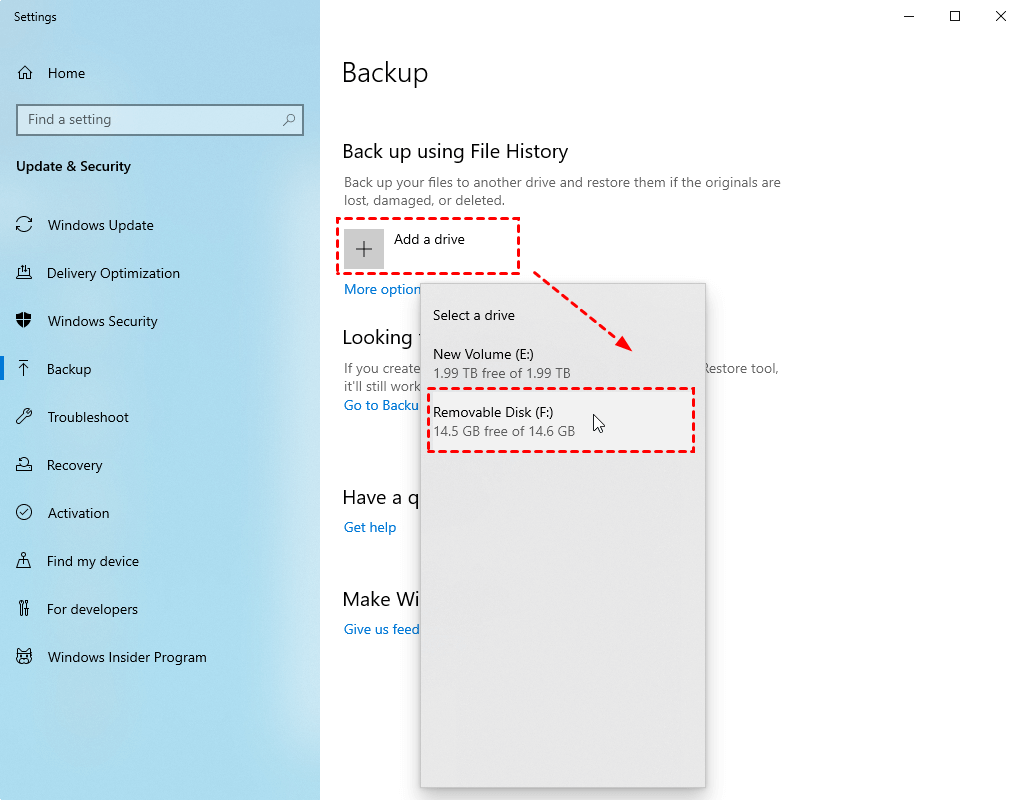
Step 3. And then, click Backup. Click or tap “+ Add a drive” to add an external hard drive that File History will back up to.
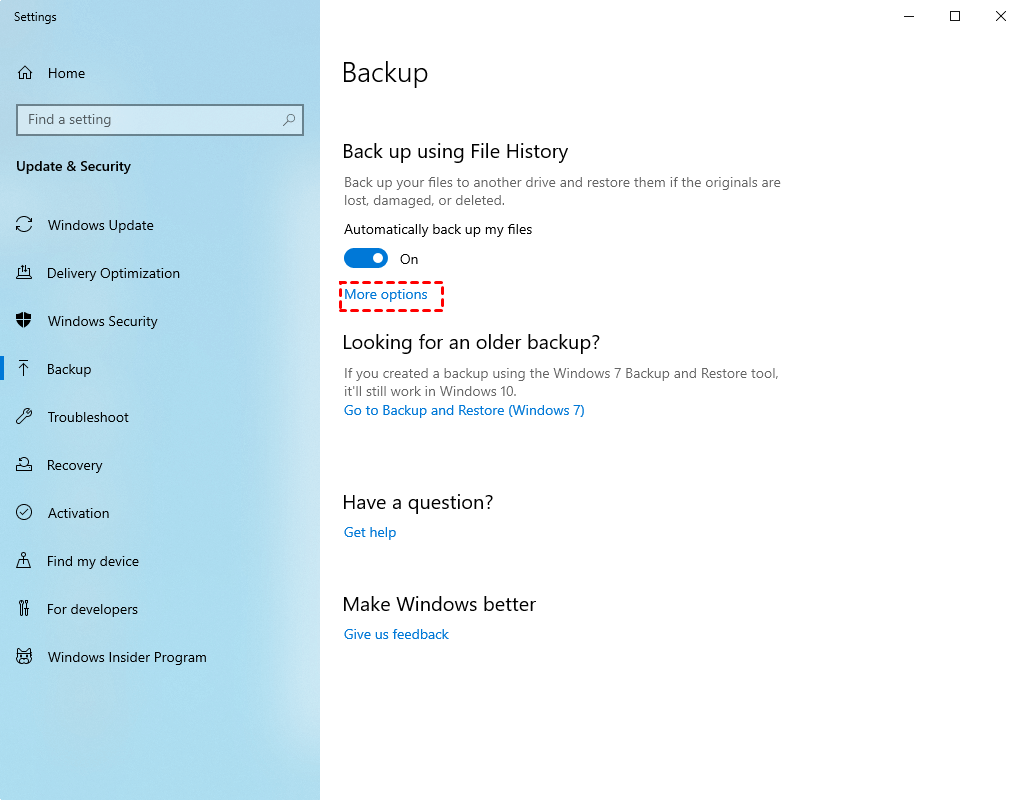
Step 4. Click More options to choose the folders you want to back up. You can also configure how often File History backs up, how long it keeps those saved versions there.
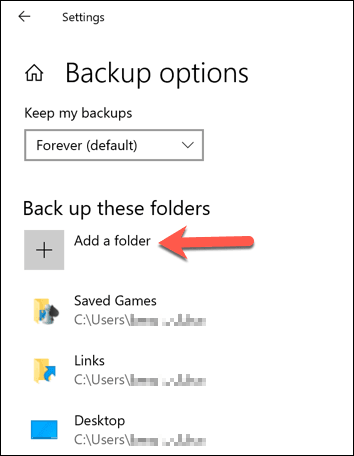
Step 5. File History will automatically back up important user folders. If you only want to back up photos, you need to remove the default folders on the list, and then click Add a folder to select the photo folder you want to transfer to the external hard drive.
Tips✍:
✩ Backup Frequency: By default, Windows 10's File History will automatically back up the folder every hour, but you can change it according to your needs.

Step 6. After confirming all your settings, click Back up now to back up your photos immediately.
This method is also suitable for transferring photos to other external devices. Read this article to learn how to transfer photos to USB stick on Windows 10.
Method 4. Easier and Safer Software to Transfer Photos to Any Storage Devices
For most people, the first method is probably the most commonly used method. But if you have too many photos, the entire copy and paste process will take you a long time. The second method requires some computer skills. For the third method, some users encountered some problems in the process of using it. For instance, File History doesn’t recognize this drive, File History service is not accessible, etc.
Considering these circumstances, I suggest you use simpler and safer free backup software to transfer your photos. AOMEI Backupper deserves to be your best choice. It’s designed for all Windows PCs, including Windows 11/10/8.1/8/7/Vista/XP.
✬ It provides you with 4 backup solutions and its File Backup feature helps you transfer photos to external hard drive or other storage devices, such as, local disk, external device (USB, HDD, SSD, etc.), cloud disk, NAS or network shared folder.
✬ It allows you to set automatic backup while transfering photos in Windows 10. You can run it in daily, weekly, monthly.
✬ It will enable incremental backup to backup only changed files if you enable the scheduled backup. Also, it will compress or split backup image automatically in the process of backup.
✬ It is able to set email notification to get backup status (success or failure), especially when you have a large amount of transferred data but don't want to wait until the backup task is complete.
Next, I will tell you how to transfer photos to external hard drive using this freeware. First, click the download button below to install it on your computer. And it also provides you with a sever edition.
Step 1. Connect the external hard drive to the computer and make sure it can be accessible.
Step 2. Start AOMEI Backupper and click Backup -> File Backup on the dark blue interface.

Step 3. Click Add folder or Add File to select the photos you want to transfer to the external hard drive.

Step 4. Then select the external hard drive as the destination to store your photos.

In daily use or long-term data protection, you need to set backup settings with the following 3 options.
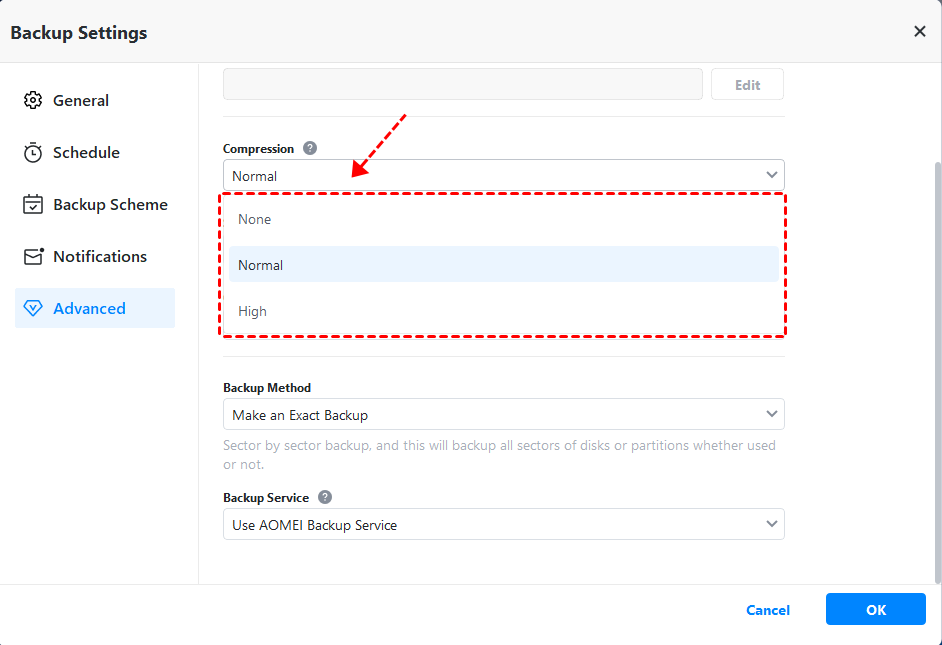
Options: You can modify the compression level to higher, set customized splitting size, enable encryption for backup, etc. Some of them are available on the AOMEI Backupper Professional.
Schedule backup: The free edition supports daily, weekly, monthly backup, and you can set hourly backup in a day. In premium version, you still can enjoy event trigger and USB plug in feature. The last one is recommended if you don't want to connect it every time before a task start.

Backup Scheme: There are 3 backup methods available: full backup, incremental backup (default), and differential backup. The last one is available after the upgrade. In the premium version, you can enjoy 3 different automatic backup cleanup method to ensure that there is always enough space for new backup images.
By quantity: It allows you to specify the number of the backup sets (1 full backup and 6 incremental or differential backups) and then it will delete old backups after exceeding the specified value.
By time: It is able to set the number of backups based on daily, weekly or monthly. When it exceeds the number, all the previous backups will be deleted.
By daily/weekly/monthly: It will keep all the backups within several days, and then only keep full backups if the set number of days exceeds, finally when the set number of weekly exceeds, all the backups will be deleted except for one full backup every month.

Step 5. Finally, after confirming all the backup settings, click Start Backup.
★ Bonus tip: backup photos to AOMEI Cloud
There is a growing trend to backup files to cloud storage. Compared to an external drive, cloud is a safer place to keep your important files because it is less subject to getting lost or damaged. If you create an AOMEI account, you can backup photos to AOMEI Cloud. You'll get 1TB free storage for 15 days after you sign up for an AOMEI account.

To Sum Up
After reading this article, you should know how to transfer photos to external hard drive on Windows 10. After comparing these four methods, the fourth method is undoubtedly your best choice. Its operation is simple, and there will be no problems during use.
Also, AOMEI Backupper is a software that integrates Backup, Clone, Restore and Synchronization. With it, you can not only transfer data, but also transfer the system. When one day you want to replace the hard drive with an SSD, it can help you transfer data to WD Blue SSD with just a few clicks.

