How to Fix iTunes Home Sharing Not Working on Windows 11/10/8/7
Apple devices fail to share files because iTunes Home Sharing not working on Windows 11/10/8/7? Read this passage to know about iTunes Home Sharing in detail and fix iTunes Home Sharing not working on Windows.
By Demi / Updated on May 14, 2026
Unable to run Home Sharing on Windows 10
I have Windows 10 on my laptop and iPhone. Home Sharing worked on both for a day and now it shows on the iPhone but has stopped working on my laptop. I have tried many ways like uninstalling and reinstalling iTunes, logging on as administrator. However, it still doesn’t show on my laptop. Has anyone had the same problem? Any help would be appreciated. Thanks.
- Question from Apple Community
The features in iTunes are getting more and more sophisticated nowadays, and Home Sharing is one of them. You can rely on the feature of Home Sharing to share media from computer to your iPhone, iPad, and iPod.
But the feature doesn't always work properly. Are you getting frustrated with iTunes Home Sharing not working on Windows 11/10/8/7? If your answer is YES, you are not alone. Read this passage to know better about iTunes Home Sharing and fix iTunes Home Sharing not working on Windows.
Overview of iTunes Home Sharing
iTunes Home Sharing is a feature designed for Apple device, enabling Apple users to share, steam and import media in iTunes library wirelessly with up to five computers or Apple devices that are connected to your home Wi-Fi network.
You can get access to iTunes Home Sharing on Windows by visiting Files on iTunes > Home Sharing > Then Turn on Home Sharing. You will be asked to enter your Apple ID and password to enable the function.

If you want to share files from iTunes to iPhone/iPad with Home Sharing, you can go to Settings > Users and Accounts > Home Sharing to turn it on. Please note that you need to sign in with the Apple ID you're using in iTunes.
4 Solutions to iTunes Home Sharing not working in Windows 11/10/8/7
After knowing about what iTunes Home Sharing is, it’s time to fix iTunes Home Sharing not working on Windows. Here are the solutions to iTunes Home Sharing not working. If you're in a hurry, an iTunes alternative is introduced in the next part, helping you share files among iOS devices and computer.
Solution 1. Some Quick fixes to iTunes Home Sharing not working
Before any specific methods, you need to check whether you missed one of the most important requirements for using Home Sharing on iTunes, because iTunes Home Sharing may keep disconnecting if you fail to fulfill any specifications and requirements below.
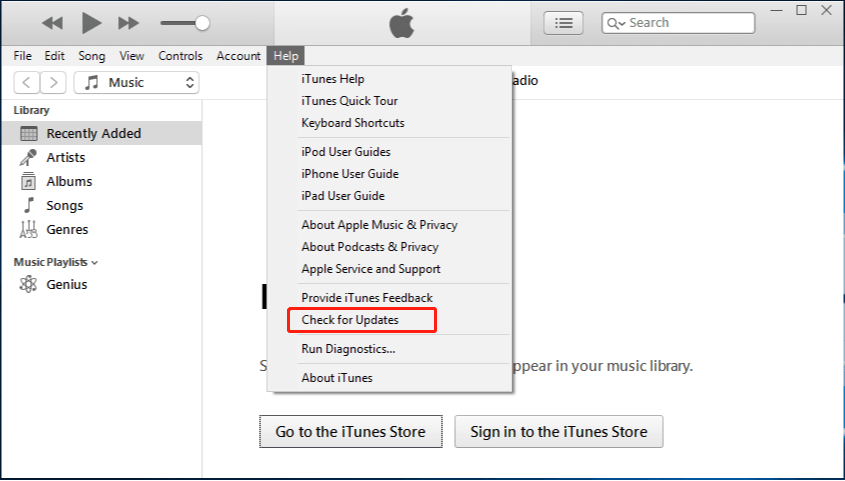
• Update the software on all your devices. Make sure you have updated the latest version of iOS, iPadOS, macOS. You also need to check whether the iTunes on your Windows is the latest version. You can go to iTunes app > Click Help on the menu bar > Select Check for Updates to make it if there is the latest version.
• Connect all devices to the same wireless network. Only when all devices are under the same Wi-Fi network, can Home Sharing be available.
• Sign in the same Apple ID in every device. Also, a same Apple ID is another prerequisite that makes iTunes Home Sharing enabled.
• Keep your Windows PC on. You have to make sure that your Windows PC and iTunes are on when you’re using iTunes Home Sharing.
Solution 2. Disable Firewall or anti-virus software
If you’ve installed any firewall or anti-virus software, it may result in that iTunes Home Sharing keeps disconnecting on Windows. As a result, you should disable any firewall or anti-virus software and switch off iTunes. Because each piece of software has its own set of steps and processes, it’s best to familiarize yourself with your anti-virus program’s settings and then follow them.
Solution 3. Reauthorize your computer in iTunes
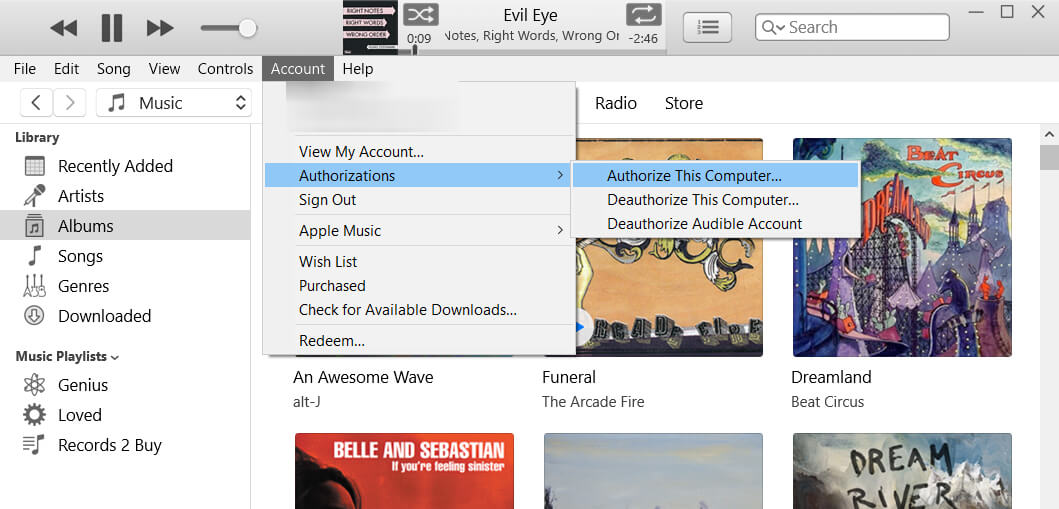
Have you authorized iTunes for use on Windows? If you are not sure about it, follow the steps to have a check and enable it.
Simple steps to check authorization. Go to iTunes app on Windows > Go to Account > Authorizations > Choose Authorize This Computer.
Note:
❶ Restart your computer and open iTunes again to see if you can access to iTunes Home Sharing.
❷ You need to keep in mind that you can only authorize at most 5 computers, including Mac and Windows. Deauthorize a computer if necessary to add another one.
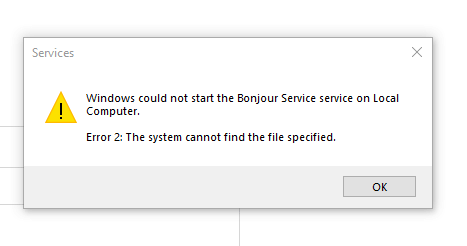
Solution 4. Ensure Bonjour Service is working
Bonjour service is software developed by Apple, helping your Windows find other Apple devices on a network, connect to other devices and access shared files. Applications like iTunes depend on it to work properly.
To check if Bonjour Service is working, go to iTunes > Edit > Preference > Select Sharing. If Bonjour Service is working, some sharing options can be seen. Otherwise, it will tell you that the Bonjour Service is not running.
To download Bonjour Service, you can uninstall iTunes and download it again. When you download iTunes, Bonjour Service will be downloaded automatically on your computer.
Step 1. Find iTunes64Setup.exe or iTunes32Setup.exe (depending on the version you downloaded) > Extract the install files.
Step 2. Double click on Bonjour64.exe or Bonjour32.exe.
Step 3. Follow the on-screen instructions to install Bonjour on Windows 10.

Bonus: Transfer files among iDevices and computer without Apple ID limitation
Given kinds of problems you may meet when you are using iTunes, I’d like to recommend you FoneBackup, an iTunes alternative to share files among iPhone, iPad, iPod, and Windows PC. Compared with iTunes Home Sharing, you don’t need to worry about neither an unstable network nor the limitation of the same Apple ID during the transfer process.
What FoneBackup can provide you:
![]() You can be free to transfer data from one Apple ID to another with no effort.
You can be free to transfer data from one Apple ID to another with no effort.
![]() It enables you to transfer files at a superfast speed offline. You just need to spend 3 seconds sharing 100 photos.
It enables you to transfer files at a superfast speed offline. You just need to spend 3 seconds sharing 100 photos.
![]() You are allowed to transfer music to iOS devices from any source, no matter it is purchased or not.
You are allowed to transfer music to iOS devices from any source, no matter it is purchased or not.
A simple interface and design helps its user handle it quickly. Besides, your data can be easily managed in its main interface in FoneBackup. Download it by clicking the icon below for free, let’s take transfer music from computer to iPhone as an example!
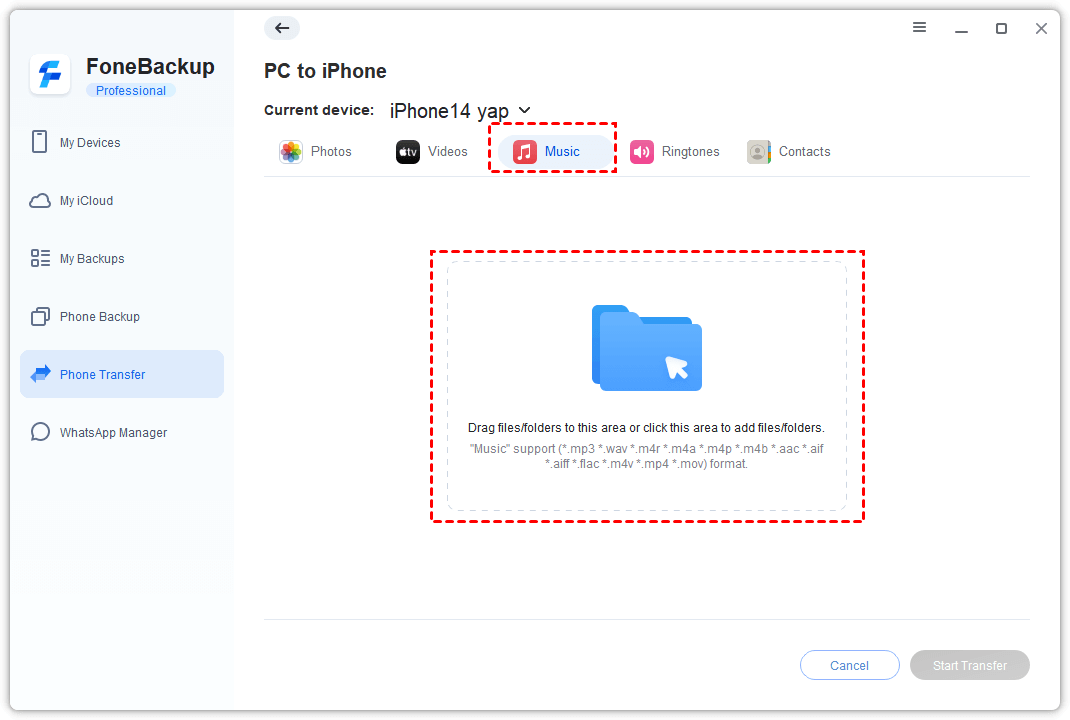
Step 1. Connect your iPhone to computer with USB > Launch FoneBackup and click Phone Transfer. Move the cursor to PC to iPhone. Click Get Started.

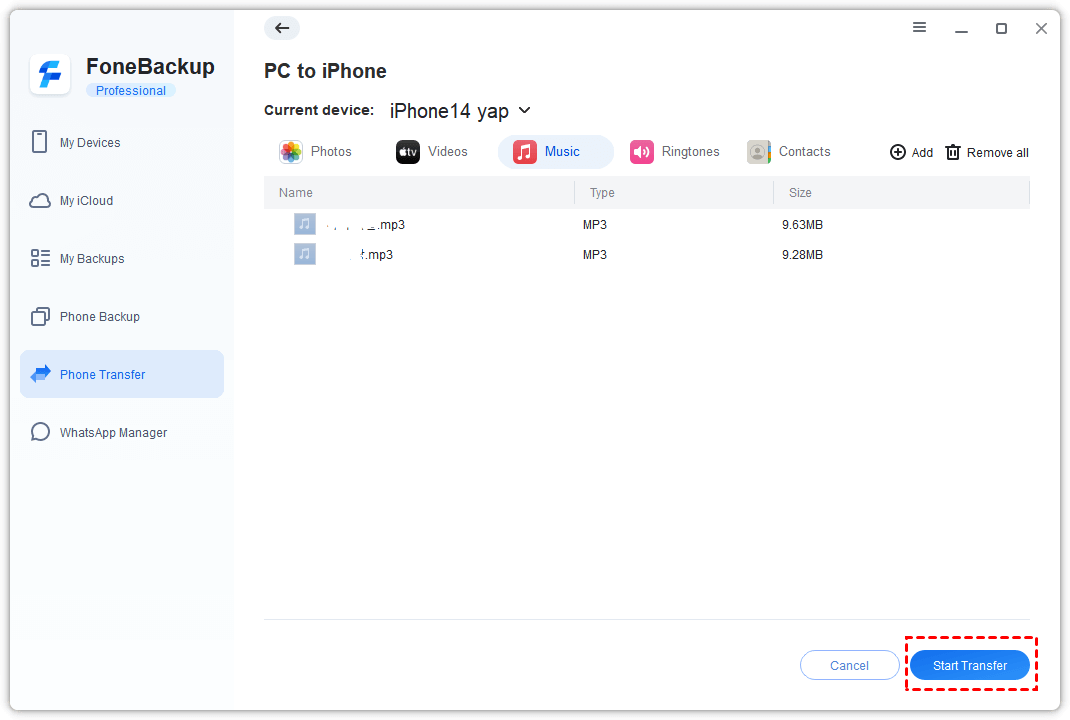
Step 2. Click the Folder icon to add music from computer > Click Open after you finish choosing the wanted music. You can add music from iTunes library, local folder on computer, CD, etc. as you like.
Step 3. You can also add photos, videos to the box at the same time > When you have added all you want > Click Start Transfer to start the task.
When the transfer is completed, you can unplug your iPhone from computer and go to the relative apps to check the transferred files. There are many other transfer functions in FoneBackup waiting for you to explore. Besides, to keep your data safe, the backup functions in FoneBackup are also nice tries to backup iPhone to PC fully or selectively.
Conclusion
Hopefully, the issue iTunes Home Sharing not working on Windows 11/10/8/7 can be solved. There are many settings and requirements you have to check before enjoying Home Sharing in iTunes. To make things easier, FoneBackup is definitely a better choice for you to transfer files from iDevice to iDevice, iDevice to computer, and vice versa. Share this passage to help more people.