You will learn the causes and 19 solutions to the system and compressed memory high disk usage issue. And a way to enhance computer security.
"Recently, my laptop, which I bought only 8 months ago, became slow in booting and copying files. And it is unresponsive when browsing the web. I could not even play games as before. At first, I couldn't pinpoint what the problem was until I opened Task Manager. I found that the root of the problem was the system and compressed memory.
It consistently took up 20-50% of the disk usage and would spike to 99% when I opened an application. When I restarted it would stay at 100% disk usage for 5-30 minutes. This is breaking me and I have no idea what to do, can anyone help me?"
System and Compressed Memory is a program in Windows 10 and it is used to compress files and folders stored on the hard disk and manage computer memory. Normally, this program only takes up a small amount of disk.
However, it can take up a lot of disk usage in some cases and cause the computer to run slower. Don't worry about this! I'll introduce you to the possible causes and corresponding solutions to fix it easily.
If you don't know how to solve this problem, we suggest referring to the following common causes. It can help you to solve the problem better.
After understanding these common reasons, you can take appropriate measures to solve them. And we provides you with 19 methods in the following to solve system and compressed memory high disk usage. These methods also apply to system and compressed memory high CPU usage.
Troubleshooting is a good start for system and compresed memory 100% disk usage issue. And it can resolve most problems related to a software or computer system. So you can try it before using other methods.
1. Press Win+R to open run dialogue and type msdt.exe -id MaintenanceDiagnostic and click OK.
2. In the System Maintenance window, tap the Advanced button in the lower-left corner.
3. Make sure Apply repairs automatically is checked, and then click Run as administrator.
4. Click Next and wait for this process to complete. Then open Task Manager again and see if the problem has been solved, if not, turn to the next method.
The page file size for all drives is set to be automatic by default, but you still can change it to a custom value. The problem is doing so may lead to 100% disk usage issue in system and comrpessed memory. So please revert it back to automatic with the following steps.
1. Press Win+S to open the search box and type Adjust the appearance and performance of Windows and press Enter.
2. Switch to the Advanced option and click Change… in Virtual memory.
3. Make sure the Automatically manage the paging file size of all disks is checked and click OK to apply your change. Finally, restart your computer.
Open Task Manager again and see if the problem of system and compressed memory high disk usage has been resolved. If not, go to the next method.
Some users still says that adjust visual effects for best performance helps you go down from about 100% disk uage in System an comrpessed memory process to 0 - 25%. You can try it with steps below.
1. Press Win+S to open the search box and type Adjust the appearance and performance of Windows and press Enter.
2. Open the Visual Effects window and click Adjust for best performance. Click Apply and then click OK. Finally, restart your computer.
1. Press Win+R, then type control and press Enter to open Control Panel.
2. Click System and Security > Power Option > Choose what the power buttons do > Change settings that are currently unavailable.
3. Uncheck Turn on fast startup (recommended) and Hibernate option and click Save changes.
4. Turn back to Power Options and find the power plan you are using now. Click Change plan settings and click Change advanced power settings.
5. In Advanced settings windows, click the Sleep option and change the Hibernate after to Never and Allow wake times to Enable. Then click Apply.
6. Then turn to PCI Express and click it. Expand Link State Power Management and change the settings to Maximum power savings. Then click Apply and OK in turn.
1. Press Win+I to open Settings. Click System > Notifications & actions.
2. Uncheck Get tips, tricks, and suggestions as you use Windows.
Too many applications can interfere with your computer's memory and may lead to abnormally high disk usage. Therefore, it is recommended that you uninstall infrequently used applications. To prevent accidentally uninstalling needed applications, you can create a system restore point before starting the operation. This will allow you to recover in case of an unexpected situation.
1. Press Win+R to open run dialogue and type control and press Enter.
2. Click Programs > Uninstall a program
3. Right-click the application that you infrequently used and click Uninstall.
1. Press Win+S to open the search box and type disk clean up then press Enter.
2. Select the drive you want to clean up and click OK.
3. Select files you want to clean up and click Clean up system files. Then you will return to step 2, please click OK again.
4. In the Disk Cleanup window, click OK and select the Delete Files option in the pop-up window.
System File Checker is a utility in Windows that allows users to scan and repair corrupted system files. It will help you with abnormally high disk usage problems.
1. Type Windows PowerShell in the search box and right-click it. Select Run as an administrator.
2. Type sfc /scannow and press Enter. Then type Repair-WindowsImage –RestoreHealth and press Enter.
1. Press Win+R and then press mdshed.
2. In the Windows Memory Diagnostic window, there will be two options. It is recommended to choose the first one: Restart now and check for problems.
3. Your computer will be restarted and check the memory. After that, please type Event Viewer in the search box and right-click it.
4. Find Windows Logs and click System. Then right-click it to select Filter Current Log.
5. In the Event source, choose MemoryDiagnostics-Results and click OK.
6. Return to the Event Viewer and review the information for each event listed. If an error is not detected, it means that the computer memory is not faulty; if an error is detected, please replace the memory promptly.
1. Press Win+S to open a search box and then type cmd and click Run as administrator.
2. In the Command Prompt window, type chkdsk C: /f and press Enter to execute the command. You can replace C with the disk drive on which Windows is installed.
3. Then press Y to confirm the check the next time reboot and restart your computer.
Outdated hardware drivers can also be a trigger for abnormally high disk usage. Therefore, it is recommended to update the display adapter and disk drives first, and then update the rest of the hardware in turn.
1. Type Device Manager in the search box and open it.
2. Select Disk drives and select one of your disks, then right-click it to choose Update driver.
3. Choose Search automatically for drivers in the new window.
4. If this drive is the newest one, you can close the window and select all remaining hardware, in turn, to ensure that all hardware drivers are up to date. Then you can reboot your computer.
By default, the system and compressed memory execute with the highest privileges, which may cause abnormally high disk usage. Therefore, you need to change the system and compress memory execution permissions to resolve this issue.
1. Open the Task Scheduler again and select Task Scheduler Library > Microsoft > Windows > MemoryDiagnostic.
2. In the middle panel, select RunFullMemoryDiagnostic, and double-click it.
3 Go to the Security options section, find and uncheck the Run with highest privileges, and then click the OK button.
1. Open MemoryDiagnostic and select RunFullMemoryDiagnostic again.
2. In the General tab, find and tap Change user or group....
3. In the Select Users or Groups window, tap the Advanced... button.
4. In the new window, tap the object type ..., you do not have to make any changes, tap OK again.
5. return to the Select Users or Groups window, and tap the Find Now button.
6. In the search results list, select your user account. Tap OK, and tap the OK button again to exit the Select Users or Groups window. After restarting your computer, open Task Manager again to see if the problem has been solved, if not, go to the next method.
If the page file size is not the problem and it is set to automatic, you still can try to disable system and comrpessed memory handlers.
1. Navigate to MemoryDiagnostic again and select RunFullMemoryDiagnostic in the middle. And then select End.
2. Reboot your computer and check the usage of system and compressed memory.
In some cases, speech recognition and Cortana on Windows 10 may cause an abnormally high disk usage problem. In case it is the culprit, simply disable the "Speech Runtime Executable" handler in Task Manager.
1. Press ESC+Shift+Ctrl to open Task Manager.
2. In the Processes list, find Speech Runtime Executable and tap the End Task.
SuperFetch is used as part of the memory cache and is mainly used to improve computer performance. However, it can also take over the CPU, causing system and compressed memory anomalies and making disk usage higher. You can disable this feature in Windows services or in the registry editor.
1. Press Win+R to open run dialogue and type services.msc and press Enter.
2. Select and double-click SuperFetch in the services list.
3. Select Disabled in the Startup status and then click OK.
1. Press Win+R to open run dialogue and the type regedit and press Enter.
2. Navigate to:
HKEY_LOCAL_MACHINE>SYSTEM>CurrentControlSet>Control>Session Manager>Memory Management
3. Select PrefetchParameters on one the left panel and double-click EnableSuperfetch.
4. Change the Value data as 0 and click OK.
Sometimes, the failed or failling RAM can also be one of the causes to System and compressed memory 100 disk usage. You can check and reset RAM to fix it. Please note that this way is in conflict with way 2. It is recommended to try way 2 first, and then use this method if it does not work.
1. Press Win+Pause to open Settings and click Advanced system settings at the bottom.
2. Click Advanced > Performance > Settings… > Advanced > Change…
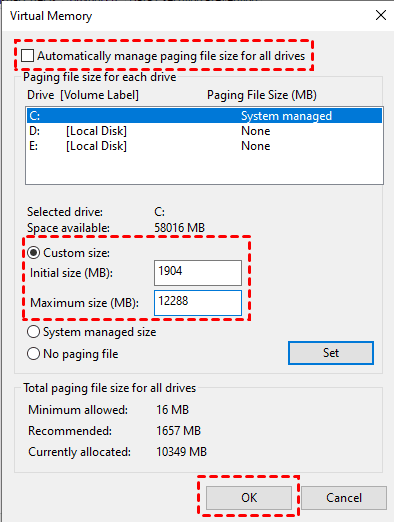
3. Uncheck the Automatically manage paging file size for all drives and select the disk where Windows is installed.
4. Switch to Custom size and enter the starting size and maximum value, tap Set and then click OK.
5. Press Win+R and type temp, then press Enter.
6. Press Ctrl+A to select all the files, then right-click them and select Delete.
Sometimes, viruses and malware is interfering with System and comrpessed memory feature and lead to 100% disk usage issue. To get rid of it, you can turn to Windows Security and scan for it.
1. Type Windows Security in the search box and select Virus & threat protection.
2. In Current threats, select Scan options and then select Full scan, then click Scan now.
1. Press Win+R and type msconfig then press Enter.
2. Switch to Services button and click Hide all Microsoft services and then click Disable all.
3. Then switch to the Startup option and click Open Task Manager.
4. In the Startup option, click the Disable button in turn and then close Task Manager. Then return to the Startup tab of System Settings and tap OK.
With all the above methods, I believe you can solve the problem of system and compressed memory high disk usage. We can see that the cause of the problem involves corrupted system files, viruses, and malware, etc. Some of them are big threats to the security of your computer system and data.
Therefore, we recommend you to ubackup system disk and run it automatically protect computer and data security. AOMEI Backupper Standard is a free but professional backup software. It allows you to create a disk backup to local disk, external disk, SD card, and NAS device, and supports Windows 11/10/8.1/8/7/XP/Vista. At the same time, you can enjoy the following advantages:
Next, I will introduce you to the detailed steps of disk backup. Before we start, download AOMEI Backupper Standard, If you are a server user, please try AOMEI Backupper Server.
1. Launch AOMEI Backupper Standard and click Backup > Disk Backup.
2. Click Add Disk to choose the disk you want to backup and then select the destination path as you like. You have two options in the following:
3. Click Schedule Backup and enable it, then select Daily/Weekly/Monthly. Once it's enabled, this software will enable incmrental backup automatically. And you can choose email notification and add comments for free in Options.
4. Choose the destination and click Start Backup. It will backup the entire disk at first and then only changed files on it.
Wait untill the process complete, you will have a copy of your files. And then, you can easily restore disk to get your computer back in a disaster. At the same time, you can perform hard disk image file restore with Explore Image feature.
It is really useful to restore files from backup when you don't have a file backup. And it works for all the backup types, such as, disk backup, system backup, partition backup, etc. In this case, you can choose to add some or all the partition(s) to a virtual drive and set drive letter for them, then copy and paste files in Windows Explorer.
You can easily fix the System and compressed memory high dish usage issues with the given 19 methods. And some of the reasons may be a big threat to computer and data security, thus it's suggested to schedule backup disk in Windows 10 or other systems. And to always keep the latest backup, you still could use incremental or differential backup, automatic backup cleanup, etc to save disk space.
And then you can restore disk to get system and data back quickly if it crashes or somethings bad happen. At the same time, in Technician or Technician Plus of AOMEI Backupper, you still can deploy image to multiple computers simultaneously, even with dissimilar hardware. All in all, it's worth trying backup software to protect computer!