How to Create Windows Server 2019 Recovery Disk (Top 2 Ways)
You can learn top two ways to create Windows Server 2019 recovery disk, including from ISO and the best professional software - AOMEI Backupper Server.
By Miya Updated on June 21, 2023
What is recovery disk?
A recovery disk, also known as a system repair disk, is a bootable media that contains the tools and files needed to troubleshoot and repair problems with a computer's operating system. Typically, a recovery disk is created by the user or pre-installed on the computer. It can be used to restore a computer to its original factory settings, or to repair a damaged or corrupted operating system.
Recovery disks may include system restore options, boot repair tools, and other diagnostic tools that can help fix common problems such as boot errors, missing or corrupted system files, and other software issues. Today we will focus on how to create Windows Server 2019 recovery disk.
Why need to create Windows Server 2019 recovery disk?
Creating a recovery disk for Windows Server 2019 (If you want to know how to create Windows Server 2016 recovery disk, you can click here) is a good practice because it can help you recover the system in case of a critical failure or error. Here are some reasons why you may need to create a Windows Server 2019 recovery disk:
➹ System failure: If your Windows Server 2019 system fails to start or experiences critical errors, a recovery disk can be used to boot the system and attempt to repair the issue.
➹ Restore point: A recovery disk can also be used to restore the system to a previous point in time when it was working correctly. This can help you undo changes that may have caused issues on the system.
➹ Reinstall Windows Server: In some cases, you may need to reinstall Windows Server 2019. A recovery disk can be used to boot the system, access installation files, and reinstall the operating system.
➹ Backup and recovery: A recovery disk can also be used to create backups of your system or recover data from backups. This can help you protect your data and recover it in case of data loss.
How to Create Windows Server 2019 Recovery Disk
Here we will describe in detail two methods to create Windows Server 2019 recovery disk including from ISO and a useful software.
Create Windows Server 2019 Recovery Disk from ISO
After downloading Windows Server 2019 from Microsoft, you can choose to download an ISO file that contains all the installation files for Windows. This file can be used to create a bootable media by copying it onto a DVD or USB drive. Follow these steps to create a bootable Windows Server 2019 recovery disk from ISO:
Step 1. You will need to download the ISO file from the Evaluation Center or another site. Once downloaded, mount the ISO file and take note of the mounted drive letter, assuming it is g:\.
Step 2. Insert the media that you want to use as a recovery disk, such as a USB flash drive. Before proceeding, make sure to back up any important data on the media, as the creation process will overwrite everything on it.
Open CMD as an administrator and enter the following commands (press Enter after each line):
diskpart
list disk
select disk # (insert the disk number or the target USB)
clean
create partition primary
select partition 1
active
format fs=ntfs quick (change "ntfs" into "fat32" if you are creating UEFI bootable USB)
assign letter=# (any available letter, assuming it is h)
exit
With the recovery disk created, you can now proceed to create the boot sector and fill it with information by entering the following commands:
cd boot
bootsect.exe /nt60 h:/ (the drive letter of your USB)
Afterwards, you can copy all the contents from the mounted ISO into the USB drive using the xcopy command as shown below:
xcopy g:\*.* h:\ /E /H /F
Next, we will do it in a simpler way to create Windows Server recovery disk.
Easier Way to Create bootable recovery disk in Windows Server 2019
AOMEI Backupper Server is a top-rated backup software designed specifically for servers, offering a range of exceptional features.
1. You can create system state backups or full server backups at your convenience. Additionally, you can backup individual files as needed.
2. This software also allows you to create bootable rescue media, which can be used to restore your system even if your hard drive fails completely.
3. The Universal Restore feature further enables you to restore system images to different computers.
AOMEI Backupper Server supports a wide range of Windows Server operating systems, including 2003, 2008, 2012, 2016, 2019, and 2022. With just one Windows Server recovery disk, you can use it on all of these operating systems. Follow these steps to create a bootable recovery disk using AOMEI Backupper Server.
Step 1. You will first need to download the software and open it.
Step 2. Choose Tools and select Create Bootable Media.

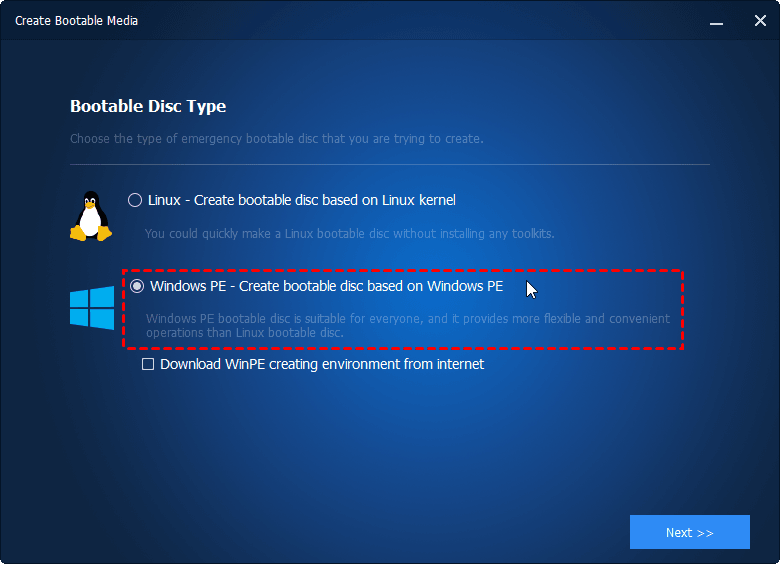
Step 3. You will need to select the type of emergency bootable disk that you wish to create - Linux or Windows PE.
☀ Note: We recommend creating a bootable disk based on Windows PE, as it offers greater flexibility and convenience compared to a Linux bootable disk. Additionally, a Windows PE bootable disk allows you to boot from both legacy/MBR and UEFI/GPT modes.
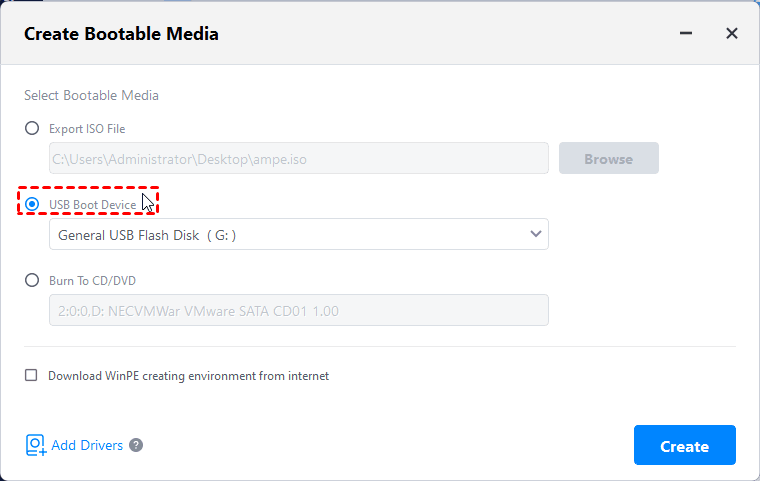
Step 4. You will need to select a bootable media from the available options, which include Burn to CD/DVD, USB Boot Device, and Expert ISO file. Once you have made your selection, like USB Boot Device, click Next to begin the process.
Creating a bootable media with AOMEI Backupper Server is a quick and easy process that only requires a few clicks and several minutes of your time. Once you have completed Windows Server 2019 recovery disk creation, you may be wondering how to proceed with the process of recovering Windows Server 2019. In the next chapter, we will take a closer look at how to restore your Windows Server 2019 using the bootable media.
How to repair Windows Server 2019 with recovery disk
Once you have created a recovery disk, you can use it to recover your computer in the event that it cannot boot properly. You can utilize recovery options such as the command prompt for advanced troubleshooting or system image recovery to restore your system.
It's important to note that if you want to recover Windows using a specific system image file, you will still need to have previously created a system image backup. This backup will contain the files necessary to restore your system to a previous state, and can be used in conjunction with the recovery disk to recover your computer.
Repair Windows Server 2019 with recovery disk with ISO file
Assuming that you have already created a system image backup, let's take a look at how to use a recovery disk to repair Windows Server 2019 using an ISO file.
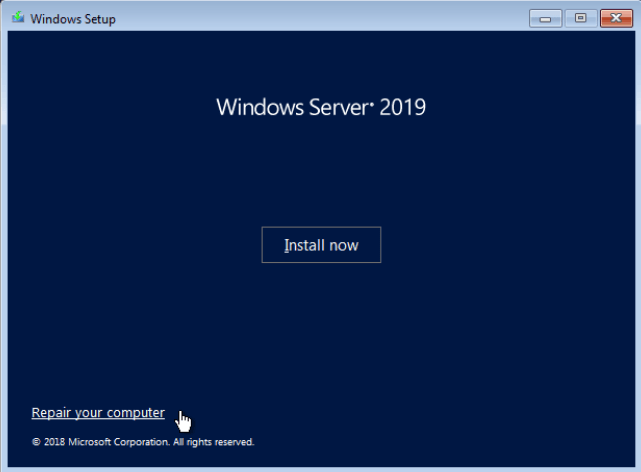
Step 1. Insert the USB bootable disk into the computer's optical drive, then boot the computer from the USB bootable disk. This will bring up the Windows Setup screen interface, where you should click Repair your computer located in the bottom left corner of the screen.
Step 2. Choose Troubleshoot button, then choose System Image Recovery in the advanced options.

Step 3. You will need to select an account and enter the password, if there is one. After doing so, you will be presented with the Re-image your computer option. Here, you can choose between two options: Use the latest available system image or Select a system image. Select the option that applies to your situation and click Next to proceed.
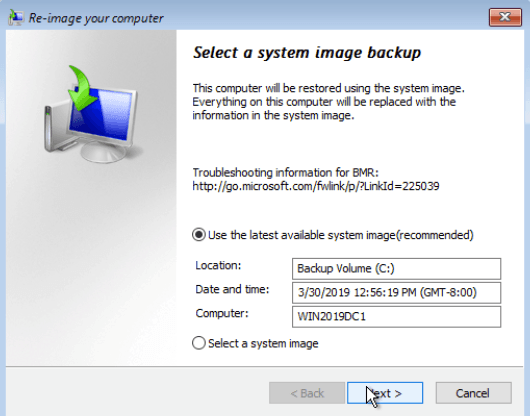
Step 4. Click Finish and then Yes to confirm the restoration process. The recovery process may take anywhere from a few minutes to a few hours.
It's worth noting that the recovery disk created can only be used on the same operating system. For example, a Server 2019 repair disk can only be used on Server 2019, and a Server 2008 recovery disk can only be used on Server 2008.
Restore Windows Server 2019 using AOMEI Backupper Server
Step 1. Insert your USB recovery disk into your Windows Server 2019. Then, start your computer and press the specific key (usually Del or F2) to boot into the BIOS. From there, set the bootable media as the first boot option.
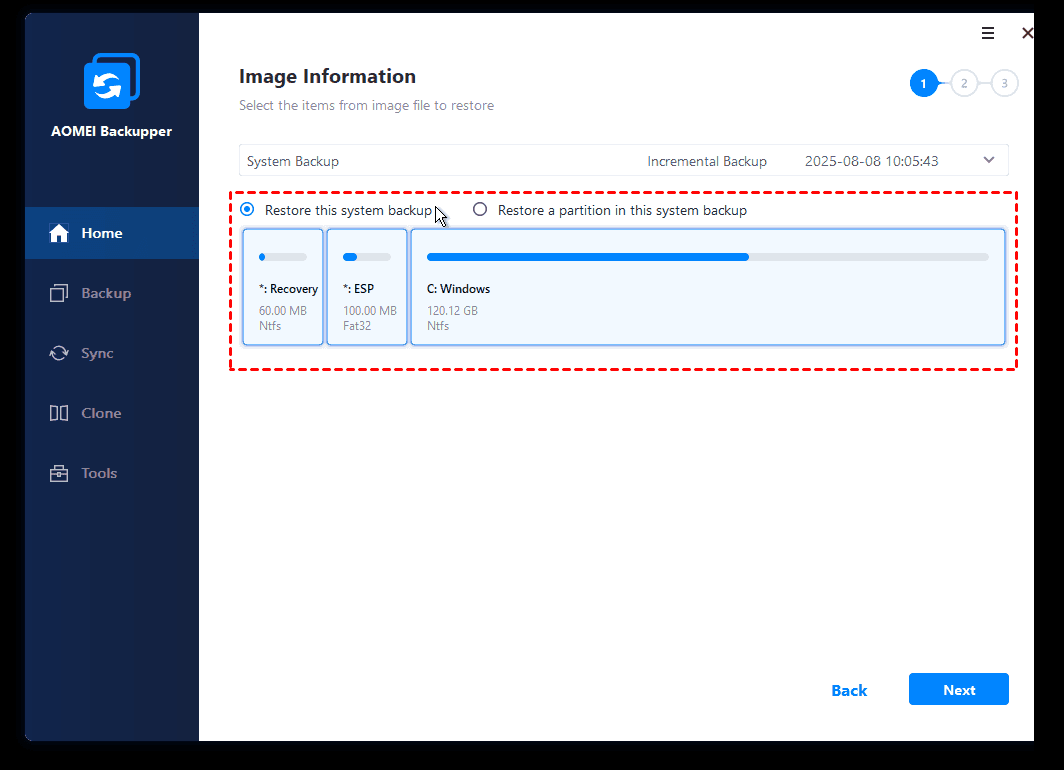
Step 2. Once the main page of AOMEI Backupper has loaded, navigate to the Home tab and find the system backup task that you created previously. Expand its drop-down menu and select Restore.
Step 3. In the subsequent window, select Restore this system backup and then click Next.
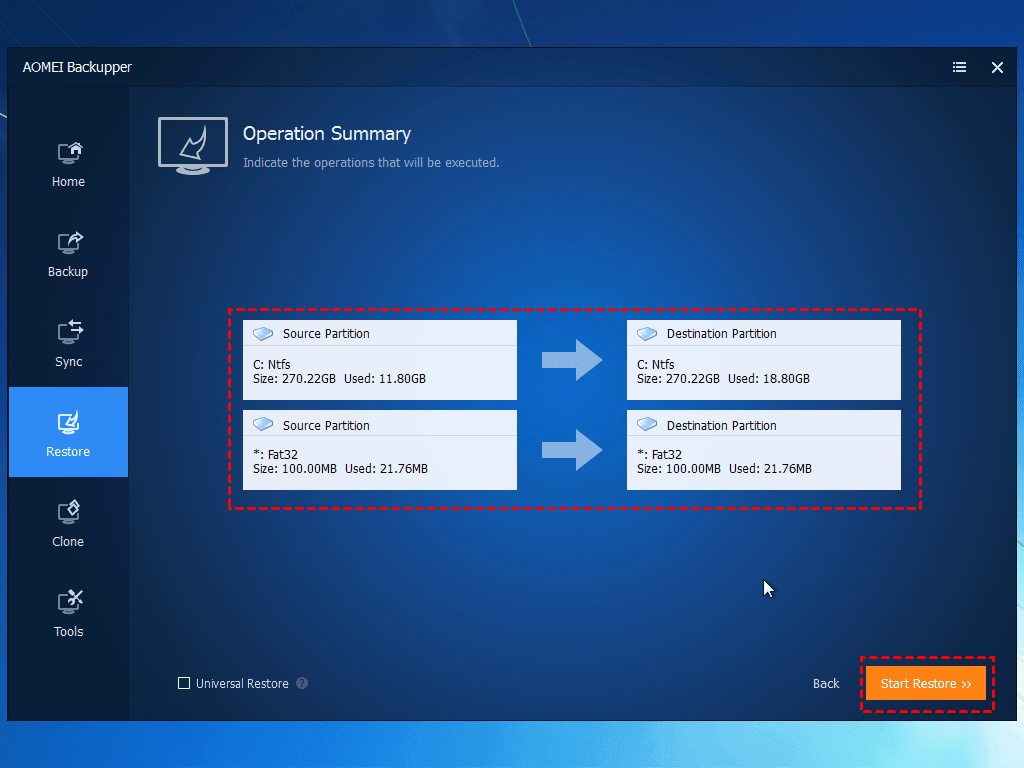
Step 4. Review the Source Partition and Destination Partition, and once you are ready, click Start Restore to initiate the restoration process.
Summary
Creating a Windows Server 2019 recovery disk is crucial for safeguarding your system and data. With AOMEI Backupper Server, this process can be accomplished with ease. Once you have created a recovery disk, you will be able to restore your computer even if it is unable to boot.
For organizations that need to protect unlimited PCs and servers, AOMEI Backupper Technician Plus is an excellent choice, which provides unlimited billable technical services to clients and also enables you to copy the installation directory for portable version creation.

