Trim SSD on Windows 11/10: How to Enable/Disable It Easily
You will learn how to enable or disable TRIM on SSD in Windows 11 in just a few clicks from this article, and you can grab a reliable way to boost SSD performance.
By Maggie Updated on January 31, 2024
SSD TRIM command: all you need to know
If you own an SSD and want to use it to improve your computer's performance, then it is vital that you know about the TRIM command on SSDs. What is TRIM and what are its benefits? How to check if it has been enabled? You can find the answers to these questions in this guide.
♨ What is SSD TRIM command?
The TRIM command, also called Disable Delete Notify, is an Advanced Technology Attachment (ATA) command developed by Microsoft in conjunction with the major SSD vendors to enable the operating system to inform the NAND flash SSD which data blocks can be erased because they are no longer in use.
The TRIM command allows SSDs to manage the available storage space and improves SSD performance and speeds up the SSD read and write process. Simply put, TRIM is an SSD optimization feature that is primarily designed to address the problem of SSD slowdown after use.
♨ Is enable TRIM good for SSD?
Obviously there are some advantages to enable TRIM on SSD, but this action may make it impossible to recover deleted or mistakenly deleted data by any means. Therefore, if your data is as critical as enough, then you need to consider whether you need to enable the TRIM command.
To learn how to let Windows 11 TRIM SSD, you may continue reading the following contents carefully.
How to enable/disable TRIM on SSD in Windows 11
By default, most SSDs now have the TRIM feature enabled. If you want to check if your SSD has the TRIM feature enabled, you can follow the steps to check if TRIM is enabled in Windows 10/11.
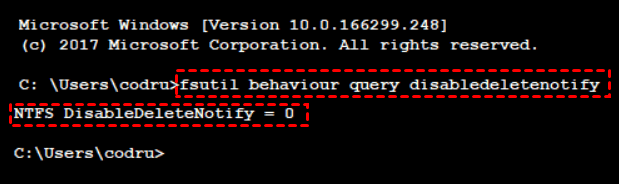
1. Type cmd in the start menu, select Command Prompt from the list, and choose Run as Administrator.
2. When the command window pop up, type “fsutil behavior query disabledeleteNotify” and hit Enter.
3. If TRIM is enabled, it will display “DisableDeleteNotify=0”. Else if the value “DisableDeleteNotify=1” is displayed that indicates the TRIM is disabled.
How to enable TRIM on SSD:
If TRIM isn’t enabled and you’d like to enable it, you can manually do so by running the following command in an Administrator Command Prompt window: fsutil behavior set DisableDeleteNotify 0.
Conversely, you can input fsutil behavior set DisableDeleteNotify 1 to tackle how to disable TRIM on SSD.
A more secure way to wipe SSD - AOMEI Backupper
You should know that when you manually delete data on an SSD can be easily recovered. Therefore, to maintain its performance and read/write speed, all you need is to securely erase the SSD on Windows 11 and then write the new data to the SSD later.
Besides making Windows 11 TRIM SSD, boosting the read/write speed of your SSD and extending its lifespan can also be done with the help of some professional SSD optimization software, such as AOMEI Backupper Professional. You can benefit a lot from its outstanding features:
❂ It supports wipe partition, unallocated space or the entire disk with different wiping methods, such as Fill sectors with Zero, Fill sectors with random data, DoD 5220.22-M, and Gutmann, which meets different levels of secure erasure.
❂ If you want to perform a bootable disk wipe or wipe the hard disk from BIOS, it is recommended to create bootable media in advance.
❂ It can help you not only erase SSDs without brand restrictions, such as secure erase Samsung SSD, Western Digital, Crucial, but also wipe USB drives and SD cards.
The following are the specific steps to wipe an SSD on Windows 11:
☎ Backup your important files if you still need them. You can backup SSD files in advance with the powerful backup feature of AOMEI.
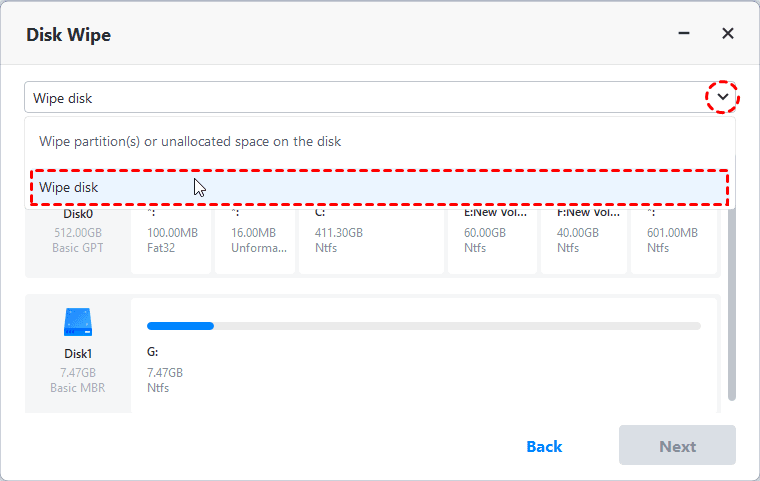
Step 1. Download AOMEI Backupper Professional, install, and open it. Then click Tools > Disk Wipe.

Step 2. In the Wiping Type window, select Wipe disk to delete all partitions and wipe all sectors on the disk and click Next.
Step 3. Select the SSD you want to wipe and click Next.
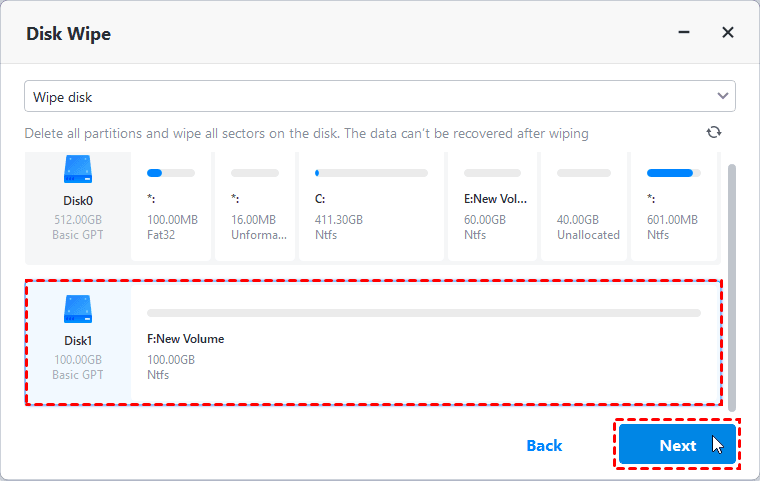
Step 4. Then you need to choose the wiping method and hit Start to begin the wiping process. You can choose safer wiping methods come with more passes and lower wiping speed. You are provided with 4 options: Fill sectors with Zero, Fill sectors with random data, DoD 5220.22-M, or Gutmann.

In the end
That’s all you can learn about how to TRIM SSD on Windows 11. While SSD TRIM command is a useful tool to improve the speed and lifespan of an SSD, it still has drawbacks. The most serious shortcoming is the inability to restore deleted files on an SSD drive with TRIM commands enabled, so it is a wise move to make a copy of your SSD regularly.
Luckily, AOMEI Backupper has an embedded feature named Disk Clone, which enables you to securely clone SSD to SSD on Windows 11 as a data recovery solution.

