4 Easy Ways to Fix Ghost windows in Windows 11
You’ll know the problem of Ghost box on Windows 11 and 4 easy ways to fix it as well as how to protect system security from problems. You can keep reading to learn the detailed information.
by Clytze Updated on October 24, 2022
User Case: Ghost Box on Windows 11
“I upgraded to Windows 11 and now I have this constant Ghost Screen on my laptop display. If I hover over it, is shows a processing blue circle that never stops. I have no idea what it is and it never goes away. Any screen area under it can not be accessed. Very annoying. How can I solve this problem? Any ideas? Thanks!”
If you are also experiencing this problem after upgrading to Windows 11, then you can read on to learn how to fix it. The article will provide 4 useful ways to help you. Each method includes a detailed graphic tutorial.
How to Fix Ghost windows in Windows 11
Next, the article will introduce 4 ways to fix this “Ghost box on Windows 11” problem. You can achieve the goal by restarting Windows Explorer, disabling MiniSearchHost, Updating or Reinstalling your displayer driver or Running DISM and SFC, etc. You can try these solutions in turn, and I believe there is always a way to help you solve this problem.
Fix 1. Restart Windows Explorer
The first workaround is by restarting Windows Explorer, which allows you to fix the problem without restarting your computer. You can remove the ghost window when it appears by following the graphic steps below.
Step 1. Click on the Search icon in Windows 11.
Step 2. Type Task Manager in the search field.
Step 3. Double-click on Task Manager to launch the app.
Step 4. Select the Processes tab.
Step 5. Right-click on Windows Explorer and select Restart.
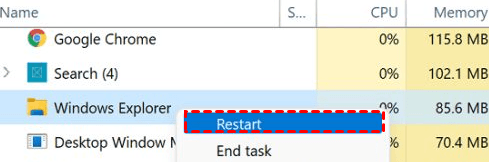
Note: If you don't see the Windows Explorer process, you may have one or more File Explorer windows still open. Close all open File Explorer windows, then look for the Windows Explorer process in the Task Manager.
Fix 2. Disable MiniSearchHost
Besides the first method, you can also adopt disabling MiniSearchHost to solve the Ghost problem on the Windows 11 home screen. And you just need to follow the steps below.
Step 1. Open the Task Manager.
Step 2. Click on the Processes tab.
Step 3. Locate the MiniSearchHost process.
Step 4. Right-click on it and select End task.
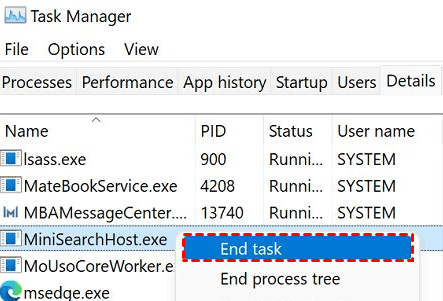
Note: If you can’t find MiniSearchHost on the Processes tab, click on the Details tab. You can find it there.
Fix 3. Update or Reinstall Your Display Driver
If you have tried the first two methods in turn, but the problem still persists, then you can try the next method, which is to update or reinstall your display driver. You can follow the steps below.
Step 1. Press Win + X to open the Device Manager.
Step 2. Expand the Display Adapters section.
Step 3. Right-click on your Display Driver and select Update driver.
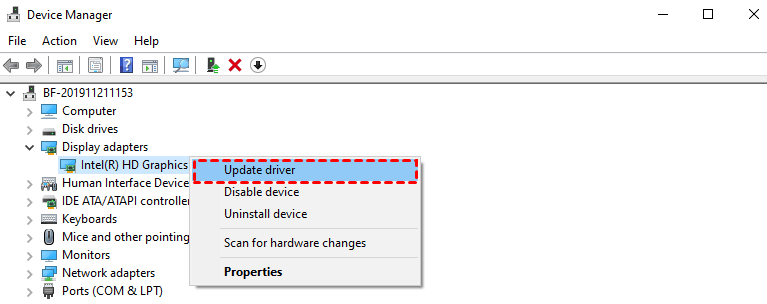
Step 4. If the ghost boxes are still there, right-click again on your Display Driver. Then select Uninstall device.
Step 5. Restart your computer to automatically reinstall the driver.
Fix 4. Run DISM and SFC
There is another way to fix this Ghost windows on Windows 11 problem, you can use System File Checker and Deployment Image Servicing and Management Tools to fix corrupt or missing system files. You can follow the steps below.
Step 1. Press Win + S to open the search box, and type cmd then click on Run as administrator to open Command Prompt.
Step 2. Run the following commands one by one, hitting Enter after each command
- dism /online /cleanup-image /restorehealth
- sfc /scannow
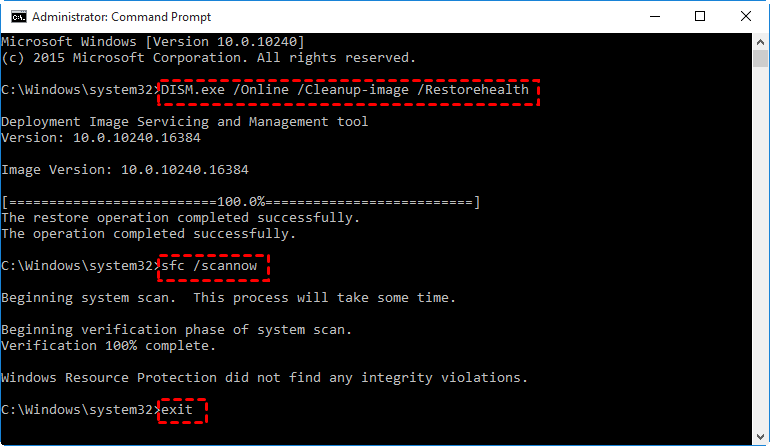
Note: When the scan process is finished, you can input exit and press enter to leave the Command Prompt window.
Step 3. Restart your computer, and check the results.
Protect System Security from Problems
When a Windows 11 ghost window appears, anything behind it is inaccessible, including icons, text, and buttons. Then you can't use your computer normally. After you have fixed the problem through the above methods, it is recommended to back up your operating system regularly. This can effectively protect the security of the system. Even if you encounter damage to the operating system, or malware, inability to boot, drive failure, etc, you can quickly restore the system backup.
The free backup software AOMEI Backupper Standard can help you easily achieve the goal of regularly backing up your system. You can set different backup frequencies according to your needs. When you perform a scheduled backup, the software automatically selects the incremental backup method for you to improve backup efficiency and save disk space. You can choose to backup your system to different destination paths, and it also supports multiple Windows operating systems.
You can first download this software and install it, and then follow the graphic tutorial below to operate. If you are a Windows Server user, you can choose the AOMEI Backupper Server version.
Step 1. First open the software, click Backup and then select System Backup.

Step 2. The software will automatically select the system partition and boot-related partitions. So you only need to select a destination.

Step 3. Click Start Backup to backup system before upgrade.

Notes:
- Options: It allows you to write comments, choose compression levels and set email notifications for system backup.
- Schedule Backup: You can choose various backup frequencies such as Daily, Weekly, Monthly, Event trigger and USB plug in. The latter two features are supported by the Pro version.
- Backup Scheme: It provides different backup methods, and if you upgrade to the pro version, you can also enable automatic backup cleanup feature to save you disk space.
- Explore Image: If you just want to restore individual files or folders instead of the entire backup, you can mount the system image as virtual partitions with the Explore Image feature.
Summary
In Windows 11, the Search widget would sometimes get stuck and fail, causing a small "ghost" window to appear above the taskbar. When the ghost window appears, nothing behind it is accessible. This article introduces 4 ways to fix Ghost in Windows 11. You can try these solutions in turn, and I believe there is always a way to help you.
After you fix this problem, in order to avoid any subsequent problems that may cause damage to the system, it is recommended to use the free backup software AOMEI Backupper Standard to regularly back up the system. You can choose different backup frequencies and backup destination paths by yourself. It also supports multiple Windows operating systems.
If your system accidentally encounters any problems, you can use this system backup to quickly restore and use the system normally. In addition, it also provides a variety of backup functions to fully protect your computer security, including disk backup, file backup, and partition backup.