Easy and Quick: Save Sent Items in Shared Mailbox Office 365
How to save sent items in Microsoft 365 shared mailbox? You can use Microsoft 365 Admin Center or PowerShell to copy sent emails in shared mailbox.
By Maggie Updated on July 31, 2023
Quick navigations:
Overview of Shared Mailbox
A Shared Mailbox is a special type of mailbox that allows multiple users to access and use it for reading and sending emails. It provides a collaborative email solution, enabling a group of people to work together seamlessly using a single email address. With a Shared Mailbox, team members can efficiently send, view, monitor, and respond to emails in real-time, ensuring rapid communication and quick response rates.
One important aspect of a Shared Mailbox is that when users reply to emails from the mailbox, the sender's email address is that of the Shared Mailbox, not the individual user's. This ensures consistent and uniform communication, as all responses are sent from the same email address, representing the team or department responsible for handling the emails.
Nowadays, more and more users benefit from Mailbox due to mainly the below advantages:
- Provide a single point of contact for everyone outside the company.
- Contact lists and shared calendars can be shared.
- Shared mailboxes reduce clutter and extra storage space as a single mailbox.
- Promotes cooperation and transparency among members.
- Reduced duplicate and missed emails.
Things you need to know: Who can Send Messages from a Shared Mailbox?
Shared mailbox delegates have the ability to send emails using permissions like 'send as' or 'send on behalf,' which are assigned to them. However, a challenge arises when a delegate sends an email from the shared mailbox as it gets stored in their personal sent items folder, rather than the shared mailbox's sent items folder. Consequently, other delegates are unable to determine who sent specific replies to emails. To resolve this issue and ensure transparency, administrators can enable specific settings in the shared mailbox, allowing all delegates to view sent emails.
How to save sent items in shared mailbox sent items folder
Option 1. Save sent items in single shared mailbox with PowerShell
Step 1. Using Exchange PowerShell, then use the PowerShell commands below to save sent items in shared mailboxes automatically.
Step 2. Run the below command to enable copy items sent as this mailbox for a single shared mailbox. You can type the name or email address between quotation marks.
Set-Mailbox "[email protected]" -MessageCopyForSentAsEnabled $true
Run the below command to copy items sent on behalf of this mailbox for a single shared mailbox.
Set-Mailbox "[email protected]" -MessageCopyForSendOnBehalfEnabled $true
You can also enable both features for a single shared mailbox in one command with PowerShell. Namely, enable copy items sent as and on behalf of a single shared mailbox with the command below.
Set-Mailbox "[email protected]" -MessageCopyForSentAsEnabled $true -MessageCopyForSendOnBehalfEnabled $true
Step 3. Similarly, you can save sent items on all shared mailboxes with a single command with PowerShell. However, We will first show you how to enable each one of the features for all shared mailboxes in Microsoft 365. Then you can enable both features in one command: copy items sent as and on behalf of all shared mailboxes.
You can copy items sent as for all shared mailboxes in one command shown below.
Get-Mailbox –ResultSize Unlimited -RecipientTypeDetails Sharedmailbox | Set-Mailbox -MessageCopyForSentAsEnabled $true
Run the command below to enable the feature copy items send on behalf of all shared mailboxes in Microsoft 365.
Get-Mailbox –ResultSize Unlimited -RecipientTypeDetails Sharedmailbox | Set-Mailbox -MessageCopyForSendOnBehalfEnabled $true
Enable both features for all the shared mailboxes in one command.
Get-Mailbox –ResultSize Unlimited -RecipientTypeDetails Sharedmailbox | Set-Mailbox -MessageCopyForSendOnBehalfEnabled $true -MessageCopyForSentAsEnabled $true
Now you have successfully save sent mails in shared mailbox.
Option 2. Save via Admin center
Step 1. Login to Microsoft 365 admin center.
Step 2. On the navigation pane, expand Team & Groups and choose Shared mailboxes.
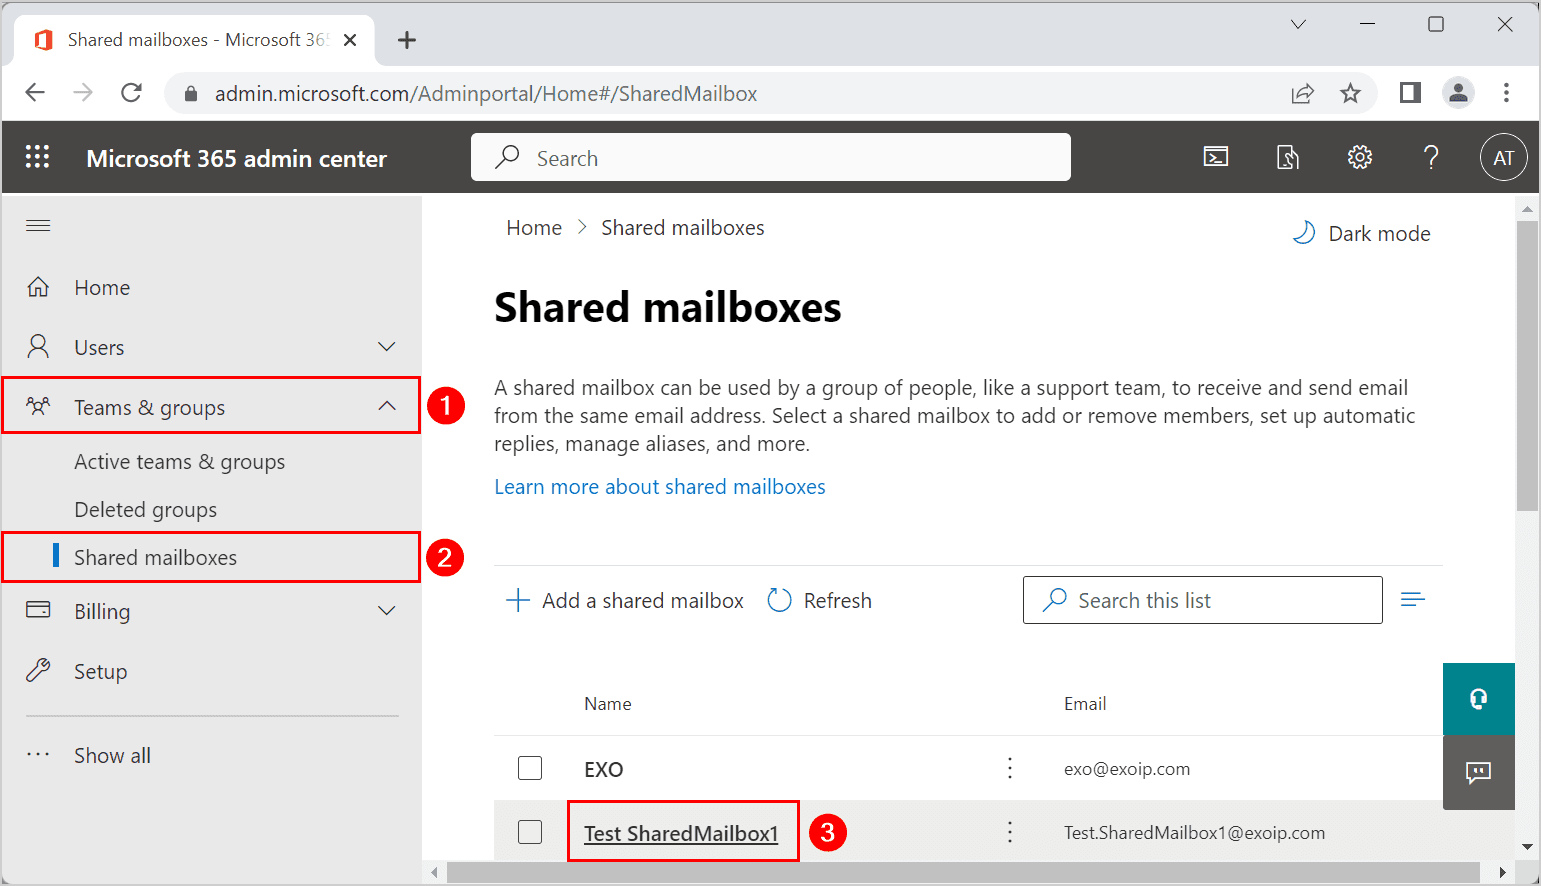
Step 3. Click on the shared mailbox you want to change.
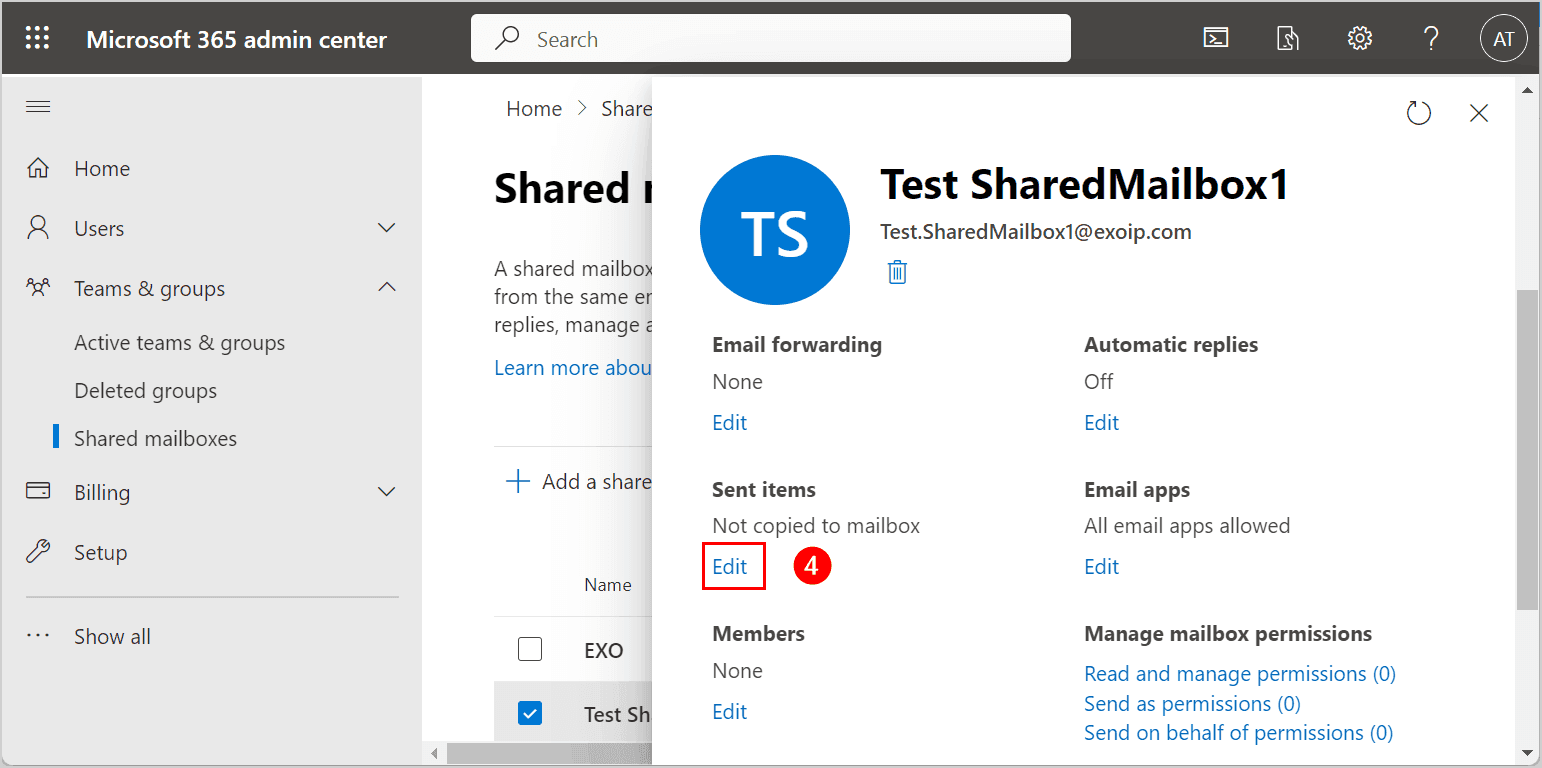
Step 4. Scroll down to Sent items and click on Edit.
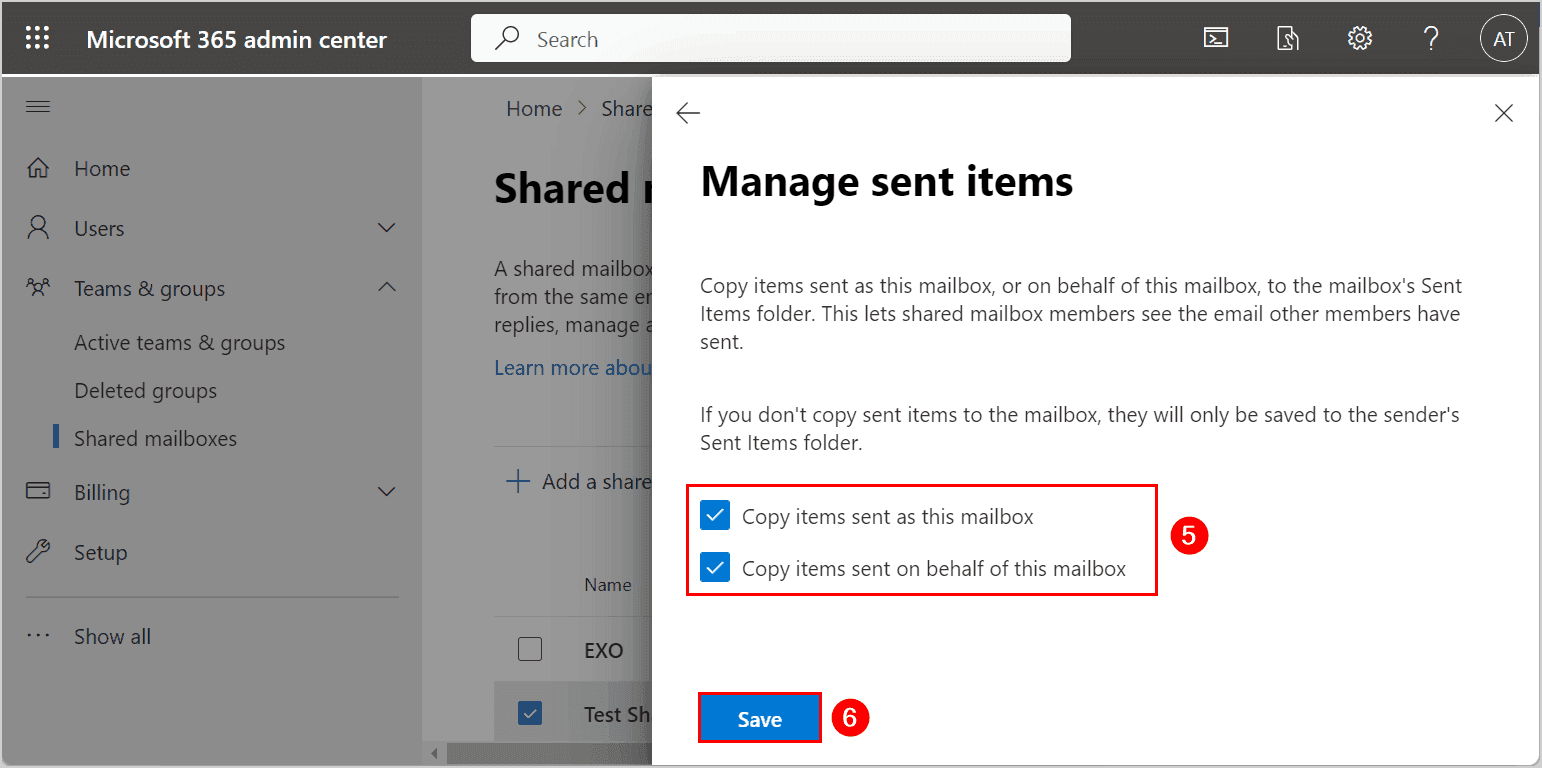
Step 5. Select both boxes:
Copy items sent as this mailbox
Copy items sent on behalf of this mailbox
Step 6. Then choose Save.
Further reading: Backup shared Mailbox via professional email backup software
We need to mention that since shared emails are accessible to multiple people, careless human-caused errors can be made. In order to avoid unnecessary mistakes, another feasible and easy way you can consider is professional and reliable email backup software, for example, AOMEI Backupper Professional. It is compatible with all Windows PC operating systems, including Windows 11/10/8.1/8/7/XP/Vista. If you are a server user, please upgrade to AOMEI Backupper Server for compatibility concerns.
☛This software allows you automatically backup your sent items in shared mailbox via its scheduled Backup utilities.
☛What’s more, you can save your email backups to various destination, such as external hard drive, USB drive, network or NAS device, cloud drive, etc.
☛Also, It provides full backup, incremental and differential backup, the latter two methods can help you save backup time and disk space, thereby improving backup efficiency.
☛Notably, this software can support various emails like Gmail, Outlook Mail, Yahoo! Mail, iCloud, Zoho Mail, HushMail, GMMX Mail, Hotmail, etc. to respond to your customized needs.
Here is the full email backup tutorial for you, before you start, please download AOMEI Backupper via the below link.
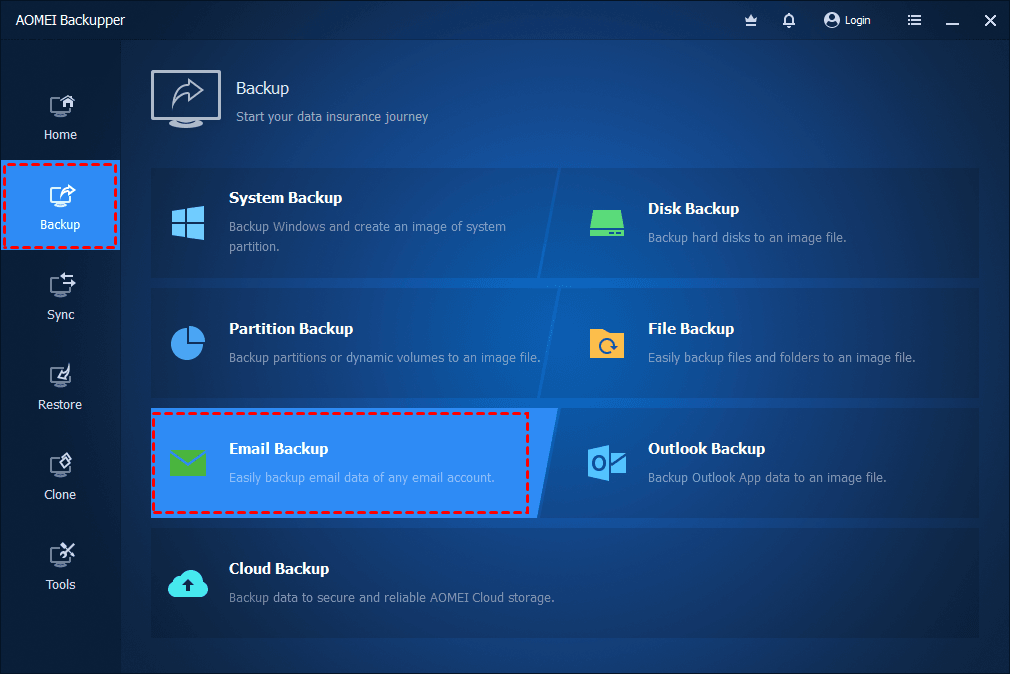
Step 1. Launch this software, select Backup and then choose Email Backup.
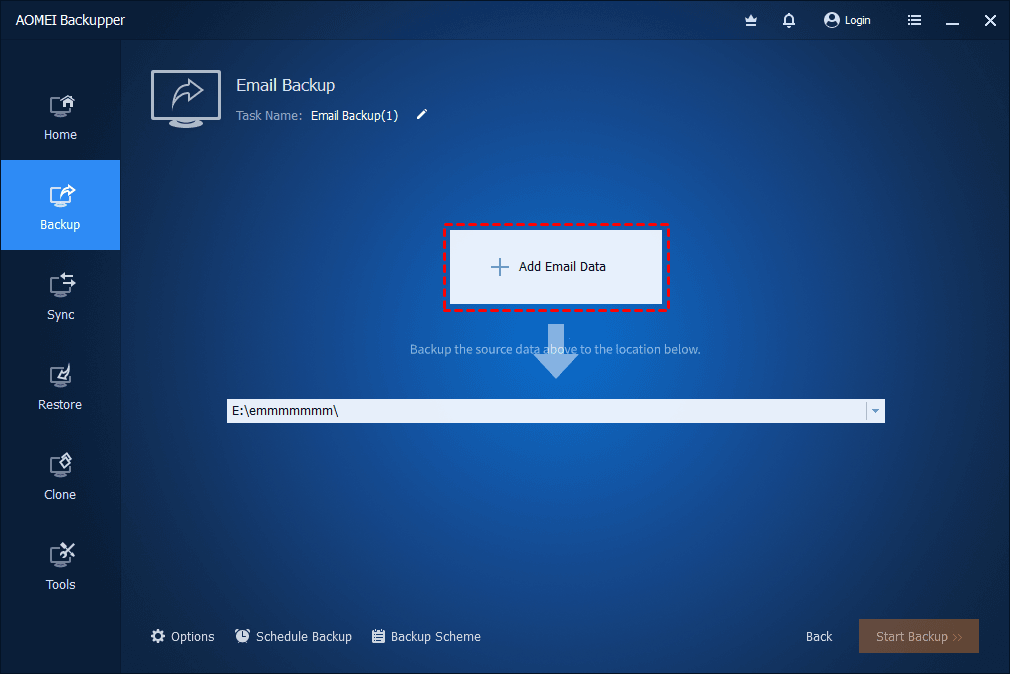
Step 2. Then click Add Email Data.
Step 3. Then click Add Mailbox, then fill in your according shared mailbox account and password. Then confirm by choosing OK.
Step 4. Then you need to select or type the destination path to store the backup image file.

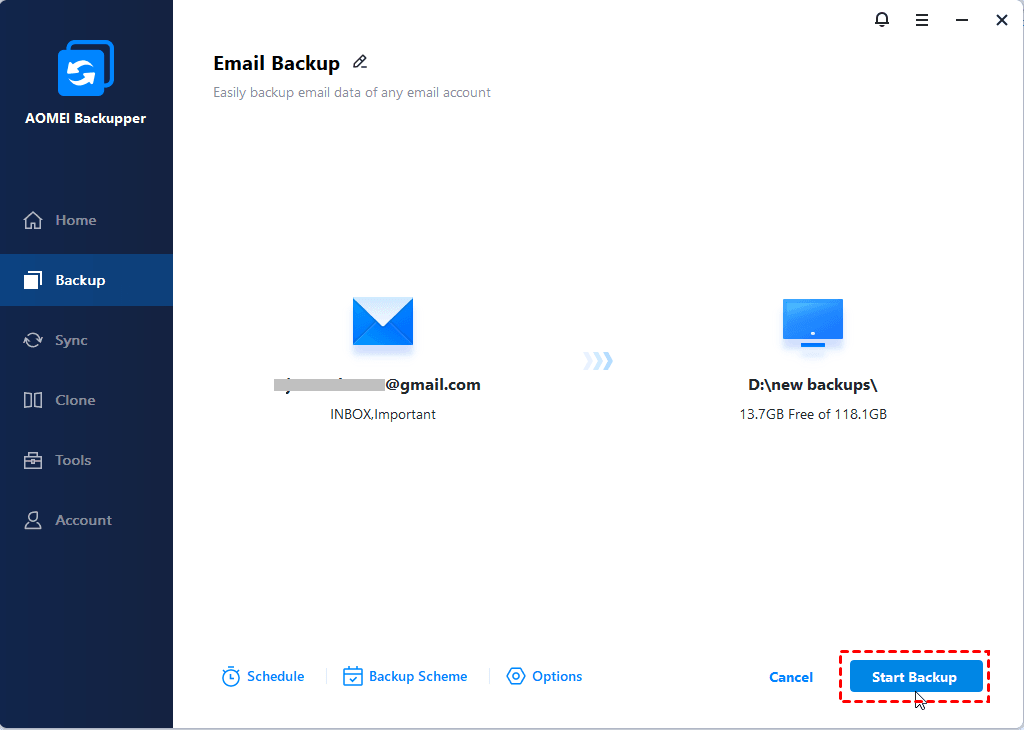
Step 5. Then choose Start Backup button to begin the backup process.
Final words
Save sent items in shared mailbox office 365 can be reached by using Powershell and Admin center. You are free to choose one of the two methods. What’s more, we suggest you use one of the best email backup software----AOMEI Bakcupper to backup your shared mailbox in case of email loss. You can still manage your emails in the shared mailbox seamlessly and without any data loss fear.

