
Easiest Way to Recover Data after Initializing Disk
How to recover data after initializing disk? FastRecovery can be your ideal choice, and it is a important part in initializing disk without losing data.
By Ivy / Updated on April 30, 2026
What does initialize disk mean?
Initializing disk is a process of building or rebuilding MBR (Master Boot Record), the first sector of a hard drive, which stores information to load logical partitions, even system files on it if there are.
During the disk initialization process, the Disk Management or third-party tool will write or rewrite the 0 sectors in the MBR partition table. However, only initializing the disk won't make it usable again. You need to further partition and format the drive.
Does initialize disk erase data?
Typically, Windows will ask you to initialize the disk in the following two situations. And there is no data loss if you initialize a new disk. But if the disk becomes not initialized suddenly, you will lose your data, as you need to partition and format the disk after initializing. If you don't partition the disk after initializing, you cannot use it for storage.
#1: You install a brand new disk on the current computer and doesn’t show up in File Explorer.
#2: Your old disk shows "Unknown, Not Initialized" suddenly.
So it is necessary to recover data after initializing the disk and save it to a new location.
How to recover data after initialize disk effectively
If the disk you initialized is an old disk that suddenly became uninitialized, you need to recover data as soon as possible. The easiest way is to use a data recovery software like FastRecovery, which enables you to retrieve data from all data loss scenarios in Windows 11/10/8/7/Vista.
Easy steps to recover data from initialized disk via FastRecovery
FastRecovery is a professional data recovery software that supports recovering all file types like photos, videos, and other files. And thanks to its intuitive interface, you can restore your data effortlessly in simple steps.
Now, you can download this software and follow the instructions below to recover data after formatting the hard disk.
-
Don't download and install FastRecovery to the old hard drive where you store deleted files, which may cause data overwriting.
-
Any newly added data or disk formatting can overwrite data. Please avoid these operations after deletion.
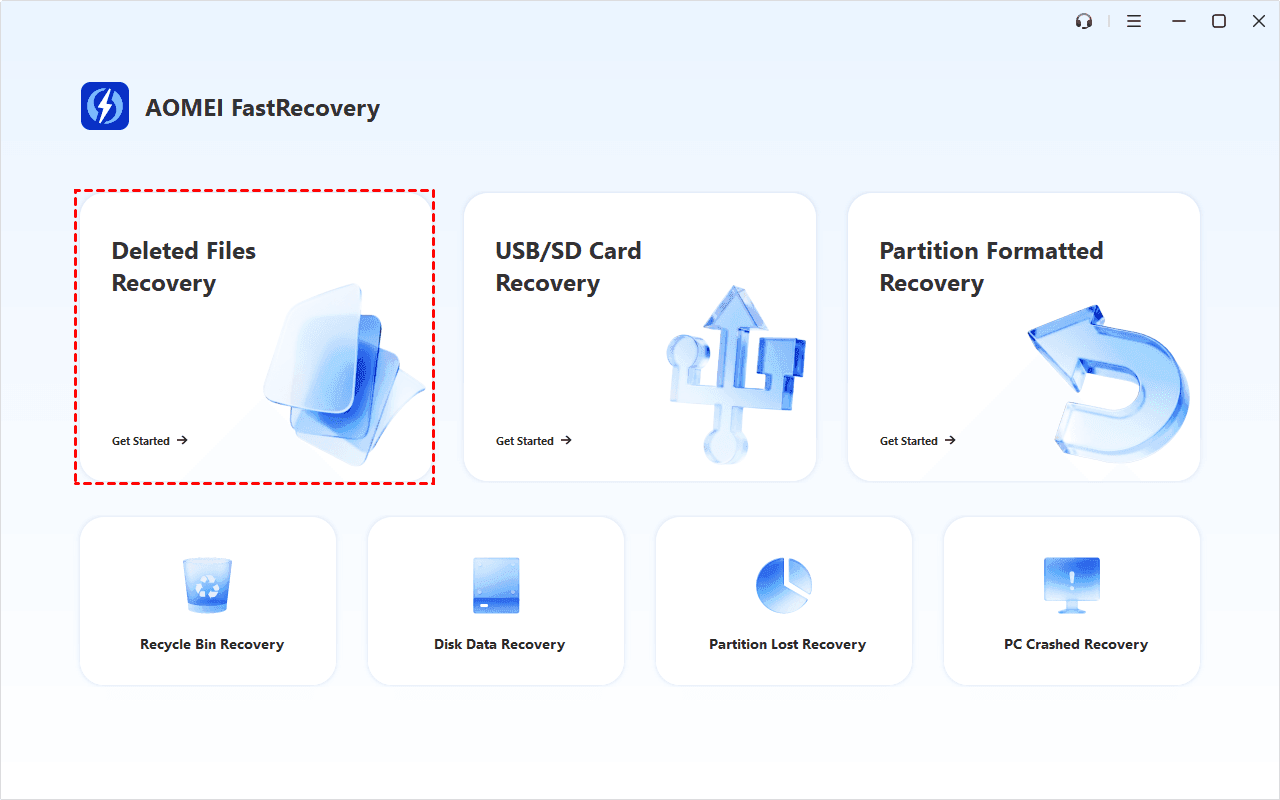
Step 1. Connect the initialized disk to your computer and make sure it can be detected by your Windows computer. Install and launch this software. Then, click Deleted Files Recovery.
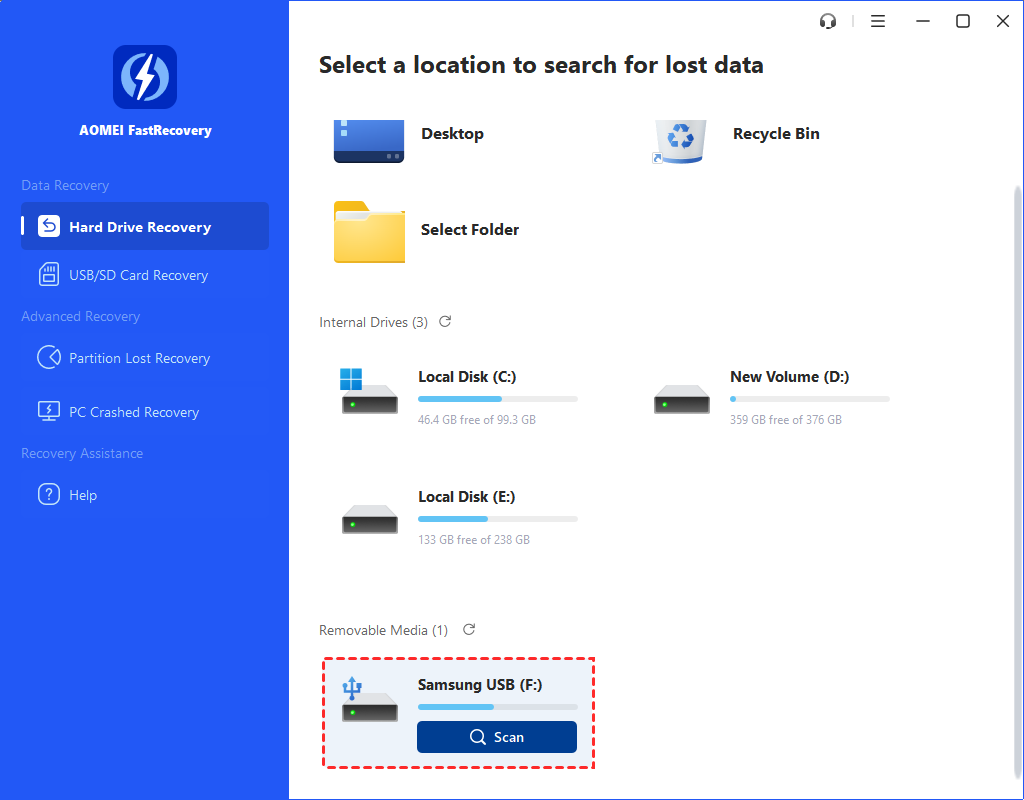
Step 2. Select the partition or disk you want to scan. Click the Scan button.
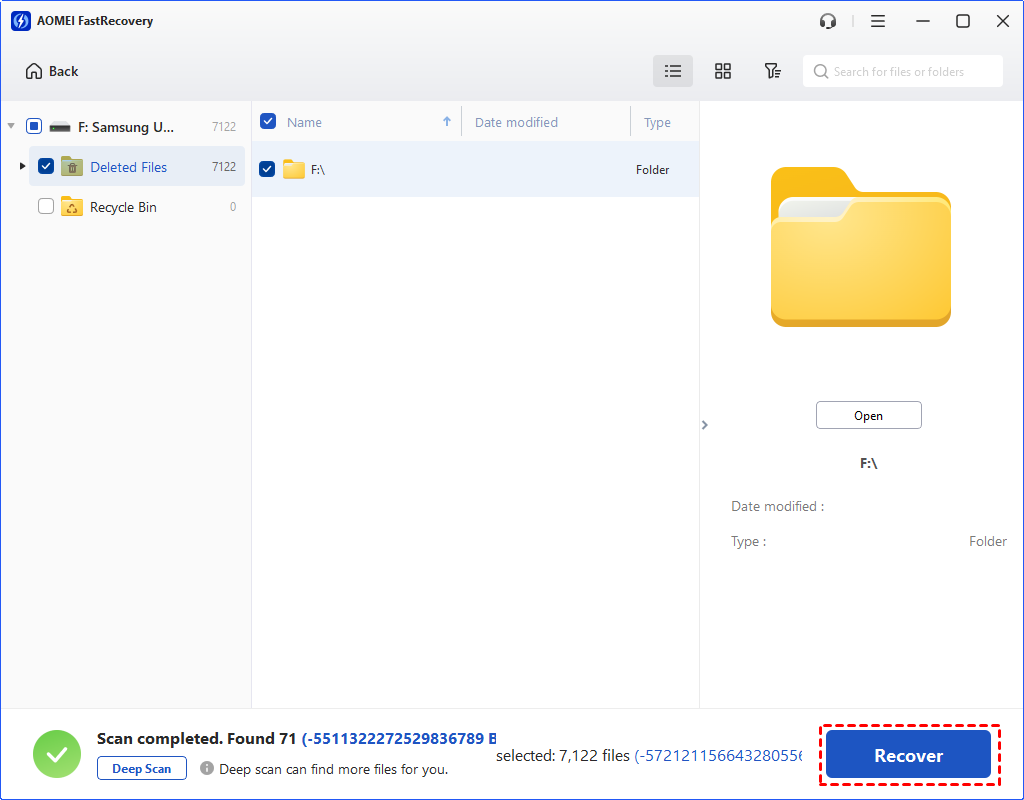
Step 2. FastRecovery will scan it at a fast speed and display all recoverable data. You can select files by Type (default) or Path, and combine them with options to sort, filter, search, and preview files.
- Sort: Sort files by name, date modified, type, etc., on the right panel.
- Filter: Specify the Type/Size (from Less than 512KB to 1GB above)to target your search.
- Search: Type the filename or extension in the search box to locate deleted files precisely.
- Preview: Double-click files to preview formats such as wav, ico, jpg, png, bmp, jpeg, tif, svg, gif, mp4, mp3, txt, xlsx, pdf, ini, docx, etc.

Step 3. Select the desired data and click “Recover” to save it. Please choose a NEW location to save the recovered data. Otherwise, the data will be overwritten.
The free edition only supports 500MB of data recovery. To recover more data, please upgrade to advanced editions.
How to initialize disk without losing data
Sometimes, if you are asked to initialize a disk, which is unavoidable, usually, at this point in time, the disk has become uninitialized. So how to initialize disk without losing data?
In fact, the disk initialization process only affects the 0 sectors in MBR, which will not erase your data. However, further partitioning and formatting will. To be sure your data is safe, you can choose to backup the entire disk just in case of secondary damage and then initialize the disk, recover data, as well as partition the disk for data storage.
Part 1: Backup not initialized disk
To backup the not initialized disk, you need a reliable backup utility, which supports backing up disk sector by sector. AOMEI Backupper Standard is such software you can use and it will keep the disk as it was. If you fail to recover data, you still can restore disk image and try again. It applies to Windows 11/10/8.1/8/7/XP/Vista.
Please download it and backup the not initialized disk:
Open AOMEI Backupper Standard after installing and select Disk Backup under the Backup tab. Select the not initialized disk and a new one as source and destination disk.

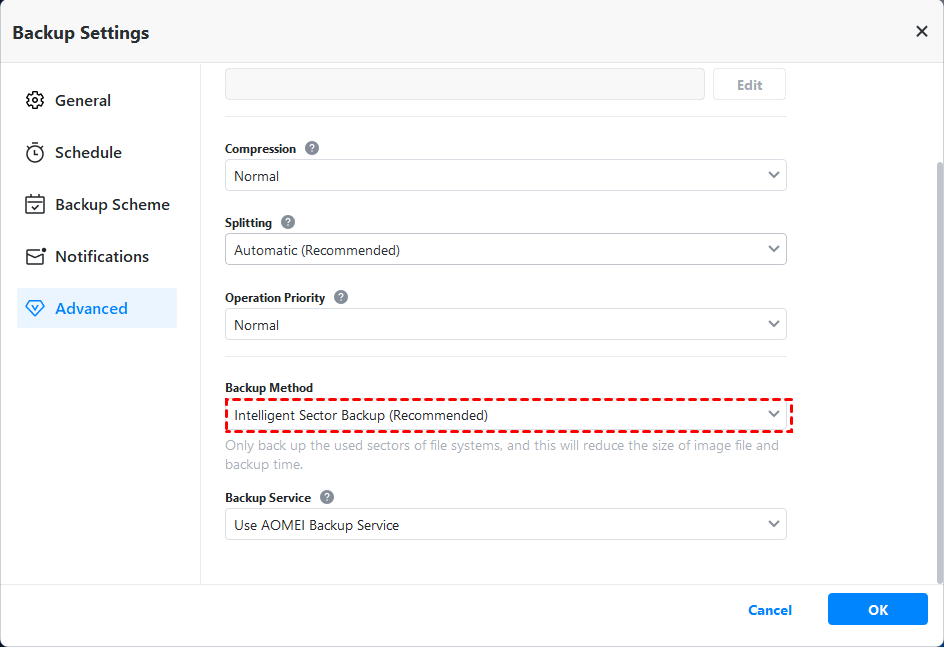
Before clicking Start Backup, select Options > Backup Mode > Intelligent Sector > Make an exact backup and click OK to confirm you want to backup disk sector by sector.
For detailed steps, you can refer to performing disk backup in Windows 10.
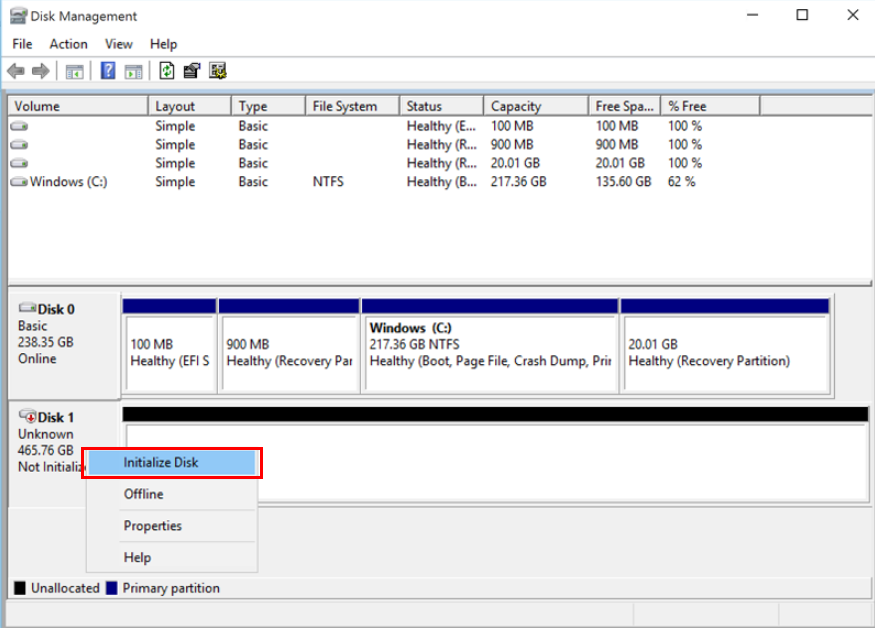
Part 2: Initialize disk in Disk Management
Press Windows + R to open the Run window, type diskmgmt.msc and click OK to open it. Right-click the not initialized disk and select Initialize Disk, then partition style (GPT or MBR), click OK to initialize disk.
Part 3: Recover data after initializing disk via FastRecoveryy
For this part, you need to use professional data recovery software - FastRecoveryy, and you can follow the steps in the previous section. In most cases, you can recover your data from initialized disk.
Note that you need to restore data to a new location, otherwise, you will lose data after partitioning the disk. If fail to recover data, you still can restore disk backup created previously and try again.
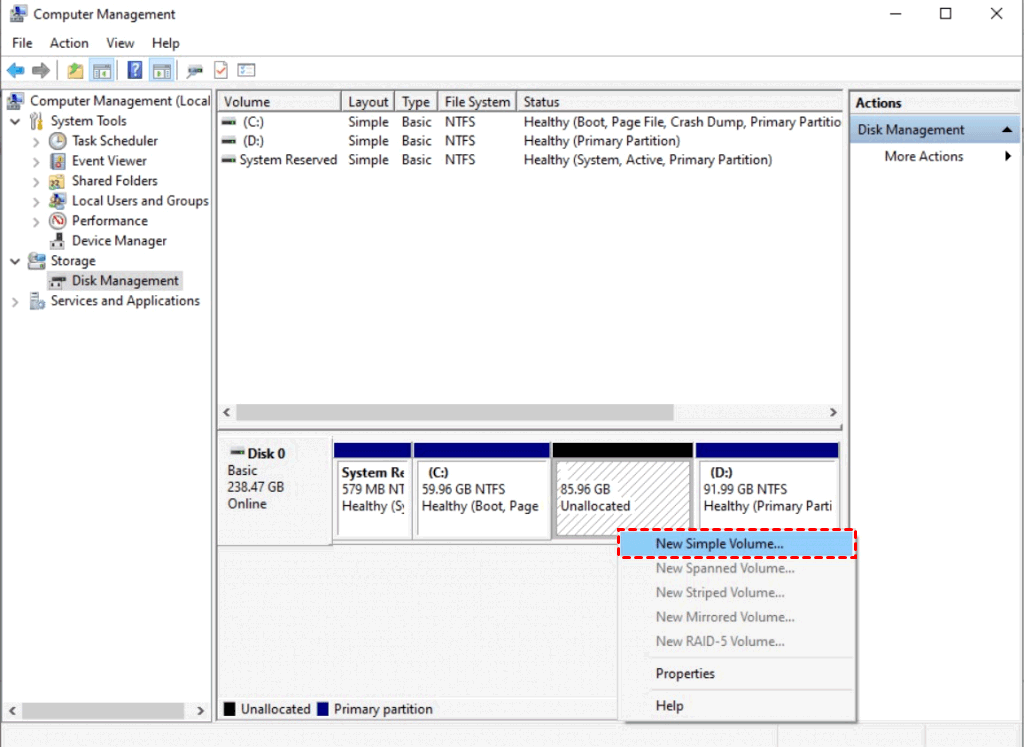
Part 4: Create a new partition with Disk Management
Open Disk Management, right-click the unallocated space on the disk, and select New Simple Volume... to access the New Simple Volume Wizard. Click Next and then select disk size, drive letter and file system (NTFS or FAT32), click Next and Finish.
Conclusion
No matter what reason you initialize the disk, you may want to learn an easy way to recover data after initializing disk. Right here, the easiest way! Also, this article still offers you the way to initialize disk without losing data step by step. So you don't need to worry about data loss whether you initialize the disk or not.
To prevent disk become not initialized again, it's suggested to create a disk backup regularly, such as, daily, weekly, monthly. If you are worried backup disk full issue, you can use its backup scheme feature in the advanced edition, such as AOMEI Backupper Professional, which has the ability to backup only changed files or delete old backup automatically. For server users, please turn to AOMEI Backupper Server.

