Here are 5 Ways! Fix BSOD Error 0x00000133 in Windows 10
Are you experiencing BSOD error 0x00000133 when booting your computer? Worry not, here are 5 possible ways to fix BSOD error 0x00000133 and recover your data using FastRecovery.
By Lori / Updated on March 9, 2026
Have you ever found yourself staring at the ominous Blue Screen of Death (BSOD) with the perplexing error code 0x00000133 or DPC Watchdog Violation 0x00000133? If so, you're not alone. This guide is designed to show you how to fix BSOD error 0x00000133 with 5 feasible ways, providing a comprehensive understanding, troubleshooting steps, and introducing FastRecovery as a data recovery solution.

What Is Error Code 0x0000133?
The Blue Screen of Death is a sight no computer user wants to encounter. Error code 0x00000133, in particular, demands our attention due to its critical nature.
Common Causes of BSOD Error 0x00000133
To effectively resolve this error, let's first explore the common causes:
Driver Conflicts: Outdated or incompatible drivers can cause this error. Make sure all your drivers are updated.
Hardware Issues: Loose or faulty hardware can trigger BSOD errors. Check and secure all hardware components like RAM and graphics cards.
Memory Problems: Faulty RAM can lead to BSOD errors. Use built-in tools to diagnose and fix memory issues.
System Overheating: Overheating can make your system unstable. Ensure your computer stays cool to prevent this.
How to Fix BSOD Error 0x00000133 in Windows 10
This part provides a detailed guide on how to fix the bugcheck 0x00000133 error using 5 methods such as changing the SATA AHCI controller driver, rolling back drivers, performing system file checks, conducting disk repairs, and restoring Windows 10.
Method 1: Change SATA AHCI Controller Driver
Step 1: Open Device Manager
First, press Windows + X and select "Device Manager" from the menu.
Step 2: Locate the SATA AHCI Controller
In Device Manager, expand the "IDE ATA/ATAPI controllers" section. Right-click on the "Standard SATA AHCI Controller" and select "Update driver."
Step 3: Search Automatically for Updated Driver Software
Choose the option to "Search automatically for updated driver software." If an update is found, follow the prompts to install it. If not, proceed to the next step.
Step 4: Browse My Computer for Driver Software
Select "Browse my computer for driver software," then "Let me pick from a list of available drivers on my computer." Choose a compatible driver, preferably the "Standard SATA AHCI Controller," and click "Next" to install it.
Step 5: Restart Your Computer
After the driver installation is complete, restart your computer to apply the changes. This can often resolve the BSOD error if it was caused by a driver issue.
Method 2: Rollback Your Driver
Step 1: Open Device Manager
Press Windows + X and select "Device Manager."
Step 2: Locate the Problematic Driver
Find the device driver that may be causing the issue (e.g., network adapter, graphics card). Right-click on it and select "Properties."
Step 3: Rollback the Driver
In the Properties window, go to the "Driver" tab and click on "Roll Back Driver." Follow the prompts to revert to the previous version of the driver.
Step 4: Restart Your Computer
Once the rollback is complete, restart your computer. This can resolve the error if it was caused by a recently updated driver.
Method 3: Fix System Files with SFC
Step 1: Open Command Prompt as Administrator
Press Windows + S, type "cmd," right-click on "Command Prompt," and select "Run as administrator."
Step 2: Execute the SFC Command
In the Command Prompt window, type sfc /scannow and press Enter. This command will scan and attempt to repair any corrupted system files.
Step 3: Wait for the Process to Complete
The scan might take some time. Once it’s done, it will display the results. If it finds any issues, it will automatically try to fix them.
Step 4: Restart Your Computer
After the scan completes, restart your computer. This can help resolve the BSOD error if it was caused by corrupted system files.
Method 4: Perform a Disk Check/Repair
Step 1: Open Command Prompt as Administrator
Press Windows + S, type "cmd," right-click on "Command Prompt," and select "Run as administrator."
Step 2: Execute the CHKDSK Command
In the Command Prompt window, type chkdsk /f /r and press Enter. You might be prompted to schedule the disk check at the next restart; type Y and press Enter.
Step 3: Restart Your Computer
Restart your computer to allow the disk check to run. This process can take some time, as it will scan and attempt to repair any issues found on your hard drive.
Step 4: Review the Results
Once the disk check is complete, review the results displayed on the screen. If any errors were fixed, this might resolve the BSOD error.
Method 5: Restore Windows 10
Step 1: Open Settings
Press Windows + I to open the Settings app.
Step 2: Navigate to Update & Security
Go to "Update & Security" and then select "Recovery."
Step 3: Choose the Reset Option
Under "Reset this PC," click "Get started." You will have two options: "Keep my files" and "Remove everything." Choose the option that suits your needs.
Step 4: Follow the Prompts
Follow the on-screen instructions to complete the process. This will restore your Windows 10 to its default state, which can resolve persistent issues like the BSOD error.
Step 5: Reinstall Necessary Software
After the reset is complete, you may need to reinstall some of your applications and drivers. Ensure to keep your system updated to prevent future errors.
How to Recover Data from a Computer with a Booting Problem?
Having trouble accessing your computer and worried about losing important data? If you've lost data due to the BSOD error, FastRecovery can be a lifesaver. It can recover data when computer won't boot. Additionally, the software allows you to create bootable media, enabling the operating system to run and facilitating the recovery of lost data with ease.
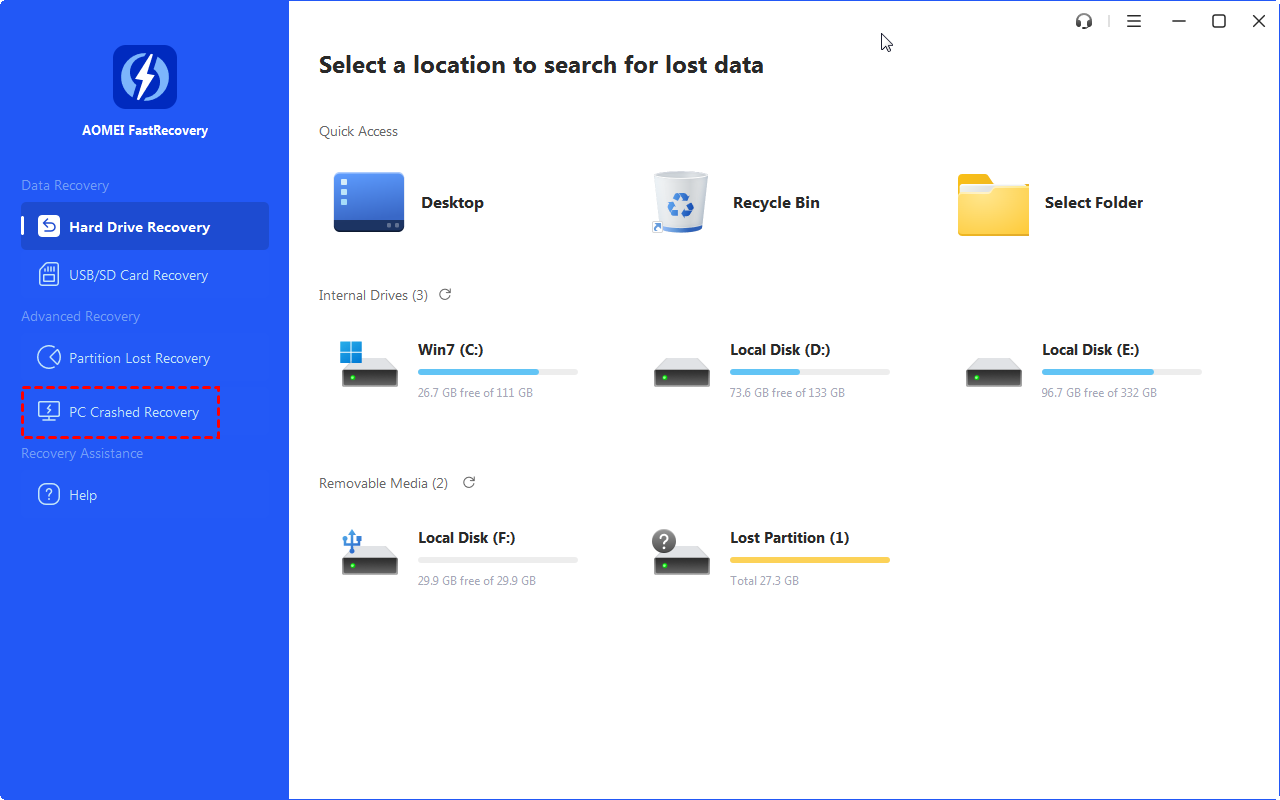
Step 1. Run FastRecovery on another working PC > click PC Crashed Recovery.
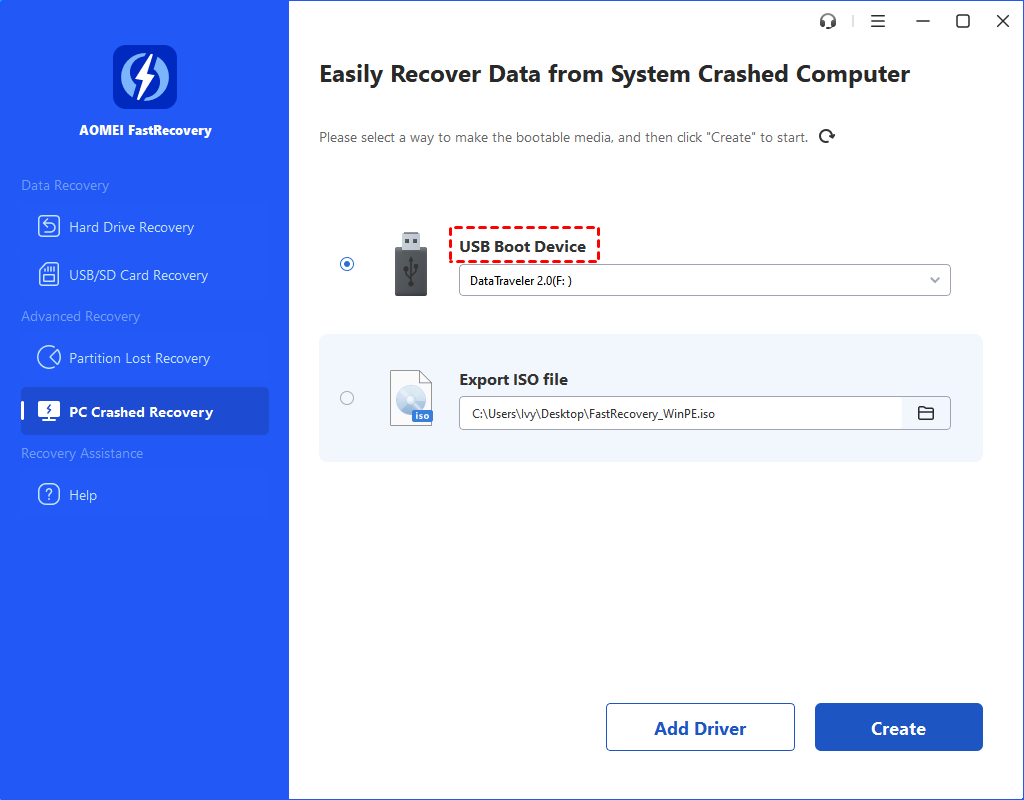
Step 2. Select a feasible way to create a bootable disk based on your needs > click Execute.
Creating a bootable disk grounded on Windows PE is achievable through three distinct methods.
- USB Boot Device: To create bootable USB media.
- Export ISO File: Once the ISO is generated, use a third-party burning utility to burn it. Alternatively, employ the ISO for virtual machine booting or burn it onto other devices.
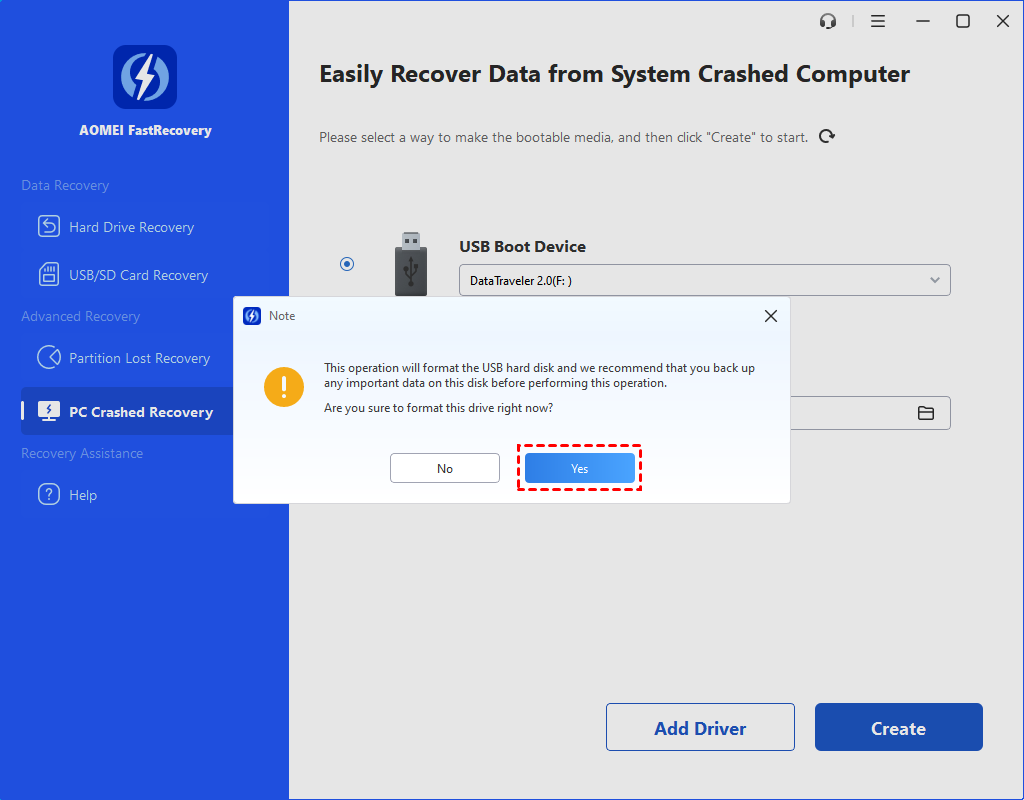
Step 3. After proceeding with the process, it shows a pop-up window reminding you to perform disk formatting. Please click Yes to continue.
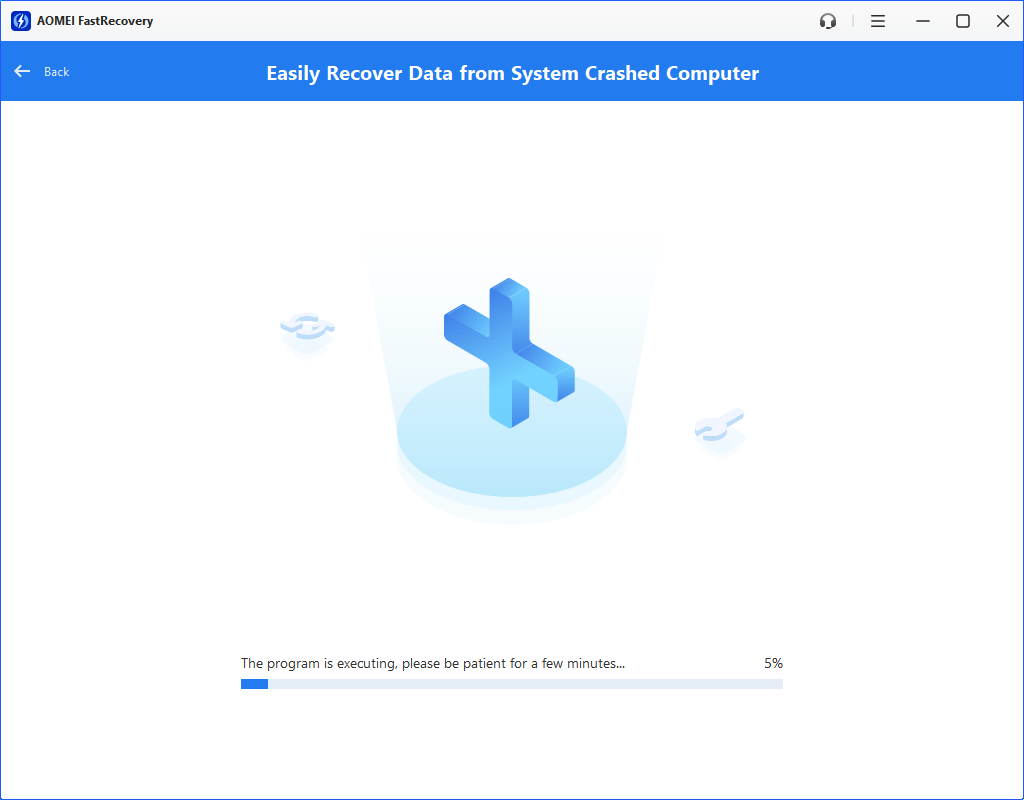
Step 4. It will take a few minutes to make a WinPE bootable USB drive. Please wait patiently. Upon completion, a success message will appear.
Step 5. Then, boot your computer from the bootable USB and recover data from a crashed system/PC.
- Connect the bootable disk to the PC that won't boot.
- Change your computer's boot sequence in BIOS. Typically, you can enter BIOS by restarting your computer and pressing F2 simultaneously.
- Set the PC to boot from "Removable Devices" (the bootable USB drive) instead of the Hard Drive. Press F10 to save and exit.
- After booting from the bootable disk, use FastRecovery to scan and recover lost files.
Other Solutions to Fix BSOD Error 0x00000133
Armed with an understanding of the potential causes and the introduction of FastRecovery, let's now delve into a detailed step-by-step resolution process for Blue Screen of Death error 0x00000133.
1. Update Drivers
Outdated or incompatible drivers are often culprits behind BSOD errors. Regularly updating your device drivers ensures optimal system performance and guards against error 0x00000133. Here's a detailed walkthrough:
1. Identify Outdated Drivers: Access the Device Manager in Windows and identify any devices with outdated or incompatible drivers.
2. Visit Manufacturer Websites: Visit the official websites of your hardware components to download the latest drivers. Ensure compatibility with your operating system version.
3. Use Automatic Driver Update Tools: Consider using automatic driver update tools that can scan your system and update drivers with minimal effort.
2. Check Hardware Connections
Loose or faulty hardware connections can trigger BSOD errors. Verify that all components are securely connected, addressing any issues with RAM, graphics cards, or other peripherals. Follow these steps:
1. Power Off and Unplug: Power off your computer and unplug it from the electrical outlet to ensure safety during hardware checks.
2. Inspect Connections: Open your computer case and inspect connections for RAM modules, graphics cards, and other peripherals. Ensure they are securely seated in their respective slots.
3. Reseat Components: Gently reseat components that may have become loose. Ensure proper alignment and secure attachment.
3. Run Memory Diagnostics
Memory problems are notorious for causing BSOD errors. Running built-in memory diagnostics tools can help identify and resolve issues related to RAM. Follow these steps:
1. Access Windows Memory Diagnostic: Open the Start menu, type "Windows Memory Diagnostic," and select the corresponding result.
2. Schedule a Memory Check: Choose the option to restart your computer and check for memory problems. Windows will automatically run a memory diagnostic during the reboot.
3. Review Results: After the computer restarts, review the results of the memory diagnostic. If issues are detected, follow on-screen instructions to address them.
4. Monitor System Temperature
Overheating can lead to system instability and trigger BSOD errors. Keep tabs on your system's temperature and ensure proper cooling to prevent error 0x00000133. Here's how:
1. Use Monitoring Software: Install and use temperature monitoring software to keep track of your CPU and GPU temperatures.
2. Check Cooling Systems: Ensure that fans are functioning correctly, and cooling systems such as heat sinks are clean and free of dust.
3. Optimize Airflow: Arrange components inside your computer case to optimize airflow. Consider adding additional fans if necessary.
Wrapping Up
In conclusion, understanding and resolving BSOD error 0x00000133 requires a systematic approach. By decoding its causes, implementing troubleshooting steps, and using FastRecovery to recover data when PC won't boot., you can regain control of your system and enjoy a more stable computing experience.
FAQs About BSOD Error 0x00000133
1. What is the primary cause of BSOD error 0x00000133?
The primary causes include driver conflicts, hardware issues, memory problems, and system overheating. Identifying and addressing these factors are crucial for resolving the error.
2. How can I update my drivers to fix BSOD error 0x00000133?
You can update your drivers by opening the Device Manager, locating the problematic drivers, and selecting "Update driver" to search for and install updates.
3. How frequently should I check for driver updates to prevent BSOD issues?
Regularly checking for driver updates is recommended to ensure optimal system performance and prevent BSOD errors. Aim for monthly updates to stay proactive and address potential compatibility issues with the latest software releases.
4. What should I do if a clean boot resolves the BSOD error?
If a clean boot resolves the error, you can re-enable services and startup items one by one to identify the specific program causing the issue.