How to Create Bootable USB by Rufus on Windows 11
Rufus helps you to create a bootable USB on Windows 11, and if you are seeking an easier way to do that, then don’t miss the article!
By Maggie Updated on August 15, 2023
Rufus overview
If you want to do a fresh installation of Windows 11 on your computer using Rufus, the simplest method is to make a bootable USB drive. Rufus is a handy tool that assists in creating this special USB drive on your computer.
Rufus is a type of software that's useful when you want to create or set up a bootable USB flash drive. This is especially handy when you need to install an operating system like Linux, UEFI, or Windows on a computer that doesn't have any operating system installed.
If you want to create bootable USB via Rufus Windows 11, now follow to read!
How do I create a Windows 11 bootable USB using Rufus?
To create a bootable USB Windows 11 Rufus, you need to connect an empty USB flash drive with 8GB of space, and then please follow this below tutorial.
Step 1. Open Rufus website and download the latest version.
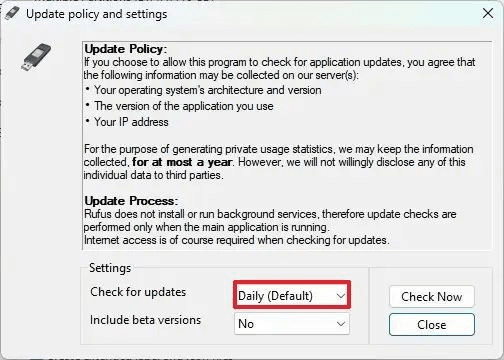
Step 2. Click on the Settings button at the bottom of the page once you have successfully installed it on your PC.
Step 3. Under the Settings section, use Check for updates drop-down menu and choose Daily option. Click Close button. And then continue with Close again.
Step 4. Now open Rufus again.
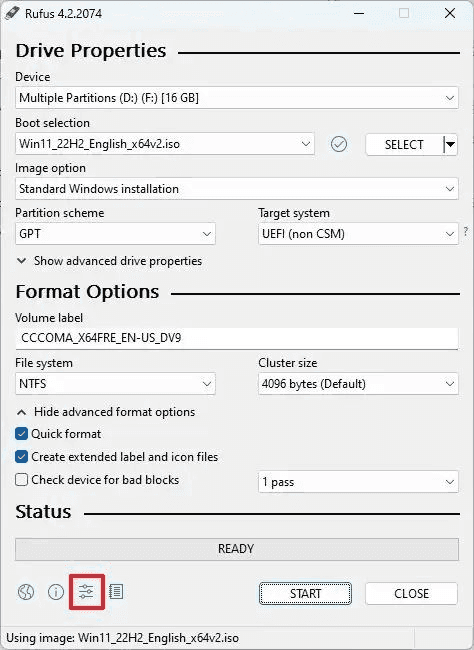
Step 5. (Optional) Under the Device section, use the drop-down menu and select the USB flash drive to create the installation media.
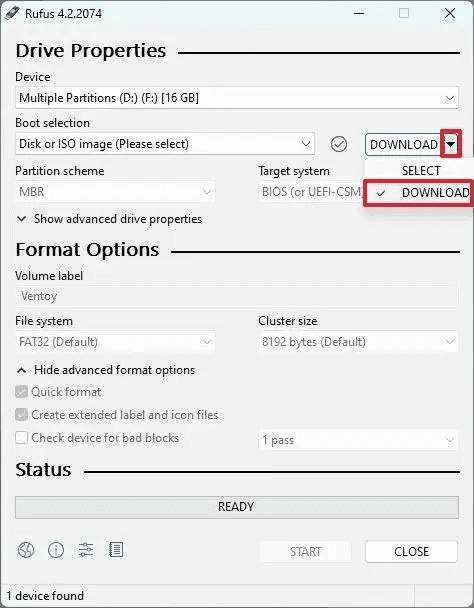
Step 6. Under the Boot selection section, use the drop-down menu and select the Disk or ISO image option.
Step 7. Click the down-arrow button (on the right side) and select the Download option.
Step 8. Click the Download button. And then select the Windows 11 option follow by click on Continue button.
Step 9. Under the Release section, select the 22H2 or 22H2 option to choose Windows 11 and choose Continue.
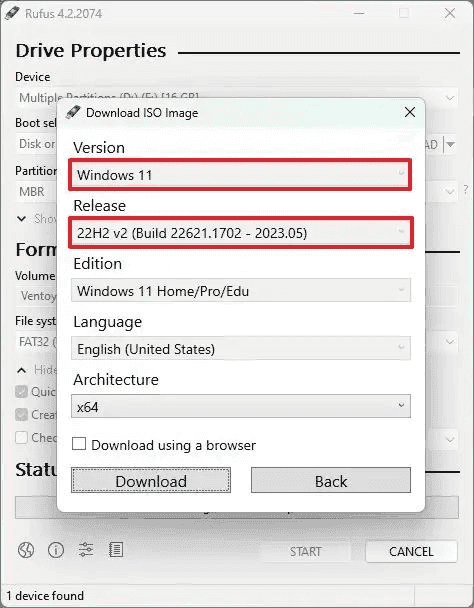
Step 10. Select the Windows 11 Home/Pro/Edu option and go on with Continue.
Step 11. Now specify the language of Windows 11 and then continue.
Step 12. Select the operating system architecture. (Windows 11 is only available in x64 architecture.)
Step 13. Click the Download button.
Step 14. Then you need to select the location to save the Windows 11 ISO file automatically.
Step 15. Under the Image option setting, select the Standard Windows 11 Installation option.
Step 16. Click the Start button.
Step 17. Clear the Remove requirement for 4GB+ RAM, Secure Boot and TPM 2.0 option.
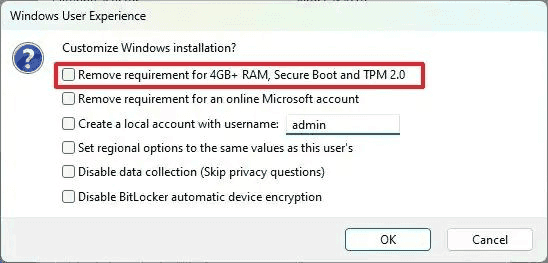
♥Note: you can check other options depending on your own needs.
Step 18. Click the OK button.
Once you complete the steps, you can successfully install Windows 11 using Rufus.
Bonus tip: easier way to create a bootable USB on Windows 11
Now you have know the whole process of Windows 11 bootable USB Rufus. To be honest, Rufus is a good bootable USB helper, indeed. However, we have to admit that it is too complex for non-technical users. Luckily, we have an easier way for you to create a bootable USB on Windows 11, a proven-efficient software AOMEI Backupper is named a lot.
☞It enables you to create Windows PF boot disk or Linux boot disc.
☞You can use USB flash drive, CD or DVD as bootable media. You can also export AOMEI ISO file as necessary.
☞It supports all editions of Windows 11/10/8.1/8/7/Vista/XP.
Here I will show you how to make a bootable USB flash drive using this software.
♥Preparations:
-Before your start, please download and install this software on your PC via the below link.
-Prepare a USB drive and connect it to your PC.
Step 1. Launch AOMEI Backupper. Select Create Bootable Media option under the Tools tab.

Step 2. In the pop-up window, choose Windows PE - Create bootable disc based on Windows PE option (recommended), and then click Next.

♥Tip: You can also choose to create a bootable disk based on Linux kernel, but a Linux-based bootable media only allows you to use basic functions of AOMEI Backupper.
Step 3. To create a bootable USB drive, you just need to select USB Boot Device as the screenshot shows, and then click Next.

Step 4. When the operation is done, just click Finish to exit the interface.
Here you have already made a bootable USB. Then, you can reboot your computer, and set the USB drive as the first boot device in BIOS settings and test if your computer can boot from the disc.
Further reading: backup system in case of accidents happen
As we mentioned above, this software is also remarkable backup and restore software, so you can make full use of this software to backup your system.

Summary
Creating a bootable USB by Rufus Windows 11 is a little complex process, you need to be patient. And if you are seeking a way to create a bootable USB, you can try another easy way, that is to use third-party software----AOMEI Bakcupper. This software can also protect your computer, for example, backup C drive Windows 11 to safeguard your data when the system crashes.

