3 Ways: Enable Never Combine Taskbar Button in Windows 11
With this article you can learn how to enable Never Combine Taskbar on Windows 11. It includes three solutions and a backup strategy.
By Miya Updated on April 22, 2024
Overview of Never Combine Taskbar on Windows 11
This post provides a guide on enabling the "Never Combine Taskbar Buttons with Labels" feature in Windows 11. By default, Windows 11 groups taskbar icons to maximize space, but users can choose to display individual windows for each application. With the release of Windows 11 version 22H2, Microsoft reintroduced the much-requested feature that allows users to show application windows separately on the taskbar, enhancing visibility and ease of access.
This option was initially available in Windows 10 but was temporarily removed in Windows 11. Following user demand, Microsoft decided to bring it back through a cumulative update for all Windows 11 devices.
Displaying each window individually on the taskbar is particularly useful in scenarios like widescreen displays or multiple monitors, offering easy identification and launching of specific program windows. Let's see how to enable Never Combine Taskbar on Windows 11.
How to Enable Never Combine Taskbar Button on Windows 11
Below are three approaches you can enable Never Combine Taskbar on Windows 11PC. Some of these methods may require administrator permissions, and it is advisable to create a backup of Windows 11 before making any changes in the registry.
👉Backup Your Windows OS to Prevent Data Loss
1. Use Windows Settings
You can enable Never Combine Taskbar buttons on Windows 11 through Windows Settings. Follow these steps:
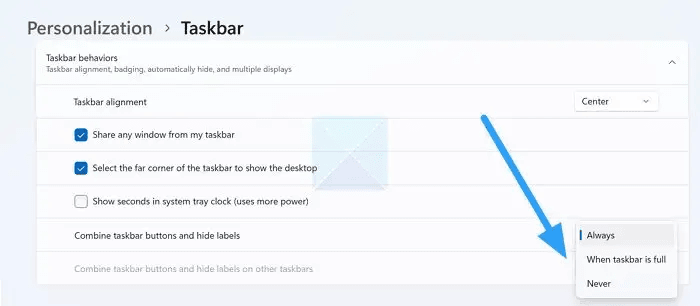
Step 1. Open Settings and select the Personalization option from the left pane.
Step 2. Click on the Taskbar option on the right.
Step 3. Choose Taskbar behaviors and then Combine taskbar buttons and hide labels. You will encounter the following options:
- Always
- When taskbar is full
- Never
Step 4. Opt for Never.
By doing so, you will activate the Never Combine Taskbar Buttons setting on Windows 11.
- Notes:✎...The meanings of the options are as follows:
- Always: Automatically groups icons from the same application and hides their labels. Hovering over the grouped icon displays previews of individual windows. Clicking on a preview switches to that window, and clicking on the cross icon closes a window.
- When taskbar is full: Groups icons from the same application only when the taskbar is full. When the taskbar is not full, icons remain separate with corresponding labels.
- Never: Permanently keeps taskbar icons separate, regardless of the number of open windows. Windows appear as individual items with labels. When the taskbar is filled, a three-dot icon appears on the right, opening a Taskbar overflow menu to accommodate extra icons.
2. Use Registry Editor
To enable the Never CombineTaskbarsetting on the taskbar, you can use the Registry Editor. Follow these steps:
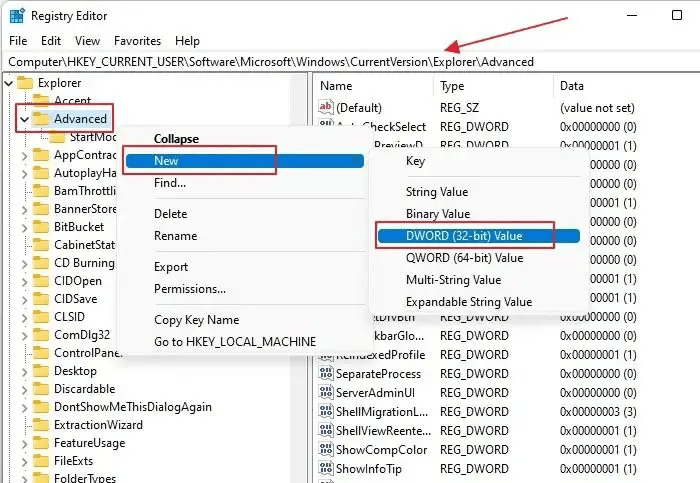
Step 1. Open the Registry Editor and navigate to the following path:
- Computer\HKEY_CURRENT_USER\Software\Microsoft\Windows\CurrentVersion\Explorer\Advanced
Step 2. Right-click on the Advanced folder and select New > DWORD (32-bit) Value from the context menu.
Step 3. Rename the newly created value to TaskbarGlomLevel. If a value with this name already exists, you can skip this step and proceed to the next one.
Step 4. Right-click on the TaskbarGlomLevel option on the right and select Modify from the context menu. Change the Value data field from 0 to 2. Click OK to apply the changes.
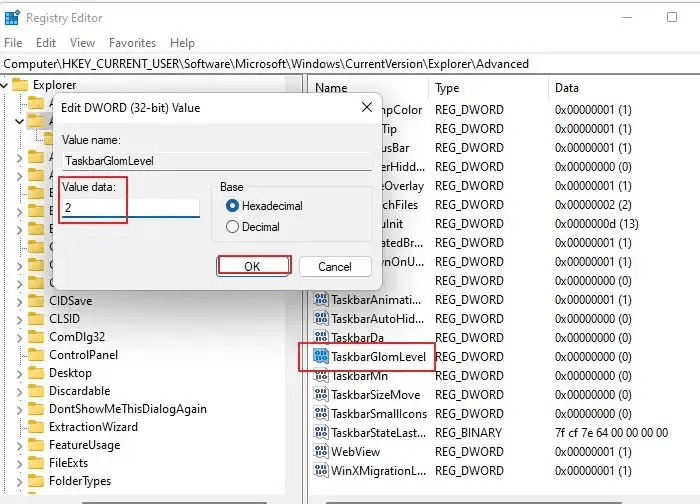
Upon saving the modifications, exit the Registry Editor and reboot your computer to apply the changes, ensuring the taskbar buttons remain uncombined.
3. Use Group Policy
Group Policy comes into play when you intend to modify this configuration on a remote PC or implement it across numerous PCs within your network. Follow these steps to solve Never Combine Taskbar buttons Windows 11 missing issue.
Step 1. Launch Group Policy Editor on your PC.
Step 2. Go to the following path: User Configuration -> Administrative Templates -> Start Menu and Taskbar
Step 3. Find the policy named Prevent grouping of taskbar items.
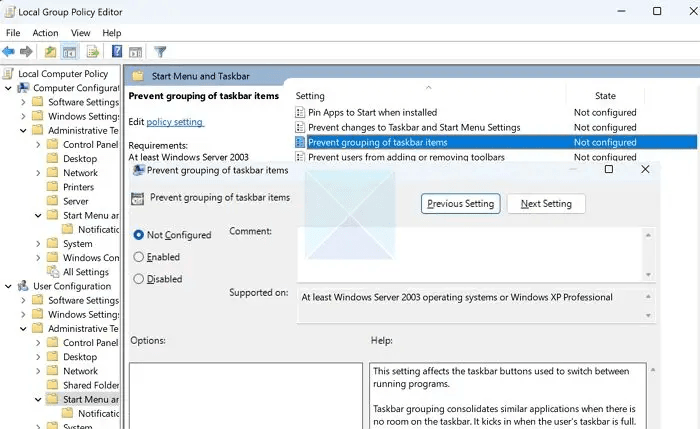
Step 4. Enable and implement the changes.
After completion, restart your PC and verify if the icons now display individually for open apps and browsers.
However, any changes to the registry and improper operation may lead to problems or crashes in your Windows system, which may result in the loss of your data. Therefore, we recommend that you back up your Windows 11 system in advance so that you can quickly revert to a previous version in case of a problem.
Next, I will recommend you a free Windows backup software to help you backup your Windows 11 system in just a few simple steps. Check it out below!
Backup Your Windows 11 to Prevent Data Loss
For a secure and dependable system backup and restore solution, consider opting for AOMEI Backupper Standard. This software boasts robust system backup capabilities along with features for partition backup, file backup, and disk backup. Additionally, it offers various supplementary functions.
✌Commenting and Notifications: You can add comments to backups and receive email notifications.
✌Backup Options: Offers intelligent sector and exact backup modes, as well as different compression levels (high/normal/low).
✌Scheduled Backup Flexibility: Backup files at fixed intervals (daily/weekly/monthly) and choose between full and incremental backup methods.
✌Versatile Storage Support: Supports various storage devices, including USB, HDD, SSD, etc.
✌Broad OS Compatibility: Compatible with a wide range of operating systems (Windows 7, 8, 8.1, 10, 11, XP, Vista, etc.).
Furthermore, the software provides diverse backup options in its professional version, catering to your various requirements while efficiently saving both time and disk space through the removal of outdated backups. To illustrate, consider the case of Windows 11. Follow the visual guide provided below:
Step 1. Attach the external hard drive to your Windows 11 PC, ensuring its proper organization. Download, install, and launch AOMEI Backupper Standard. Navigate to Backup> System Backup.
Best free Windows backup software for personal use.

Step 2. Select the backup destination by clicking on the location indicated by the arrow.

Step 3. Validate your actions and initiate the backup process by clicking on Start Backup.

Additional Information: Unlock a range of enhanced features by utilizing "Options, Schedule, Scheme."
▶ Options: Access a multitude of functions, including the ability to add comments to system images, compress files, encrypt data (supported in the professional version), and split image files, among others.
▶ Schedule: Employ this feature to establish automated backup routines for daily, weekly, monthly intervals, or trigger events like USB plug-ins for seamless Windows 11 backups.
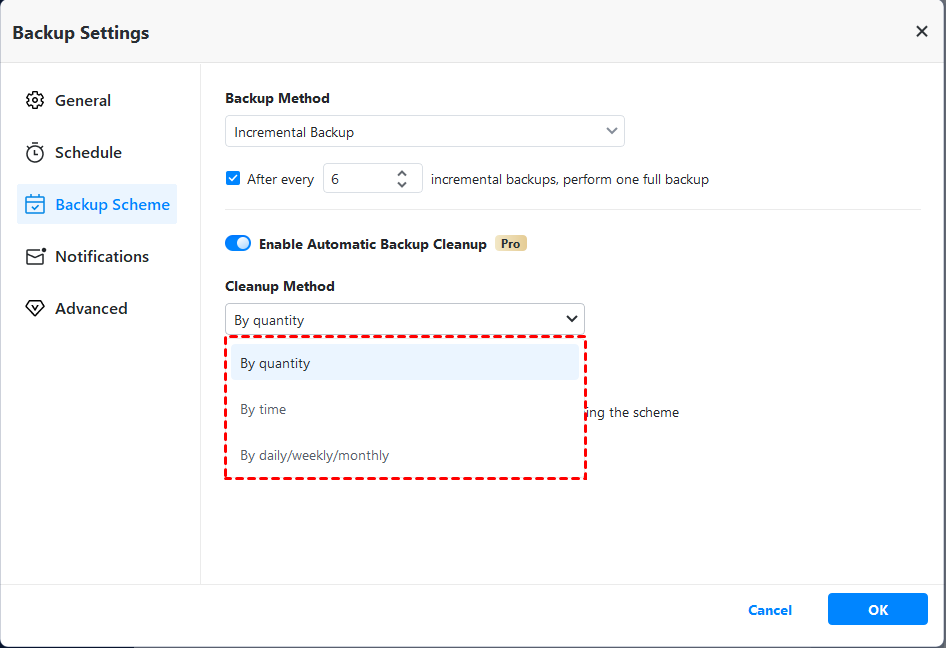
▶ Scheme: This functionality, exclusive to the professional edition, enables the automatic removal of outdated backups, optimizing backup disk space utilization.
Upon the successful completion of the backup task, a system backup will be created. In the event of a computer failure, you can restore the system backup onto a new disk and utilize it for booting up your computer.
Summary
This is all about enabling Never Combine Taskbar on Windows 11. Three solutions + a backup strategy are included. Opting for a system backup is a reliable method to safeguard your Windows 11. If you're seeking to back up Windows 11 onto an external hard drive, consider AOMEI Backupper, as it not only backs up Windows but also generates an image of the system partition.
It provides flexibility for additional configurations, including adding comments, configuring notifications, scheduling backups, and selecting backup modes. Furthermore, this software extends its utility to file backup, partition backup, and disk backup. For a more in-depth exploration of these features, visit the download page and start using it!

