How to Fix IntcOED.sys on Windows 11? Try Top 4 Ways Here
When you encounter IntcOED.sys on Windows 11, you may wonder what has caused this error and what are the effective solutions to fix it. From this page, you can get all you want to know.
By Miya Updated on January 3, 2024
User case
How to fix the intcOED.sys Blue Screen error in Windows 11?
Good day! I've just upgraded to Windows 11 Pro 21H2 version, and I have an annoying problem: Every time I leave my laptop open and then try to use it again it gives me a blue screen with error code: driver_unloaded_without_cancelling_pending_operations and what failed is intcOED.sys. I checked my hardware and there is nothing wrong with it. Any ideas? Thanks in advance.
- Question from Microsoft Community
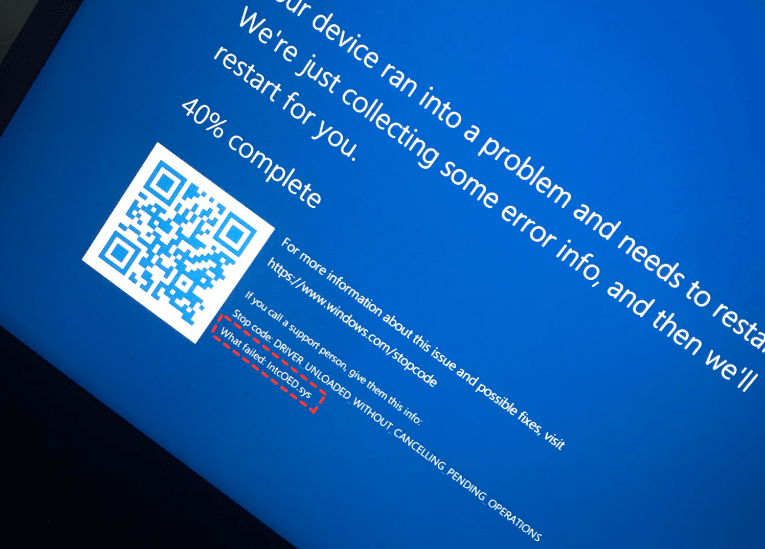
If you're a Windows 11 user, you may have come across the error message “What failed: IntcOED.sys” at some point. This intcOED.sys Windows 11 error occurs when the IntcOED.sys file, which is a part of the Intel audio driver, is corrupted or missing. Other reasons such as malware or virus infection, system file corruption, and hardware failure can also lead this error to happen. In this tutorial, I’ll explain how to easily troubleshoot this problem with simple 4 methods.
👉Bonus tip: Backup Windows 11 to stay away from disasters
How to fix Windows 11 intcOED.sys error
Since you know what causes the stop code driver to unload without canceling pending operations on Windows 11, now I will walk you through the effective fixes to tackle this issue. Just keep reading if you are interested.
Fix 1. Run the Audio Troubleshooter
1. Open the System section in the Update & Security part.
2. Go to the Troubleshoot from the left pane. Scroll down and click Additional troubleshooters.
3. Please choose Playing Audio and click on Run the Troubleshooter from the drop-down.
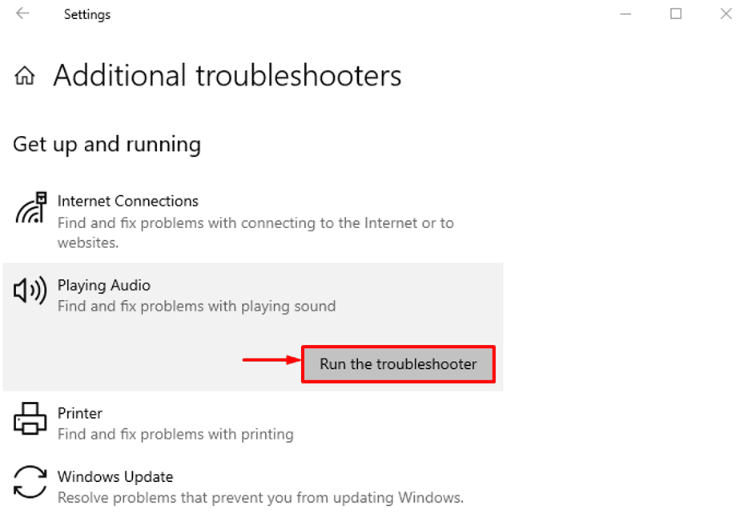
4. Simply wait for a moment, it will show you the fix. Then restart your computer and see if the issue is resolved.
Fix 2. Uninstall Intel’s Smart Sound Technology (SST)
Because this error can occur due to corrupted or missing IntcOED.sys file, you can follow the steps below to update the Intel audio driver.
1. Press Windows + X and select Device Manager from the menu.
2. Expand the Sound, video and game controllers category and locate Smart Sound Technology OED.
3. Right-click on Smart Sound Technology OED. From the context menu, select Uninstall Device option.
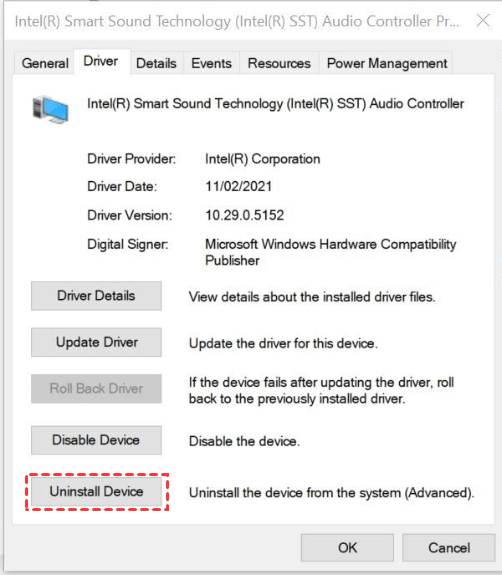
4. Click Yes when a message pops up asking if you are sure you want to uninstall the device. Once the uninstallation is done, please reboot your PC.
Fix 3. Run a Malware Scan
Sometimes, IntcOED.sys error can be caused by malware or virus infection. To run a malware scan, follow these steps:
1. Open Windows Security by pressing Windows + I.
2. Click on Virus & threat protection.
3. Click on Scan options.
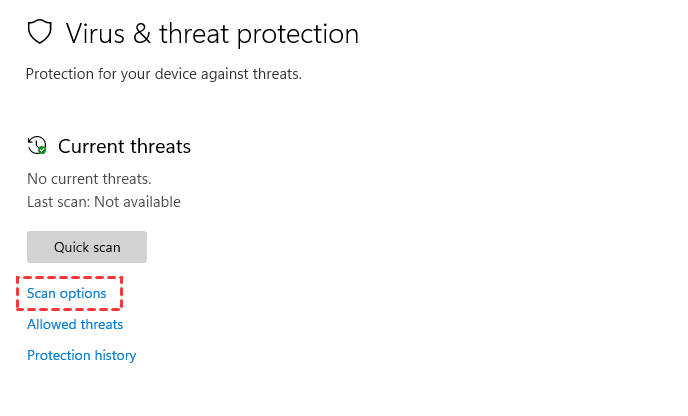
4. Select Full scan and click on Scan now.
5. Wait for the scan to complete and follow the on-screen instructions to remove any detected malware or virus.
Fix 4. Run System File Checker
System file corruption can also cause IntcOED.sys error. Here are the simple steps to run the System File Checker tool.
1. Press Windows + X and select Command Prompt (Admin) from the menu.
2. Type sfc /scannow and press Enter.
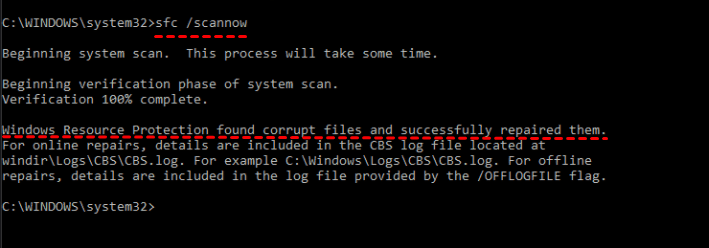
3. Wait for the scan to complete and this will help you repair the corrupted files automatically.
Bonus tip: Backup Windows 11 to stay away from disasters
The above solutions should help you get out of IntcOED sys blue screen smoothly, but the troubleshooting process can be time-consuming. If you don't want to search for a solution every time you encounter a computer failure, then you can try another simpler and more effective approach. That is to back up your computer regularly in order to use it to recover in the event of a failure and avoid data loss.
You can make frequent backups of your Windows OS with the best free backup software AOMEI Backupper Standard for disaster recovery. With its help, you can benefit a lot for:
Backup Windows OS to various locations: NAS, local disks, external drives, network share, USB, and cloud drives.
Optimize storage space: Utilize incremental or differential backup methods for improved efficiency.
Automated scheduling: Set up daily, weekly, monthly, event triggers or USB plug in backups to streamline your backup tasks
Compatibility: Suitable for all Windows PC OS (Windows 11/10/8.1/8/7/Vista/XP, 32-bit and 64-bit), with a dedicated version for Windows Server users in the form of AOMEI Backupper Server.
Download it to have a try and then backup Windows 11 for disaster recovery.
Best free Windows backup software for personal use.
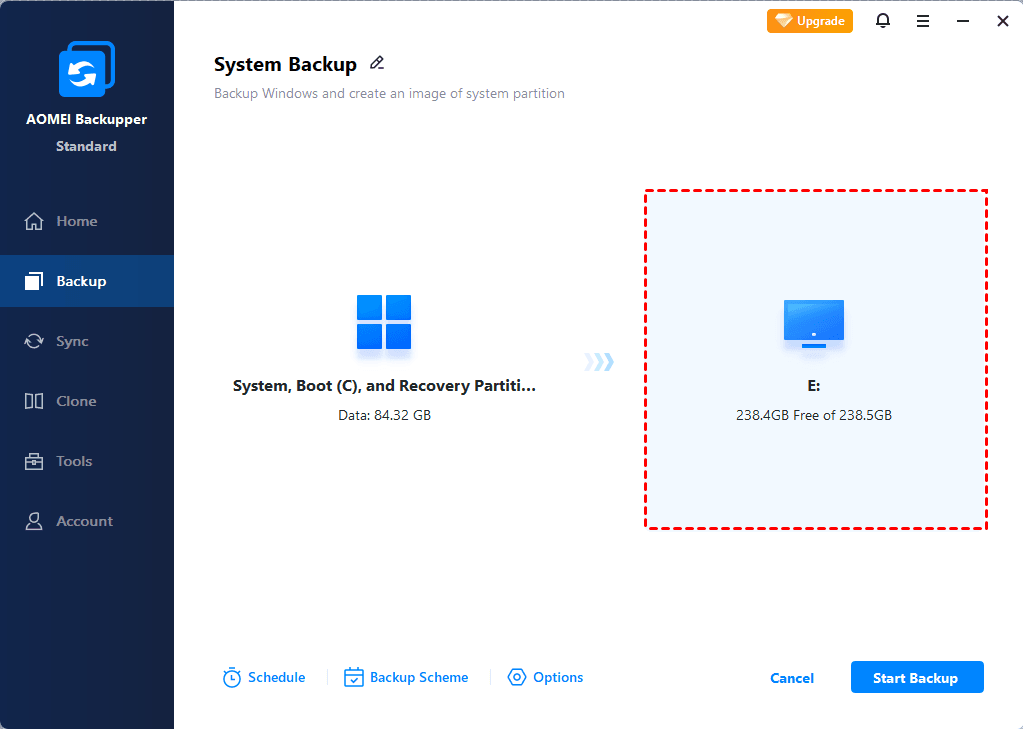
Step 1. After installing this freeware on your PC, open it. Click System Backup tab under the Backup option.

Step 2. The system partition and the relevant partition are selected by default, you just need to select a destination path to save the backup image.
Step 3. Access the Schedule Backup option located in the bottom left corner. Enable Schedule Backup and select your preferred frequency, including options like "Daily," "Weekly," "Monthly," "Event triggers," and "USB plug in."

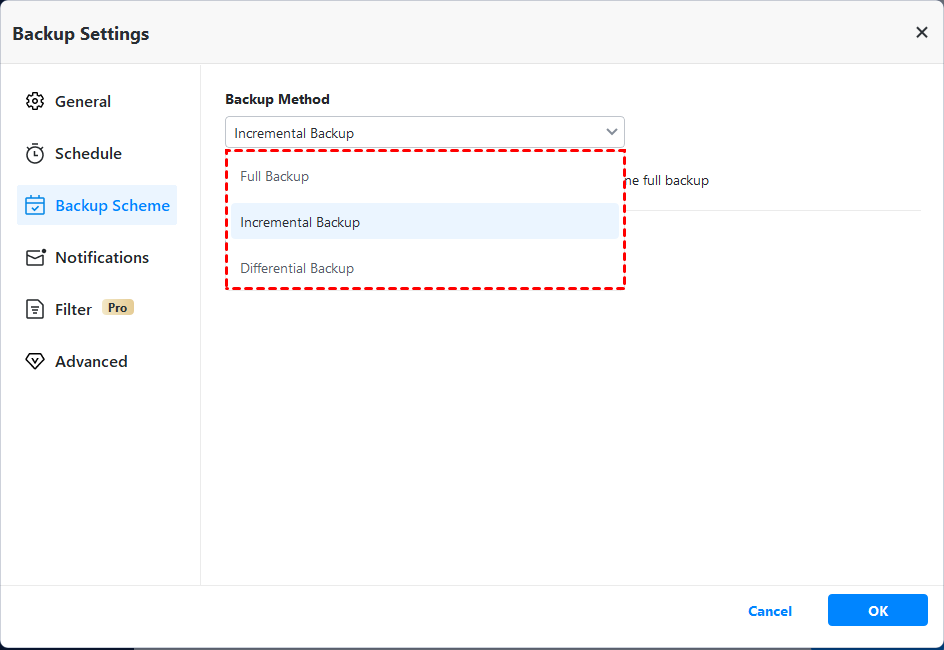
Step 4. (Optional) Within the Schedule window, navigate to Backup Scheme on the left panel. By default, "Incremental Backup" is selected as the backup method. If you prefer "Differential Backup," an edition upgrade is required.
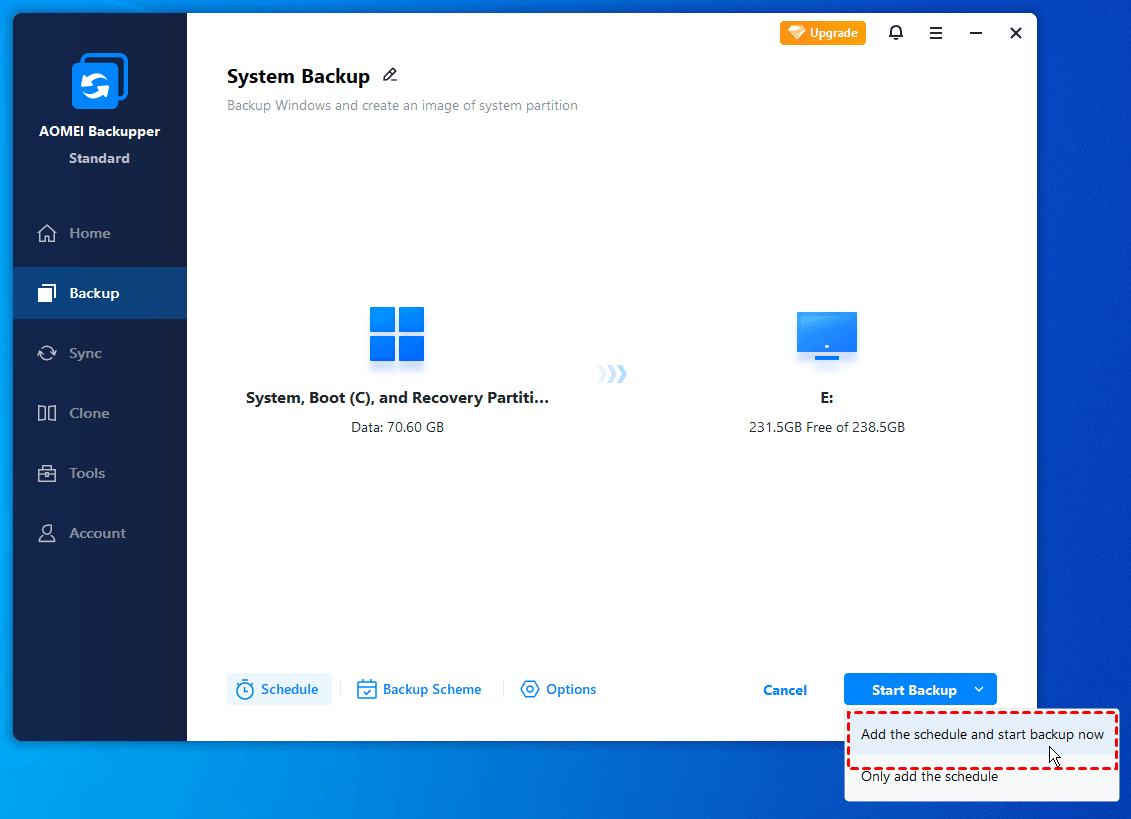
Step 5. Once you've configured all the settings, click Start Backup, add the schedule, and initiate the backup process.
Your turn
In conclusion, IntcOED.sys on Windows 11 can be frustrating, but with the fixes outlined in this tutorial, you should be able to fix it without effort. To prevent unnecessary data loss, you’d better use AOMEI Backupper, the best free backup software to backup Windows in advance. Thus when there’s something wrong happens to your PC, you can use it to restore to normal state.
On the other hand, if you find that the process of using Clonezilla Clone SSD to NVMe is quite complicated, you can try the clone feature of AOMEI Backupper, which is simpler and more secure.

