Backup and Restore Windows 11 Image to New Hard Drive Easily (3 Ways)
Don’t want to reinstall system and afford data loss? Check the content below and learn how to backup and restore Windows 11 image to new hard drive with 3 working ways.
By Ivy Updated on October 20, 2022
Backup is very important to protect your system and data
Windows 11 is officially released by Oct 5, 2021, many users may upgrade Windows 10 to Windows 11 to experience the new feature of it and you are one of them. If you like the latest operating system and want to use it in the future, you may want to create a system image backup in Windows 11.
![]()
A system image will include the operating system, system files and settings, installed programs and your personal data on the system partition, which can help to prevent data loss, virus attack, system crash, disk failure etc and easily restore Windows 11 image to new hard drive in case of serious computer failure happen.
Thus, if you create a system image backup in Windows 11, you will never have to worry about any computer failure, whether it is minor or major. If you still don’t have a system image backup, you can read the content in the following and learn how to do it with 3 working ways. Also, the system recovery process will be included in case you need to recover someday.
How to backup and restore Windows 11 image to new hard drive easily
Here you will learn 3 useful ways to create a system backup for Windows 11 and restore system image to new hard drive for quick disaster recovery. The previous two ways are using free backup software Backup and Restore (Windows 7) and AOMEI Backupper Standard. Both require an extra device to temporarily store your backup and you need to perform two operations to complete the entire process.
If you want an easier way to achieve this goal, you can choose to directly clone Windows 11 system to new hard drive. It also makes an exact copy of your system and ensures your computer is bootable. For detailed steps, please refer to Method 3.
Method 1: Backup and restore Windows 11 system image to new hard drive using built-in tool
Windows 11 comes along with a free backup software - Backup and Restore (Windows 7), it was first introduced in the Windows 7 and later inherited in Windows 8 and Windows 10. And it does not make much change, which is similar to create system image backup in Windows 10.
Anyway, you will learn all the steps in detail, not only backup, but also restore.
Part 1: Prepare your hard disk for backup and restore
Whether you want to create a system image in Windows 11 or restore Windows 11 image to new hard drive, you need to prepare your disk. The steps are the same.
Step 1. Prepare a hard disk and USB to SATA cable. If you have enough budget, you can get a USB to SATA enclosure to connect your disk.
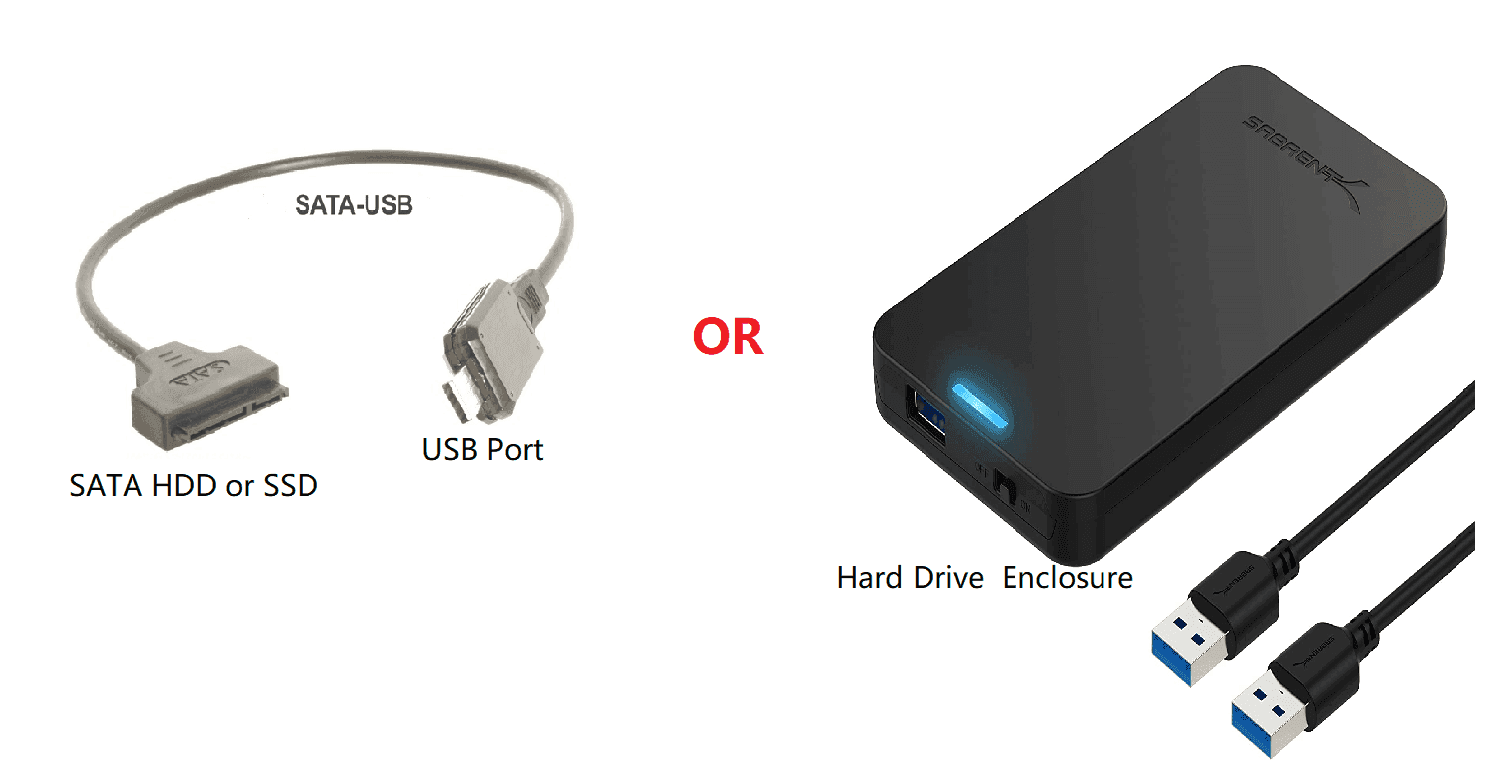
Step 2. Connect your hard disk via SATA cable. Then, connect the other end to your computer via USB port.
Step 3. Initialize disk in the Disk Management.
1. Type diskmgmt.msc in the search box and select the top result.
2. Right click the disk marked with Unknown, and select Initialize Disk.
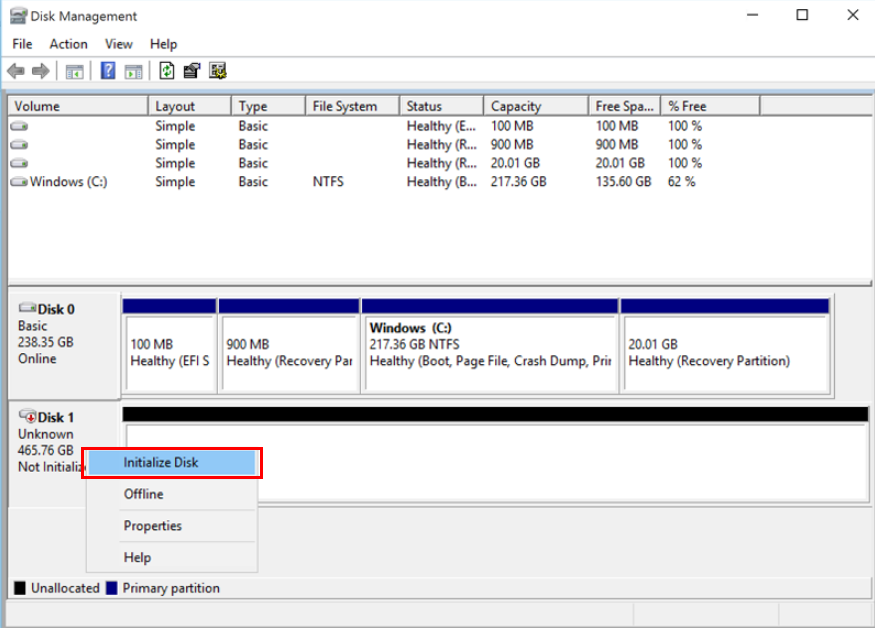
3. In the Initialize Disk window, select MBR or GPT partition style you prefer and click “OK”.
• If you plan to backup your Windows 11 system, you need to be sure the backup target is larger than the system partition you want to backup. If not, you need to delete some files on it to free up disk space.
• If you need to restore Windows 11 system image to new hard drive, in order to guarantee this operation can be completed successfully, please prepare a new disk larger than the backup target. Because the built-in tool does not support restoring system image from a larger disk to smaller one, even the used space of backup target is smaller than or equal to the new hard drive.
Part 2: Create a system image for Windows 11
Step 1. Open Backup and Restore(Windows 7). You can achieve this by two ways below.
Through Control Panel: Press “Win + R” to open the Run box > type control and click OK > select Backup and Restore (Windows 7) under the System and Security.
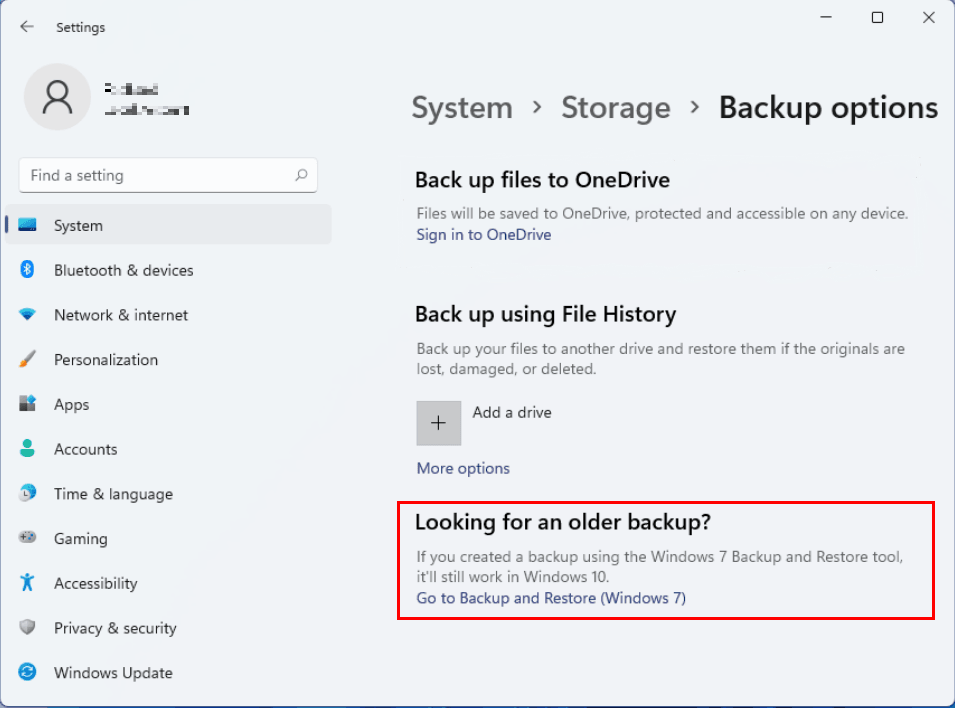
Use settings option: Go to Start > Settings > System > Storage and then click Advanced storage options > Backup options. After that, scroll down to Looking for an older backup title and select Go to Backup and Restore (Windows 7).
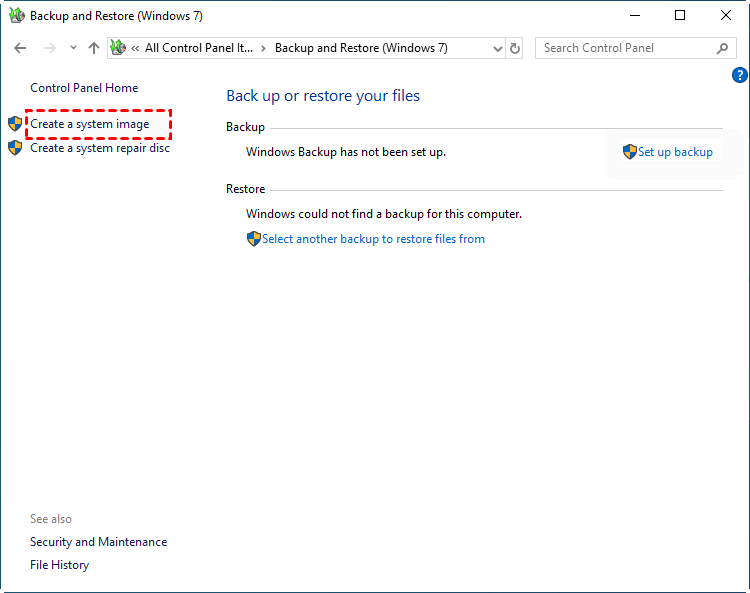
Step 2. Now, you may be in the Backup and Restore (Windows 7) window. Click Create a system image on the left panel.
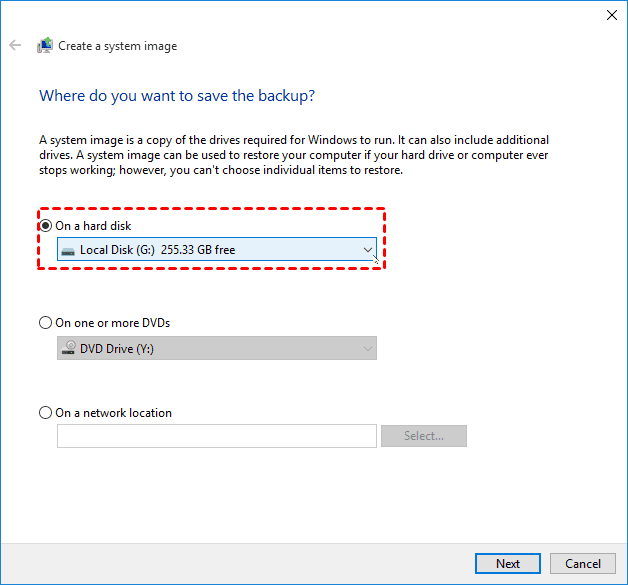
Step 3. Select a backup destination to store the backup image. Here take external hard drive as an example, please tick On a hard disk and select your disk. If you don’t have external hard drive, you can choose to backup Windows 11 to network drive.
Step 4. The system partition and boot partition(s) required to start a Windows is included by default.
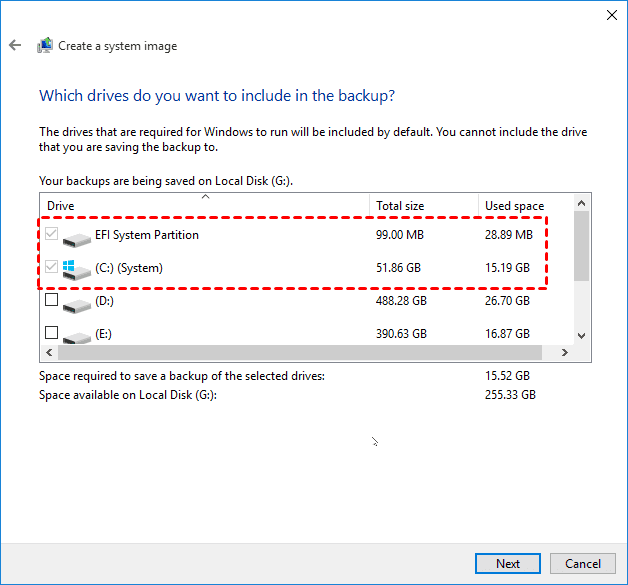
Step 5. Confirm the drives you want to backup and the backup target is correct.Then, click Start Backup to backup your Windows 11.
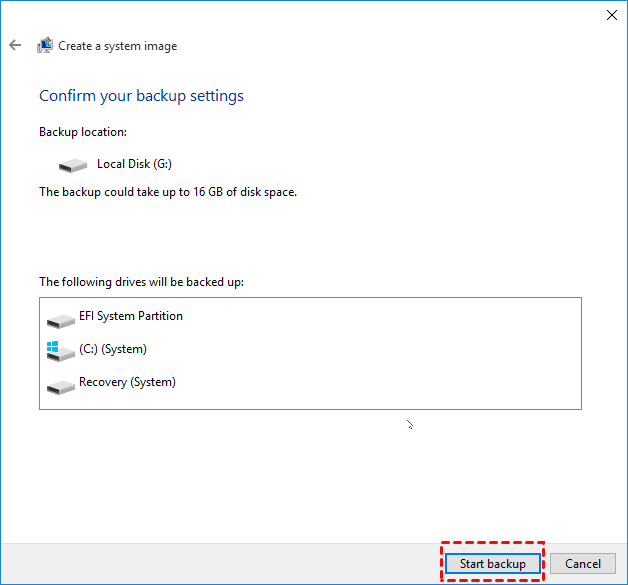
After the system backup created successfully, you will be asked to create a system repair disc, click Yes to continue if you have CD/DVD. If not, you can create a recovery drive in Windows 11 with its Recovery Drive feature or use a third-party bootable media creator.
Part 3: Restore Windows 11 system image to new hard drive
System image is very useful, especially when your computer run into issues, then you can restore Windows 11 system image to new hard drive and replace the old disk. Below are the steps.
Step 1. Connect the backup target containing your Windows 11 system image and be sure your computer recognizes it.
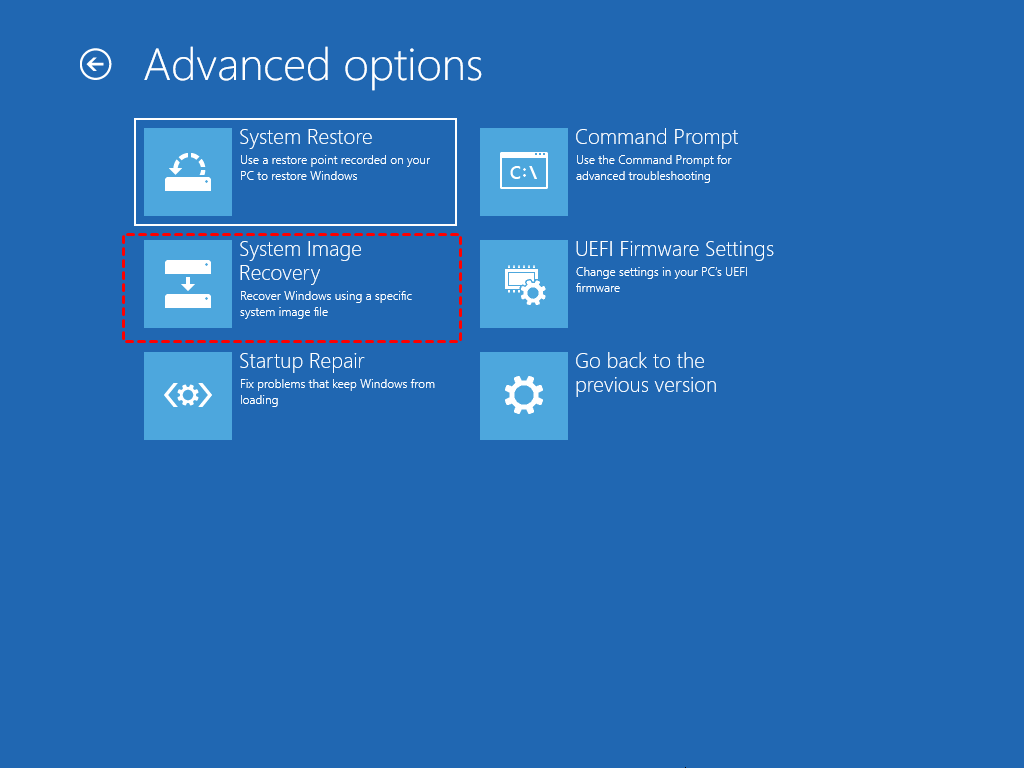
Step 2. Then, Open System Image Recovery tool. You have two ways in the following.
If your computer is still bootable: Go to Start > Settings > Recovery and click Restart now next to Advanced to startup. Then, you will be navigated to the recovery environment, choose Troubleshoot > Advanced options > See more recovery options > System Image Recovery.
If your computer is not bootable: Connect the Windows 11 installation media and boot your computer from it. Then, in the recovery environment, select your preference settings and click Next until you see Repair your computer, choose it and then Troubleshoot > System Image Recovery.
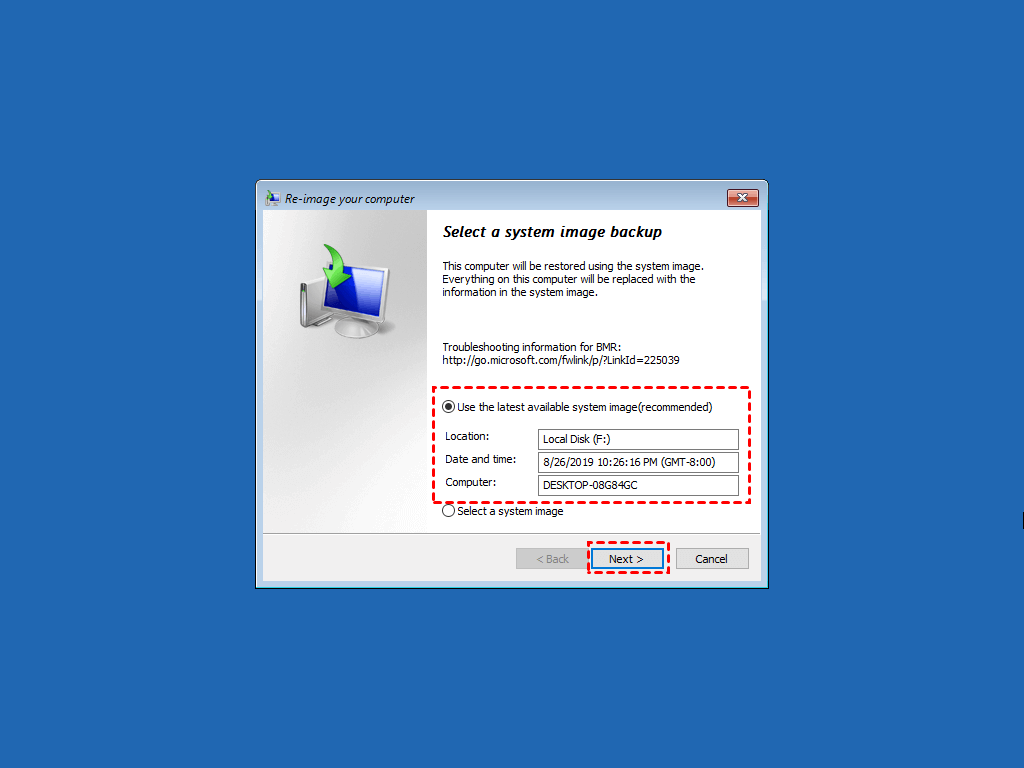
Step 3. Select Use the latest available system image (recommended) and click Next.
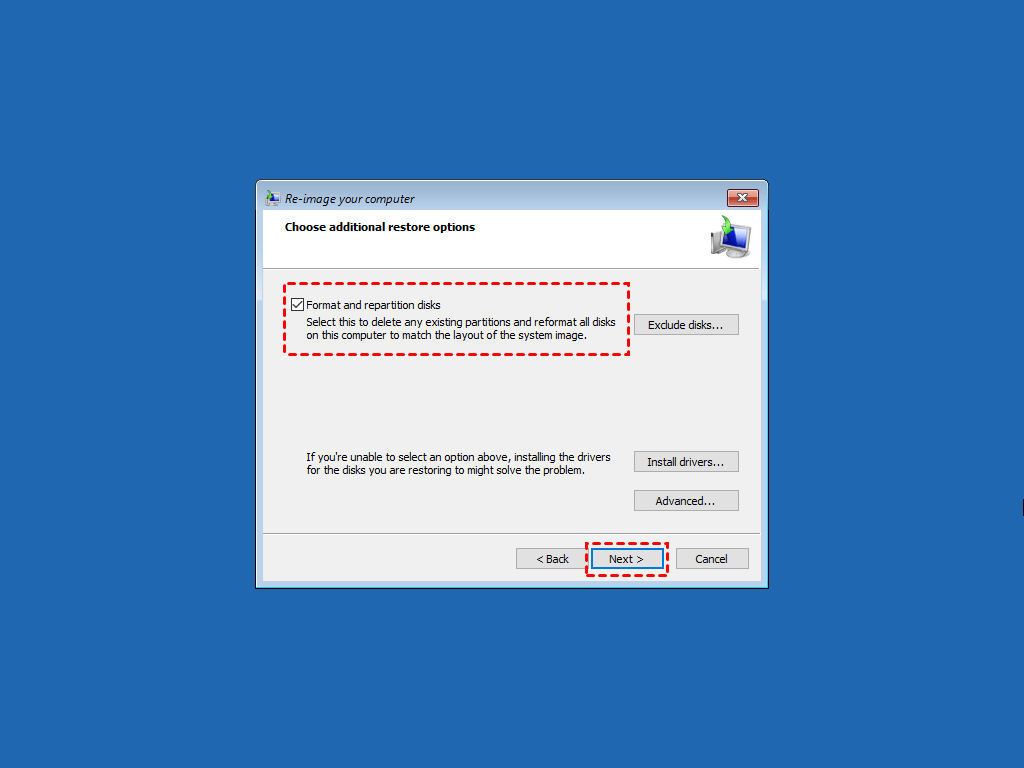
Step 4. Choose Format and repartition disks option. Then, click Next > Finish > Yes to restore system image to new hard drive.
Further reading: Why not use System Restore feature?
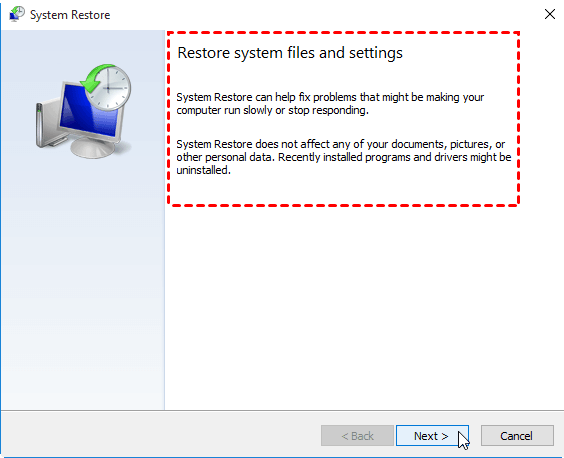
Besides system backup, Windows 11 still allows you to restore your system to previous date with another feature, it’s System Restore. Then, you may wonder why not use it?
This feature is used to create system restore point and restore system when your computer run slowly or stop responding due to recently installed software, driver or update. And it does not delete any files on your computer during the restore process. That’s to say, you can only restore system files and settings, recently installed programs, drivers etc from a system point point. And it does not work for restoring files.
While for system backup created by Backup and Restore (Windows 7), it creates a full copy of your system partition and you can use it to restore everything in the backup, including personal files stored on the system partition. Usually, it is used to fix more serious problems, such as, blue screen of death, system corruption, etc. In addition, system image not only can be saved to internal disk, but also external hard disk, CD/DVD, and network location.
Thus, if you want a more frequent way to ensure your computer runs smoothly, you can use System Restore feature. But don’t forget to make a backup of your system and files.
That’s all for how to backup and restore Windows 11 system image to new hard drive with built-in Windows Backup utility. It is suitable for all users, even beginners, if you don't mind it being harder to find and more complicated.
And it still has other limitations, such as, you need to manually create a system image every time when needed and the backup is performed by full backup, requiring much disk space and backup time. Besides, you cannot restore system image from a larger drive to a smaller drive and it is limited to the current computer.
If you want a more flexible way to backup and restore Windows 11 system image to new hard drive, you can try Method 2.
Method 2: Backup and restore Windows 11 image to new hard drive with free backup software
Although the built-in tool can help users backup and restore system image to new hard drive in Windows 11, it has many restrictions. To make this process easily, you can use free backup software AOMEI Backupper Standard. It has the following advantages:
★It allows you to backup system, disk, partition and files per your needs.
★ It provides multiple schedule backup settings, such as, Daily, Weekly, Monthly, which frees you from the misery of manual backups. And it is capable of backing up only changed files with its Incremental Backup.
★ In addition, it is still able to restore Windows 11 system image to new hard drive (even smaller) if you created a system image with this software when your computer works properly.
★ If your computer is not bootable, you can create Windows 11 bootable USB on another working computer and use it to boot your computer, then restore system image and replace the old disk.
Then, please download this software to have a try right now! (Windows 11/10/8/7/XP/Vista supported)
Step 1. Launch this software, and create a system image with its System Backup feature. For detailed steps, please refers to create system image backup in Windows 11.

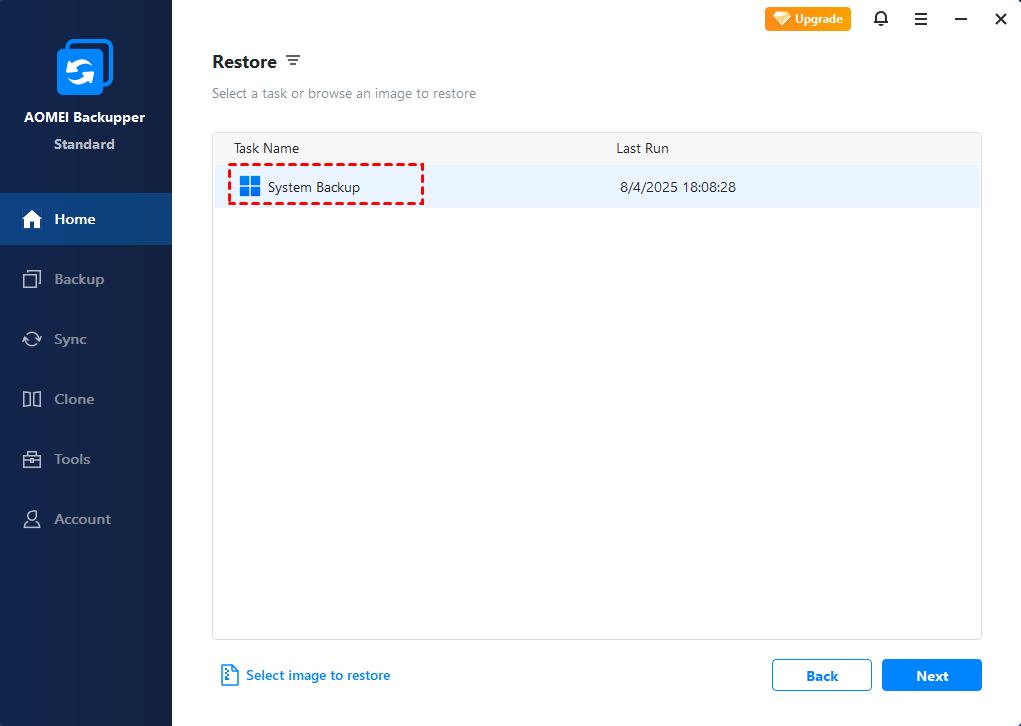
Step 2. Then, let’s move forward to restore system image to new hard drive in Windows 11. Insert the backup disk containing your system image and then open this software if your computer is still bootable, go to Restore > Select Task.

Step 3. In the Restore window, you will see all the backup image created before. Select the System Backup and click Next.
- ★Tip:
- If your backup image is not listed in the window, you can go back to previous page and click Select Image File. It allows you to select backup image manually, from an external hard drive, network drive or other storage devices.
Step 4. Tick Restore this system backup and Restore system to other location below. Then, click Next.

Step 5. Confirm the source disk and destination disk, if there is no problem, click Start Restore to restore Windows 10 image to new hard drive.
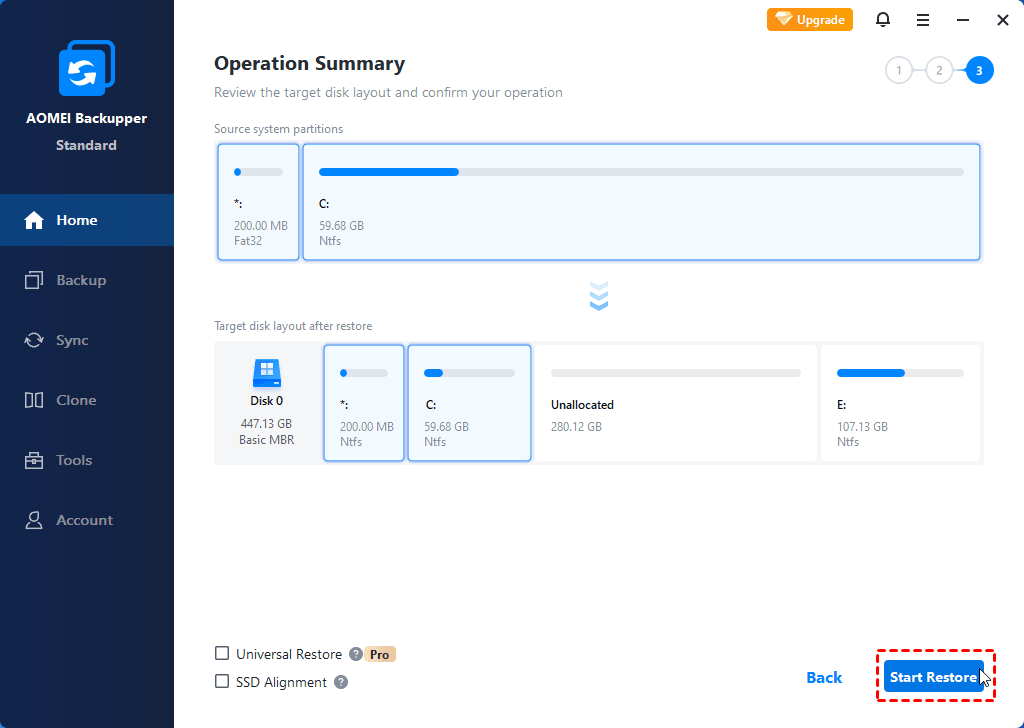
- ★Tip:
- If you want to restore system image to computer with dissimilar hardware, you need to tick Universal Restore feature before clicking Start Restore. Otherwise, the computer you are currently restoring to may not boot from the new hard drive owing to incompatible driver issues or other hardware issue. And this feature is available on the professional version at least, you can upgrade to it and then enjoy.
With its intuitive user interface, you may feel the process is much easier, even restore system image from a larger drive to smaller drive. And it has more advanced features, such as, schedule backup, incremental backup, normal or high compression level, etc.
But anyway, it still requires creating a backup image first and then you can restore to a new hard drive. To simplify the process, you can try to transfer system image to new hard drive with System Clone feature in AOMEI Backupper.
Method 3: Transfer Windows 11 system to new hard drive with system clone software (Easiest)
Here you will use the System Clone feature to move OS to new hard drive. Please note this feature is charged, so you need to upgrade to the professional version at least. Click Upgrade at the top location of this software and select the version you want to buy. After that, click the start menu and Registry with your licence code.
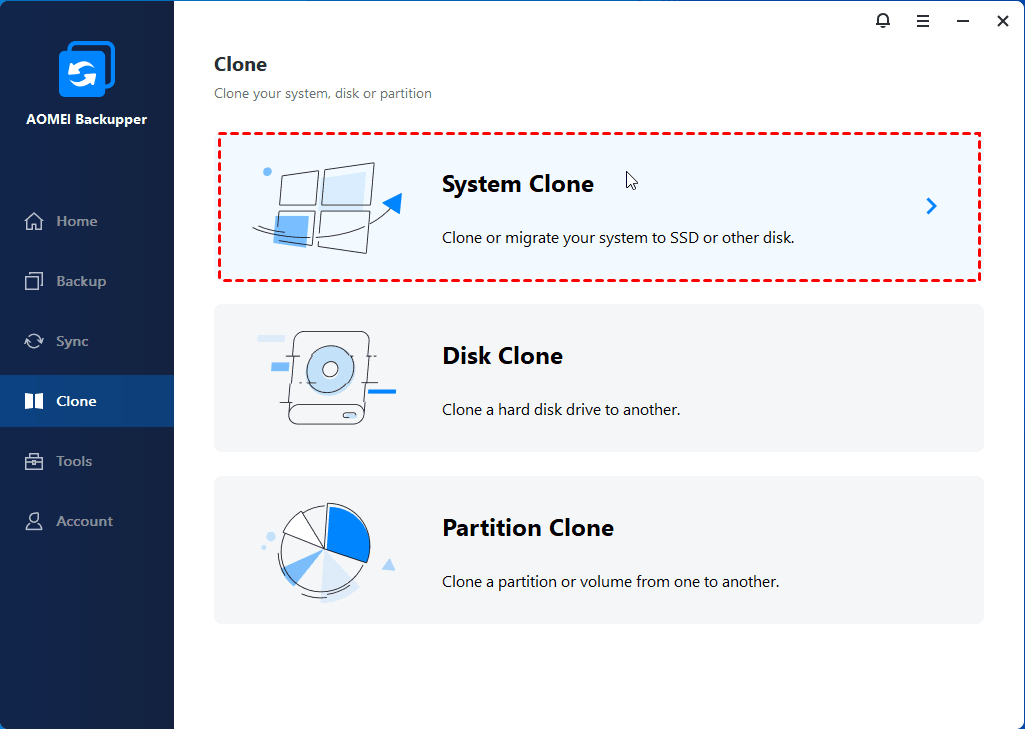
Step 1. Go to this software and then click Clone > System Clone.
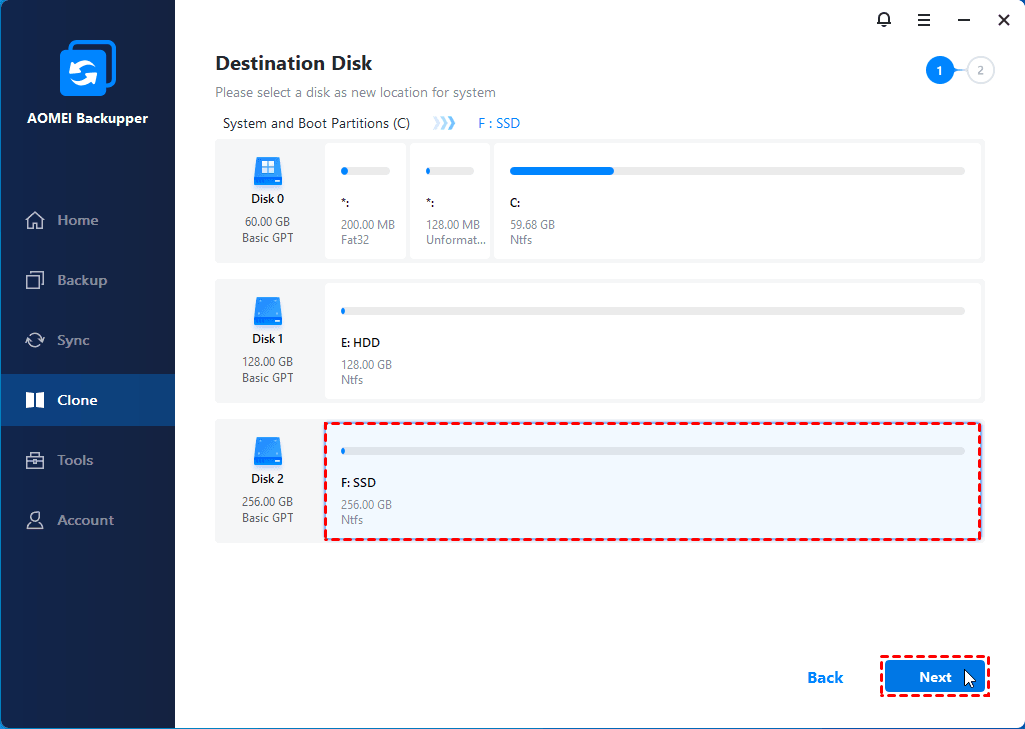
Step 2. Select the new hard drive or a partition on it and click Next.
Step 3. Confirm the disk info and click Start Clone to transfer system image to new hard drive.
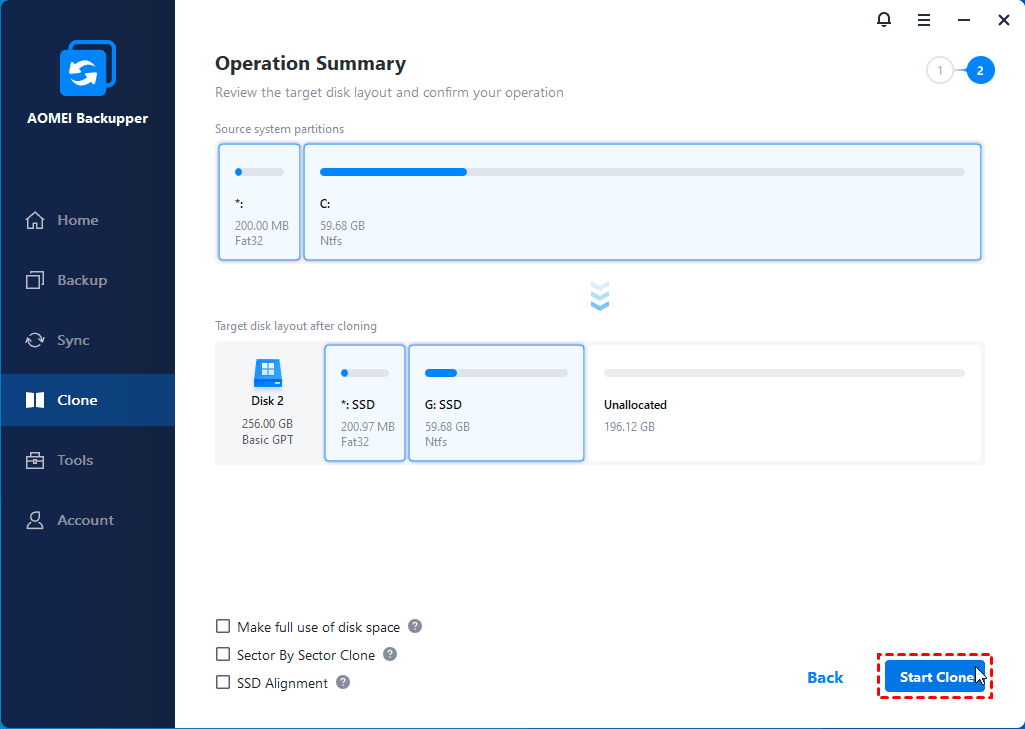
- ★Tips:
- If your new hard drive is an SSD, please check SSD Alignment feature to accelerate the writing and reading speed of SSD disk as well as prolong its lifespan. It makes full use of 4K alignment technology.
- If you want to clone all sectors of the system partition or it includes System Reserved Partition or EFI system partition, you’d better tick “Sector by Sector Clone” feature. If the system reserved partition is missing or on the wrong disk, the boot process may have problem.
- If you are currently using a server computer, AOMEI Backupper Server will a proper choice. It supports all the server system, from server 2003 to server 2022.
Backup system before you need to restore
I'm sure that you have learned how to backup and restore Windows 11 image to new hard drive by reading 3 working ways above. And the last way is the easiest, you just need a new hard drive and a disk clone software, then you can easily transfer system image to new hard drive in 3 steps.
However, whether you use previous two ways or the last one, you need to keep a copy of your system partition when your computer works fine. Otherwise, the backup and restore process may not work as you expect. The same is true for a cloning task.

