Unlocking Solutions: Mastering the Windows 11/10 Troubleshooter
Navigate the intricacies of Windows 11/10 troubleshooting with confidence as we unveil effective strategies and solutions. Explore the reasons behind utilizing the Windows 11/10 troubleshooter, mitigate risks, and harness the power of MyRecover to recover missing files on Windows systems seamlessly.
Possible Reasons to Use Windows 11/10 Troubleshooter:
The Windows 11/10 troubleshooter serves as a beacon of hope for users encountering various system glitches and errors. Whether it's a malfunctioning hardware component, a software compatibility issue, or network connectivity woes, the troubleshooter stands ready to diagnose and resolve a myriad of problems.
Users turn to the Windows 11/10 troubleshooter for its simplicity and efficiency in addressing common system hiccups, saving time and frustration in the process.
Potential Risks of Non-Working Windows 11/10 Troubleshooter:
Despite its utility, encountering a non-working Windows 11/10 troubleshooter poses significant risks to users. Without access to this troubleshooting tool, identifying and resolving system issues becomes a daunting task.
Users may resort to trial-and-error methods or seek external assistance, leading to prolonged downtime and potential data loss.
A non-functional troubleshooter diminishes the user experience and undermines the system's reliability, highlighting the critical importance of ensuring its functionality.
Feasible Fixes to Run Windows 11/10 Troubleshooter:
1. Use Built-in Troubleshooter:
The built-in troubleshooter in Windows 11/10 is a versatile tool designed to diagnose and resolve a wide array of system-related issues. Developed by Microsoft, the troubleshooter leverages a database of known problems and their corresponding solutions to offer users a streamlined troubleshooting experience.
Whether it's troubleshooting network connectivity issues, resolving hardware conflicts, or addressing software compatibility issues, the built-in troubleshooter serves as a first line of defense for users encountering system anomalies.
- Access the Control Panel on your Windows 11/10 system.
- Navigate to the "Troubleshooting" section and select "View all" to display all available troubleshooters.
- Choose the troubleshooter corresponding to the issue you're experiencing, such as network connectivity, hardware, or system maintenance.
- Follow the on-screen prompts to initiate the troubleshooting process and implement recommended fixes.
2. Utilize Windows Settings Troubleshooter:
Windows Settings Troubleshooter represents a modern approach to system diagnostics and problem resolution within the Windows 11/10 environment.
Integrated seamlessly into the Windows Settings menu, this troubleshooter provides users with intuitive access to a variety of diagnostic tools and utilities.
Developed as part of Microsoft's ongoing efforts to enhance user experience and streamline system maintenance, the Windows Settings Troubleshooter offers a user-friendly interface and guided troubleshooting process aimed at empowering users to resolve common system issues independently.
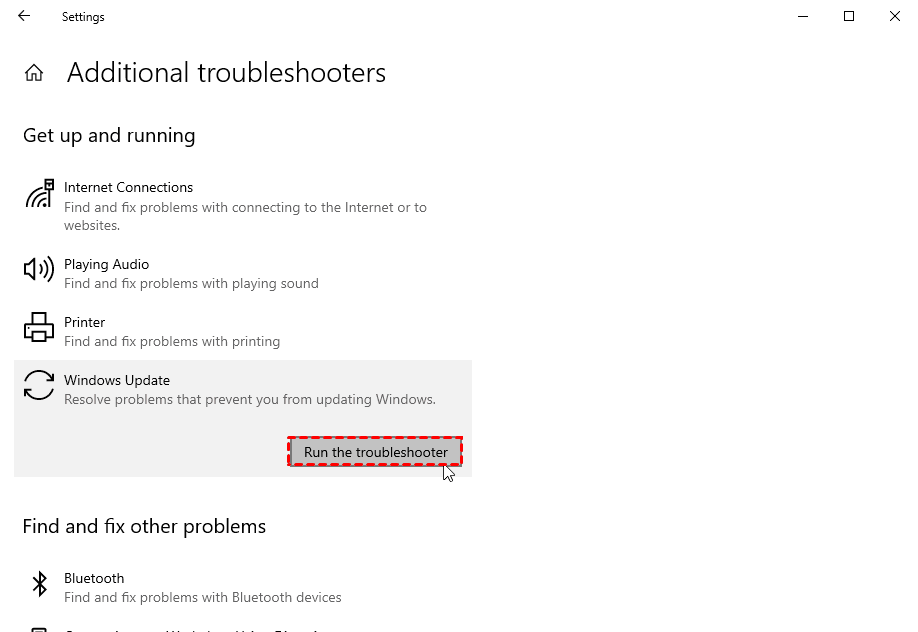
- Open the Windows Settings menu by pressing the Windows key + I.
- Navigate to the "Update & Security" section.
- Select the "Troubleshoot" tab from the left-hand menu.
- Choose the specific troubleshooter related to your issue and click on "Run the troubleshooter."
- Follow the guided prompts to diagnose and resolve the identified problem areas.
3. Run Hardware and Devices Troubleshooter:
The Hardware and Devices Troubleshooter in Windows 11/10 is specifically designed to address hardware-related issues that may impact system performance and functionality. As technology evolves and hardware components become increasingly intricate, the need for robust diagnostic tools becomes paramount.
Developed by Microsoft, the Hardware and Devices Troubleshooter employs sophisticated algorithms to detect hardware anomalies and recommend appropriate solutions.
Whether it's troubleshooting malfunctioning peripherals, diagnosing hardware conflicts, or identifying driver issues, the Hardware and Devices Troubleshooter offers users a comprehensive toolkit for maintaining system integrity.
- Press the Windows key + X and select "Device Manager" from the menu.
- Expand the categories to identify the device experiencing issues.
- Right-click on the problematic device and select "Troubleshoot" to launch the hardware troubleshooter.
- Follow the on-screen instructions to detect and resolve hardware-related issues.
Recovering Missing Files on Windows with MyRecover:
In the unfortunate event of file loss or corruption on your Windows system, MyRecover emerges as a beacon of hope, offering robust data recovery solutions with unparalleled efficiency.
Key Features of MyRecover:
- Streamlined Interface: MyRecover boasts an intuitive user interface, making it accessible to users of all proficiency levels.
- Advanced Scanning Algorithms: Employing cutting-edge algorithms, MyRecover conducts comprehensive scans to locate and recover missing files swiftly.
- Selective Recovery Options: Users can pinpoint specific files for recovery, minimizing time and effort invested in the recovery process.
Operating Steps to Recover Missing Files with MyRecover:
Download and Install MyRecover:
Visit the official MyRecover website and download the installation package.
Double-click the downloaded file to initiate the installation process.
Follow the on-screen instructions to complete the installation of MyRecover on your system.
Launch MyRecover:
Double-click the MyRecover icon on your desktop to launch the application.
Select Scan Location:
Choose the drive or specific location where the missing files were stored before the data loss occurred.
Initiate Scan:
Click on the "Scan" button to commence the scanning process.
Preview and Recover Files:
After the scanning process completes, MyRecover presents a list of recoverable files.
Preview the files to verify their integrity and select the ones you wish to recover.
Save Recovered Files:
Choose a secure location to save the recovered files and complete the recovery process.
In Conclusion:
Mastering the Windows 11/10 troubleshooter empowers users to tackle system challenges head-on, ensuring seamless functionality and optimal performance. By understanding the reasons behind utilizing the troubleshooter, mitigating risks, and exploring effective fixes, users can navigate system complexities with confidence.
Coupled with the data recovery prowess of MyRecover, users can safeguard their valuable files and maintain system integrity in the face of adversity.
FAQs:
Q1: Can I use the Windows 11/10 troubleshooter to fix software-related issues?
A1: Yes, the Windows 11/10 troubleshooter can diagnose and resolve a wide range of software-related issues, including application crashes and compatibility errors.
Q2: Is MyRecover compatible with all versions of Windows?
A2: Yes, MyRecover is compatible with various versions of Windows, including Windows 11, Windows 10, Windows 8, and Windows 7.
Q3: Can I recover permanently deleted files using MyRecover?
A3: Yes, MyRecover can recover files that have been permanently deleted from your system, provided they have not been overwritten by new data.
Q4: How long does the scanning process take with MyRecover?
A4: The duration of the scanning process with MyRecover depends on factors such as the size of the storage device and the extent of data loss. It typically ranges from a few minutes to several hours.
Q5: Can I recover files from a formatted hard drive using MyRecover?
A5: Yes, MyRecover can recover files from formatted hard drives, partitions, and other storage media, ensuring comprehensive data recovery solutions.


