How to Create Rufus Bootable USB on Windows 10
Are you searching for ways to make a bootable USB for Windows 10? Apart from Rufus, there’s another easier way to help you!
By Maggie Updated on August 22, 2023
Is Rufus workable on Windows 10?
When a new version of Windows 10 is released, the update doesn't hit all devices simultaneously. Instead, Microsoft rolls out the upgrade gradually, taking time to reach each device.
However, if you're not keen on waiting for the automatic update, you have the option to take matters into your own hands. You can explore third-party tools like Rufus to facilitate the process of downloading and creating bootable USB media for installing Windows 10.
This guide walks you to create bootable USB Windows 10 Rufus with a step-by-step guide.
How to create bootable USB drive on Windows 10 via Rufus
To create a Rufus bootable Windows 10, you need to connect a USB flash drive with at least 8GB of storage. You may need to restart the tool if you do not see the device on the list.
Step 1. Open Rufus website and then you can do Rufus download for Windows 10 by clicking on its download button.
Step 2. When you successfully installed this software on your PC, click on Settings icon at the bottom of the page.
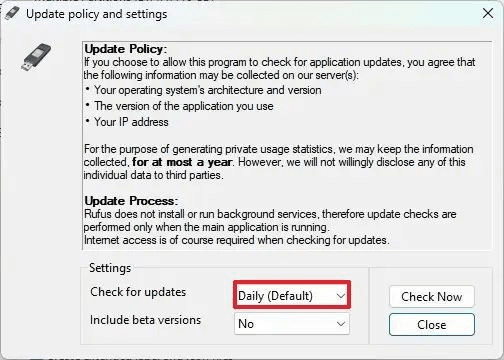
Step 3. Under the Settings section, use Check for updates drop-down menu and choose Daily option. Click Close button. And then continue with Close again to close this app.
Step 4. Now you need to open Rufus again.
Step 5. (Optional) Under the Device section, use the drop-down menu and select the USB flash drive to create the Windows 10 installation media.
Step 6. Under the Boot selection section, use the drop-down menu and select the Disk or ISO image option.
Step 7. Click the down-arrow button (on the right side) and select the Download option.
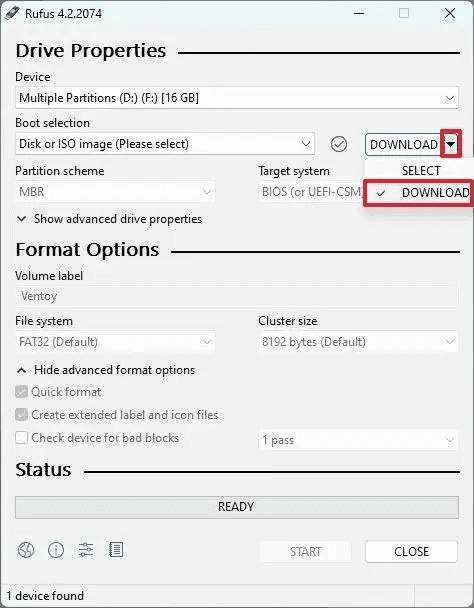
Step 8. Click the Download button. And then select the Windows 10 option follow by clicking on Continue button.
Step 9. Under the Release section, select the version of Windows 10 you want to download, such as version 22H2, and choose Continue.

Step 10. Click the Continue button on the Edition setting (since there’s only one option).
Step 11. Now specify the language of Windows 10, like English and then Continue.
Step 12. Select the operating system architecture. Select the x64 (64-bit) operating system architecture. (You may need to download the x86 (32-bit) option if you have an older machine.)
Step 13. Click the Download button.
Step 14. Then you need to select the location to save the Windows 10 ISO file automatically.
Step 15. Continue with the default settings after the download.
Step 16. Click the Start button.
Step 17. Click the OK button, and then click on the OK button again.
Once you complete the steps, you have successfully created Rufus Windows 10 bootable USB and then you can boot and install Windows 10 on computers running on UEFI or BIOS, depending on your firmware.
An easier way to create a bootable USB drive for your Windows 10 system
Is it a little bit complex for Rufus Windows 10? If you are looking for a simpler but reliable way to create a bootable USB on Windows 10 system, you are in the right place! AOMEI Backupper Standard offers a safe and free way to help create a bootable USB on Windows 10. You can see more of its advanced feature below:
♥It enables you to create Windows PF boot disk or Linux boot disc.
♥You can use USB flash drive, CD or DVD as bootable media. You can also export AOMEI ISO file as necessary.
♥It supports all editions of Windows 11/10/8.1/8/7/Vista/XP. Namely, if you are tired of Rufus Windows 11, you can still use this software to help you.
Here I will guide you to create a bootable USB drive via 4 simple steps.
✍Preparations:
-Please download and install this software on your PC via the below link.
-Prepare a USB drive with at least 8 GB and connect it to your target PC correctly.
Step 1. Launch AOMEI Backupper. Select Create Bootable Media option under the Tools tab.

Step 2. In the pop-up window, choose Windows PE - Create bootable disc based on Windows PE option (recommended), and then click Next.
♥Tip: You can also choose to create a bootable disk based on Linux kernel, but a Linux-based bootable media only allows you to use basic functions of AOMEI Backupper.

Step 3. To create a bootable USB drive, you just need to select USB Boot Device as the screenshot shows, and then click Next.

Step 4. When the operation is done, just click Finish to exit the interface.
Here you have already made a bootable USB. Then, you can reboot your computer, and set the USB drive as the first boot device in BIOS settings and test if your computer can boot from the disc.
Suggestion: backup your system before operation
Every operation constitutes potential data loss. And it is not easy to recover everything back to normal once it has been damaged. Hence, you need to use this free backup and restore software to safeguard your original computer before you create a USB drive via Rufus or other ways. This software is efficient, not only for your running system but also capable of backing up your files and folders, disks, and partitions. Similarly, as backup C drive Windows 11, you can also backup your Windows 10 system effectively.

Conclusion
Rufus bootable Windows 10 is not too difficult. However, for non-technical users, I recommend you use the easier AOMEI Backupper to help you. What’s more, this software can not only help you create a bootable USB drive but also safeguards your computer via its powerful backup and restore function. Once you find something wrong with your PC, you can easily restore it via backup images.

